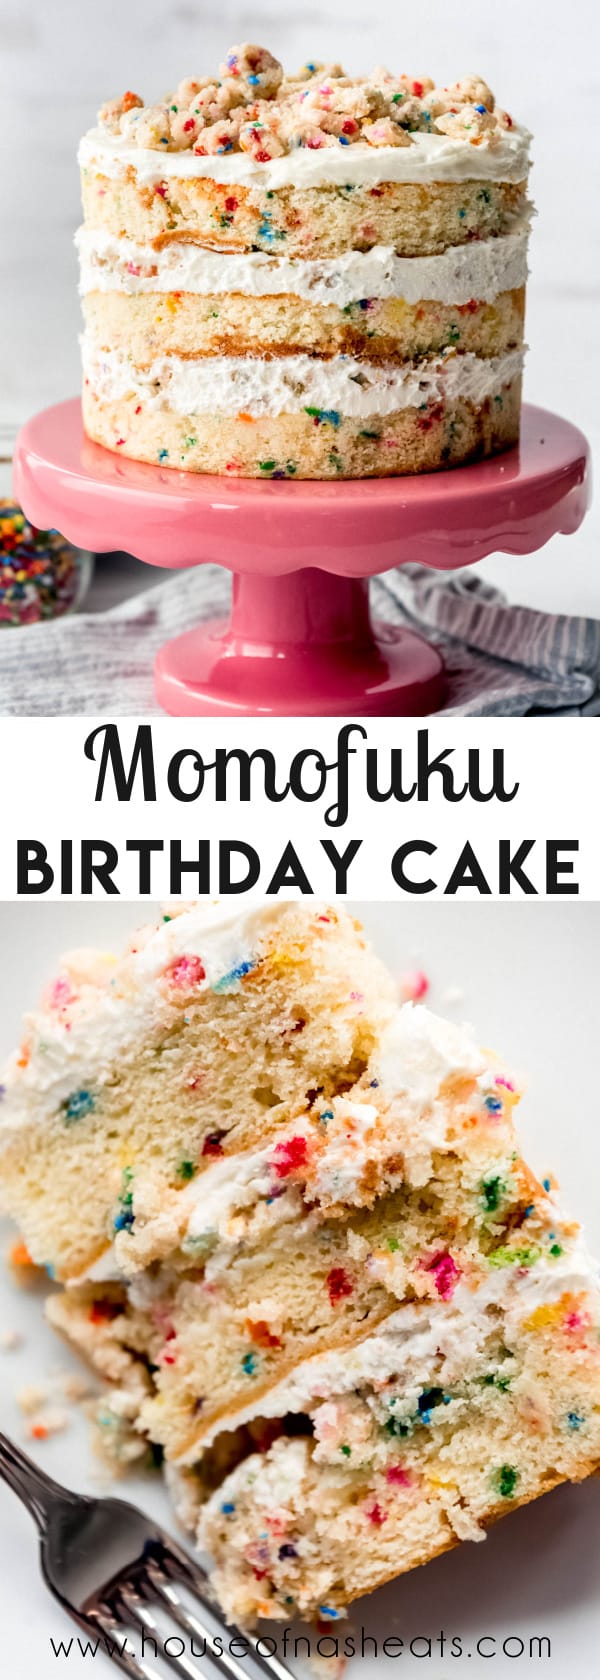
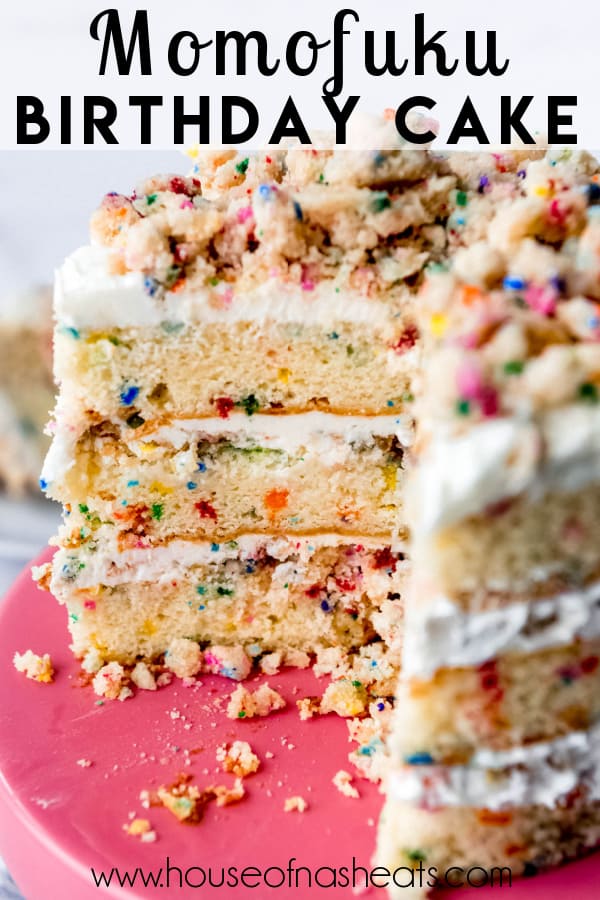
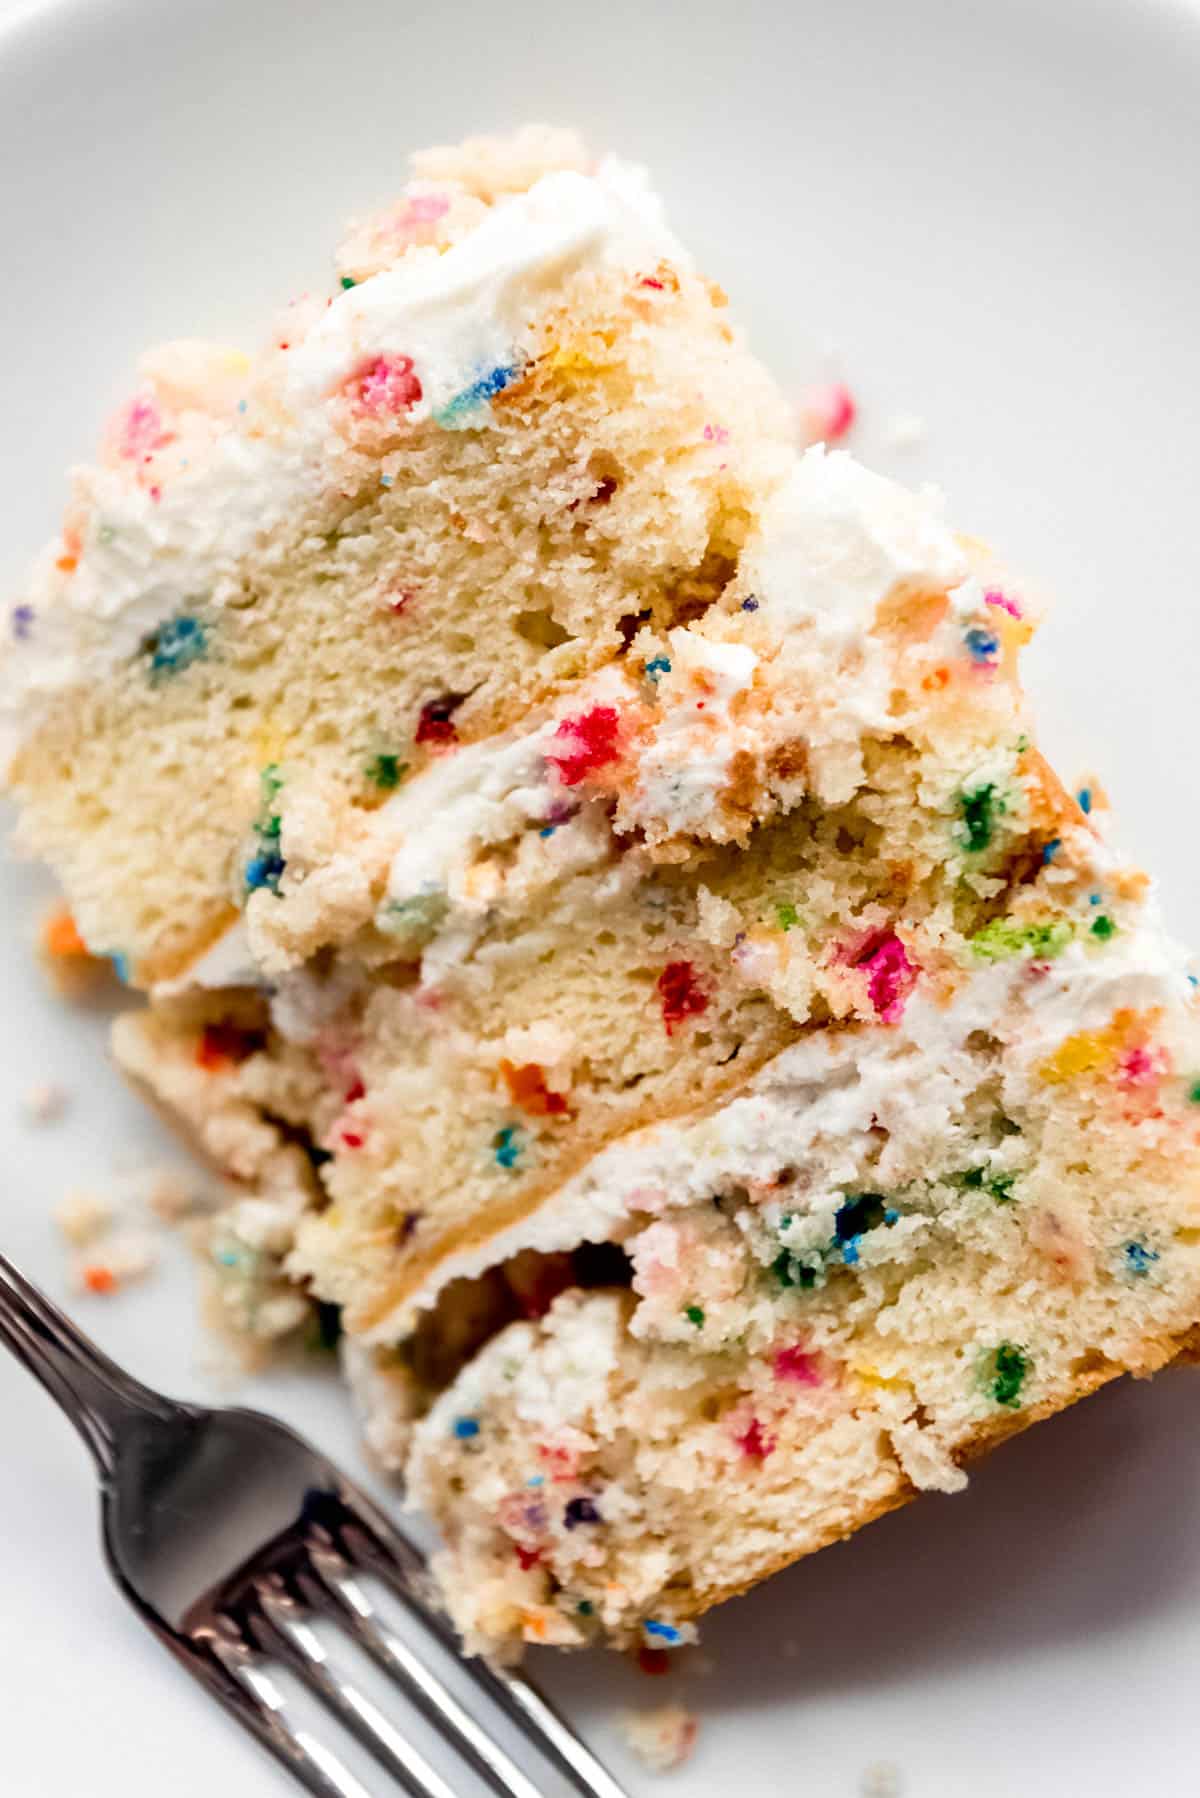
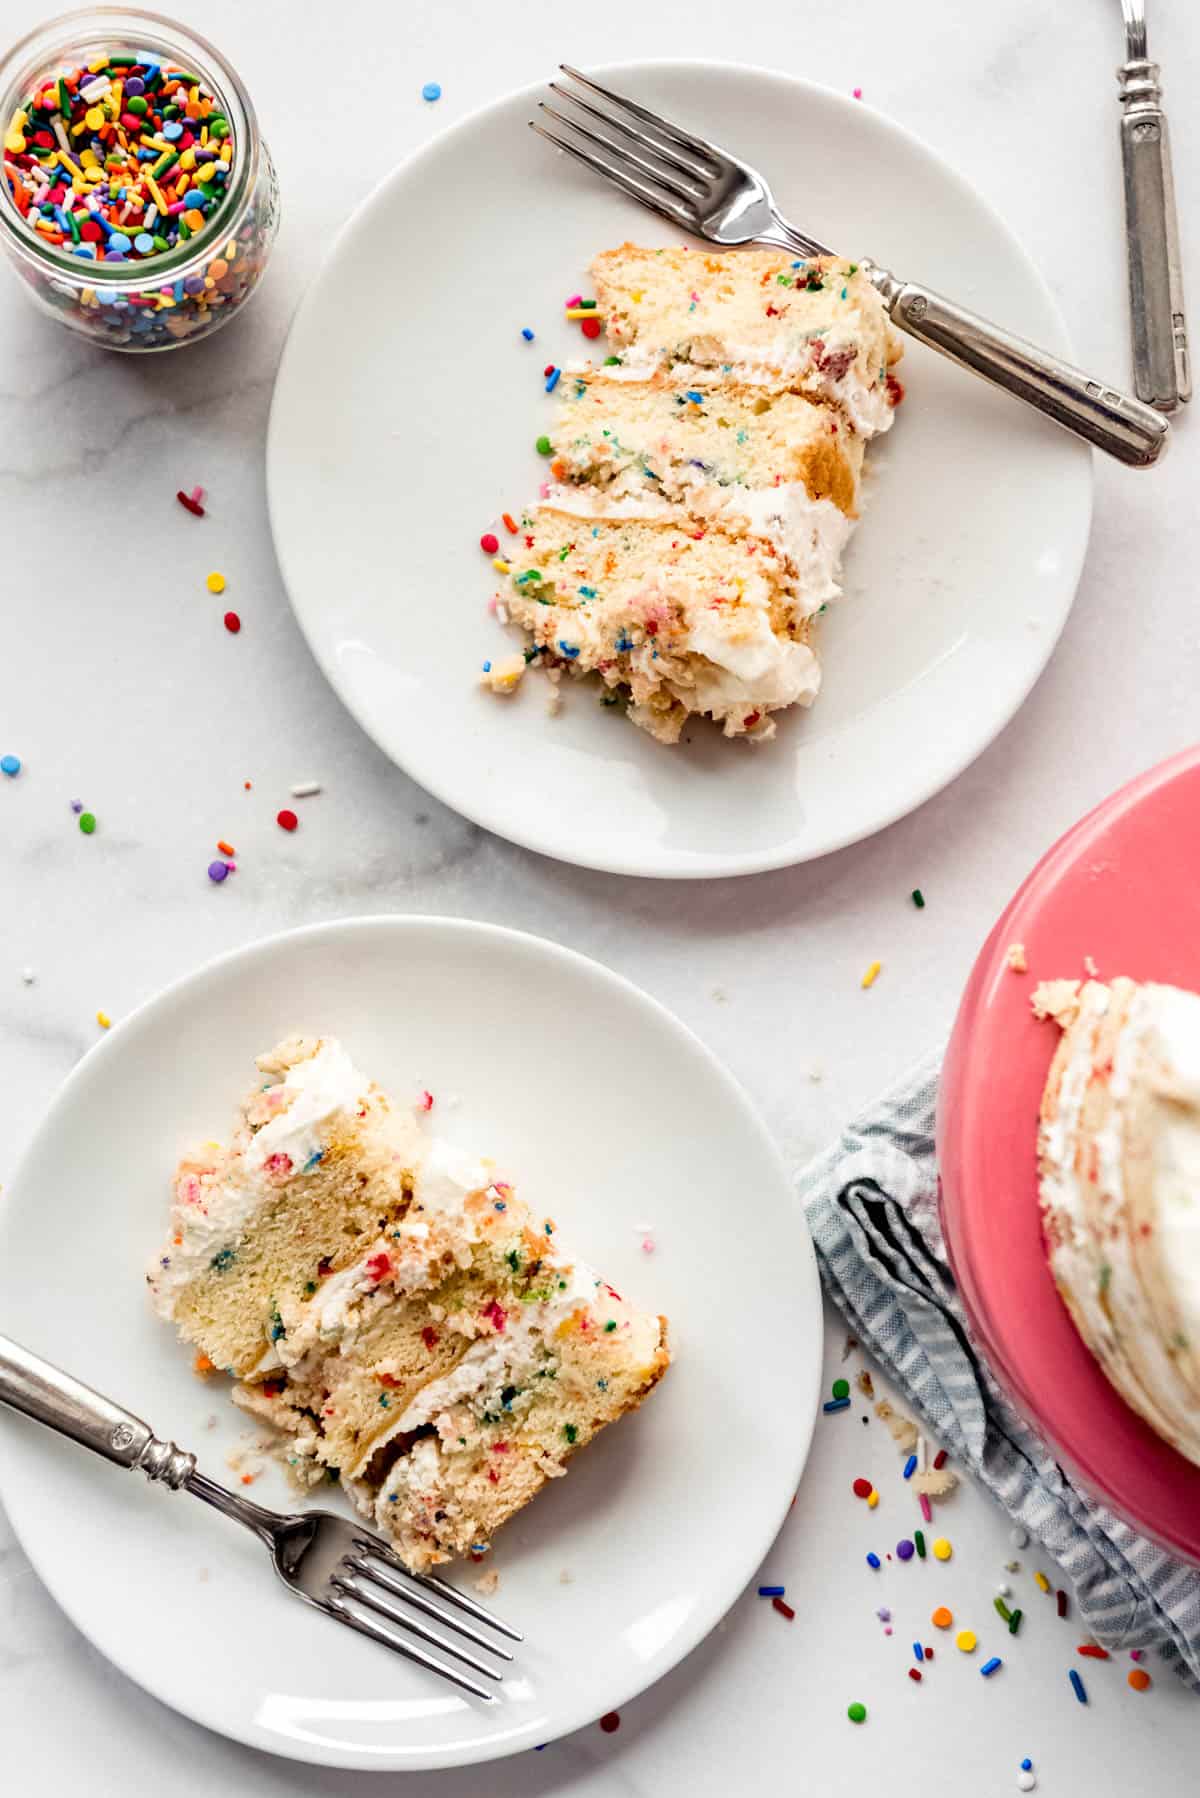
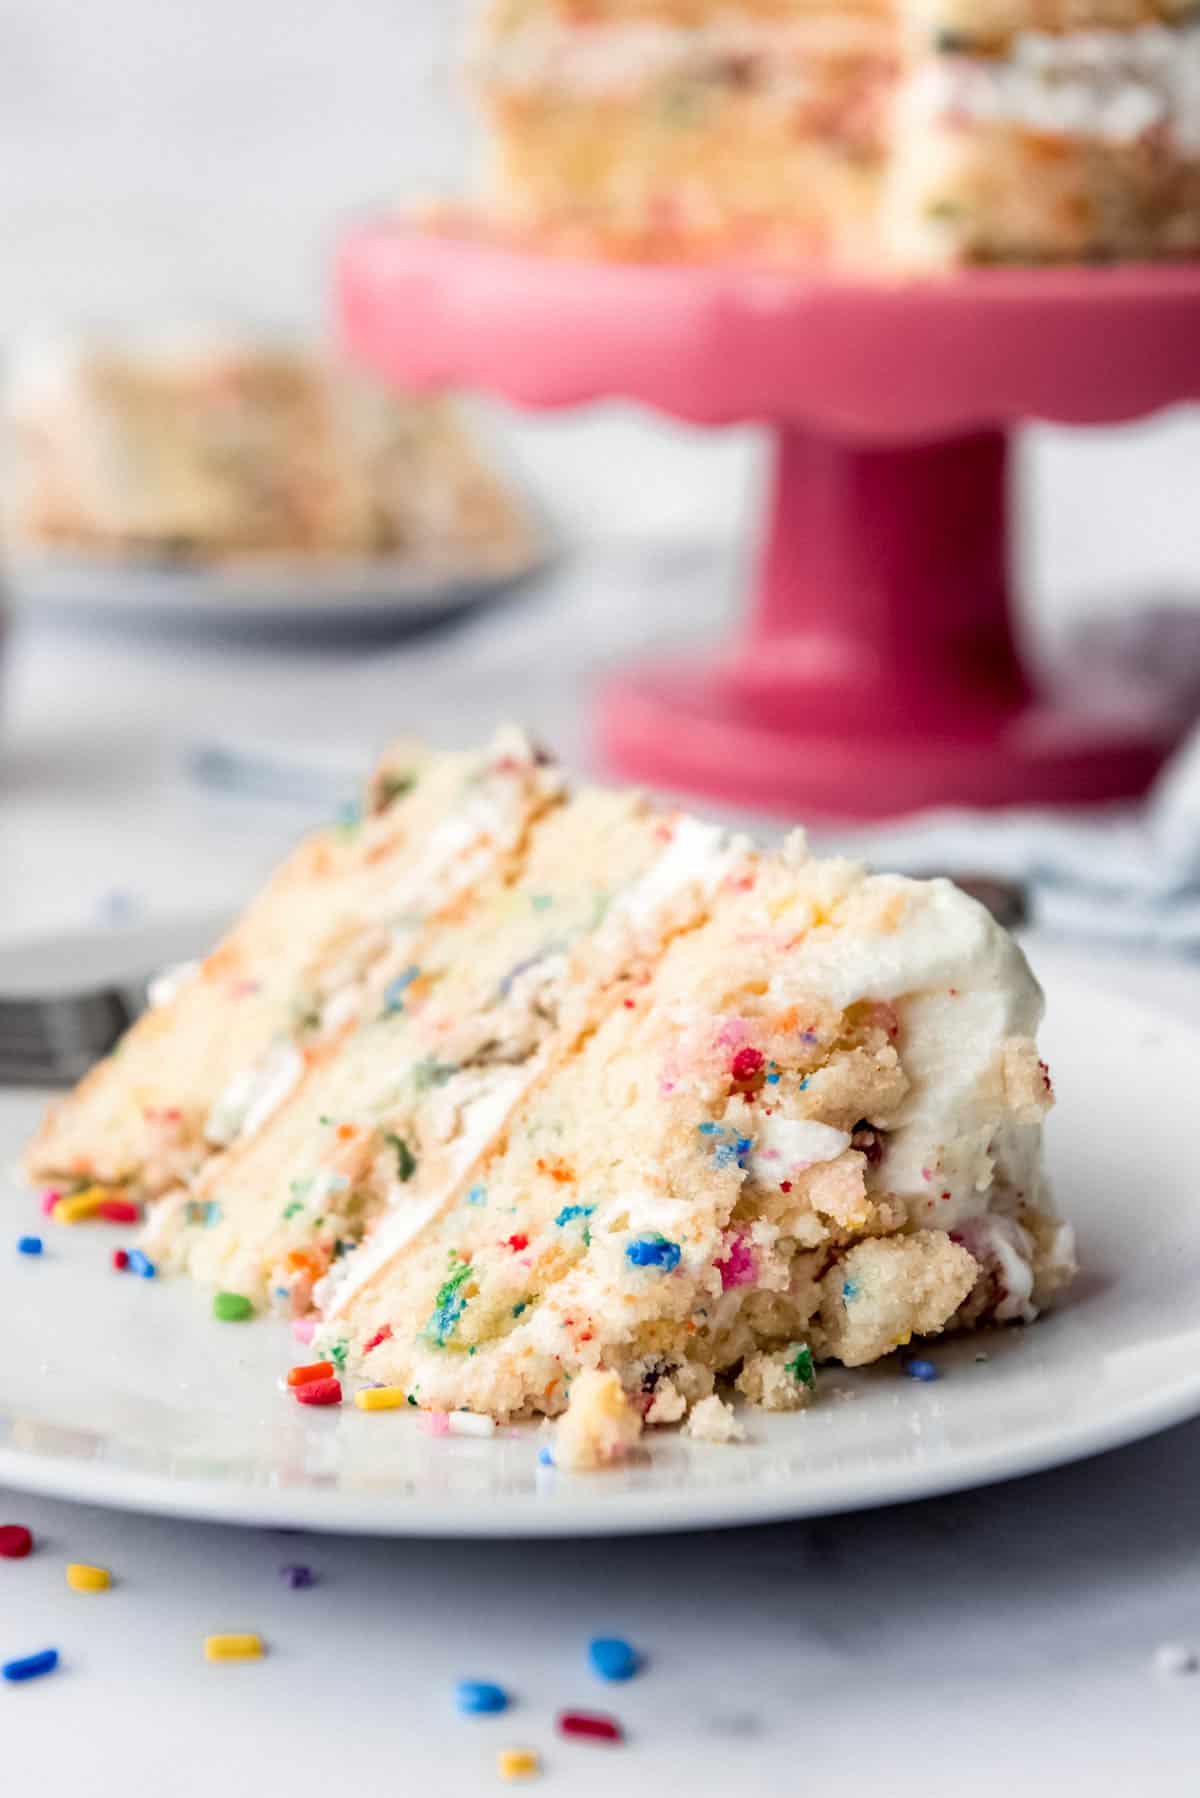
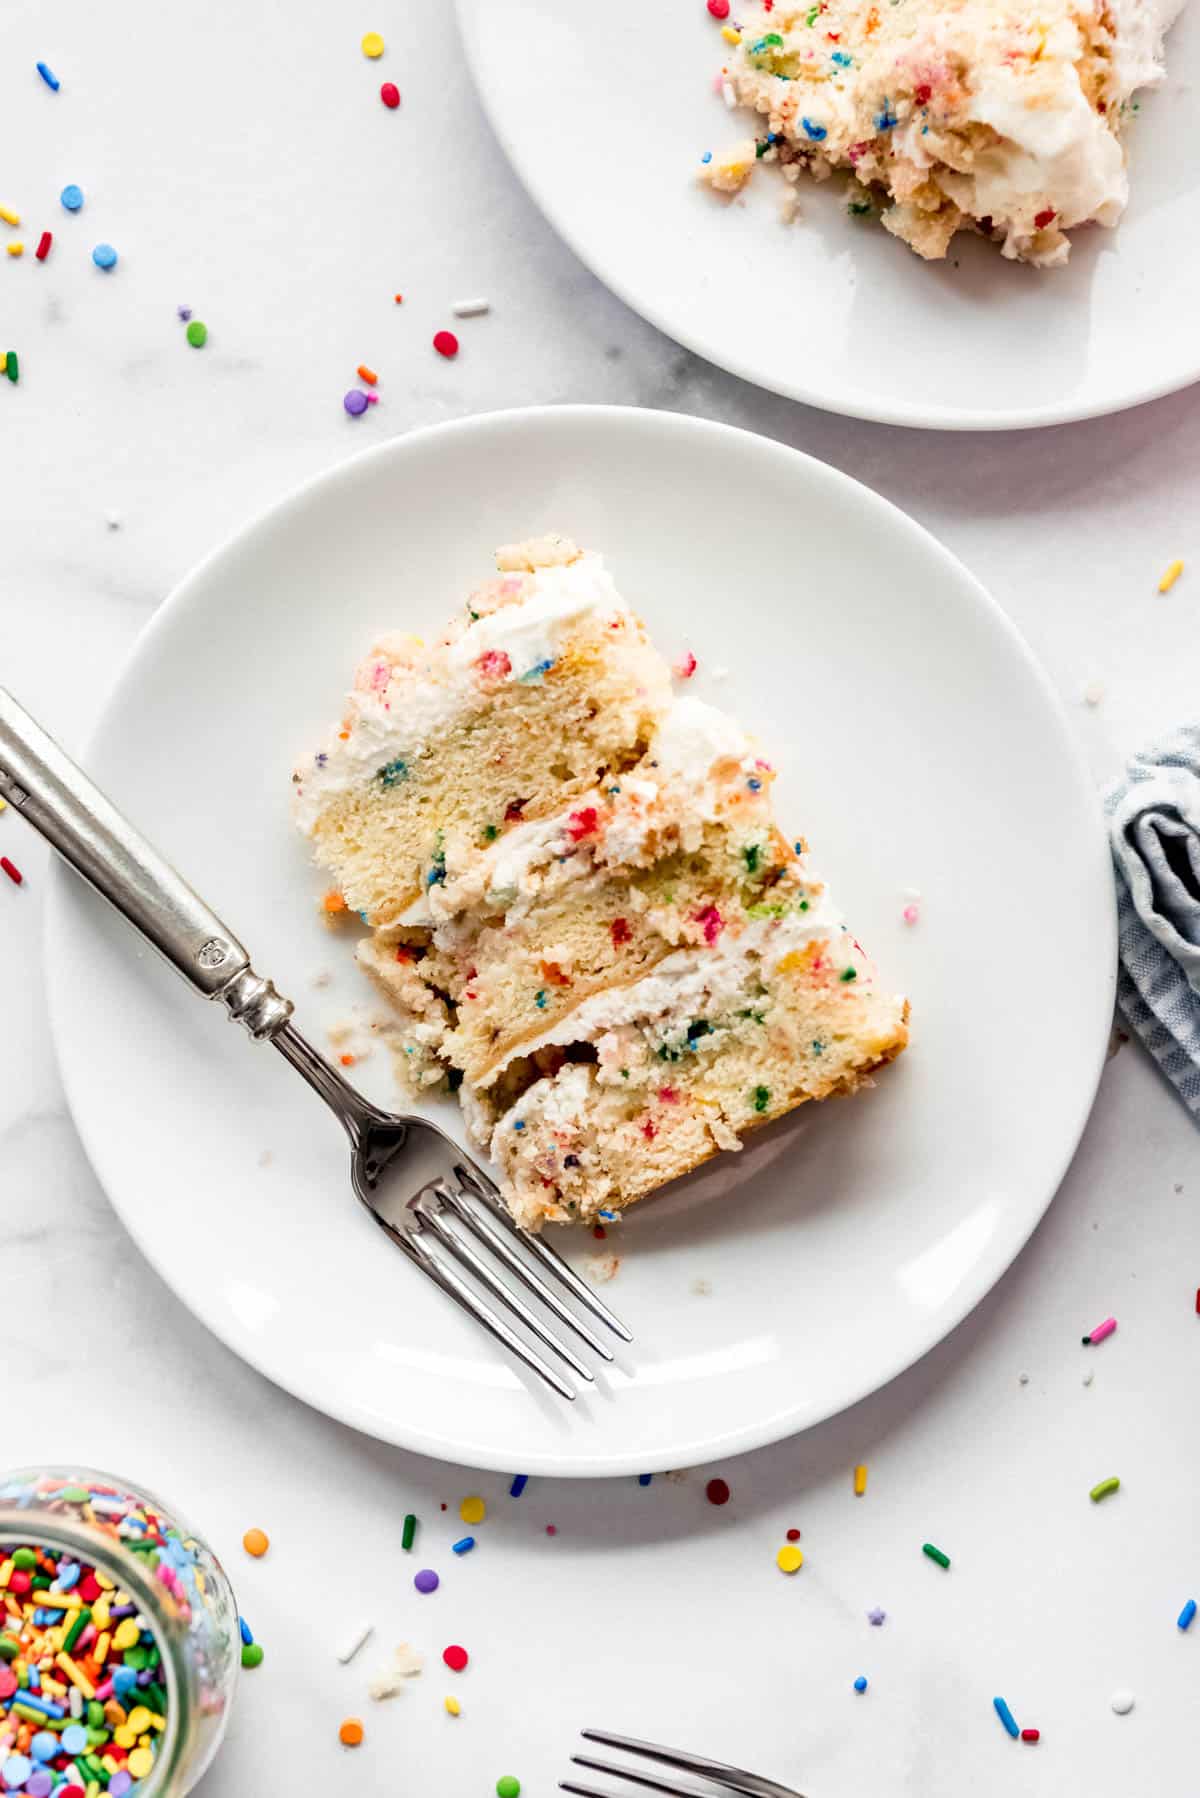
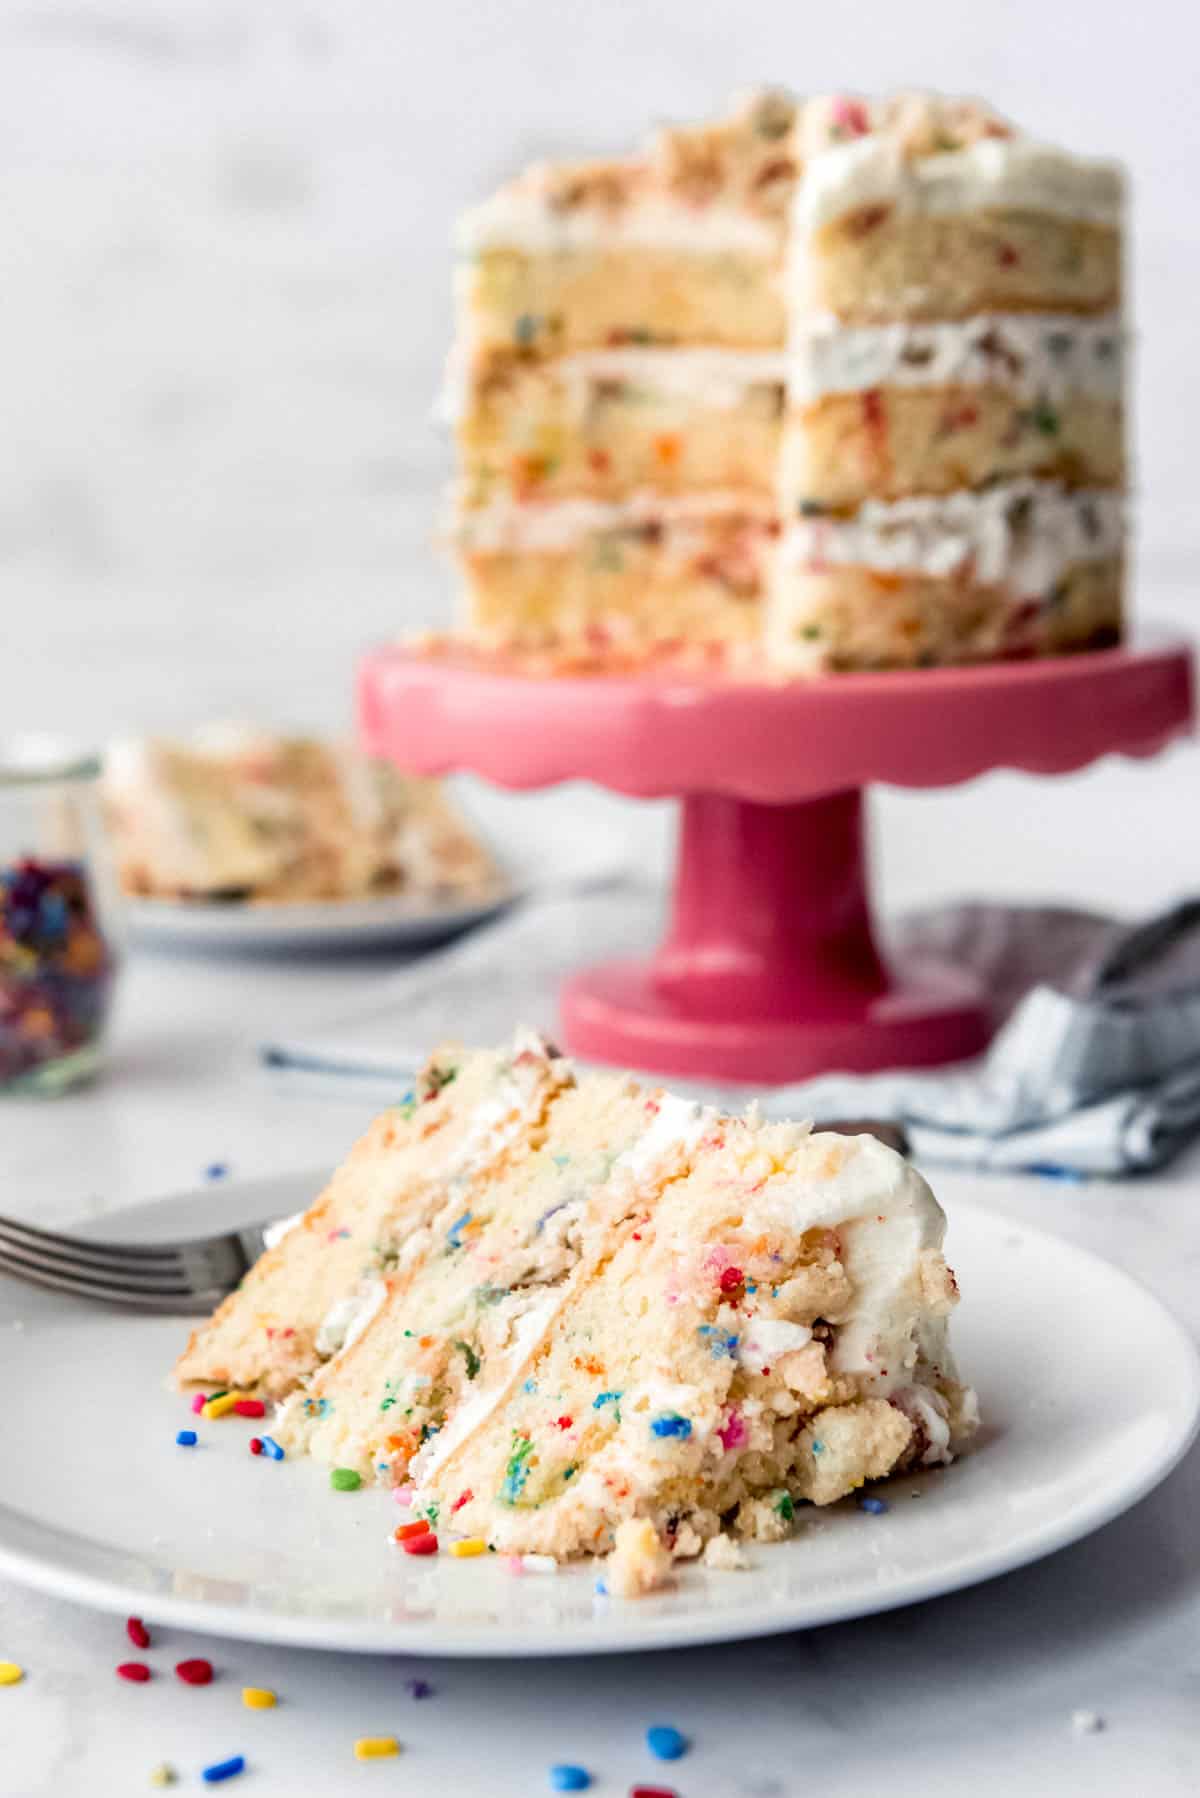
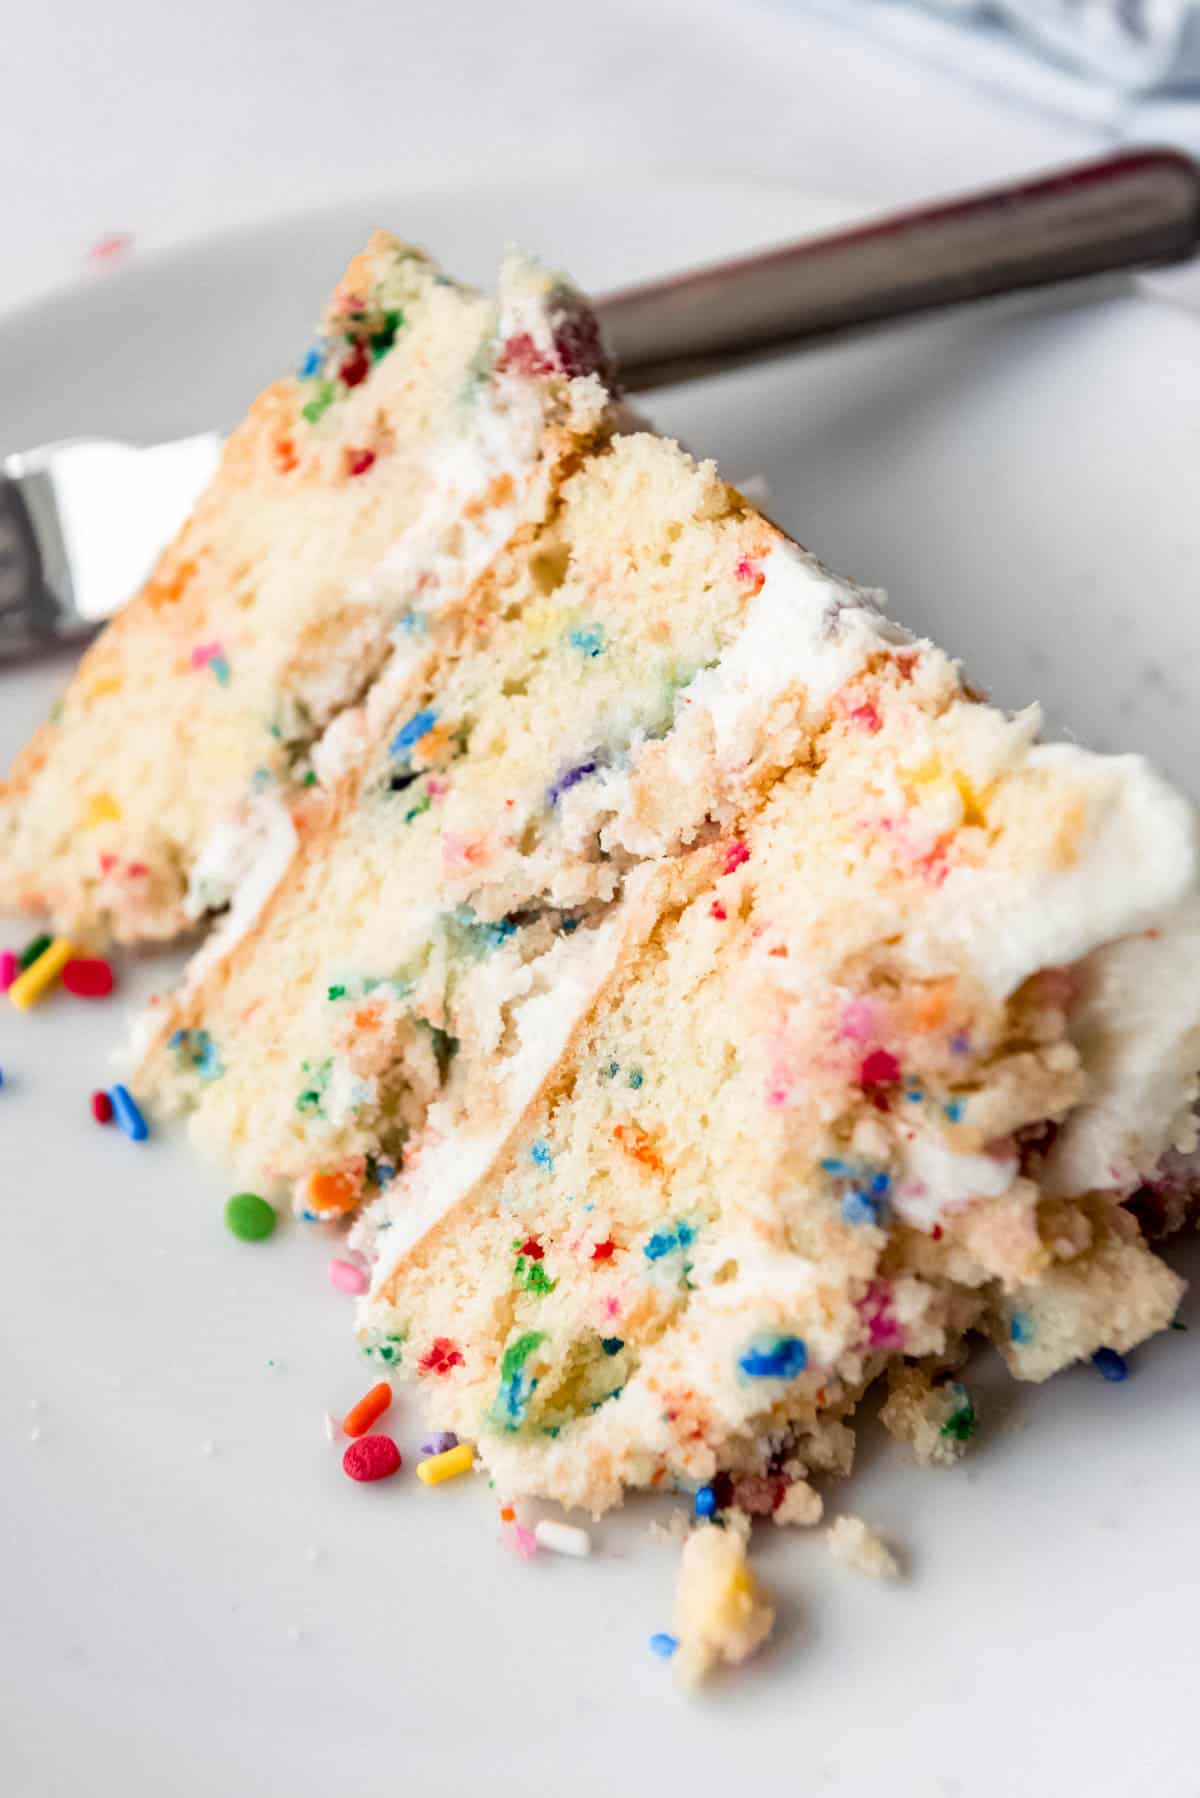
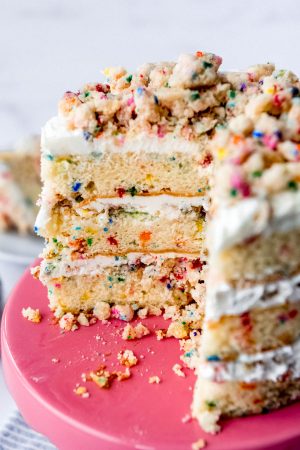
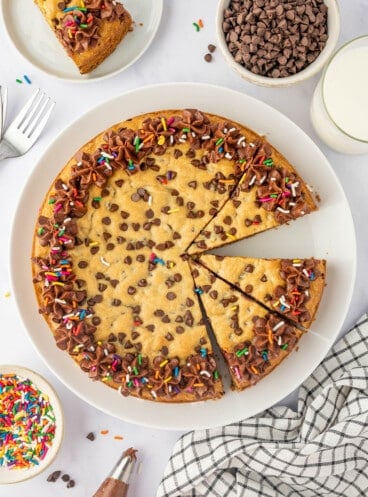
The Momofuku Milk Bar Birthday Cake has three soft, scrumptious layers of vanilla cake loaded with sprinkles and crunchy cake crumbs sprinkled in with the dreamy light frosting. It's perfect for all kinds of celebrations and special occasions without a trip to NYC!

Table of Contents
It's House of Nash Eats' 6th Anniversary! My first post ever went up in June 2016 and it's been a crazy, amazing experience developing, photographing, and sharing recipes ever since. There are now over 1,000 recipes on the site and more than a million visitors here every month!
The first recipe I ever published was for a Blackberry Nectarine Crumble. I still love that post with all the pictures of my kids when they were tiny and we went blackberry picking at a nearby U-Pick farm.
Each year I like to celebrate my blogiversary by sharing a fun new layer cake to the blog.
- 1st blogiversary: Vintage Cherry Chip Layer Cake
- 2nd blogiversary: Yellow Cake with Chocolate Frosting
- 3rd blogiversary: Homemade Funfetti Cake From Scratch
- 4th blogiversary: Cherry Crisp Cake
- 5th blogiversary: Chantilly Cake
This year I wanted to tackle a cake that has been on my baking bucket list for a long time: the Momofuku Birthday Cake created by Christina Tosi for Milk Bar in NYC. I ended up making this cake a few times and it's a fun one!
Sprinkles just make everything seem more celebratory! If you love sprinkles be sure you also try our Soft Funfetti Whoopie Pies!
Thank you for making my recipes! For commenting and sharing them with your families and friends. For the likes and pins and mostly just sitting down at the table to enjoy good food with the people who are important to you.
This little business of mine started out as a hobby born out of my love of food, baking, cooking, sharing, and photography. I never thought of myself as creative or entrepreneurial, but it turns out those abilities were inside me all along waiting to be developed and I'm so immeasurably grateful for the experience I've had growing this site into what it is today.

Why You'll Love This Cake
Besides that fact that we are talking sprinkles and cake, here are a few reasons to try making the Milk Bar birthday cake at home!
- Easy substitutions. The original recipe calls for some unusual things like citric acid and glucose. But since most home bakers don't have those on hand, I opted to replace them with common or at least easily accessible options instead.
- It's a showstopper. Bring this out for any occasion and you'll hear oohs and ahhs of delight.
- No fussy decorating. If you don't have frosting or piping skills and your cakes look "rustic" or "homemade" (nothing wrong with that!), then this cake gives you the advantage because it's supposed to look that way!
What to Know Before Getting Started
There are four elements to this cake. Don't be intimidated or overwhelmed when you see the length of the recipe card though - each of the elements is actually pretty easy and straightforward if you take them one at a time.
- Funfetti Birthday Cake - This is the most involved layer and where you'll spend the bulk of your time. The method of baking on a quarter sheet pan or jelly roll pan is different, but otherwise things are pretty straightforward if you have ever baked a cake from scratch before.
- Cake Crumbs - These crunchy little crumbles come together in just a couple of minutes and are baked until crunchy. They are then used as a filling between layers and for decorating the top. It's a fantastic textural element that we love about this cake.
- Frosting - Nothing too unusual here except for the addition of some corn syrup to make the frosting extra smooth.
- Cake Soak - I feel so boujee using a cake soak but it's just two ingredients meant to keep the cake extra moist and delicious.
Unlike typical cakes which are baked in round cake pans, this one is baked in a 10x15-inch jelly roll pan then you will cut out circles of cake and assemble in an acetate collar. So you need some additional tools that you might not already have on hand.
- One jelly roll pan
- 6-inch cake ring
- A sheet of acetate or acetate strips
You can probably find all of these at any craft of hobby store like Joann's, Michael's, or Hobby Lobby or at baking stores like Orson Gygi if you happen to live in Utah.
Acetate is basically just a flexible thin plastic that creates a sleeve for assembling the cake, then you peel it off once the cake is done.
Ingredients
This is a quick overview of some of the important ingredients you'll need for this Milk Bar birthday recipe. Specific measurements and full recipe instructions are in the printable recipe card below.
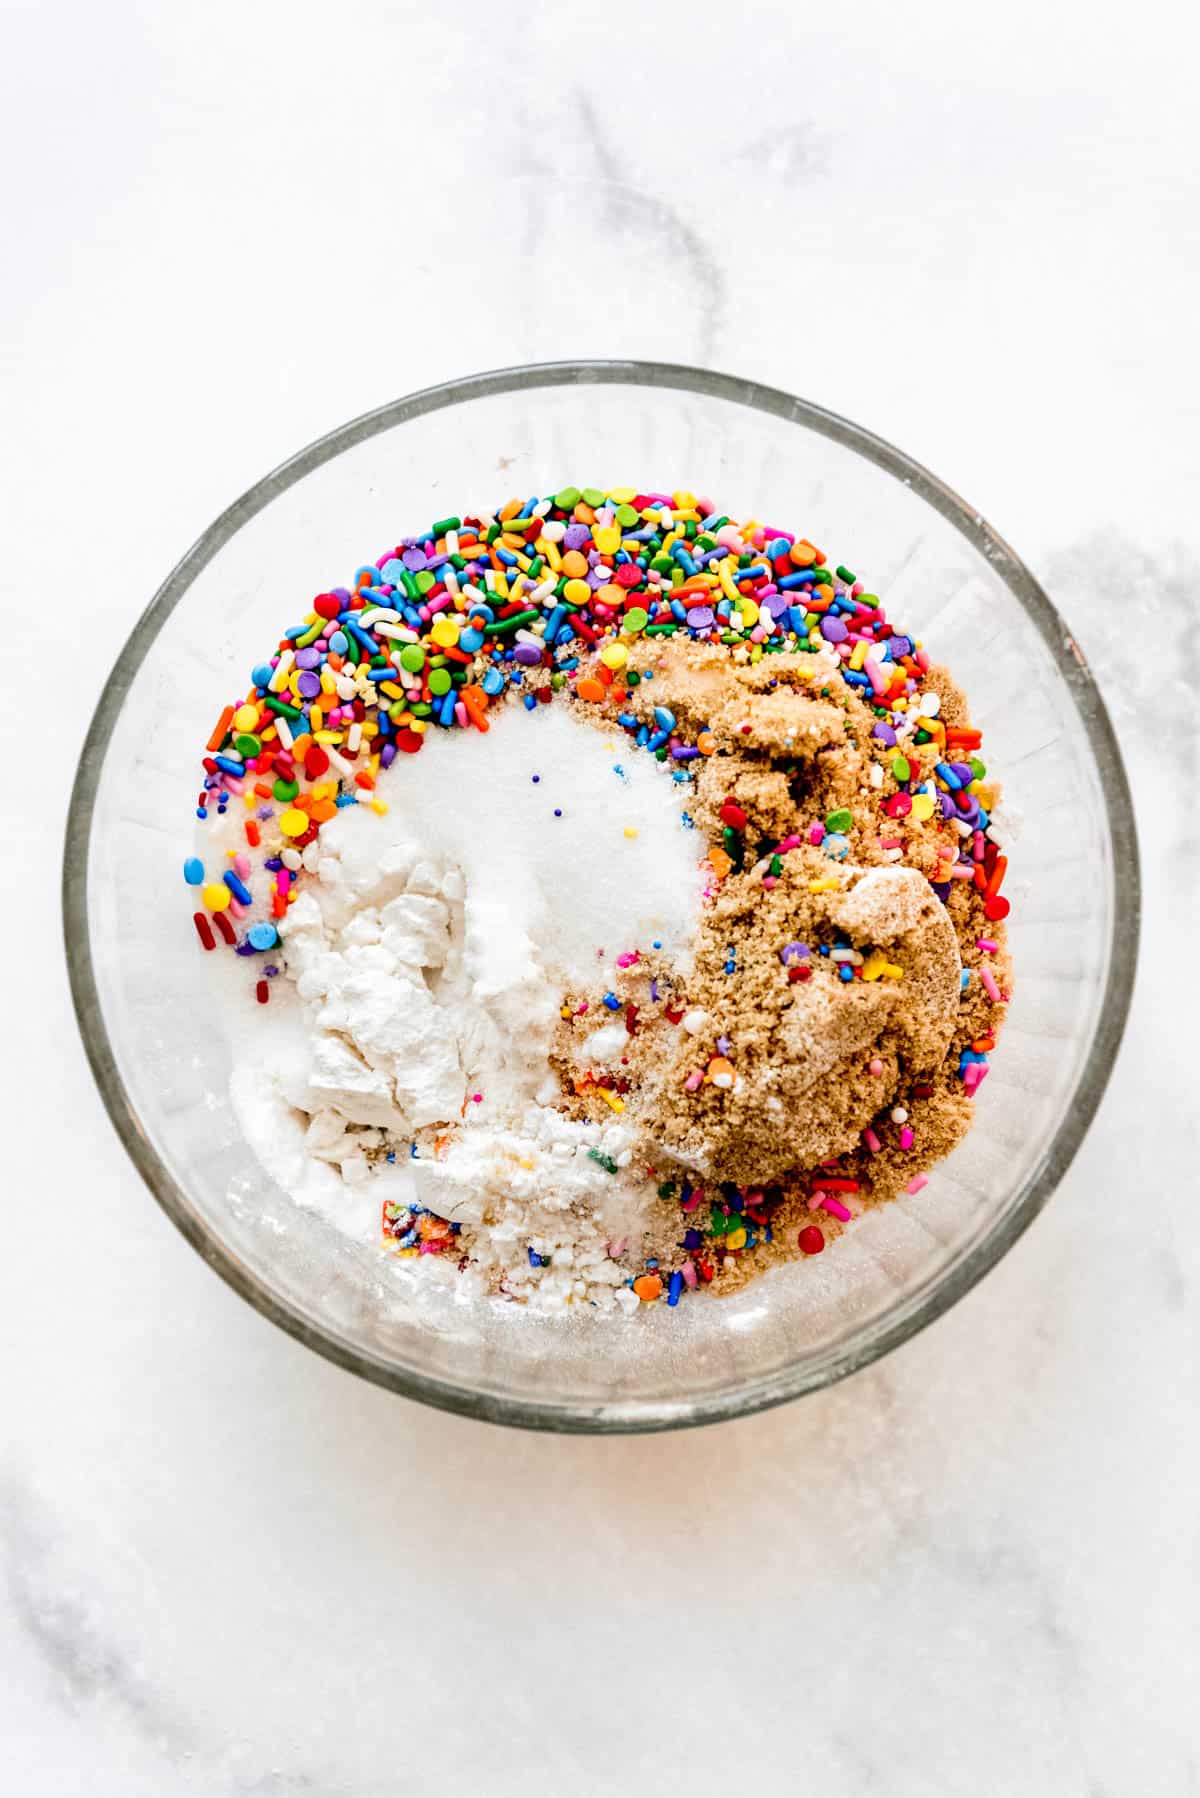
- Sugar: This recipe calls for granulated sugar and brown sugar in the cake batter and cake crumbs, with powdered sugar in the frosting recipe. Pretty standard.
- Sprinkles: You can't very well make funfetti cake without colorful sprinkles, now can you? You want rainbow jimmies instead of the nonpareils.
- Cake flour: I definitely recommend using cake flour for this milk bar cake recipe, but you can get away with all-purpose flour or a cake flour substitute made from flour and cornstarch (see recipe notes).
- Baking powder: This gives lift so the cake bakes up nice and fluffy.
- Salt: Because nobody wants bland cake.
- Butter, shortening, and oil: All three are used and serve a purpose in terms of adding flavor or keeping the cake moist. The original version calls for grapeseed oil, which is a very neutral oil, but I have found that vegetable oil honestly works just as well and it's what I always have on hand.
- Vanilla extract: Christina Tosi's recipe calls for clear vanilla extract instead of the regular brown kind that most of us are familiar with. It does have a slightly different flavor and it's worth keeping a bottle in your pantry if you bake a lot. But regular vanilla extract will work just fine if that's all you've got.
- Eggs: Try to remember to pull these out ahead of time so they are at room temperature for best results. Or place them in a bowl and fill it with hot water then let them sit for 10 minutes while gathering the other ingredients and your eggs will be good to go.
- Buttermilk: I love the flavor and moistness this ingredient adds to the cake batter.
- Cream cheese: For the frosting! It's not so much to create an overwhelmingly cream cheesy frosting, but just enough to make for a rich and interesting flavor that pairs perfectly with this cake.
- Corn syrup: Also for the frosting. Interestingly, the original recipe also calls for glucose in addition to the corn syrup which is supposed to make a smoother frosting. I kept things simple by replacing the glucose with corn syrup here and thing it works just fine.
- Lemon juice: This is another substitution instead of the citric acid called for in the original version. It's a tiny amount but keeps the frosting fresh and light instead of cloying.
- Milk: For a simple vanilla cake soak that makes the funfetti cake layers extra moist.
How to Make a Milk Bar Cake
Make the cake batter
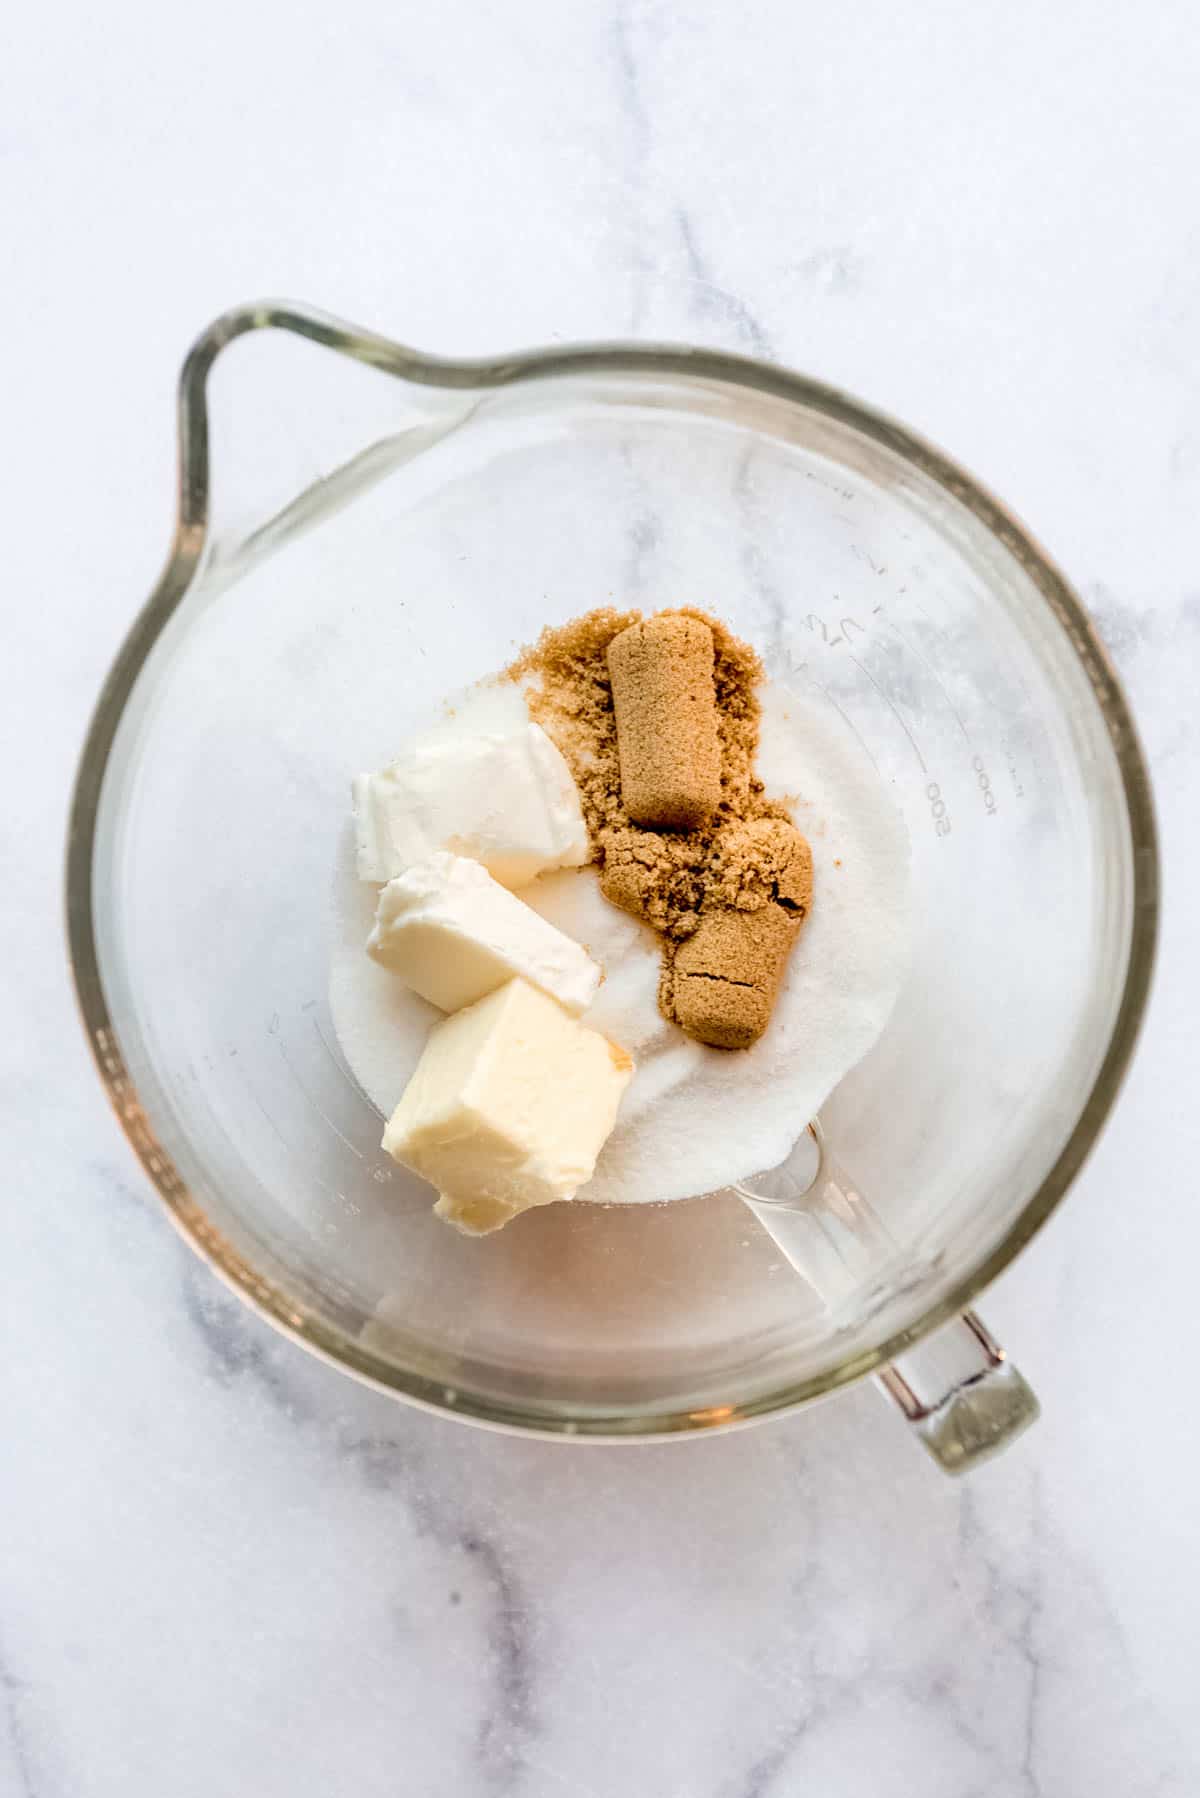
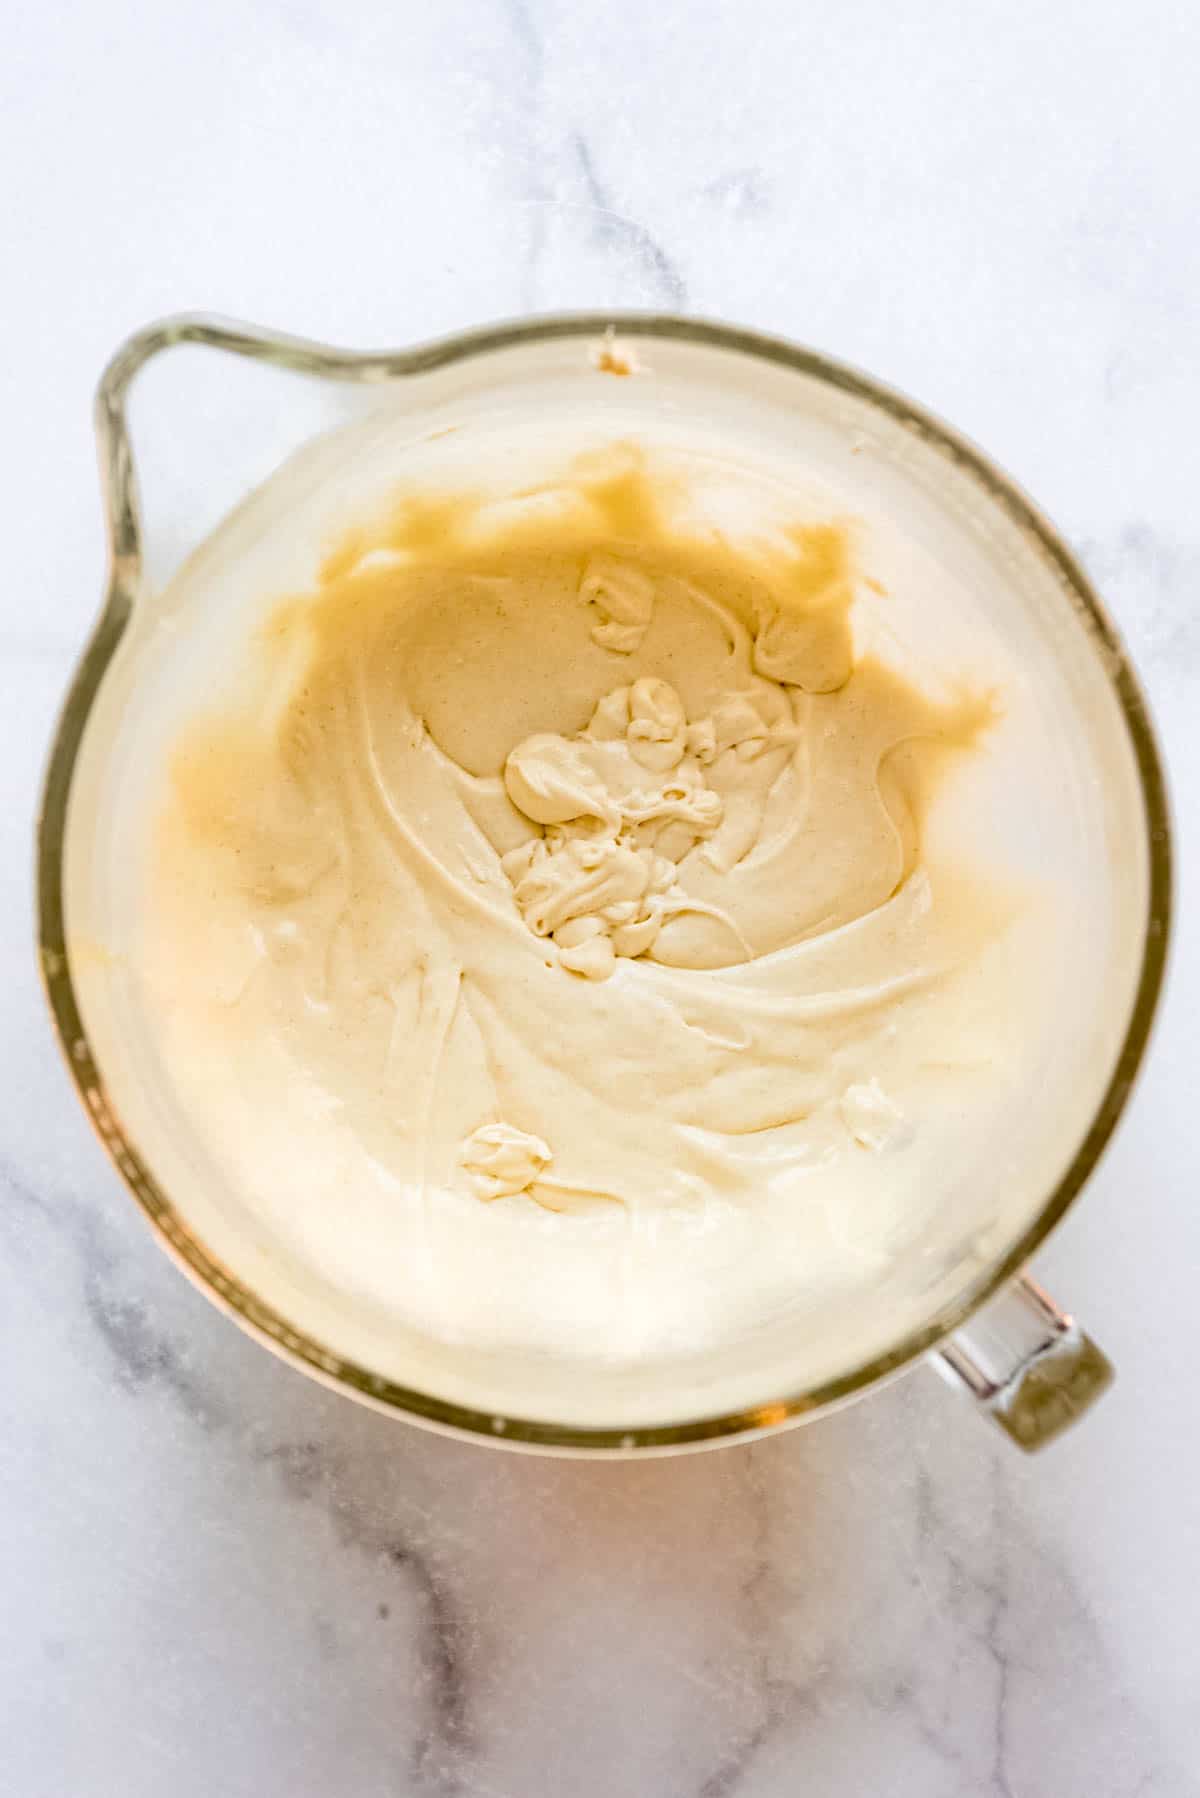
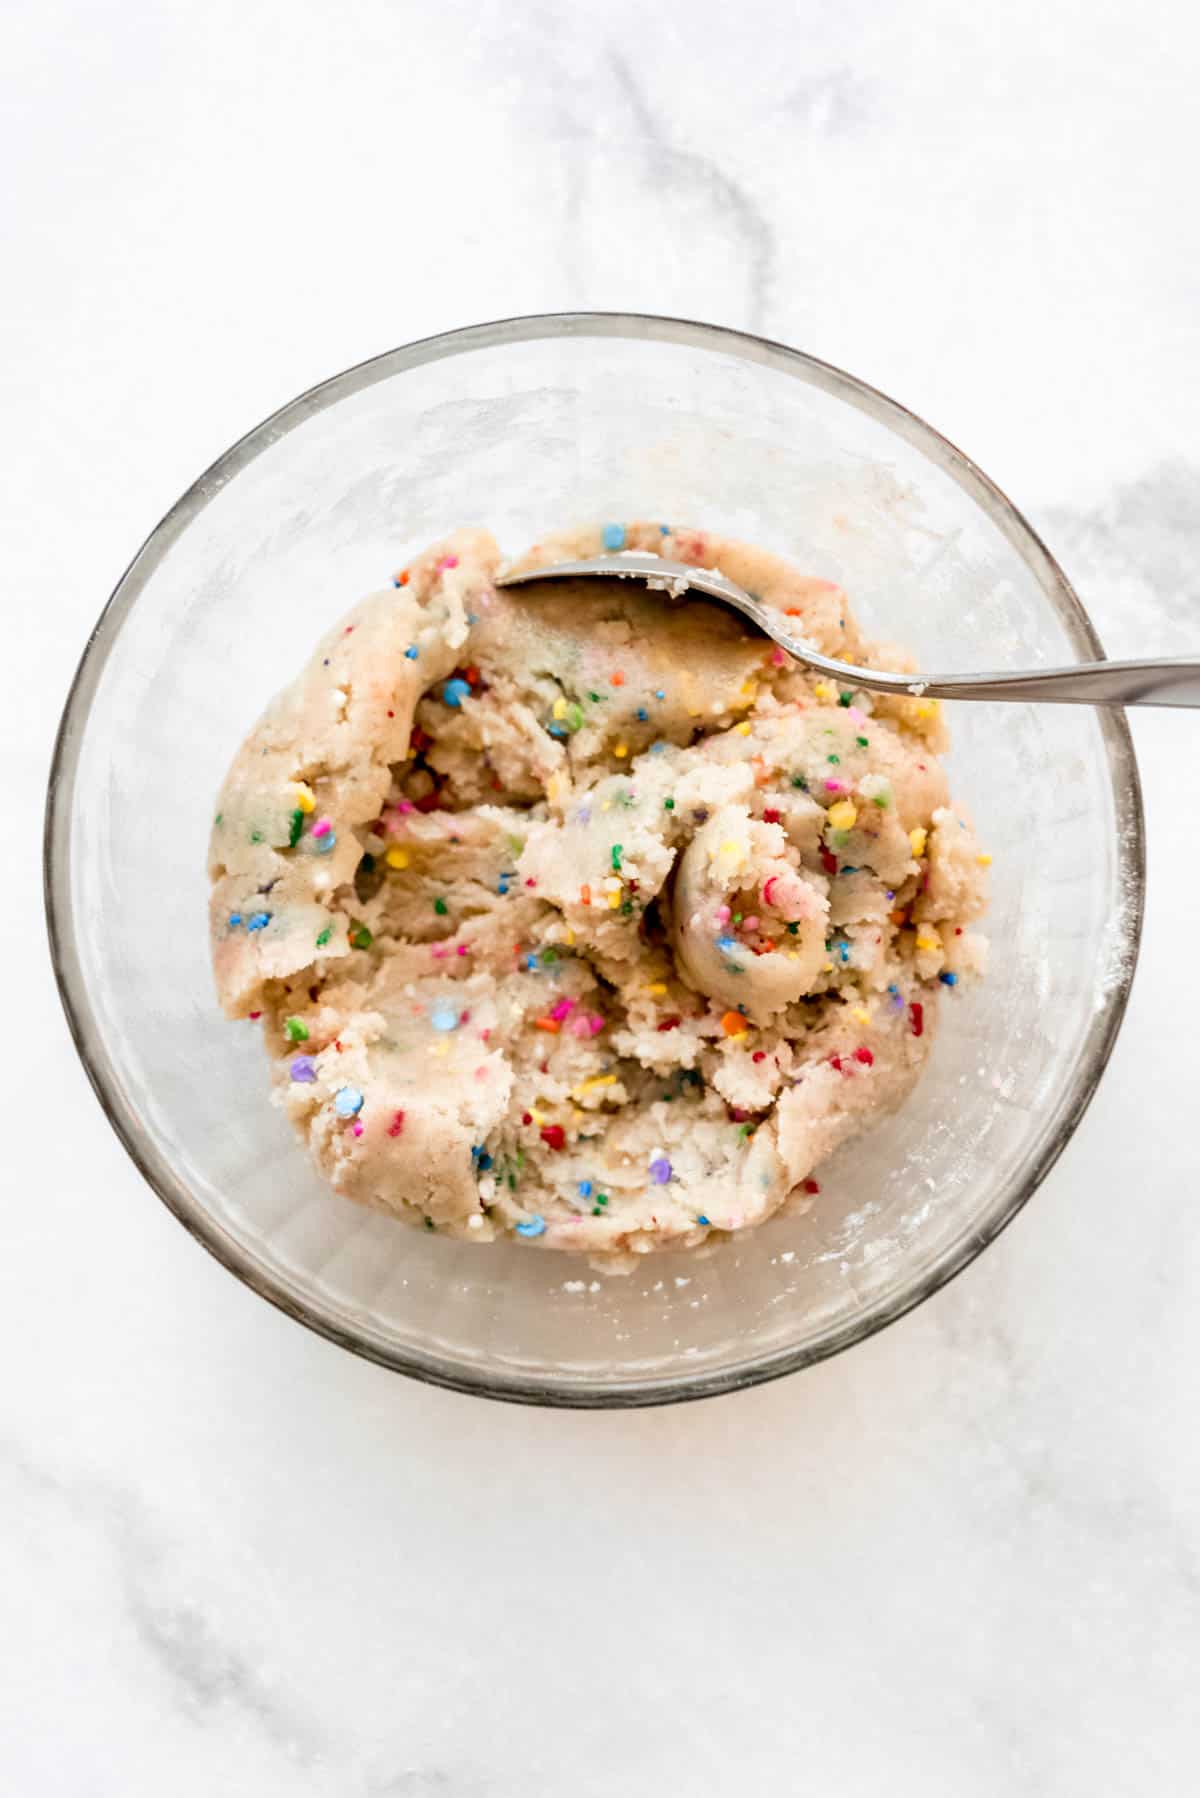
Cream butter, shortening, and sugars in a large bowl for 3-4 minutes until fluffy and light. Be sure to stop and scrape the bottom and sides of the bowl.
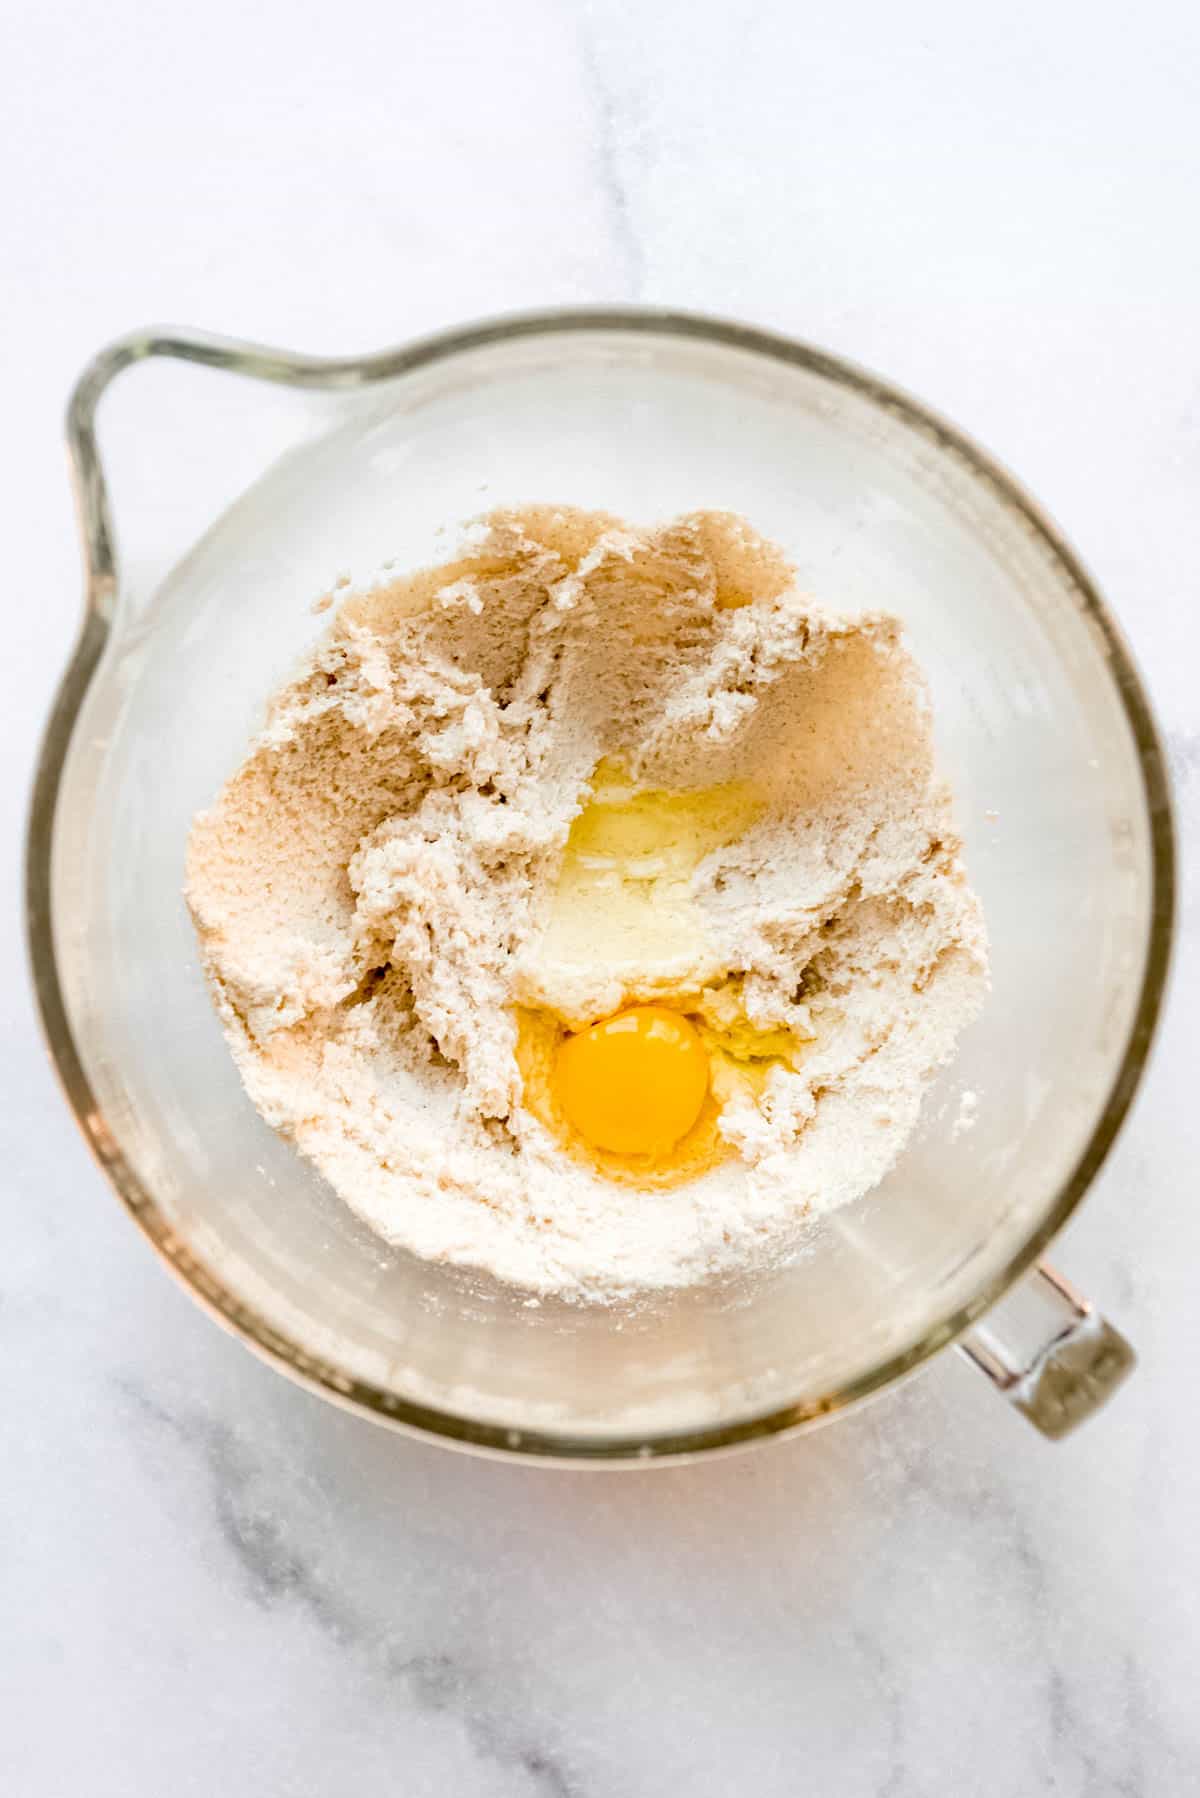
Add eggs one at a time, then beat for another 3-4 minutes until the batter is thick and light, almost doubling in volume.
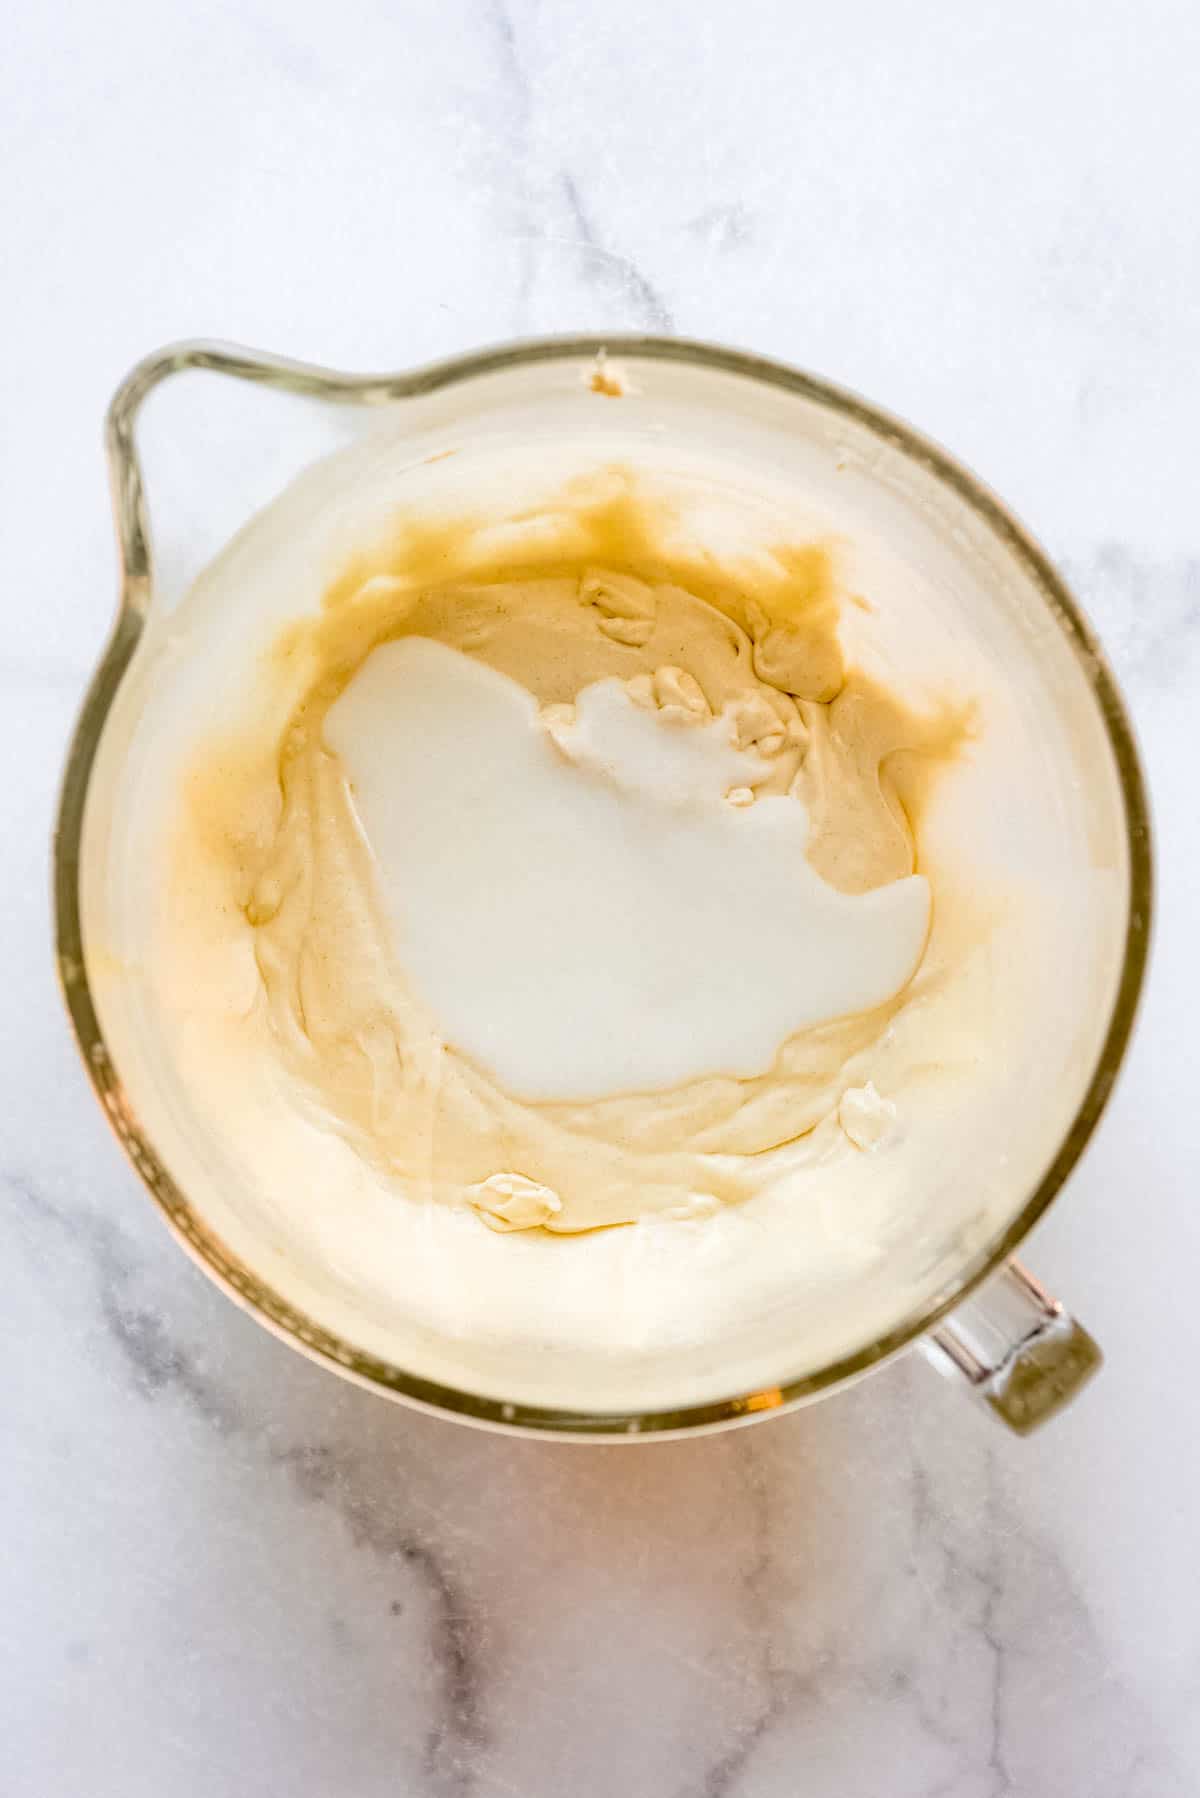
Mix in buttermilk, oil, and vanilla extract on low speed until combined, then increase the speed and beat until incorporated.
Add dry ingredients and mix until combined, scraping the bottom and sides of the bowl one last time to make sure everything is evenly mixed together.

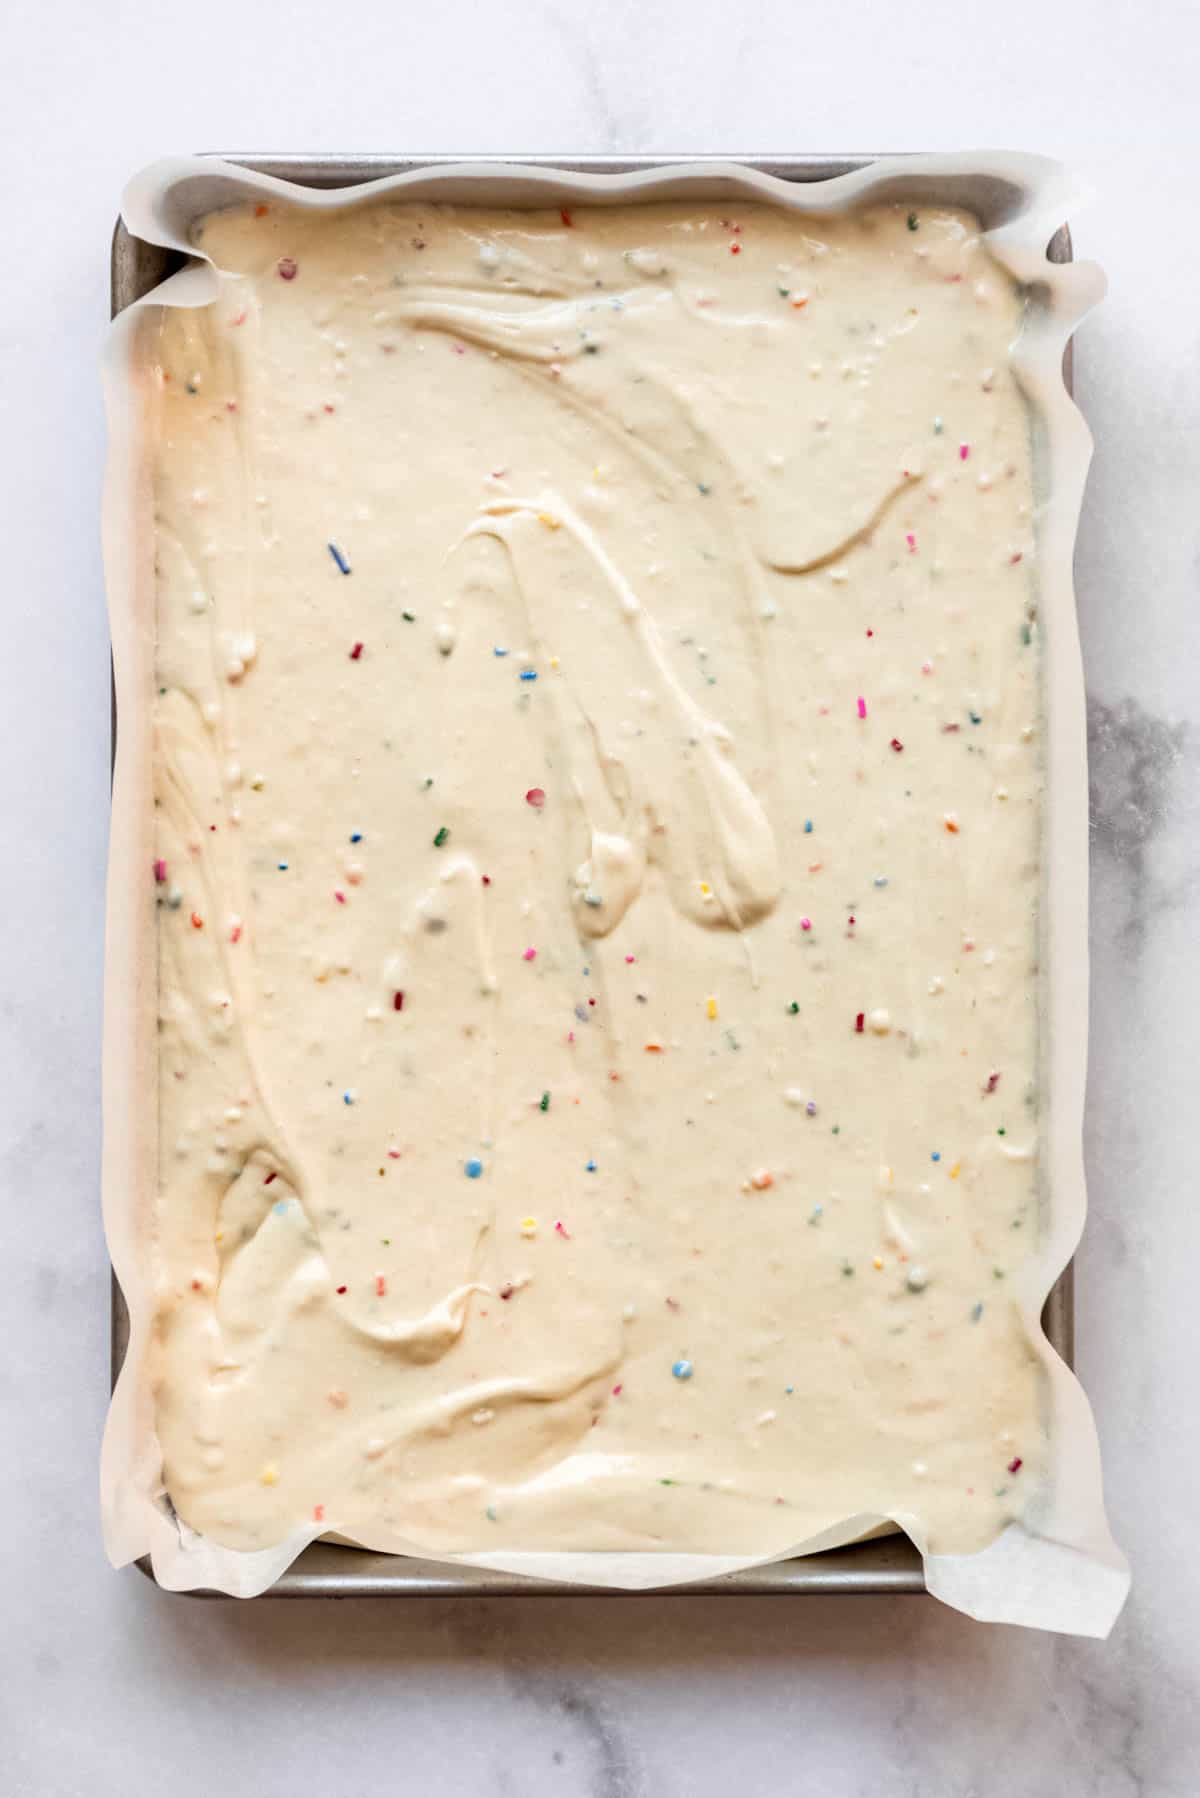
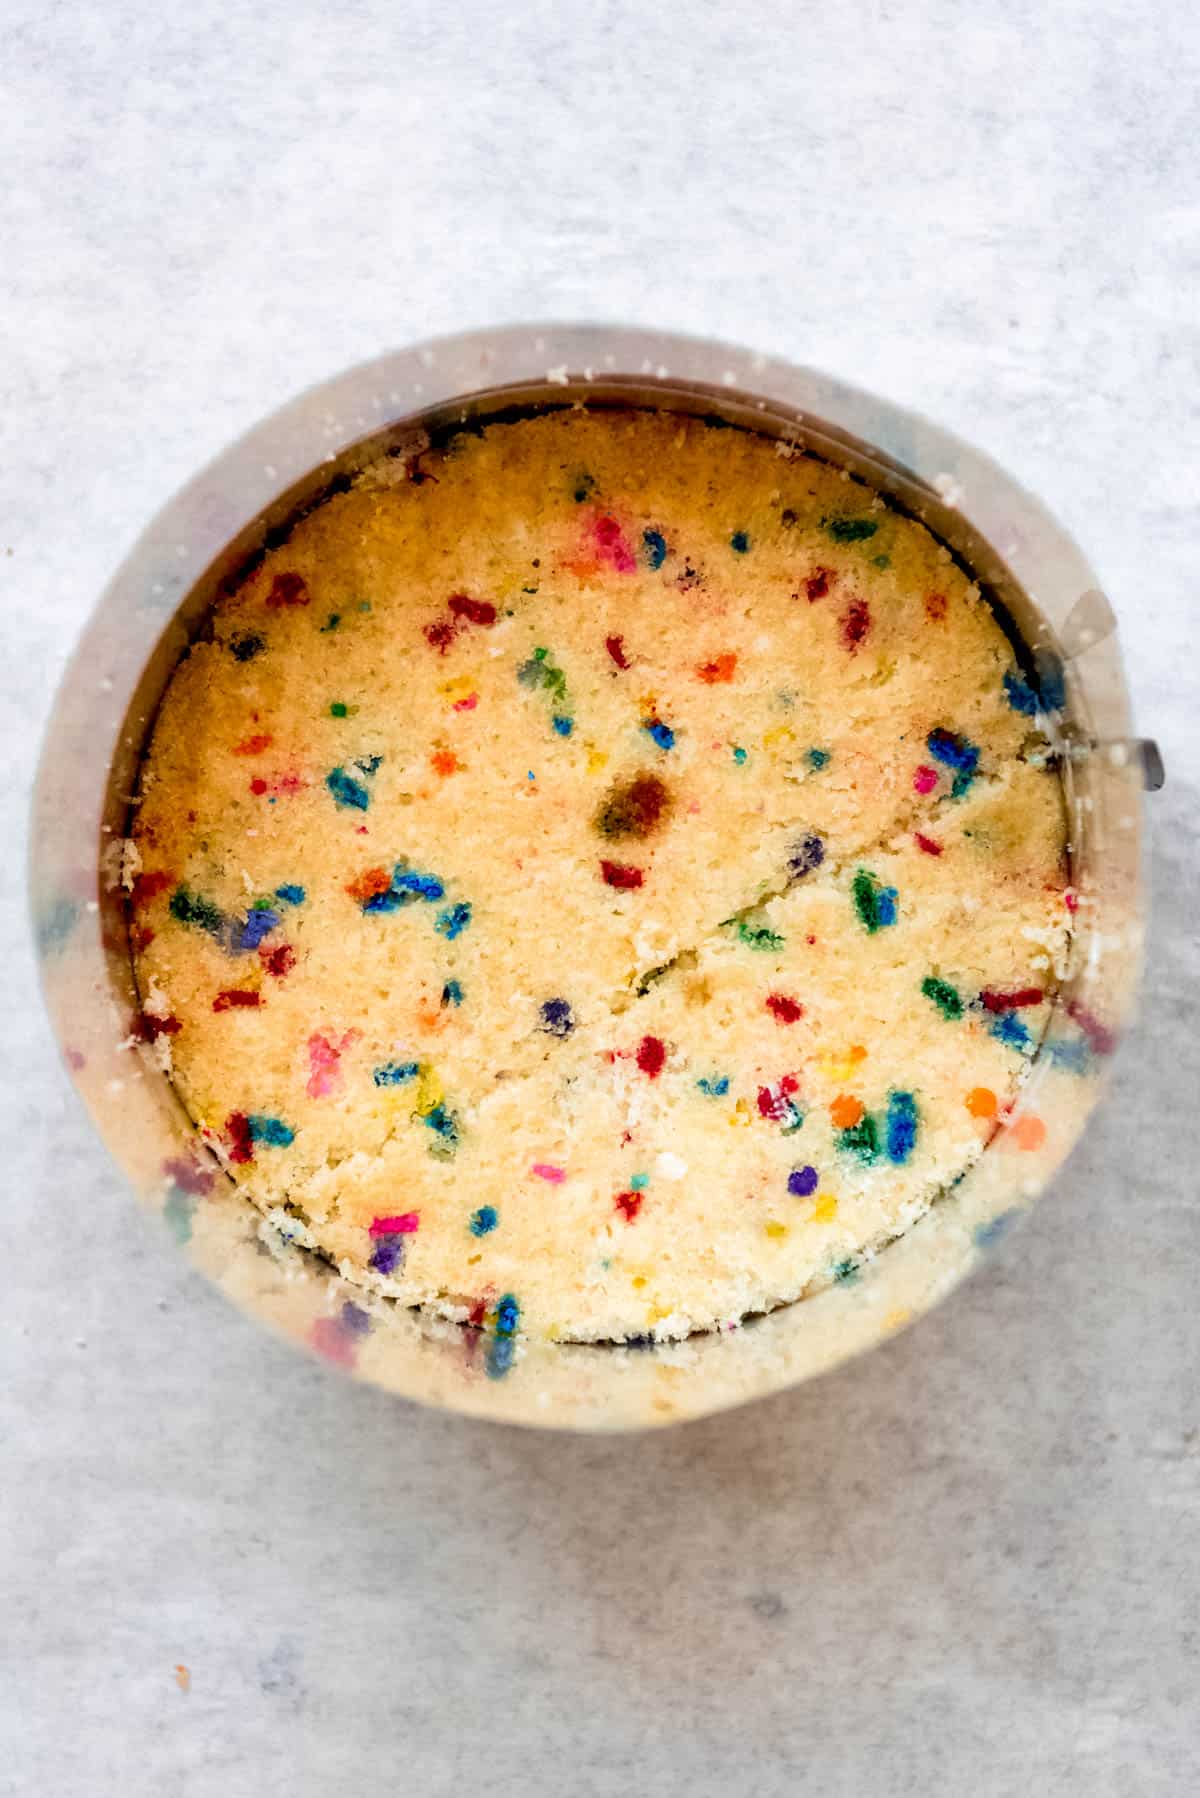
Spray a 10x15 jelly roll pan (not a regular baking sheet, which is too big) with cooking spray, then line with parchment paper. The cooking spray will help the parchment paper stay in place. Pour the cake batter into the pan and spread in an even layer.
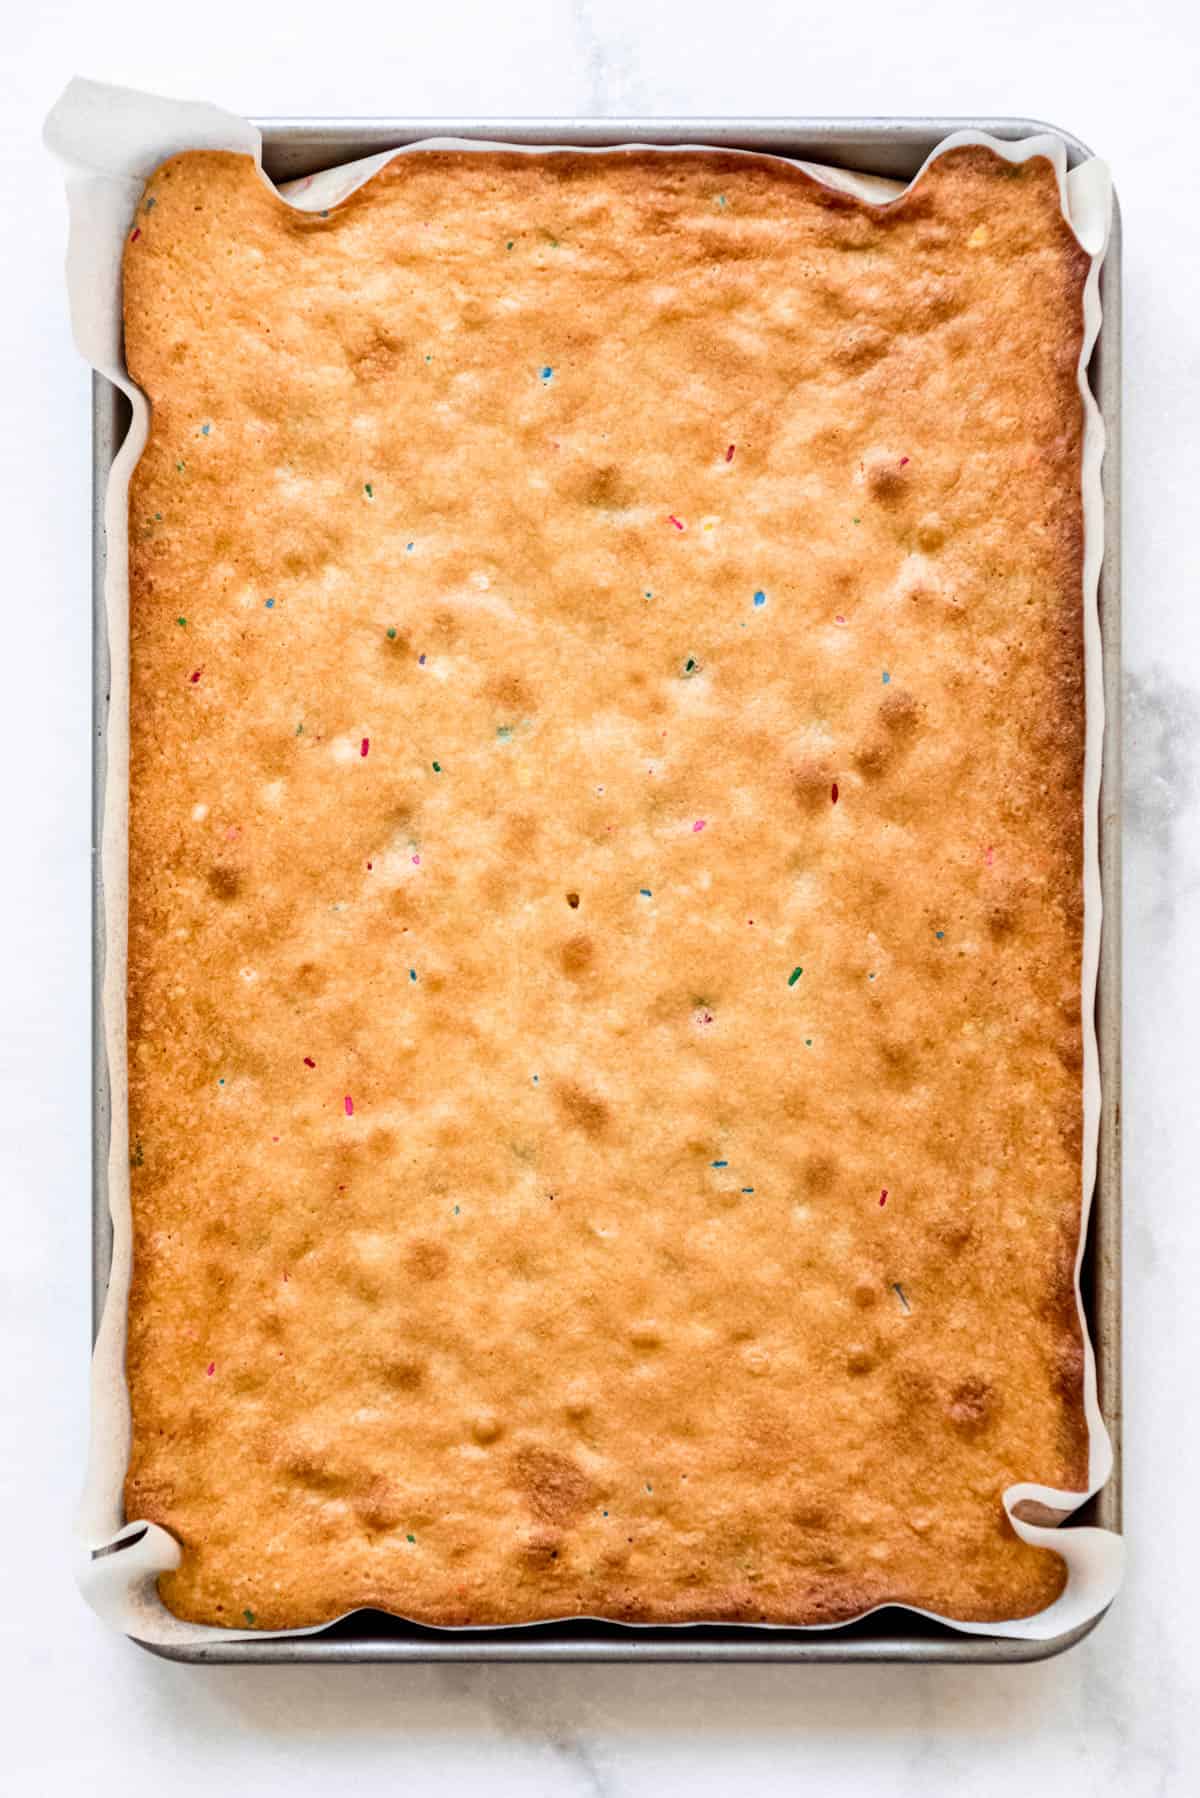
Bake for 30-35 minutes until done. The cake should be golden brown and set in the center if you test it with a toothpick to check to see if it comes out clean. Set aside to cool completely.
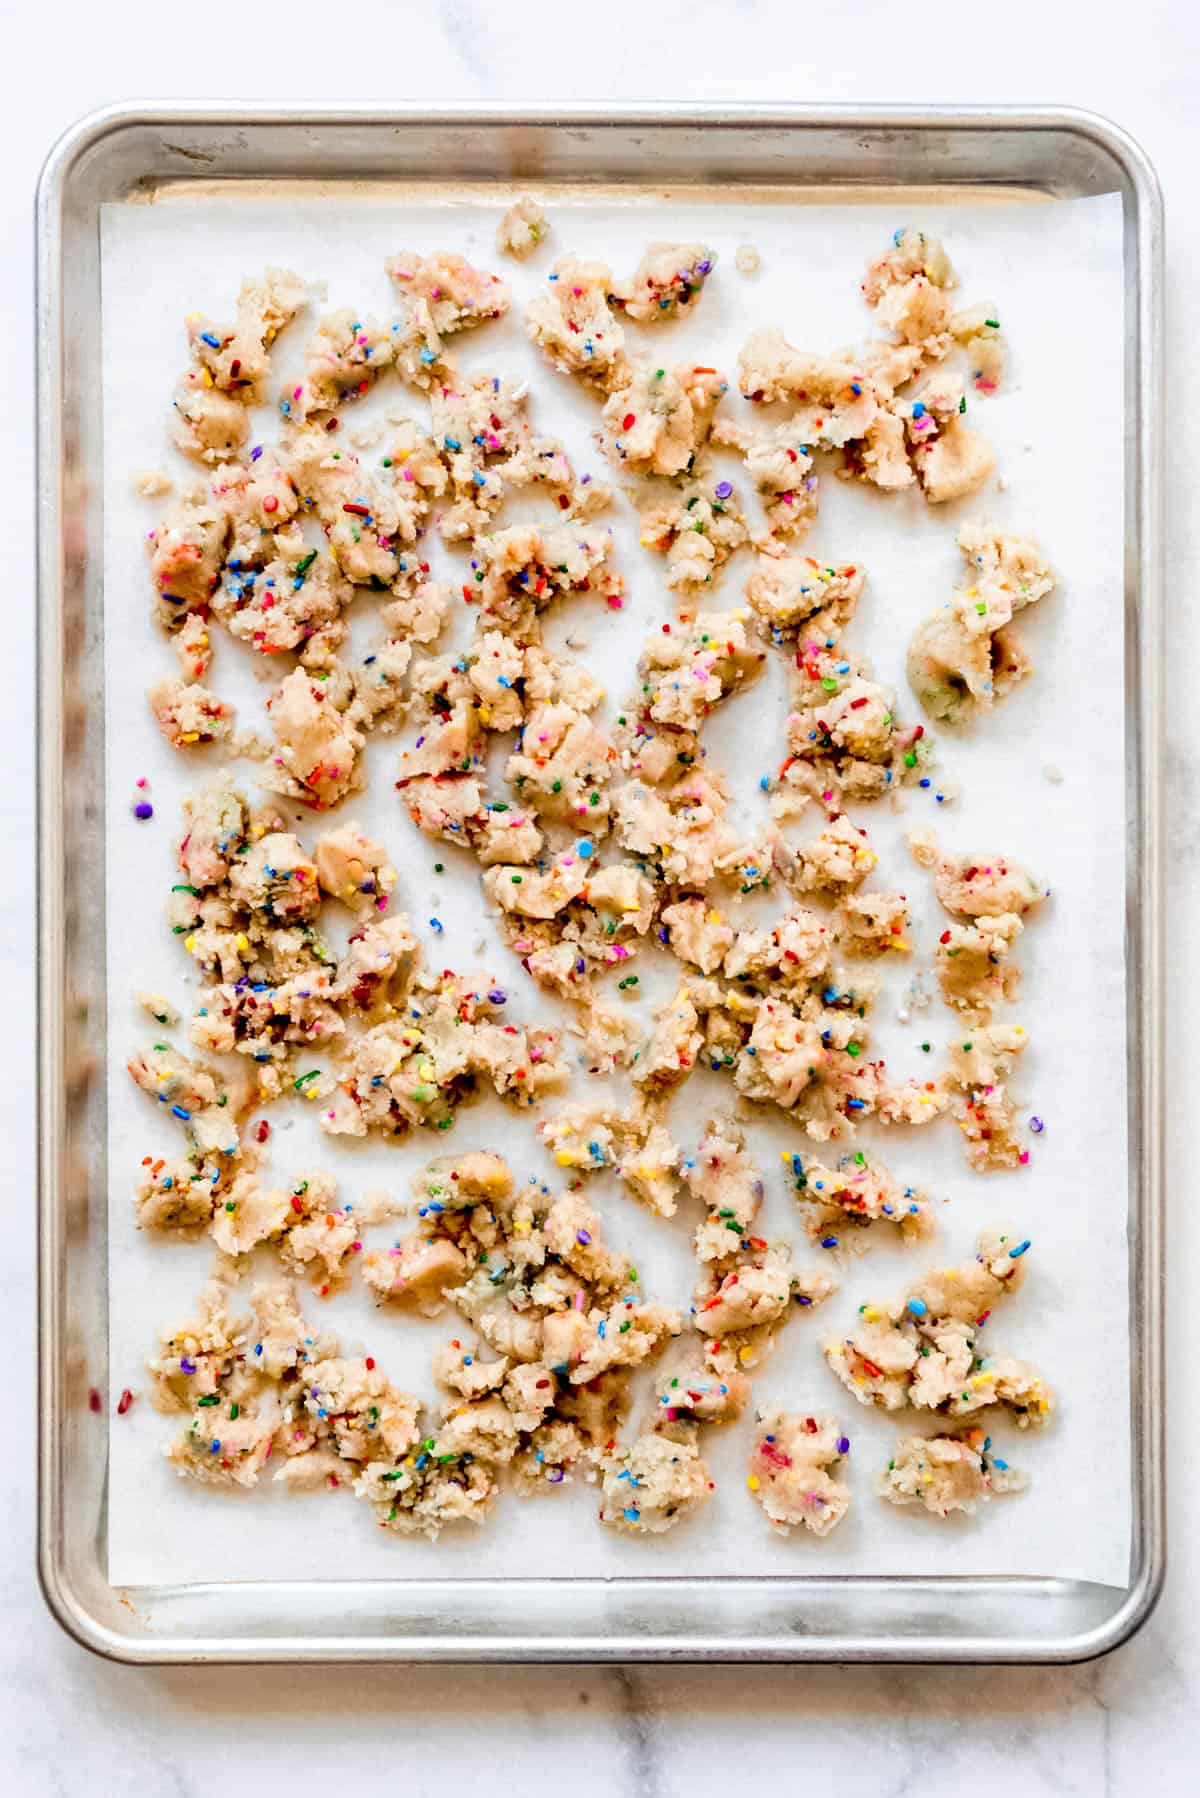
Make the cake crumbles
Combine ingredients in a medium bowl, stirring to combine until it comes together in a crumbly dough. Spread them over a parchment-lined baking sheet so you have some bigger and some smaller crumbles.
Bake for 10-15 minutes until crunchy. You may want to stir them partway through baking. Cool completely and set aside for assembly. This step can be done a few days ahead, but be careful because these crumbs are hard to resist and you might find you've eaten all of them before you have a chance to assemble the cake!
Make the frosting
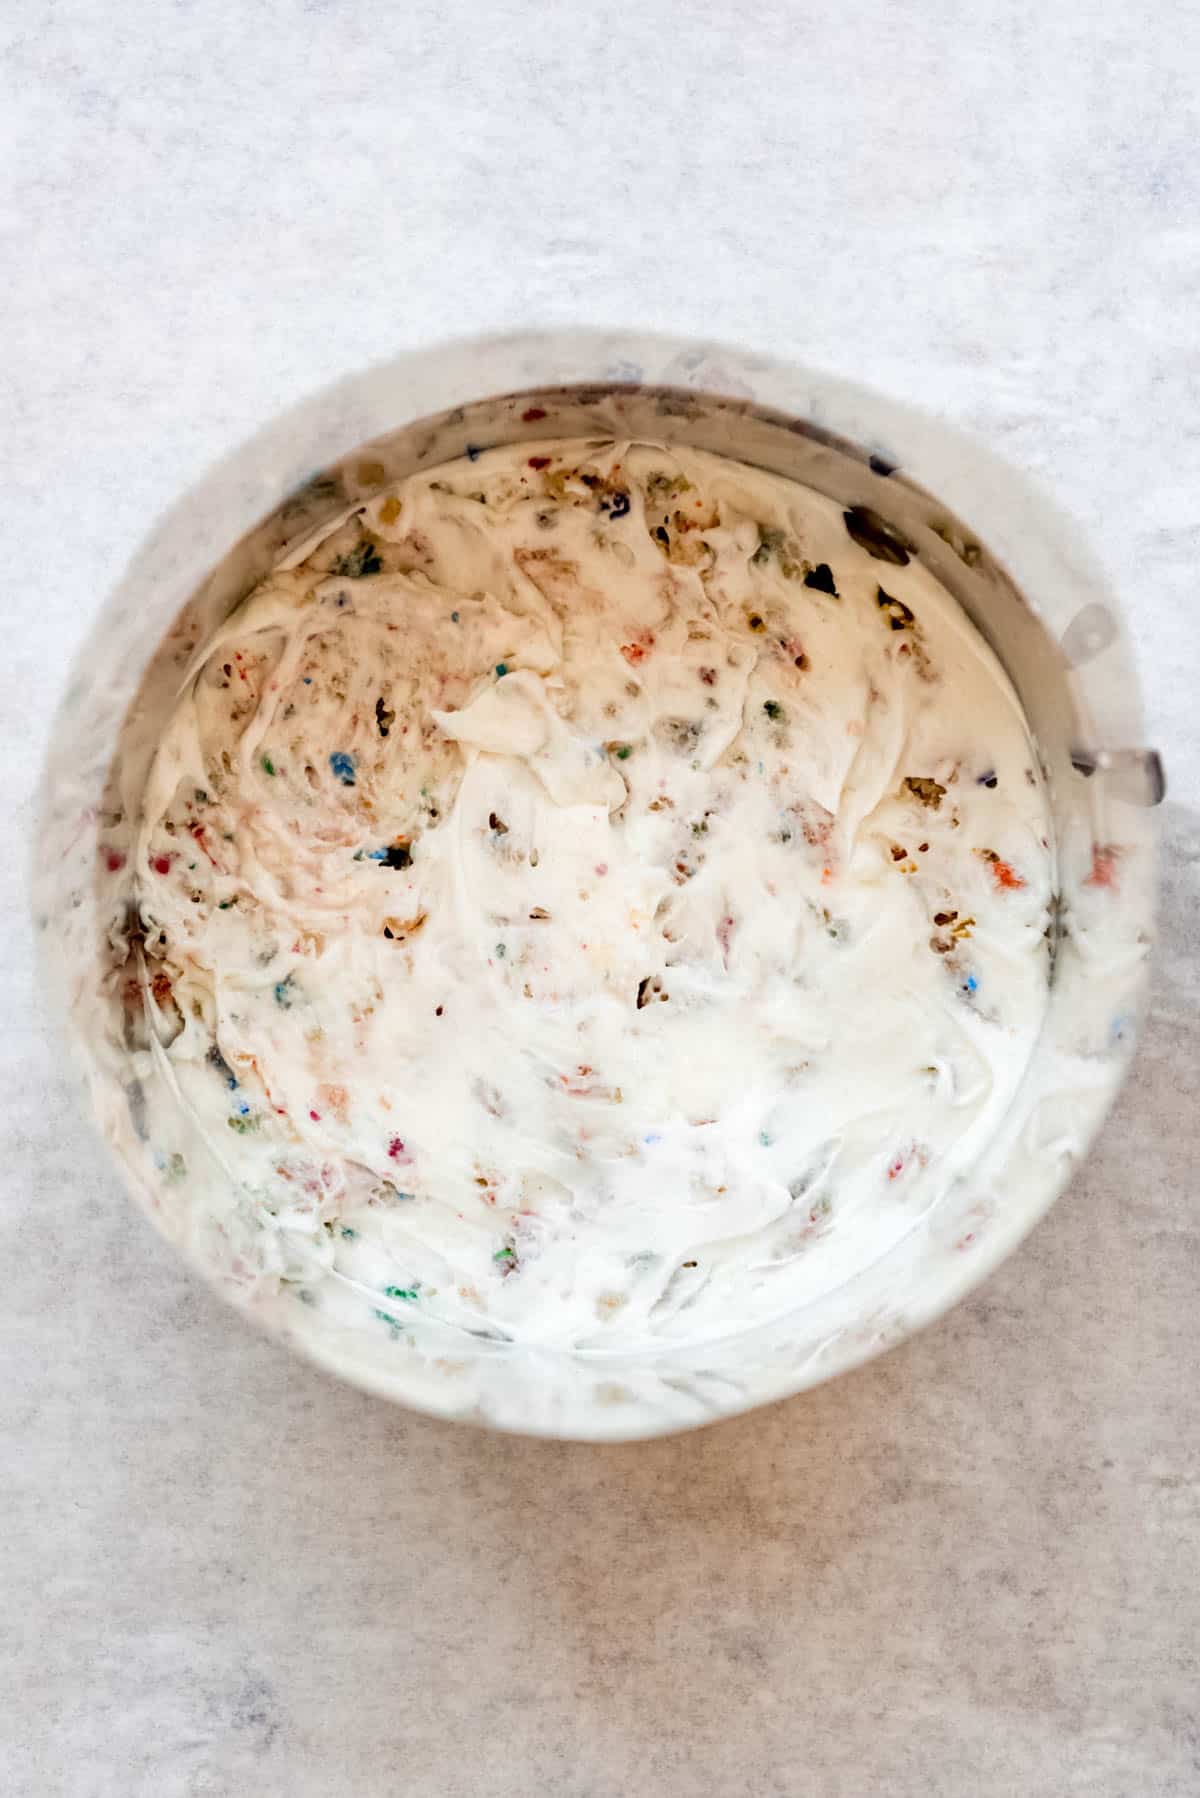
Beat softened butter, shortening, and cream cheese in a large bowl for 2-3 minutes until creamy and smooth. Stop and scrape the bottom and sides of the bowl, then add the corn syrup and vanilla extract and continue to beat for another minute to combine..
Add powdered sugar, baking powder, and lemon juice and mix on low speed until starting to combine. Increase the speed and beat the frosting for 3-4 minutes until creamy and light. This can also be made up to 1 week ahead and refrigerated or frozen for up to 1 month. Just let it thaw completely on the counter and beat again for a couple of minutes before using so it's fluffy and spreadable.

Assembly
Place an acetate collar in your 6-inch cake ring. This makes assembly really easy and you don't need to mess around with tape or anything since the cake ring will hold the acetate in place. Arrange partial cake layers inside the cake ring.
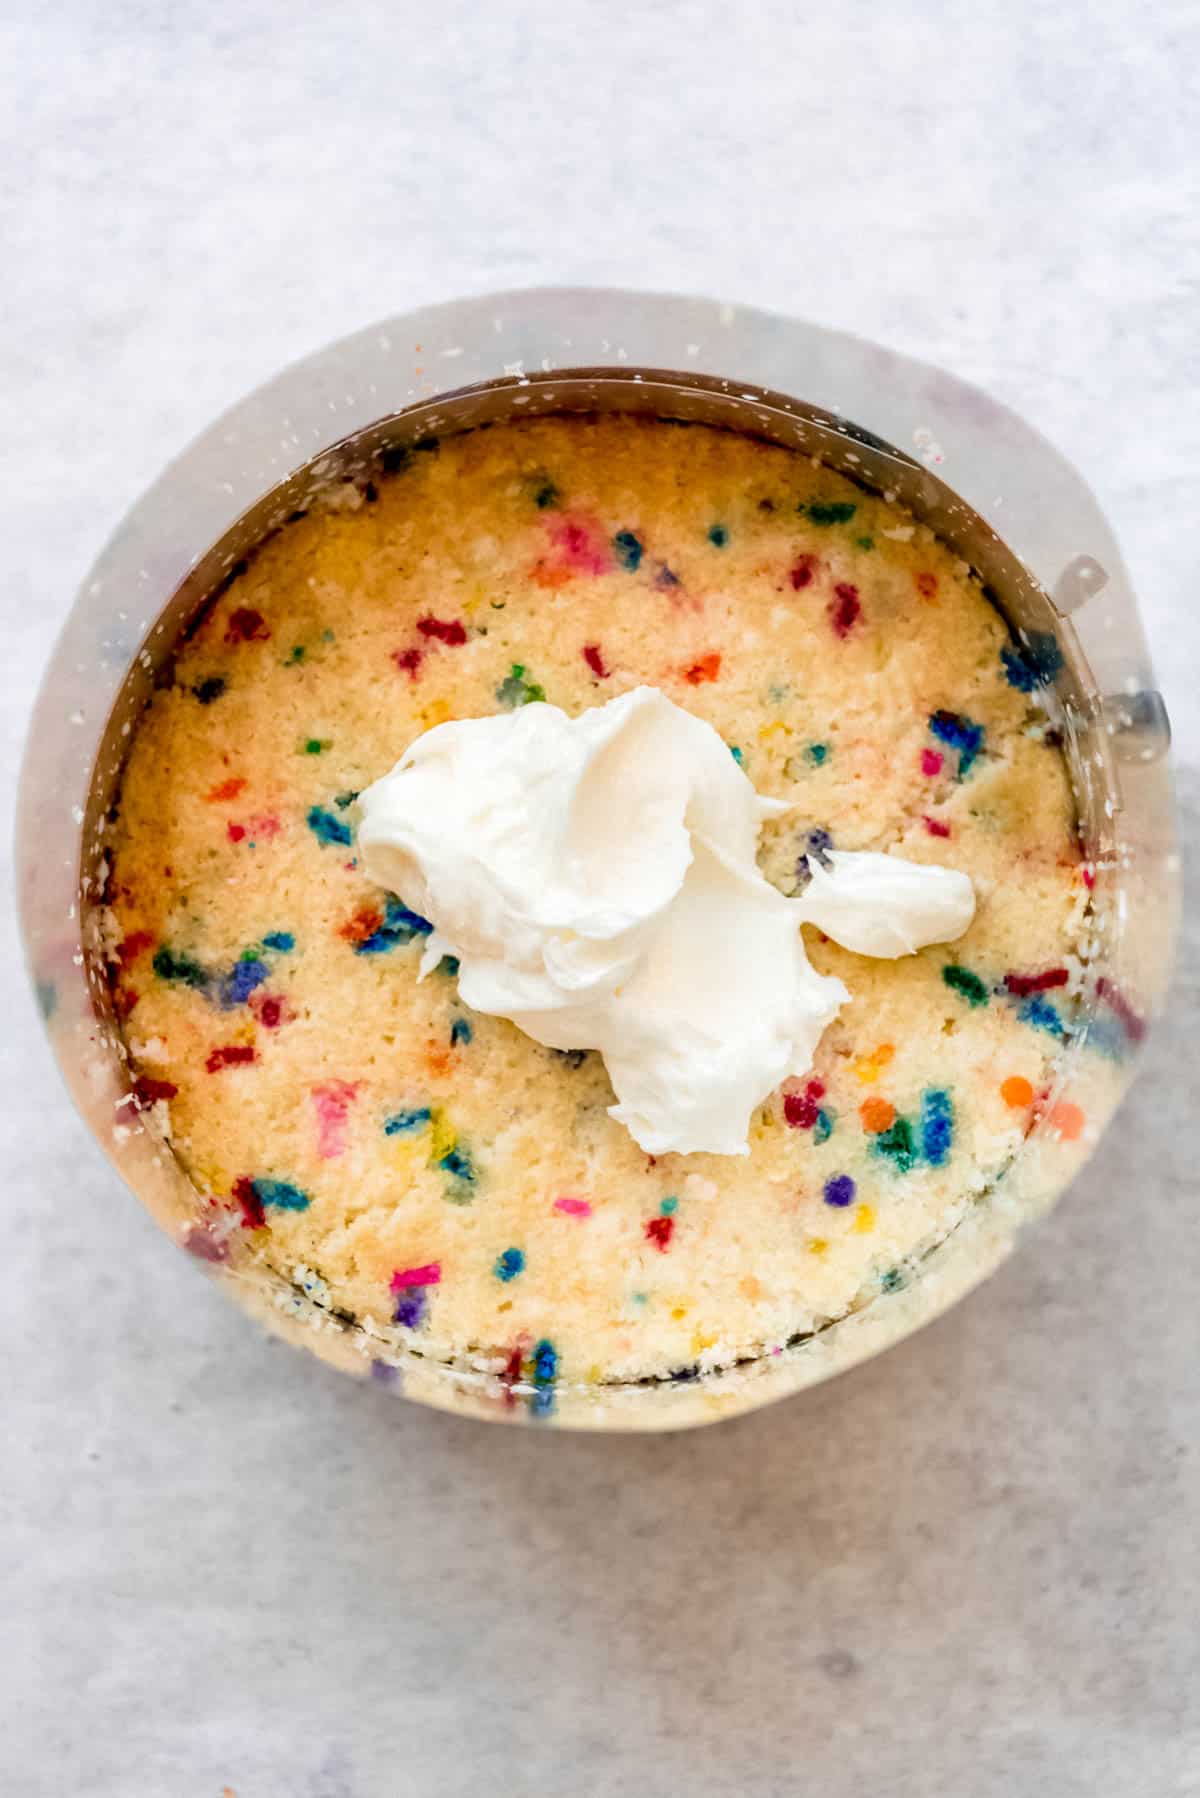
Brush with a simple cake soak made by combine milk and vanilla extract. You'll use ⅓ of the cake soak on the bottom layer.
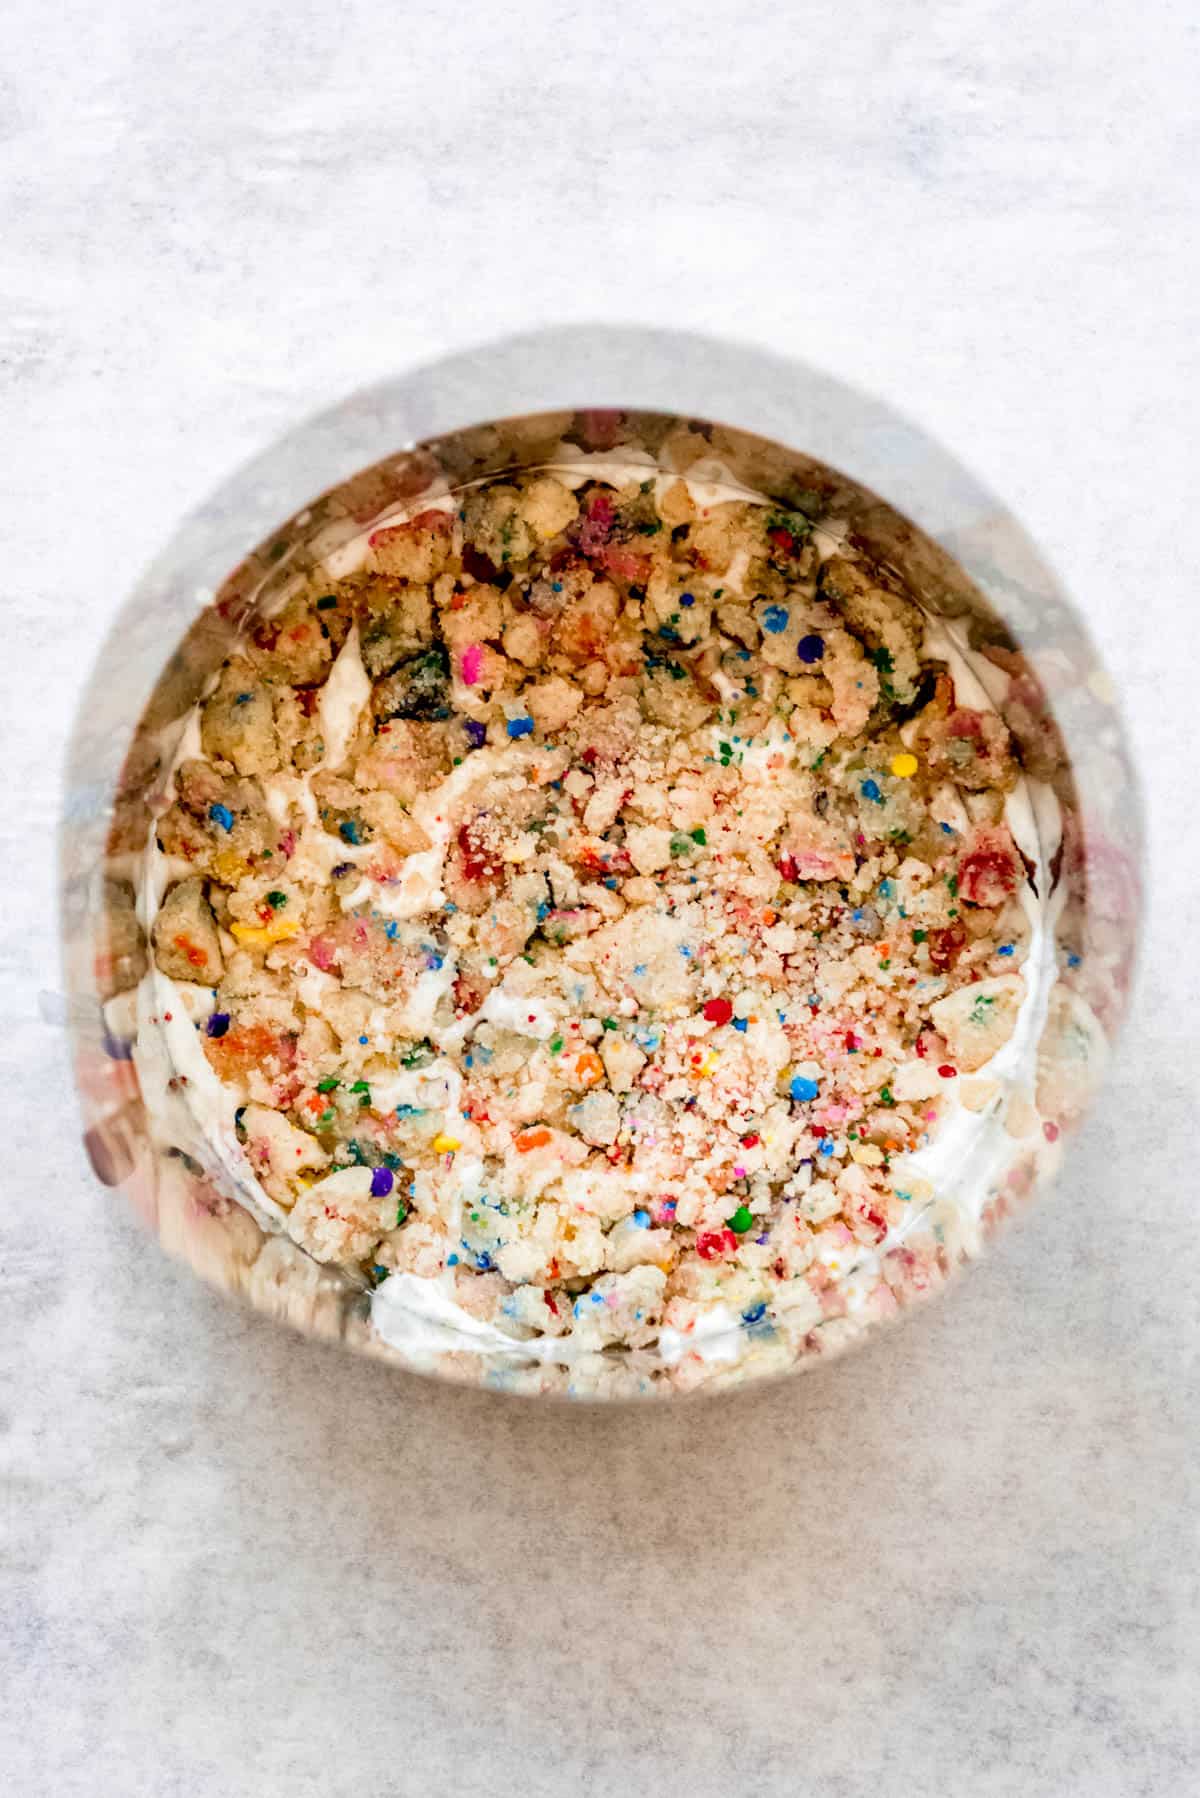
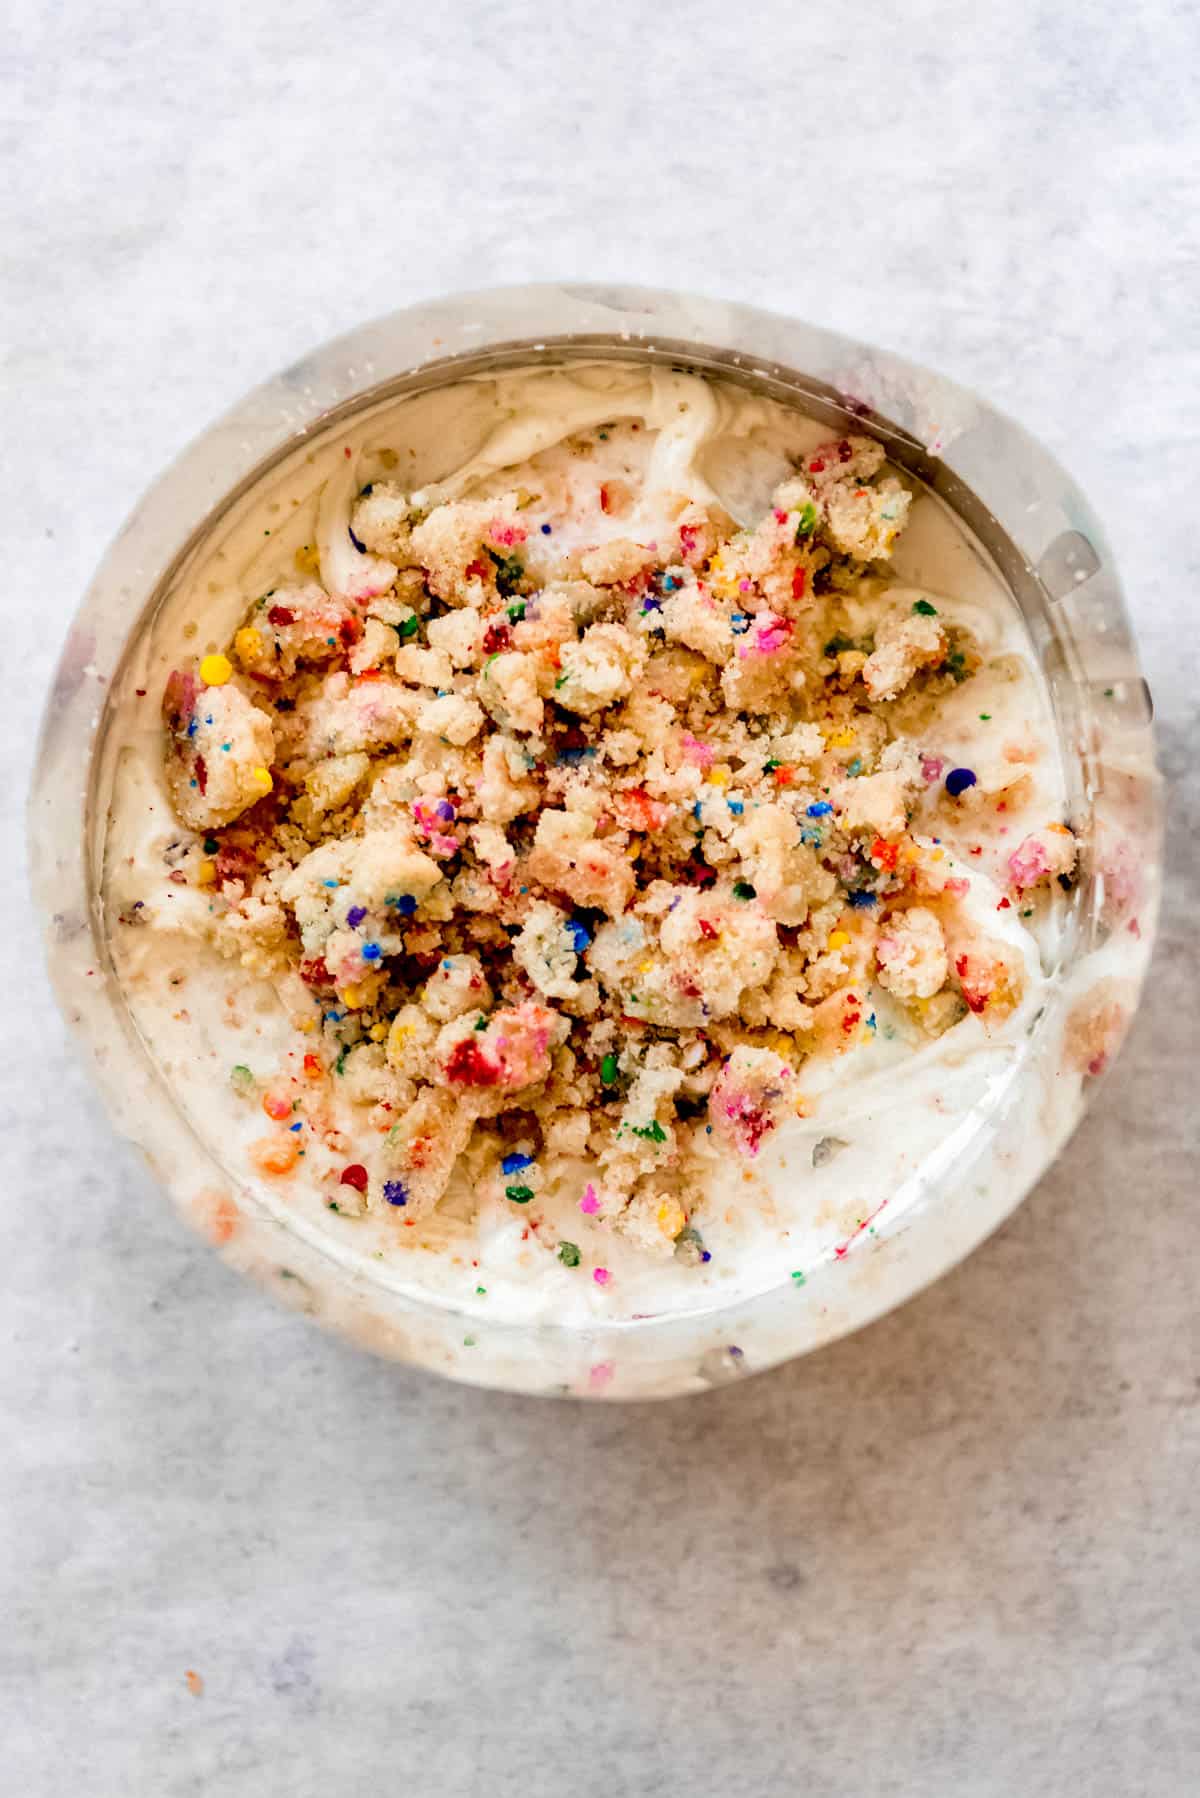
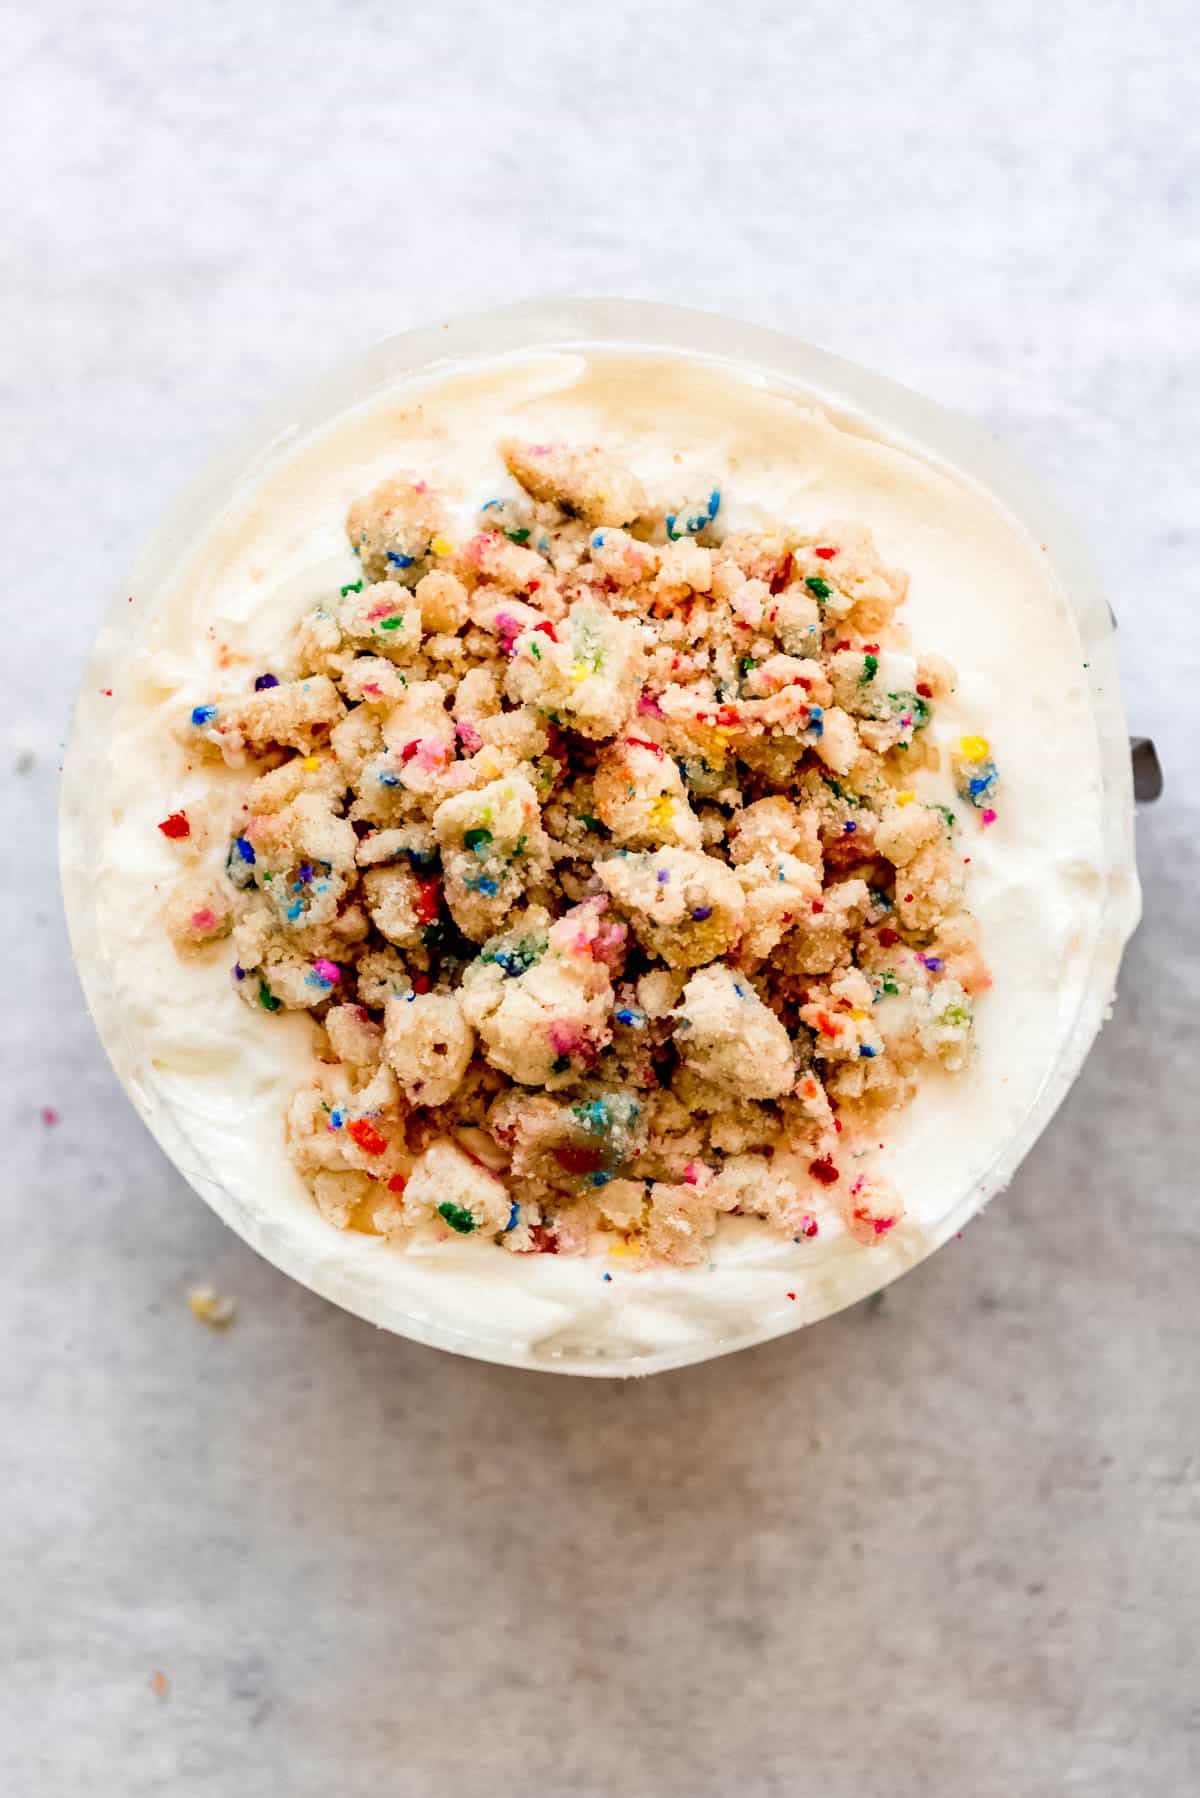
Layer frosting and cake crumbs by spreading ⅕ of the frosting on the cake layers, sprinkling with ⅓ of the crumbs, then spreading another ⅕ of the frosting over those.
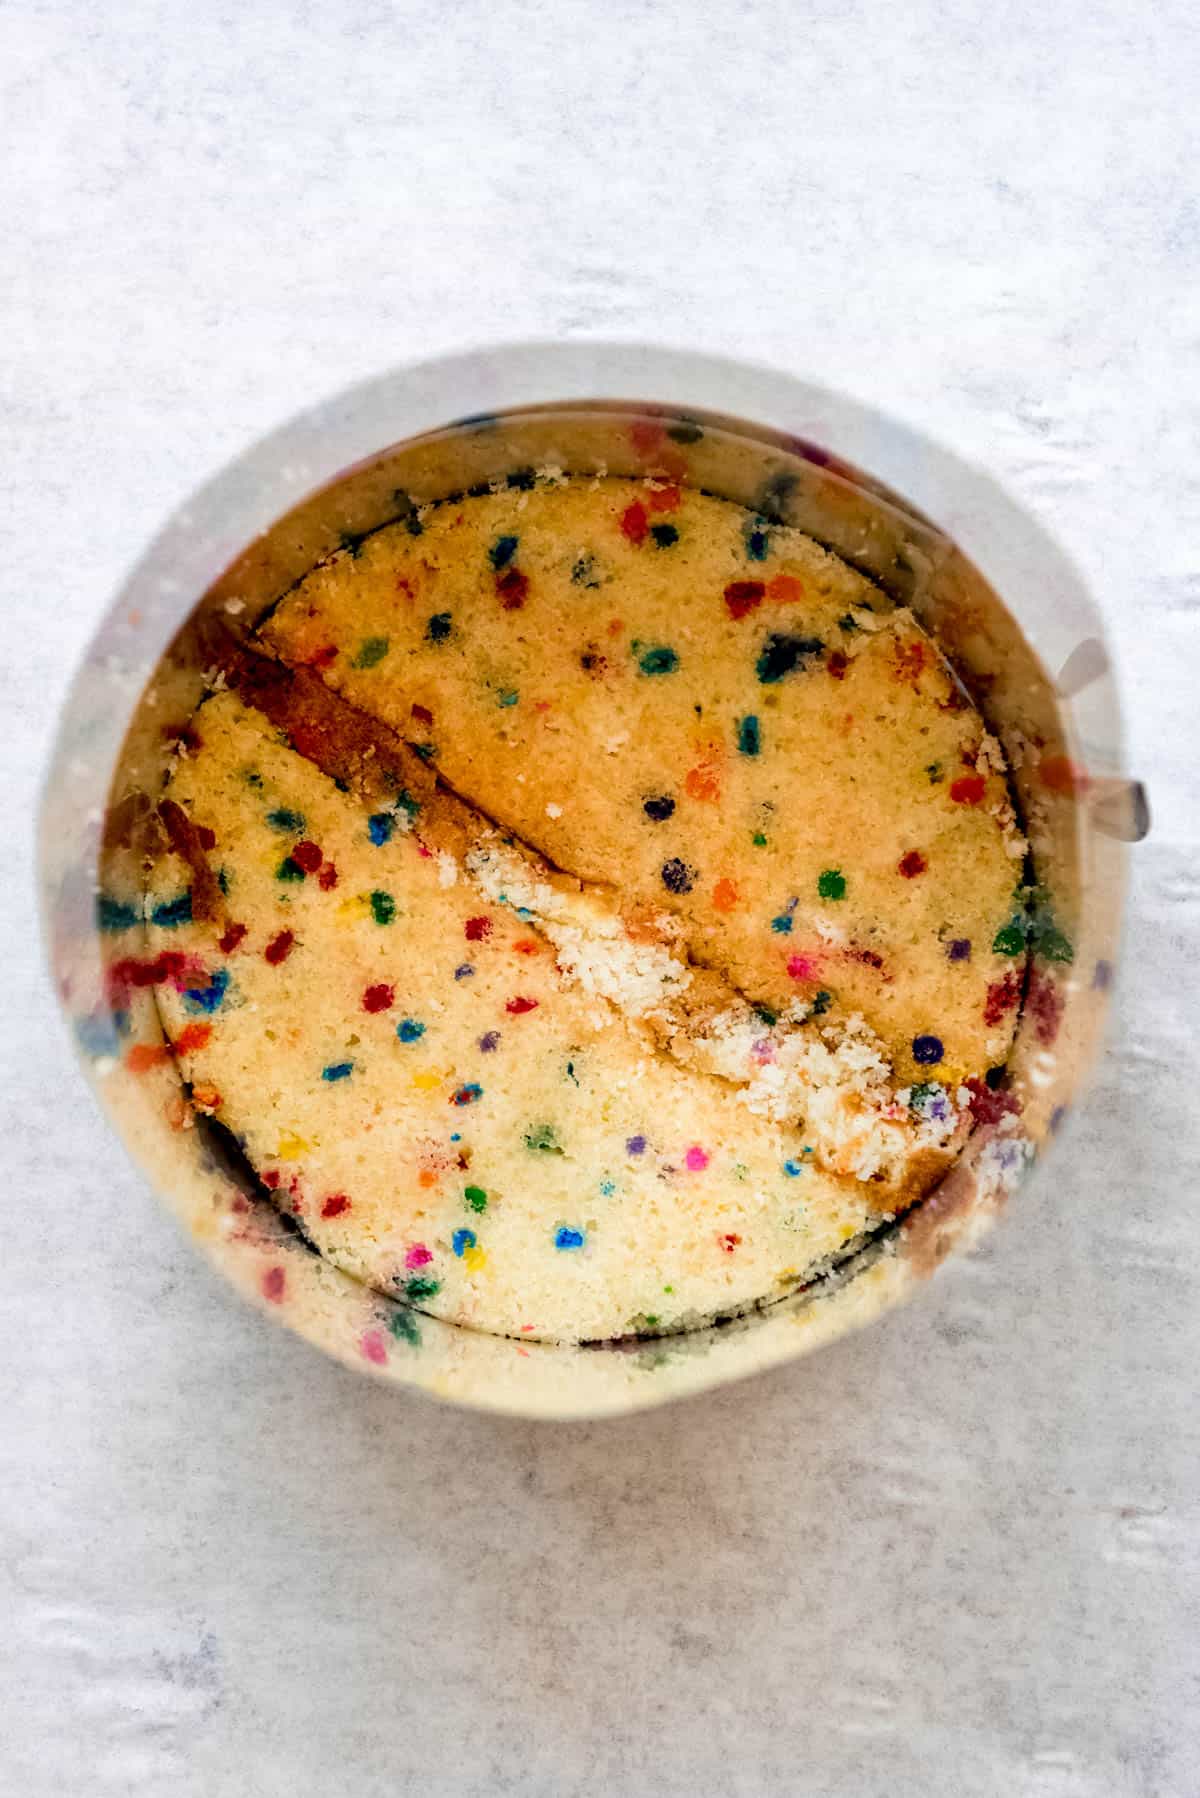
Repeat assembly with your next cake layer, ⅓ of the cake soak, frosting, and cake crumbs. If you need to, you can add a second acetate collar if needed so it is tall enough to hold the whole cake.
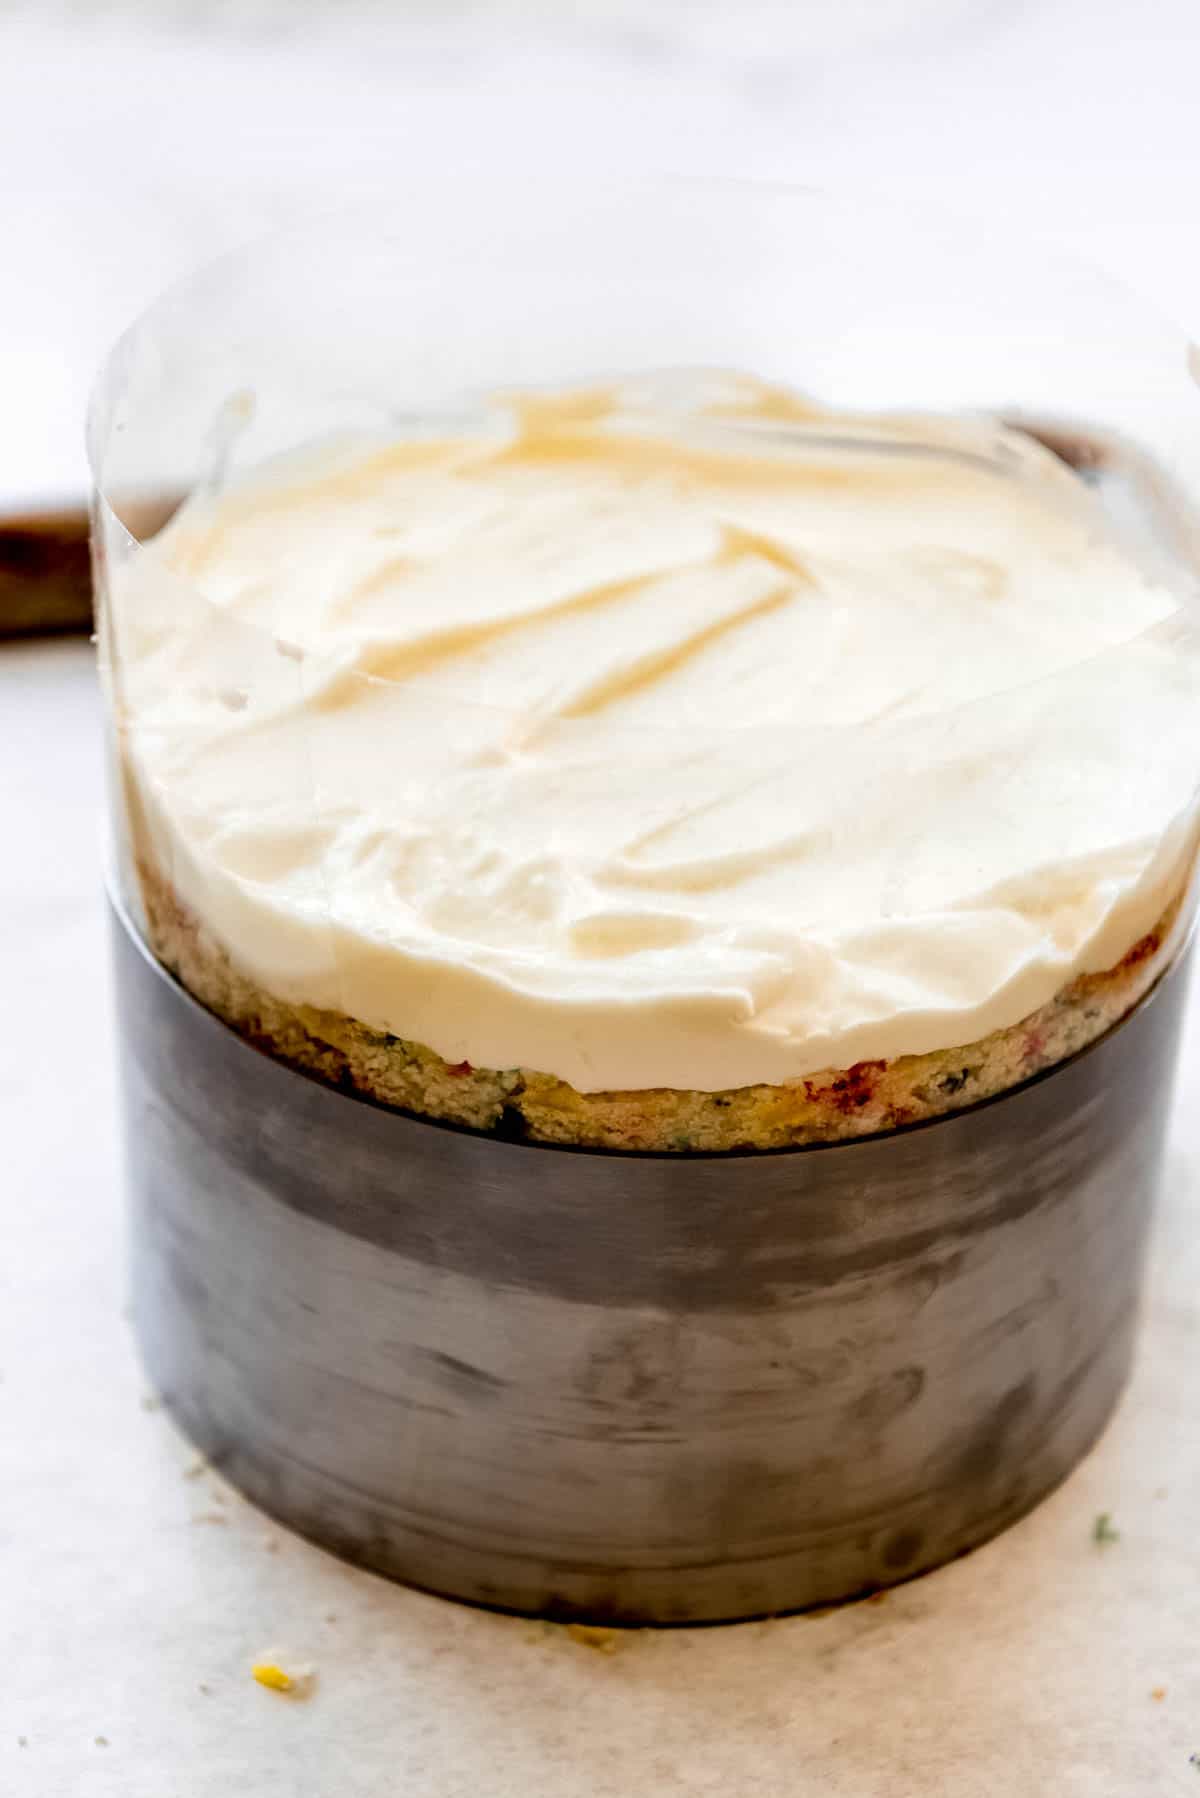
Place last cake layer and brush with final ⅓ of the cake soak, then top with the remaining frosting and cake crumbs.
Freeze to set. It's so tempting to enjoy the cake right away, but it actually needs 3 hours in the freezer for the layers to really set. You can even freeze the cake completely overnight for 12+ hours or up to 2 months.
Remove cake ring and acetate collar, then thaw completely. The cake will take at least 3 hours or more to thaw in the fridge or 2-3 hours at room temperature on the counter before slicing and serving.
FAQ's
Yes, if you have 6-inch cake pans you could bake 3 separate layers just by dividing the batter between the three pans. Or you could do two 8-inch cake layers instead.
Christina Tosi specifically created this cake to recreate the taste of boxed cake mix and canned frosting from the store. The clear imitation vanilla actually lends that flavor element to the completed cake that you will likely notice since vanilla is a predominant flavor here. It's worth purchasing, especially if you already know you love this cake.
Storage
The cake can be frozen whole for 2-4 weeks and still taste delicious and fresh when it's thawed.
You can also store the cake in the fridge for about 5 days, but be sure to wrap it well in plastic wrap to keep the naked edges from drying out since they aren't covered in a protective barrier of frosting.
Let the cake come to room temperature before serving for best results.
Pro Tips
- Use the right sprinkles. Nonpareils bleed in the batter and you won't get the pretty, clean look that you get from rainbow jimmies.
- Don't skip the cake soak. It's a little thing that doesn't take much extra time but it adds moistness and even more vanilla flavor.
- You may want to double the frosting. The original Milk Bar birthday cake isn't overly heavy on the frosting and personally I like it that way. But you could definitely do 1.5x or even double the amount and not overwhelm the cake if you like frosting.
More Recipes Like This
- Lemon Bundt Cake
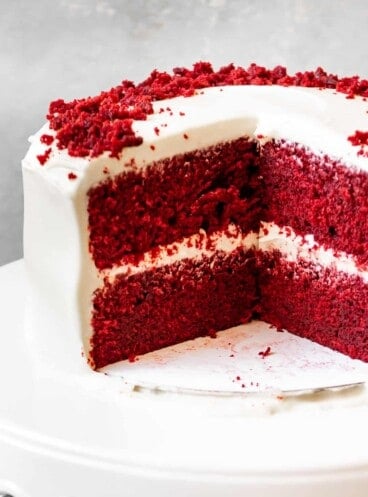
- Easy Red Velvet Cupcakes with Cream Cheese Frosting
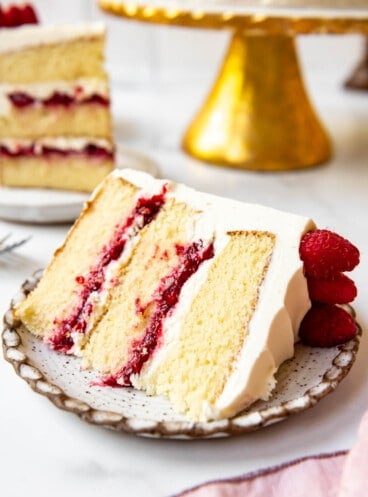
- Vintage Cherry Chip Layer Cake
- The Most Incredible Chocolate Bundt Cake
- Devil’s Food Chocolate Cake
- Cherry Crisp Cake
Did you make this recipe?
Let me know what you thought with a comment and rating below. You can also take a picture and tag me on Instagram @houseofnasheats or share it on the Pinterest pin so I can see.
Momofuku Milk Bar's Birthday Confetti Cake
Equipment
- 1 6-inch cake ring or springform mold
- 2 strips acetate (flexible plastic paper), each 3-inches wide and 20-inches long
Ingredients
Cake
- 2 cups cake flour, scooped & leveled (240g)
- 1 ½ teaspoons baking powder
- ¾ teaspoon kosher salt
- ¼ cup + 2 Tablespoons rainbow sprinkles, divided
- ½ cup buttermilk (120ml)
- ⅓ cup grapeseed oil
- 2 teaspoons clear imitation vanilla extract
- 1 ¼ cups granulated sugar (248g)
- ⅓ cup vegetable shortening (61g)
- 4 Tablespoons unsalted butter, room temperature (57g)
- 3 Tablespoons light brown sugar
- 3 large eggs, room temperature
Crumbs
- ¾ cup cake flour or all-purpose flour, scooped & leveled (90g)
- ½ cup granulated sugar (100g)
- 2 Tablespoons light brown sugar
- 2 Tablespoons rainbow sprinkles
- ½ teaspoon baking powder
- ½ teaspoon kosher salt
- ¼ cup grapeseed oil (60ml)
- 1 Tablespoon clear imitation vanilla extract
Frosting
- ½ cup salted butter, room temperature (227g)
- ¼ cup vegetable shortening
- 2 ounces cream cheese, room temperature
- 2 Tablespoons light corn syrup
- 1 Tablespoon clear imitation vanilla extract
- 1 ¼ cups powdered sugar (142g)
- ¼ teaspoon kosher salt
- ¼ teaspoon baking powder
- ½ teaspoon fresh lemon juice
Cake Soak
- ¼ cup milk
- 1 teaspoon clear imitation vanilla extract
Instructions
Cake
- Preheat oven to 350°F. Line a 10x15-inch rimmed jelly roll baking sheet with parchment paper and spray with baking spray. Set aside.
- Whisk flour, baking powder, salt, and ¼ cup sprinkles together in a large bowl. Whisk buttermilk, oil, and vanilla in a separate bowl.
- Beat granulated sugar, shortening, butter, and brown sugar together in a large bowl for 3-4 minutes until creamy and light using an electric mixer. Add eggs, one at a time, stopping to scrape the bottom and sides of the bowl. Continue to beat, scraping down the bottom and sides of the bowl once or twice, for another 3-4 minutes until almost doubled in volume and very light. The color will turn a pale yellow.
- Add buttermilk mixture on low speed, mixing just until combined. Add the flour mixture, mixing until just combined. Transfer batter to prepared pan and sprinkle the remaining sprinkles over the top. Bake for 30-35 minutes until a light golden brown or a toothpick inserted into the cake comes out with just a few moist crumbs. Remove from oven and cool completely.
Crumbs
- Preheat oven to 300°F. Line a baking sheet with parchment paper. Set aside.
- Combine flour, granulated sugar, brown sugar, sprinkles, baking powder, and salt in a medium bowl. Add oil and vanilla, then mix until evenly moistened. Squeeze handfuls together to form large clumps, then transfer to the prepared baking sheet, breaking up into clusters of varying sizes. Bake for 10-12 minutes, stirring occasionally, until golden brown and crunchy. It will firm up more as it cools.
Frosting
- Beat butter, shortening, and cream cheese for 2-3 minutes in a large bowl of a stand mixer fitted with the paddle attachment until creamy and light. Add corn syrup and vanilla extract. Beat for 3 minutes until smooth and very light in color, stopping to scrape the bottom and sides of the bowl.
- Add powdered sugar, baking powder, salt, and lemon juice. Beat on low speed until incorporated, then increase speed to medium-high and continue to beat another 3-4 minutes until bright white, fluffy, and smooth.
Assembly
- Make cake soak by combining milk and vanilla in a bowl. Set aside.
- Invert cake onto a clean piece of parchment paper and peel off the back piece. Use the cake ring to cut out two 6-inch cake rounds. Cut out two additional half-circles from the scraps to piece together a third 6-inch cake round.
- Place a clean piece of parchment paper on a baking sheet, then place a 6-inch cake ring on it. Line the inside of the cake ring with 1 of the acetate strips. Arrange the two half-circle cake pieces in the bottom of the ring, filling in any gaps with cake scrips to form the bottom layer. Brush with about half of the cake soak to evenly moisten.
- Spread about 3 tablespoons of the frosting over the bottom cake layer with the back of a spoon or spatula. Evenly sprinkle ⅔ cup of the crumbs over the frosting, then spread another 3 tablespoons of the frosting over the crumbs as best you can.
- Add the second acetate strip to create a 5- to 6-inch tall ring. Nestle the next cake layer down into the acetate ring. Brush with the remaining cake soak and repeat the frosting-crumbs-frosting layer.
- Add the last cake layer on top of the frosting, then cover with the remaining frosting. Top with the rest of the crumbs.
- Freeze for at least 3 hours to set the cake and filling. Remove from freezer at least 3 hours before serving and peel off the acetate strips. Thaw in the fridge for at least 3 hours before serving.
Notes
- Yield: Makes one 6-inch layer cake. It may not seem large, but it's plenty for 8-10 people. The nutrition was calculated for 10 servings.
- Make-ahead: You can make the cake layer 5 days ahead and store in the fridge wrapped in plastic wrap until ready to assemble. Crumbs can be made 5 days ahead and stored in an airtight container at room temperature. Frosting can be made 1 week in advance and kept in an airtight container in the fridge. Let come to room temperature for 2-3 hours, then beat again before using.
- Storage: Cake will keep well for up to 1 week in the fridge wrapped well in plastic wrap or up to 1-2 months in the freezer.
- You may want to double the frosting. The original Milk Bar birthday cake isn't overly heavy on the frosting and personally I like it that way. But you could definitely do 1.5x or even double the amount and not overwhelm the cake if you like frosting.

How do you make this gluten free
I actually think it would work pretty well with a good gluten-free 1-to-1 flour like Bob's Red Mill. I have had really great results with other recipes using that but haven't tried it on this particular one yet.
Is the cake meant to be baked on a 10x15 jellyroll pan or a 9x13 baking sheet? Both are mentioned. Thanks!
I'm sorry about that typo! It's a 10x15 jelly roll pan. I fixed that in the recipe.
Thank you
When you premake and freeze the whole cake assembled, do you take it out of the cake ring and acetate then cover it? Or do you leave it in the cake ring and acetate uncovered? I am planning on making this cake this weekend for my little first birthday next Saturday.
I would go ahead and leave it in the acetate just because it will protect the cake from drying out.