Seasoned with traditional spices like cumin and chili powder, and paired with green chilies and salsa verde, our homemade Shredded Beef Chimichangas offer a rich authentic Mexican taste! Whether you're serving them up for a cozy family dinner or a festive gathering like Cinco de Mayo, get ready to enjoy a meal that's both delicious and satisfying, with all the rich flavors of a dish straight from your favorite Mexican restaurant.
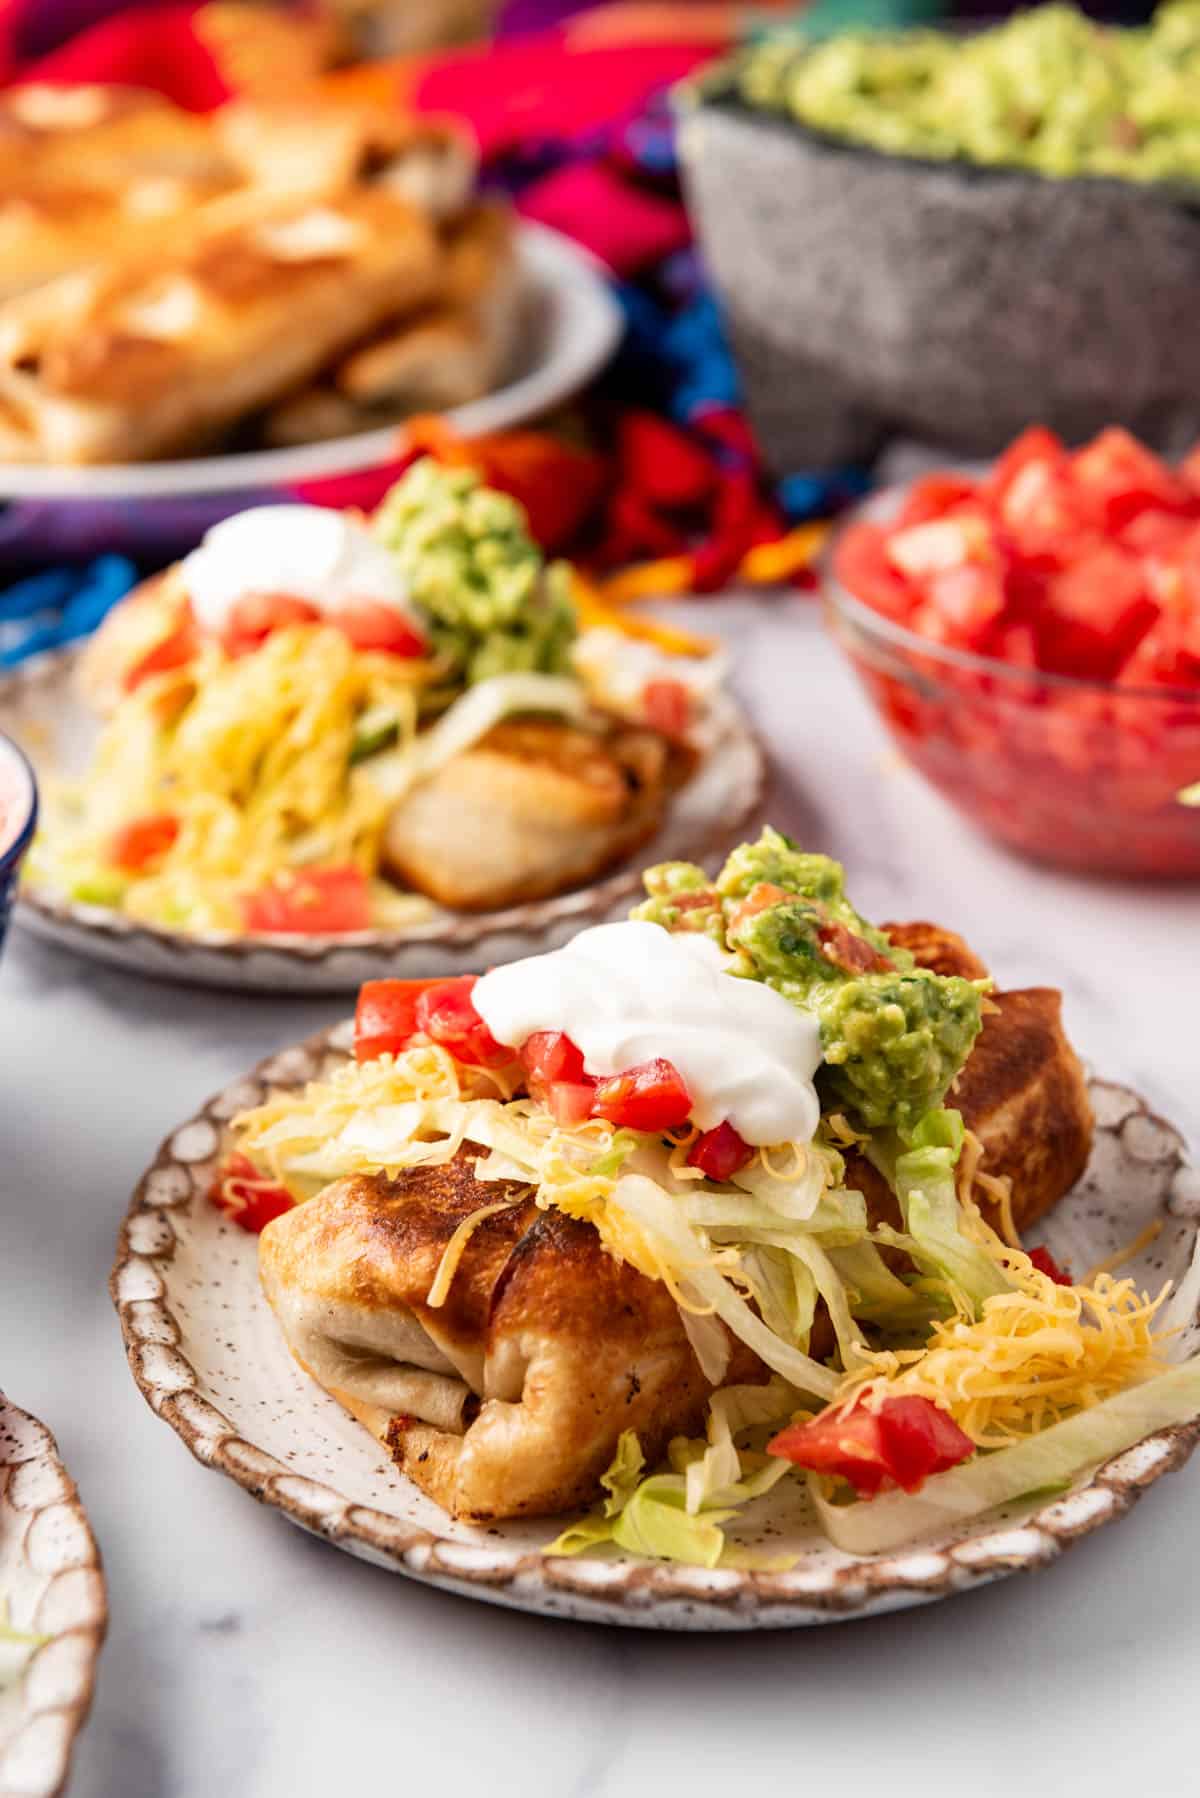
Table of Contents
Do you remember when you were a kid and were asked the question, "If you could only eat one thing for the rest of your life, what would it be?” My answer was ALWAYS chimichangas. Seriously, I thought (and a part of me still thinks) I could eat these shredded beef chimichangas every single day.
Chimichangas are similar to burritos, except deep fried to create a crispy, golden tortilla shell around a flavorful filling, usually shredded chicken or beef.
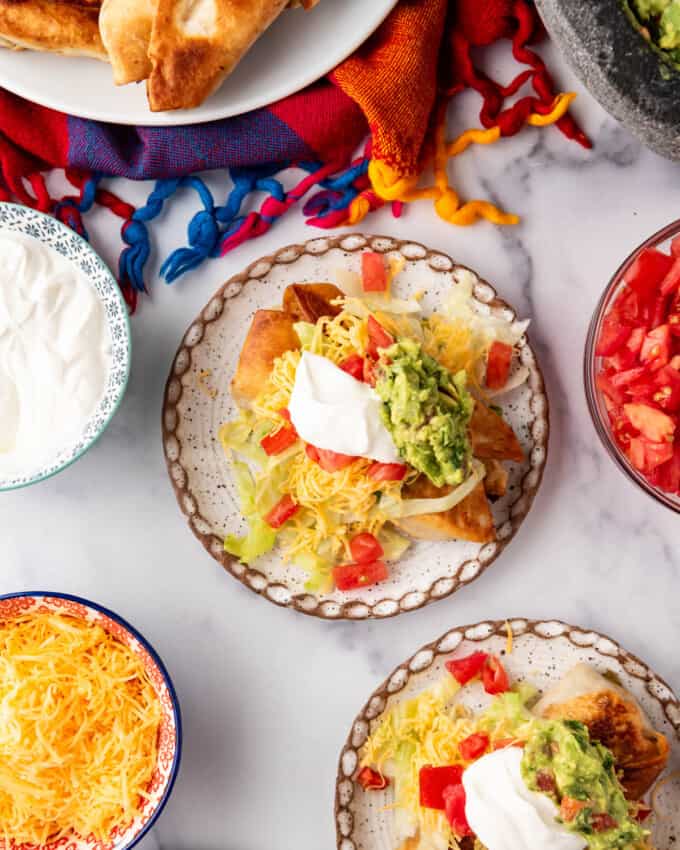
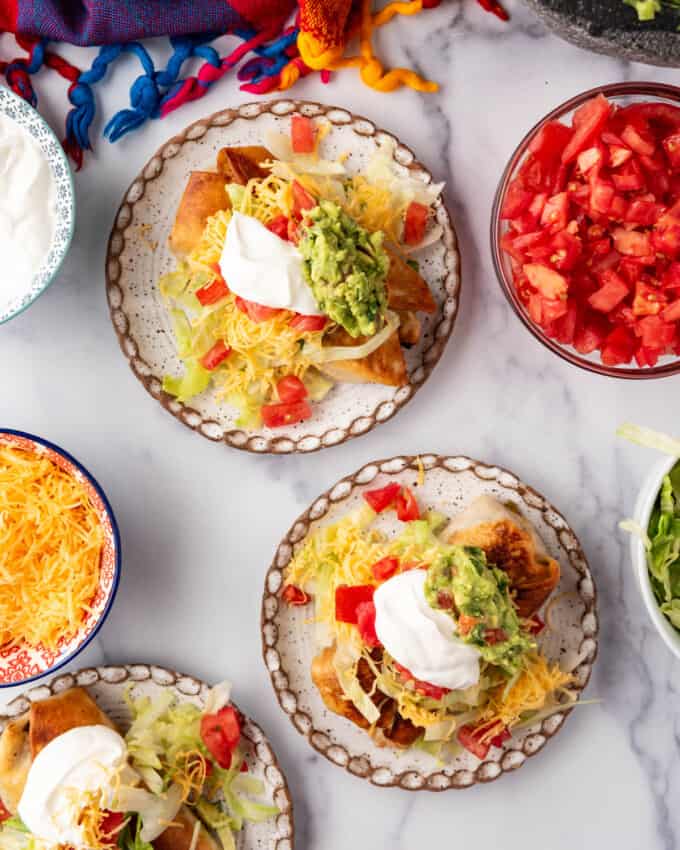
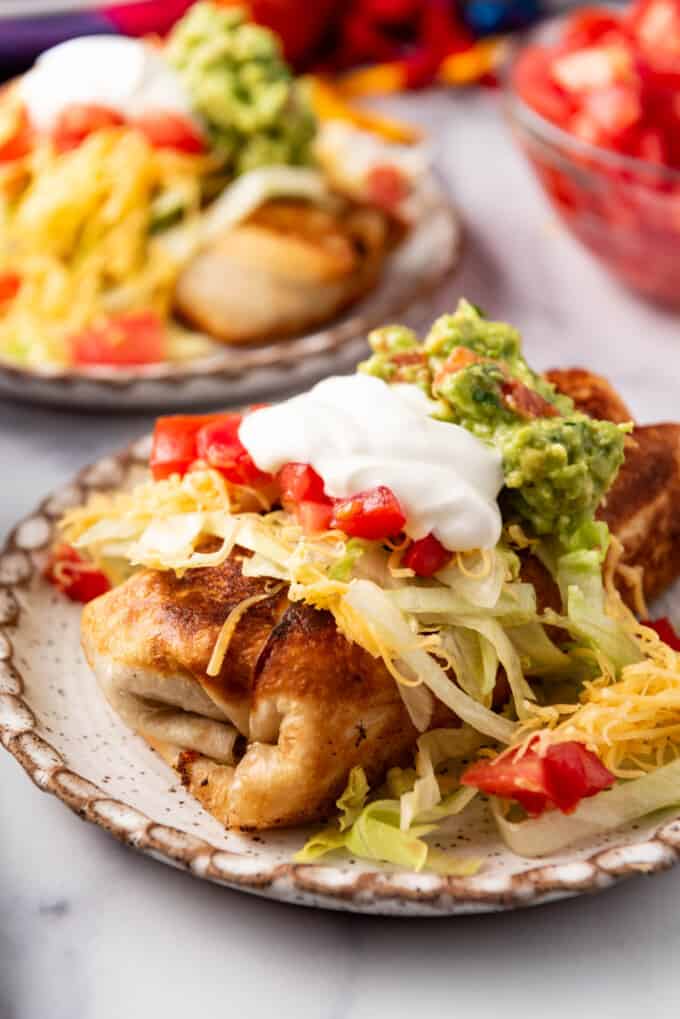
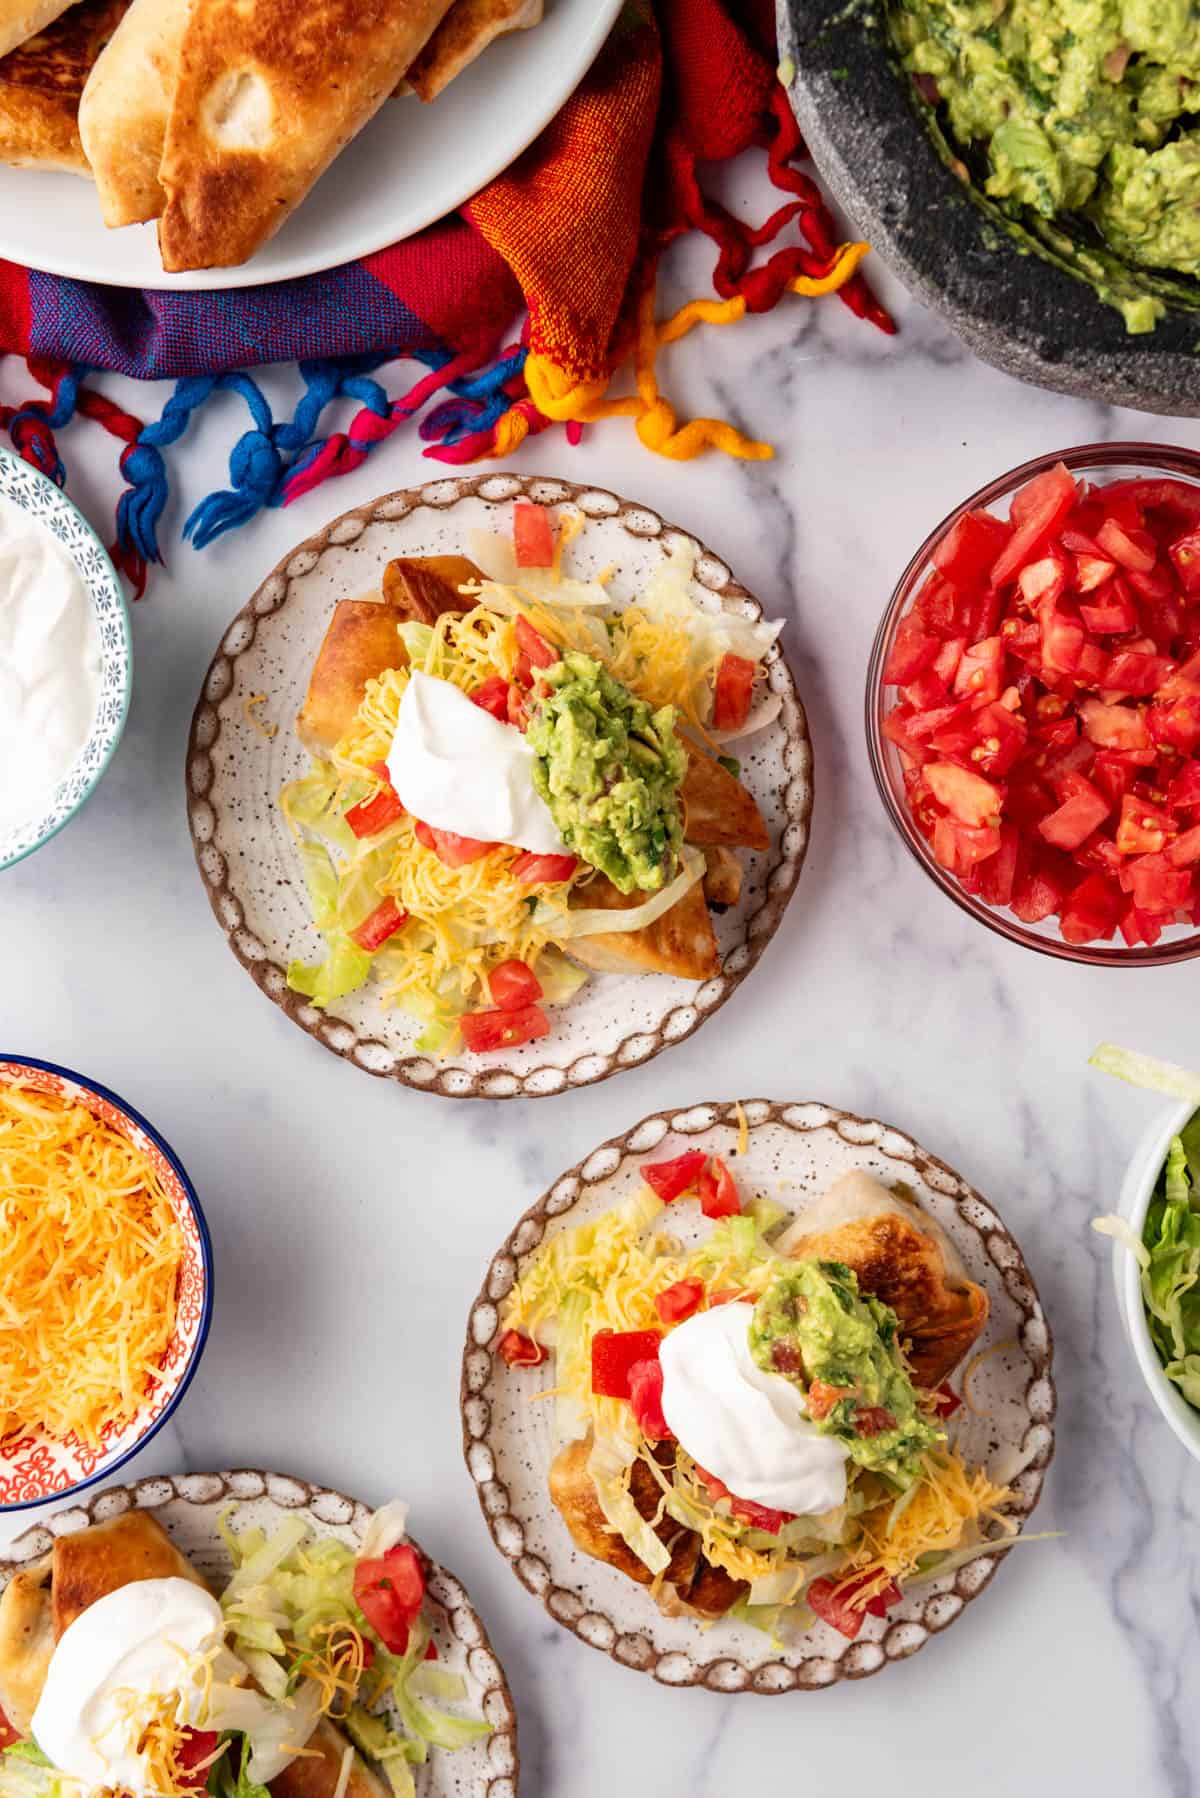
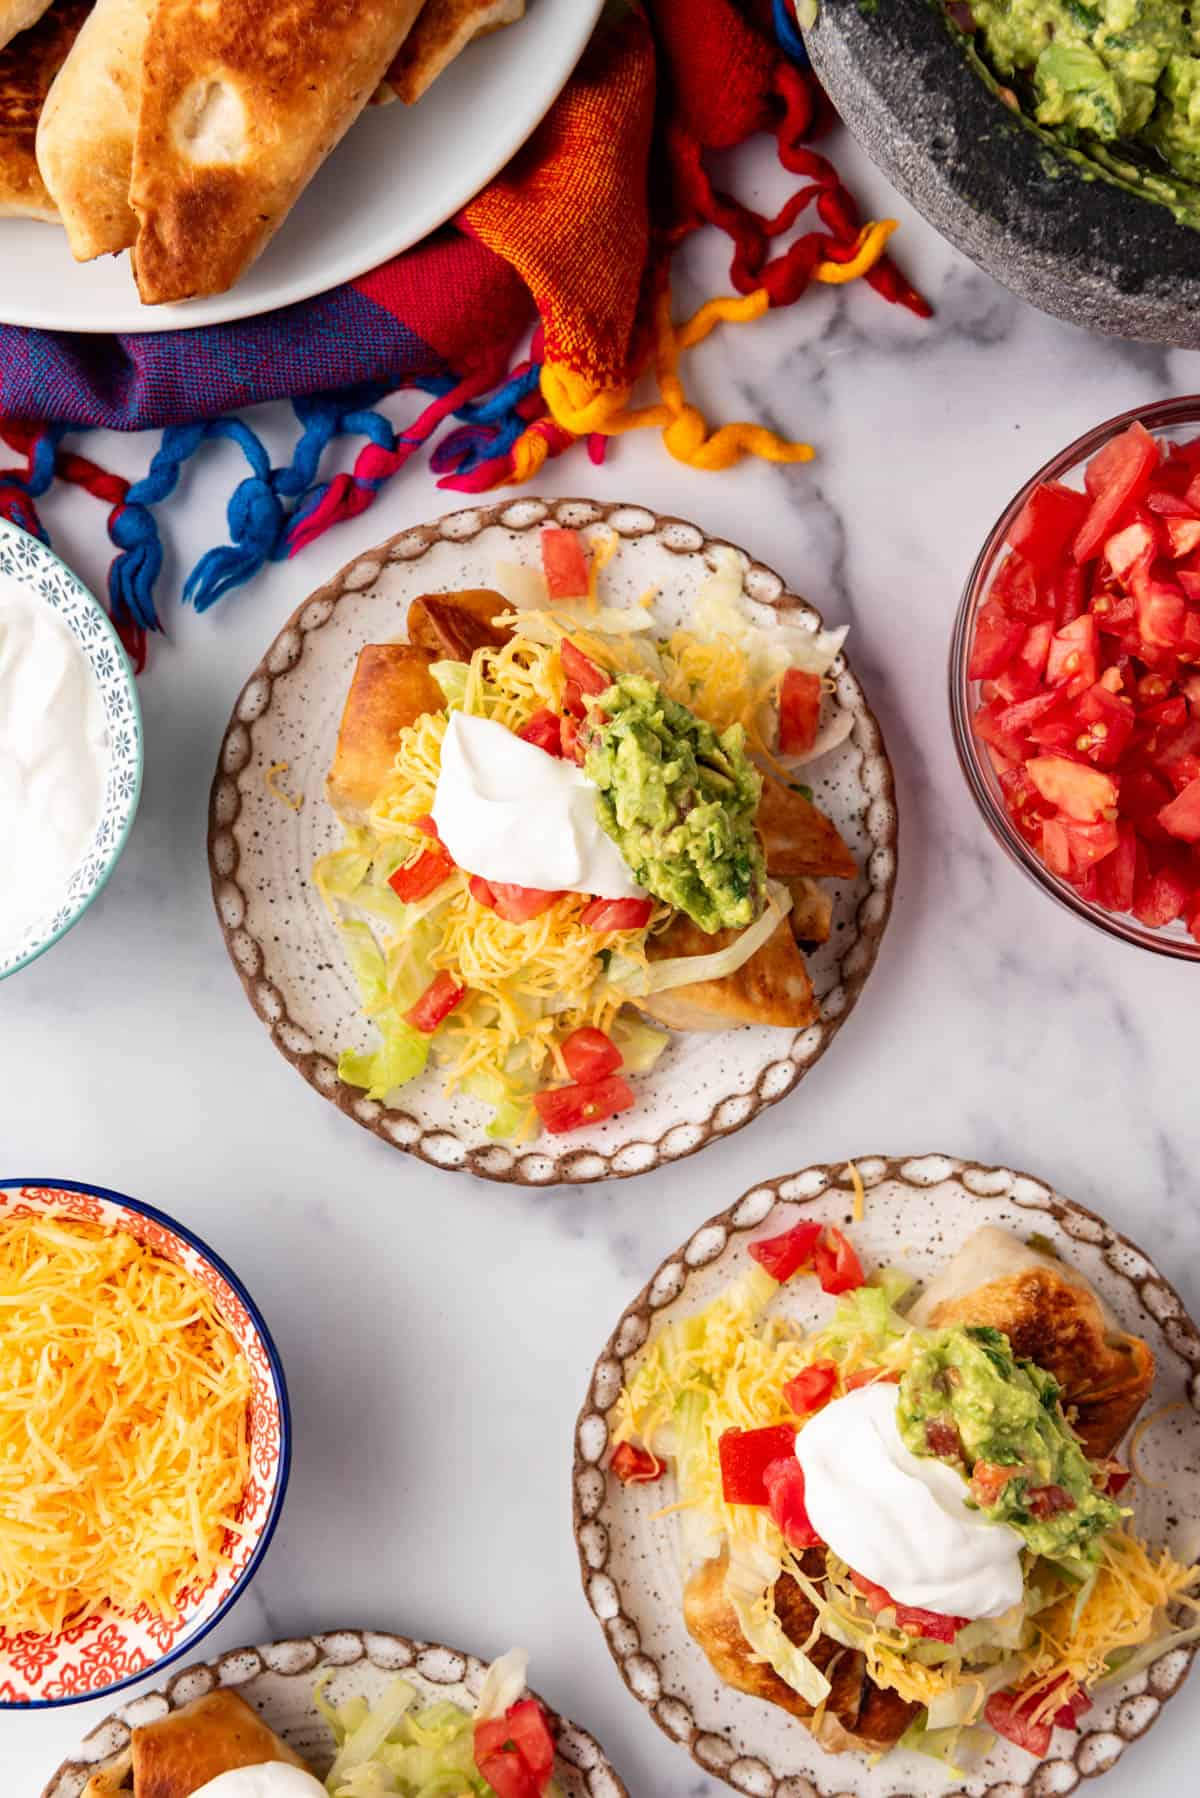
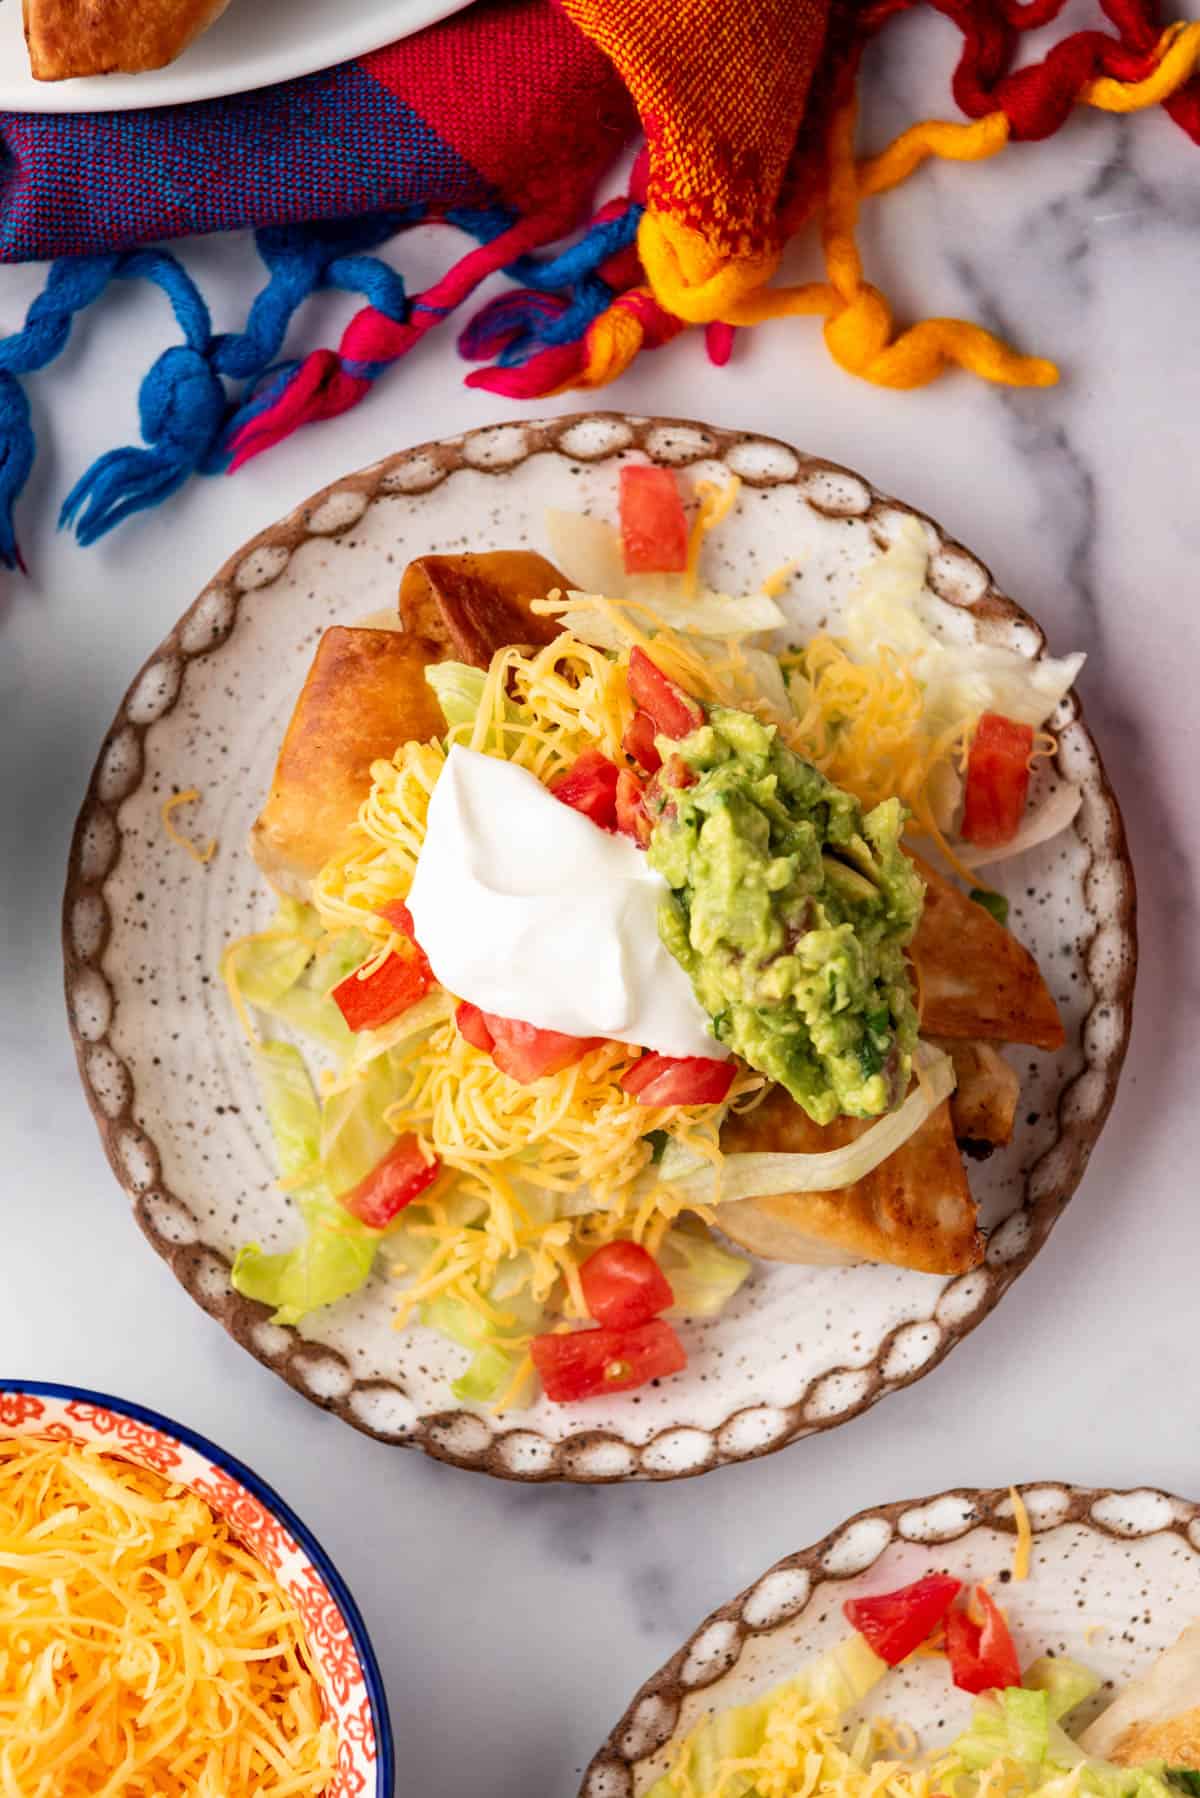
There is just something about a warm flour tortilla wrapped around spicy, tender Mexican shredded beef and fried up all nice and crispy on the outside, then topped with shredded cheese, lettuce, tomatoes, sour cream and guacamole that makes my soul sing like a mariachi band.
If you are planning a Mexican-themed feast, be sure to serve these chimichangas with some Homemade Mexican Rice, Instant Pot Refried Beans, and Horchata (a creamy cinnamon agua fresca that is delicious!).
What You'll Need
Scroll down to the recipe card below this post for ingredient quantities and full instructions.
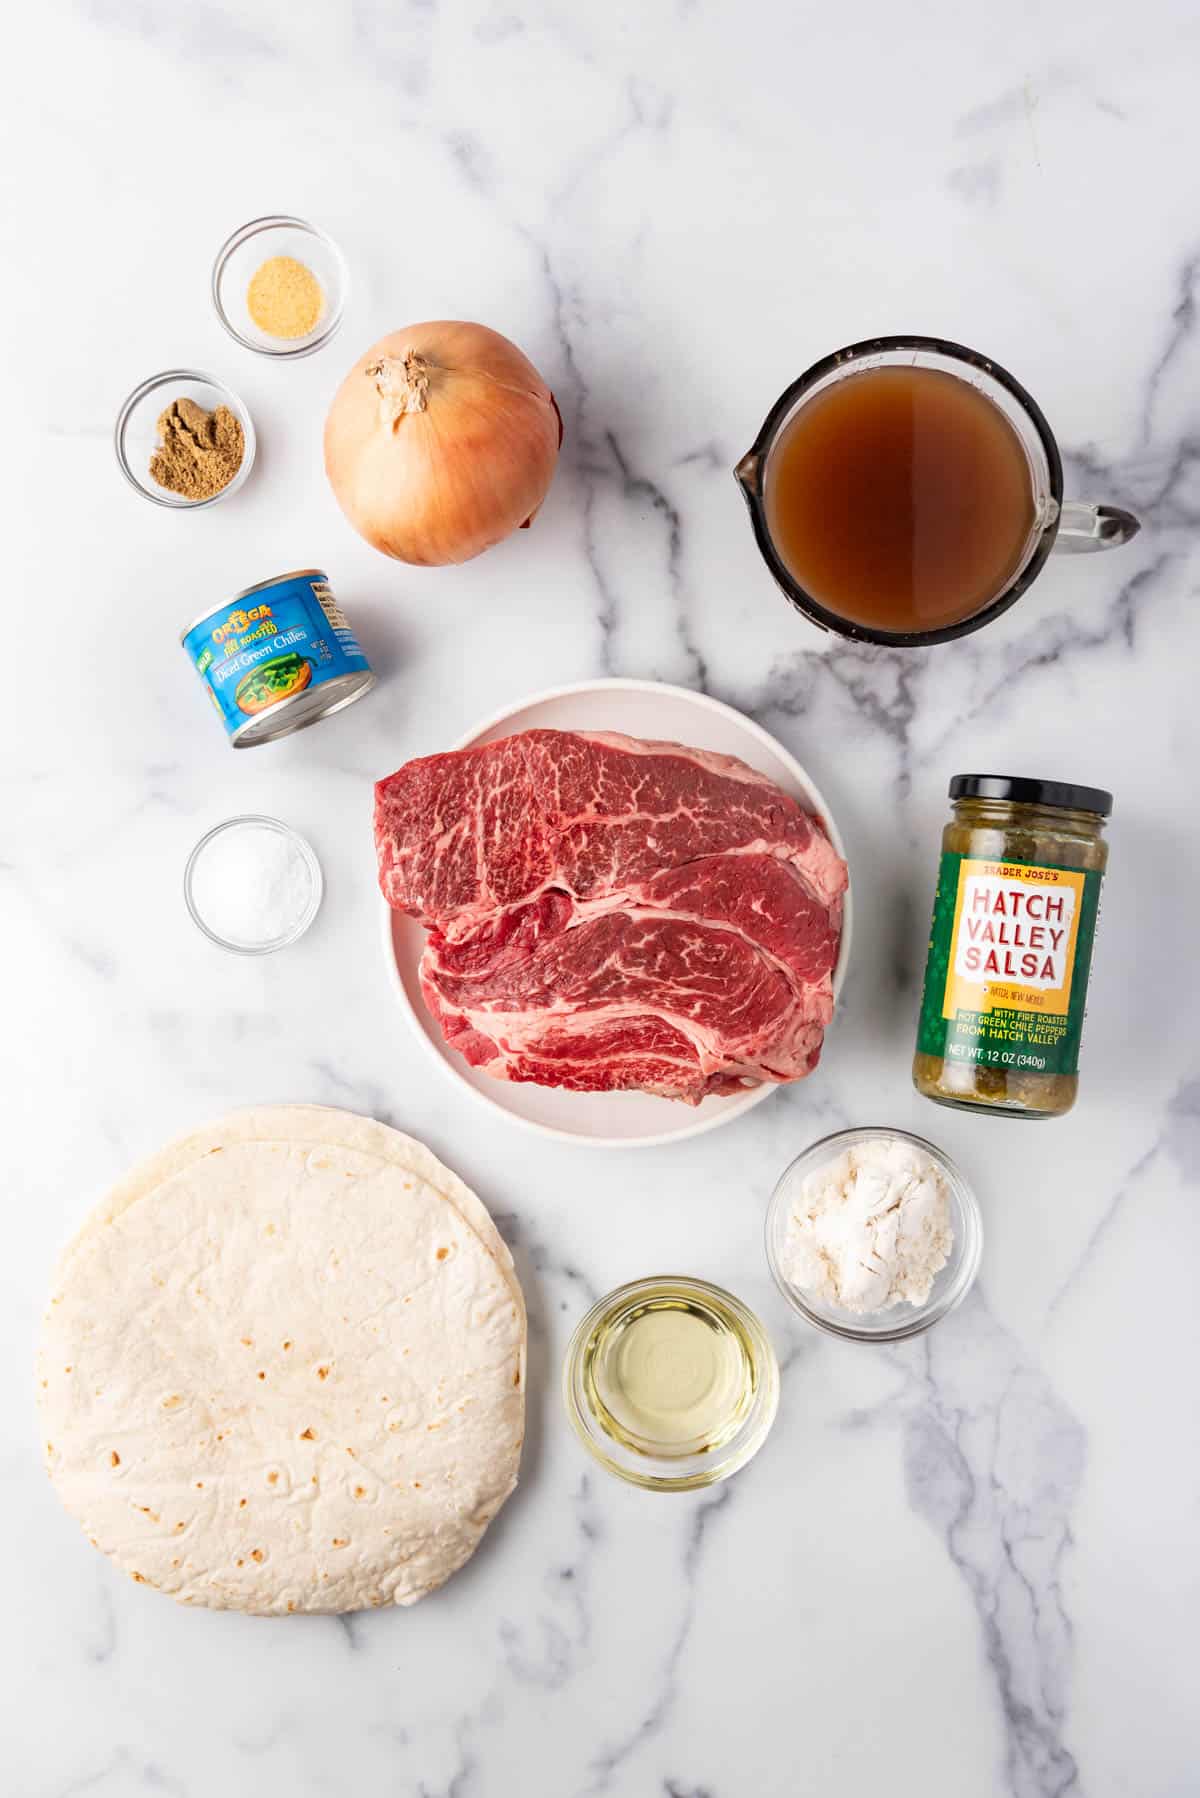
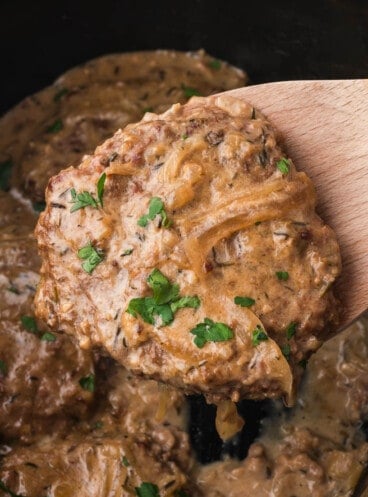
- Shredded Mexican Beef - Slow cooker shredded beef is tender, flavorful, and soaks up the spices and salsa beautifully.
- Vegetable Oil - Used for sautéing and frying, it helps cook the fillings and crisps up the tortillas to golden perfection.
- Large Yellow Onion - Adds a sweet, aromatic base to the filling, enhancing the overall flavor of the chimichangas.
- Green Chilies - Diced green chilies introduce a mild, tangy heat that’s essential for that signature Mexican zest.
- All-Purpose Flour - Helps thicken the beef filling, ensuring it's hearty and rich.
- Salt, Ground Cumin, and Garlic Powder - These spices are key for achieving the authentic Mexican flavor profile, each adding its unique touch.
- Green Chili Salsa or Salsa Verde - Injects a vibrant, tangy kick to the filling, meshing well with the spices and beef.
- Beef Broth - Adds moisture and depth to the filling, helping to bind all the flavors together.
- Flour Tortillas - The wrapping for all the delicious filling, flour tortillas are pliable and hold up well to frying, ensuring a perfect chimichanga every time.
How to Make Homemade Beef Chimichangas
- Make the shredded beef. If you haven't already cooked the chuck roast, it needs to be slow cooked first so it can be falling apart and shredded. I use this recipe for beef barbacoa which I use in lots of other Mexican dishes. Once the meat is done, shred it with two forks and set aside.
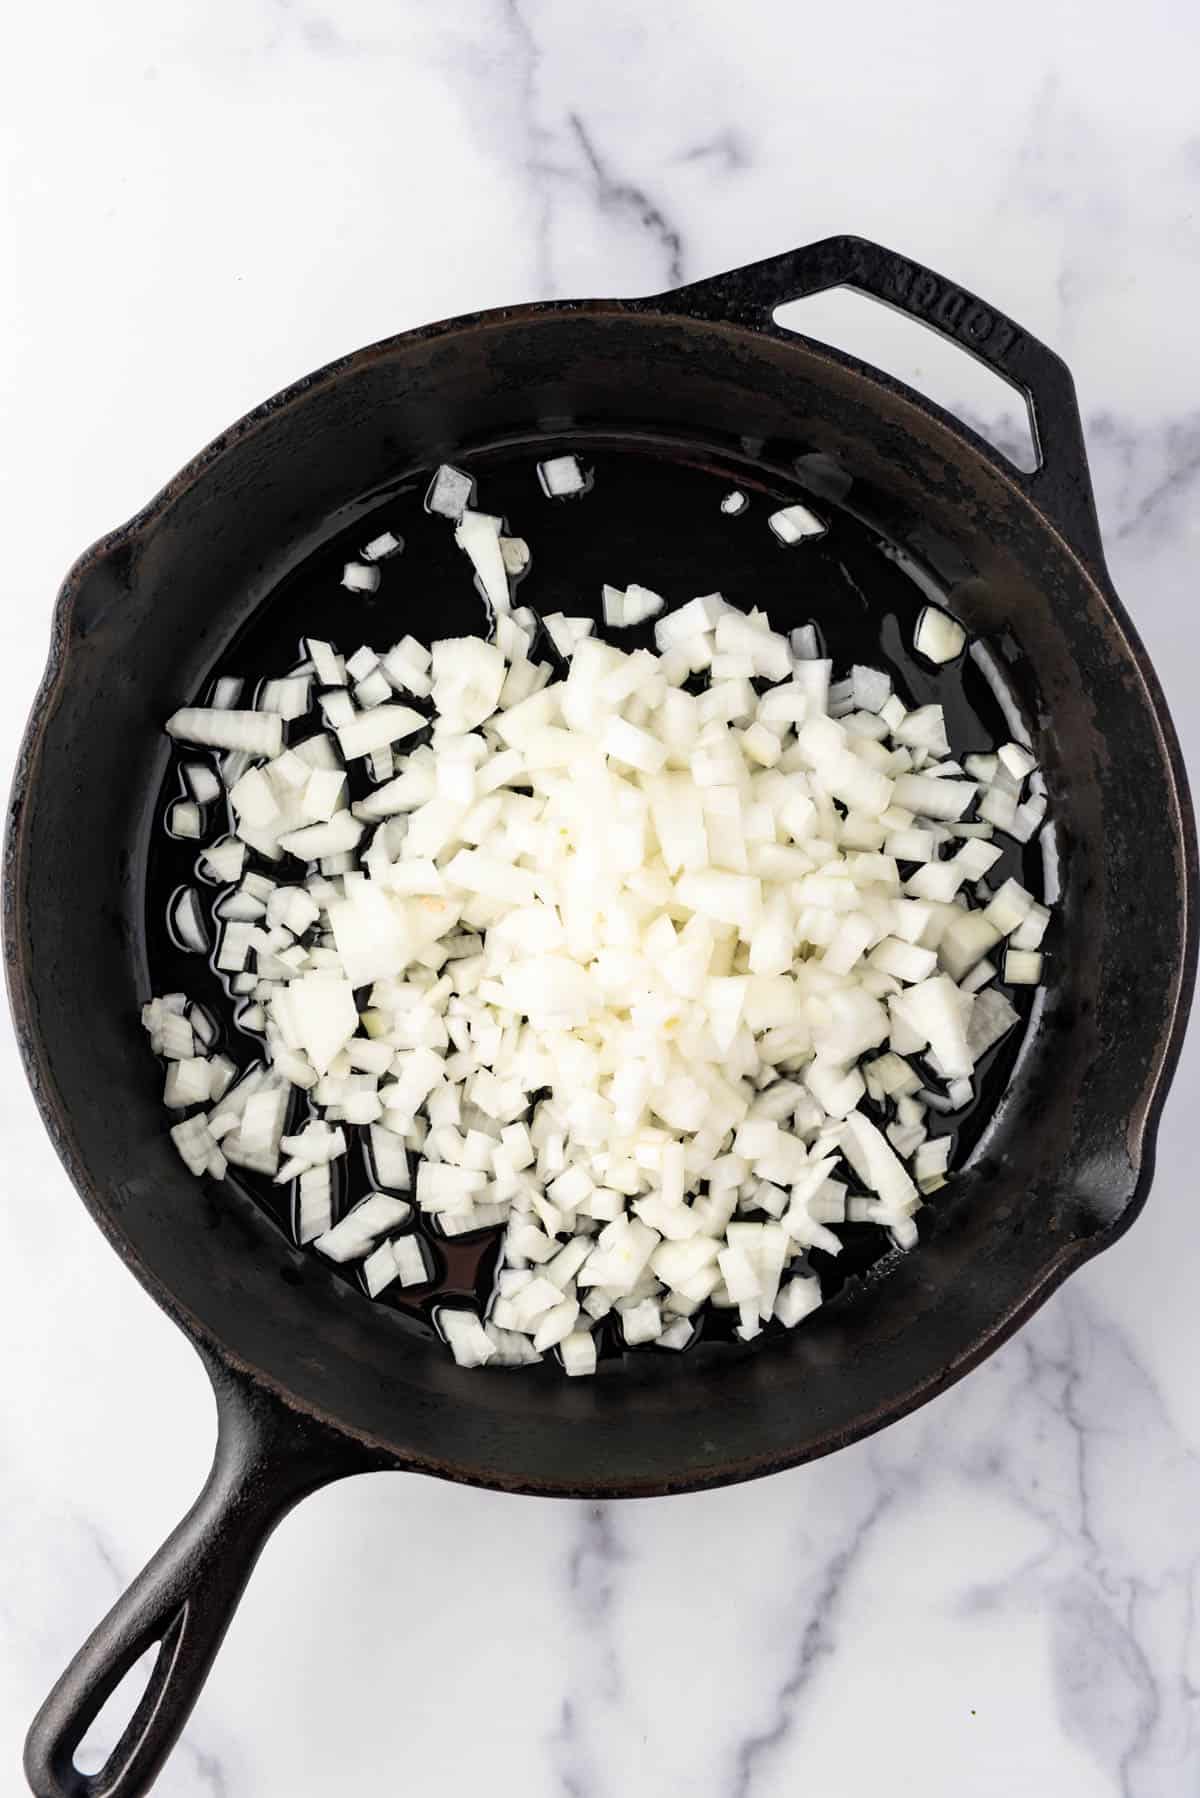
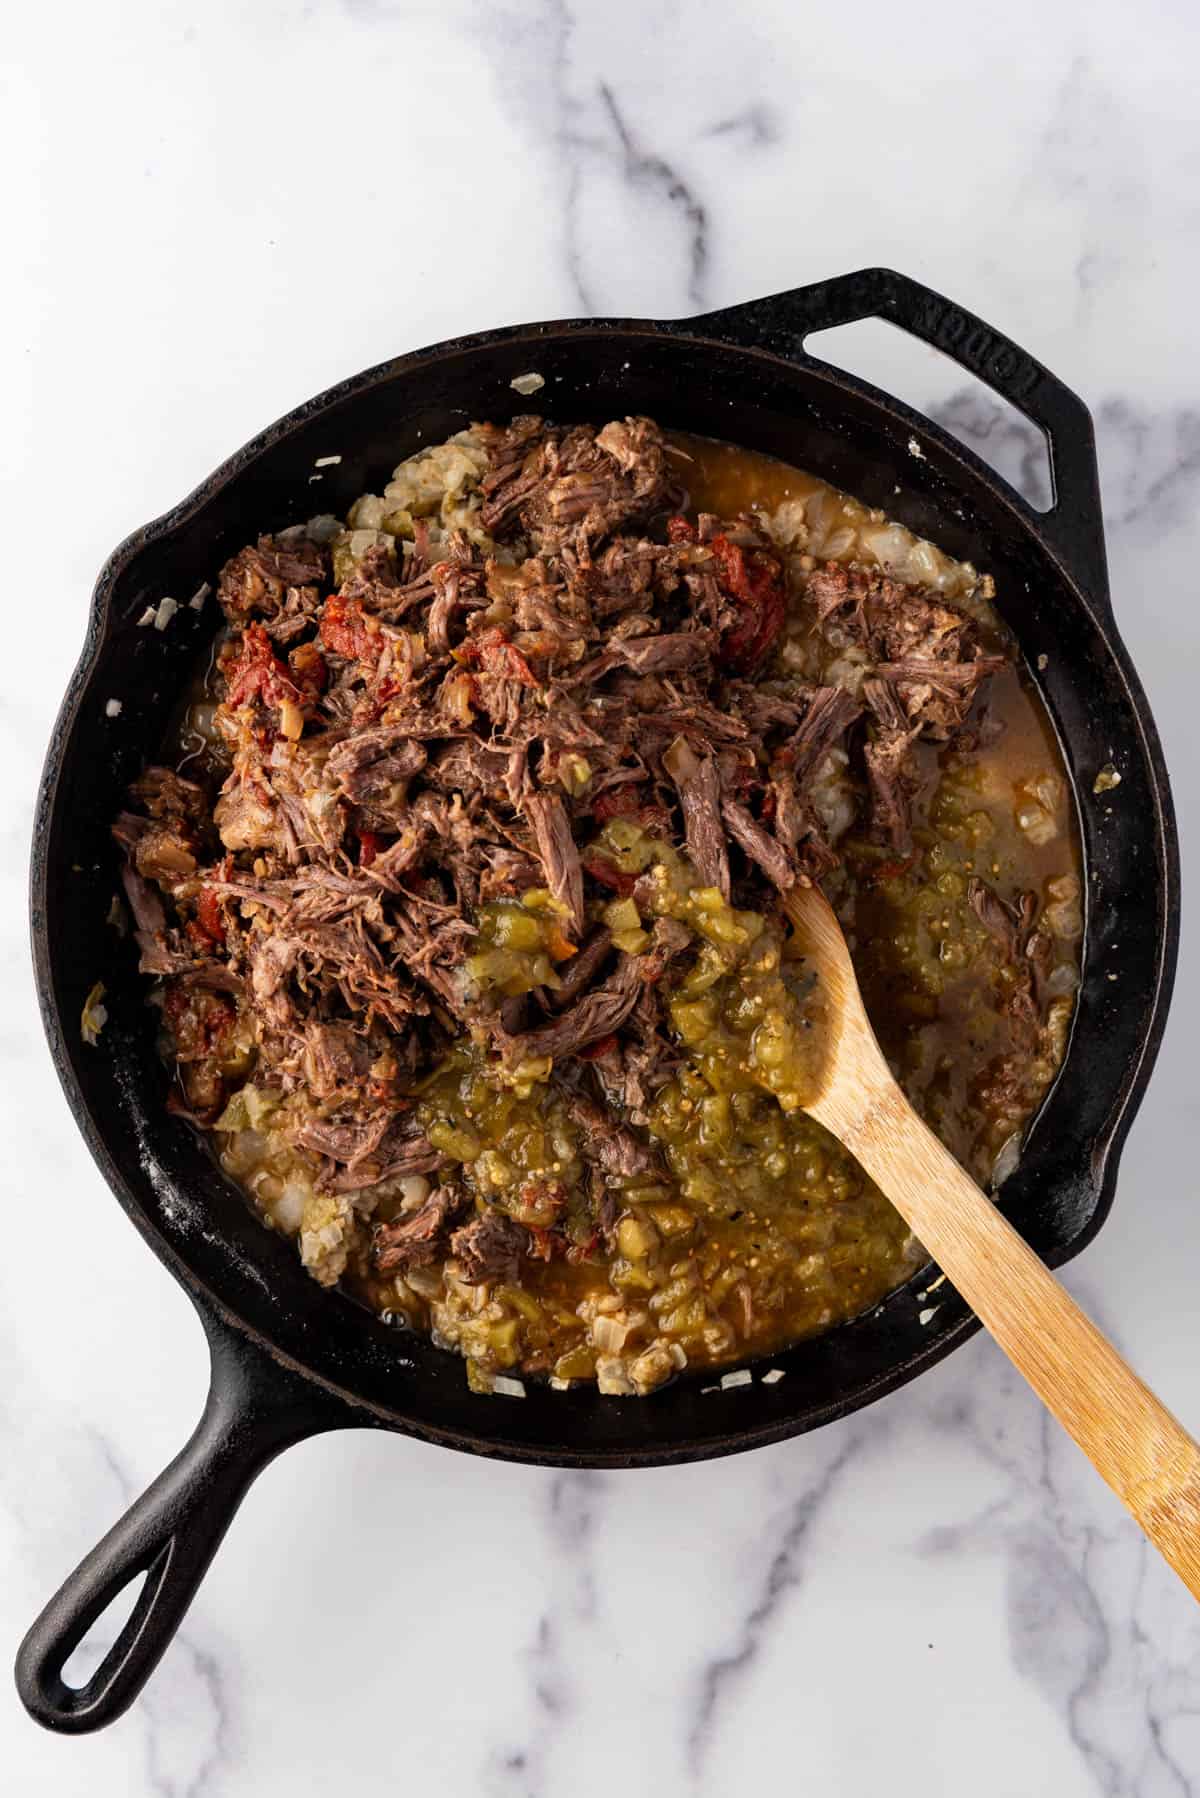
- Cook onions. Start by heating a little oil in a very large skillet or pot over medium-high heat. Add chopped onions to the hot oil and cook for 3-4 minutes until they begin to soften.
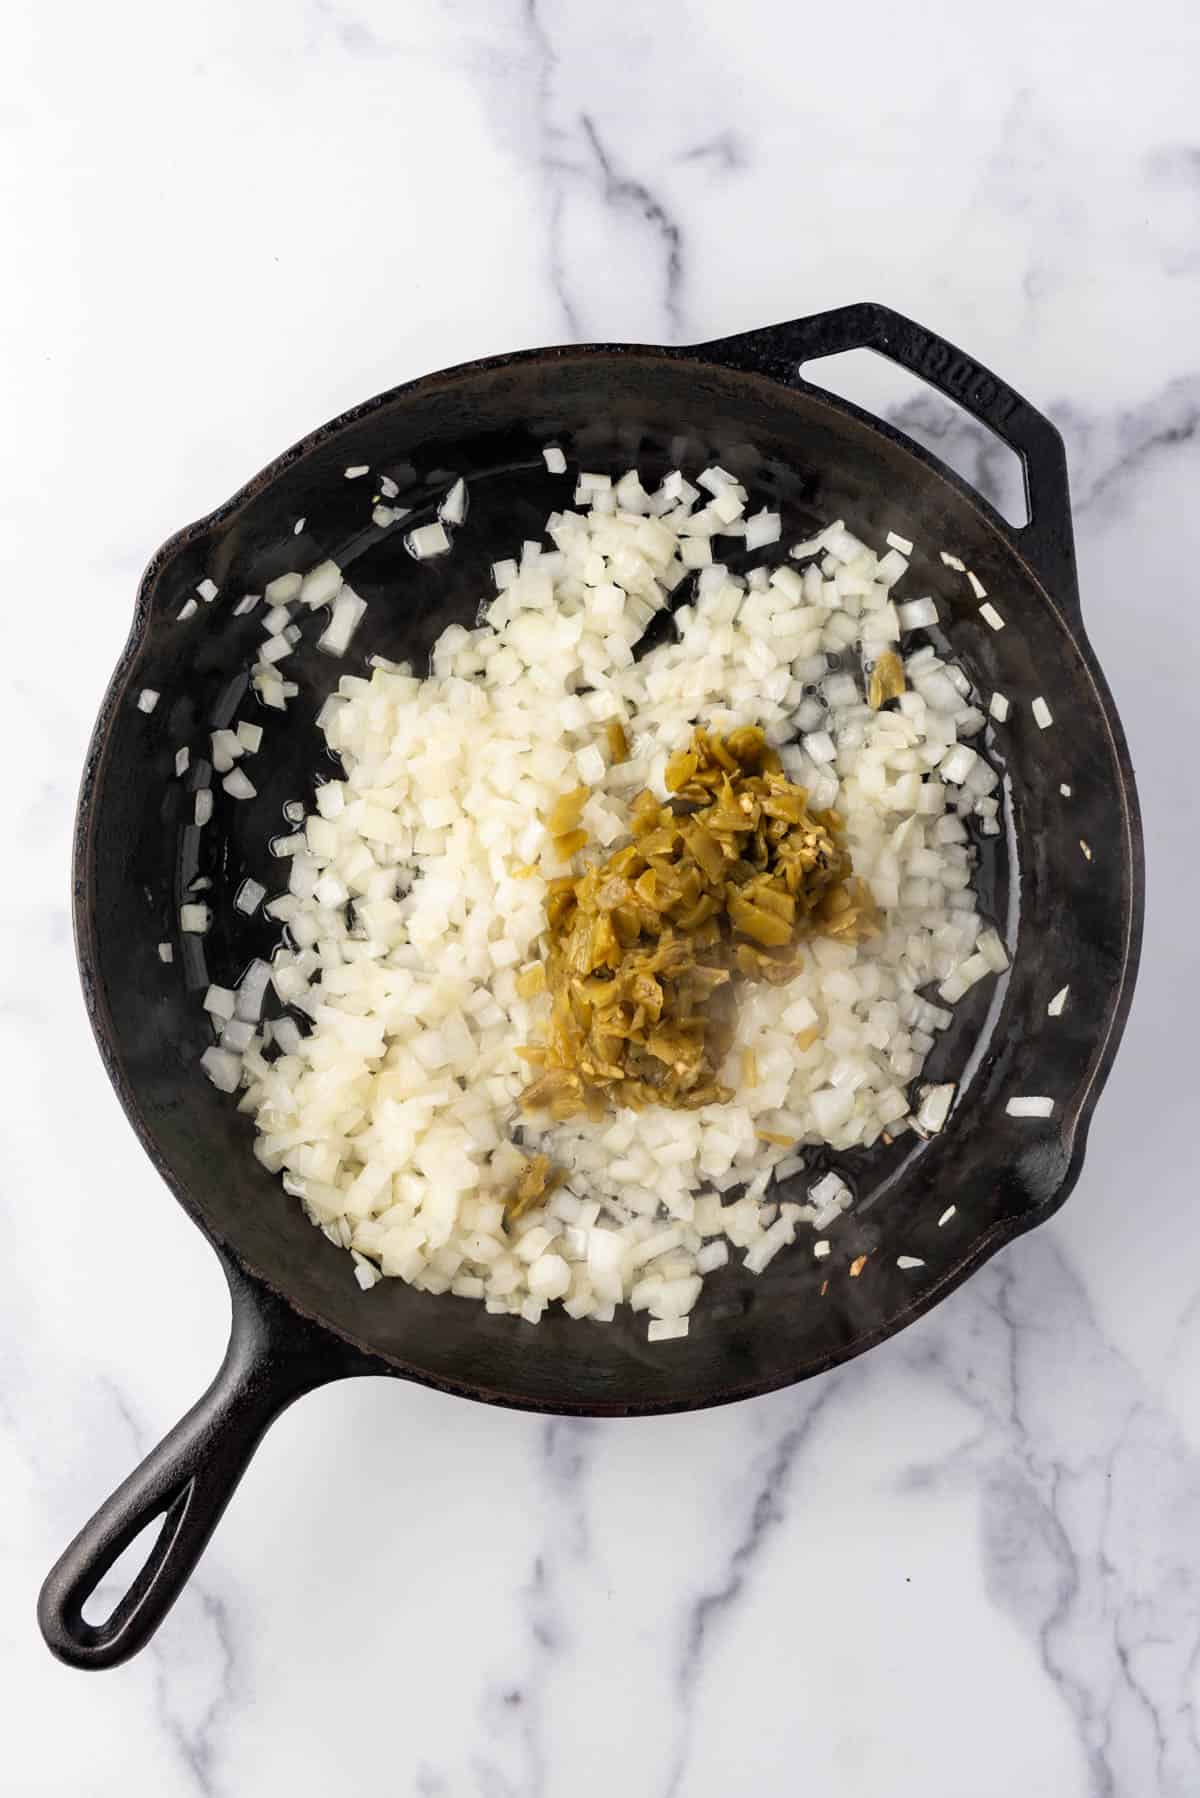
- Saute chilies. Then, add the diced green chilies and sauté for another minute. This base will give your chimichangas a rich, aromatic foundation.
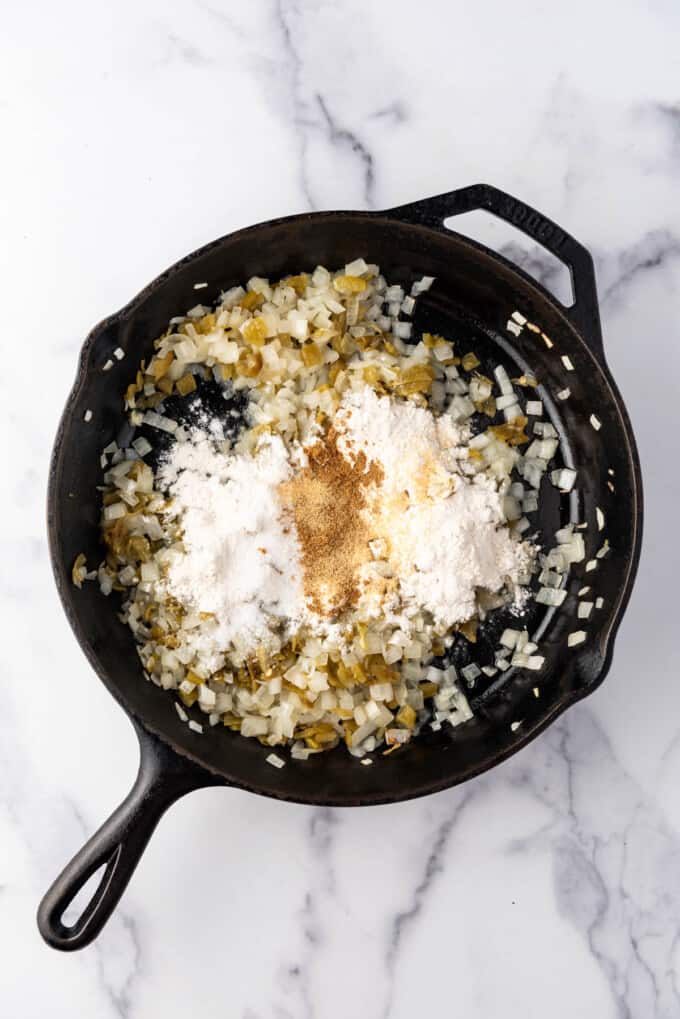
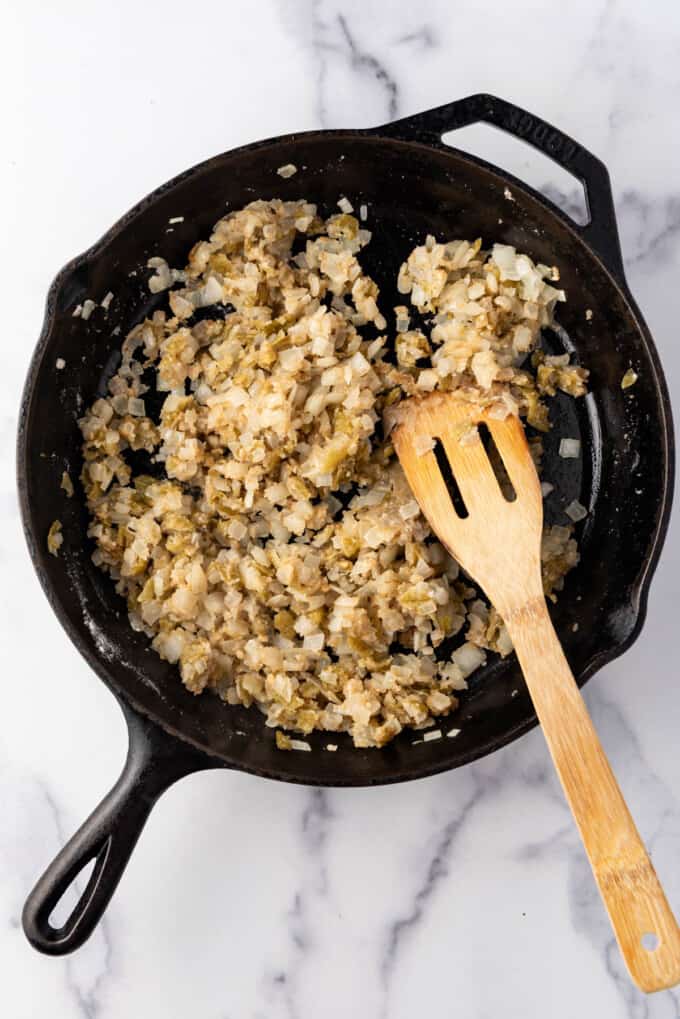
- Combine with dry ingredients. Next, sprinkle the flour, salt, cumin, and garlic powder over the onions and chilies. Cook for another minute, stirring constantly to combine everything and prevent any burning. This step will help thicken your filling and lock in all the delicious flavors.
- Add the beef. Add the shredded beef, green chili salsa, and beef broth to the skillet. Stir occasionally and let it cook for about 5 minutes. This allows the mixture to thicken slightly and the meat to fully absorb the flavorful salsa and broth. Taste and adjust the seasoning with salt if necessary. Once done, remove the skillet from heat.
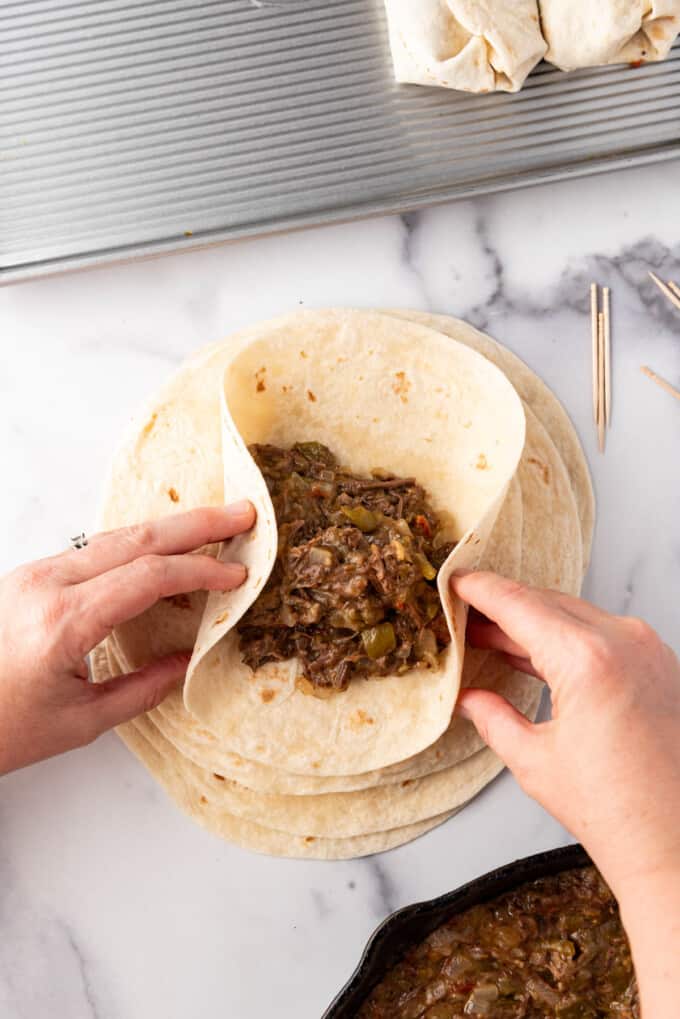
- Fill tortillas. Warm the flour tortillas in the microwave between two damp paper towels for one minute to make them pliable. Place about ¾ to 1 cup of the beef mixture on each tortilla, depending on the size of your tortillas. It’s important to fill them enough to be satisfying but not so much that you can’t close them securely.
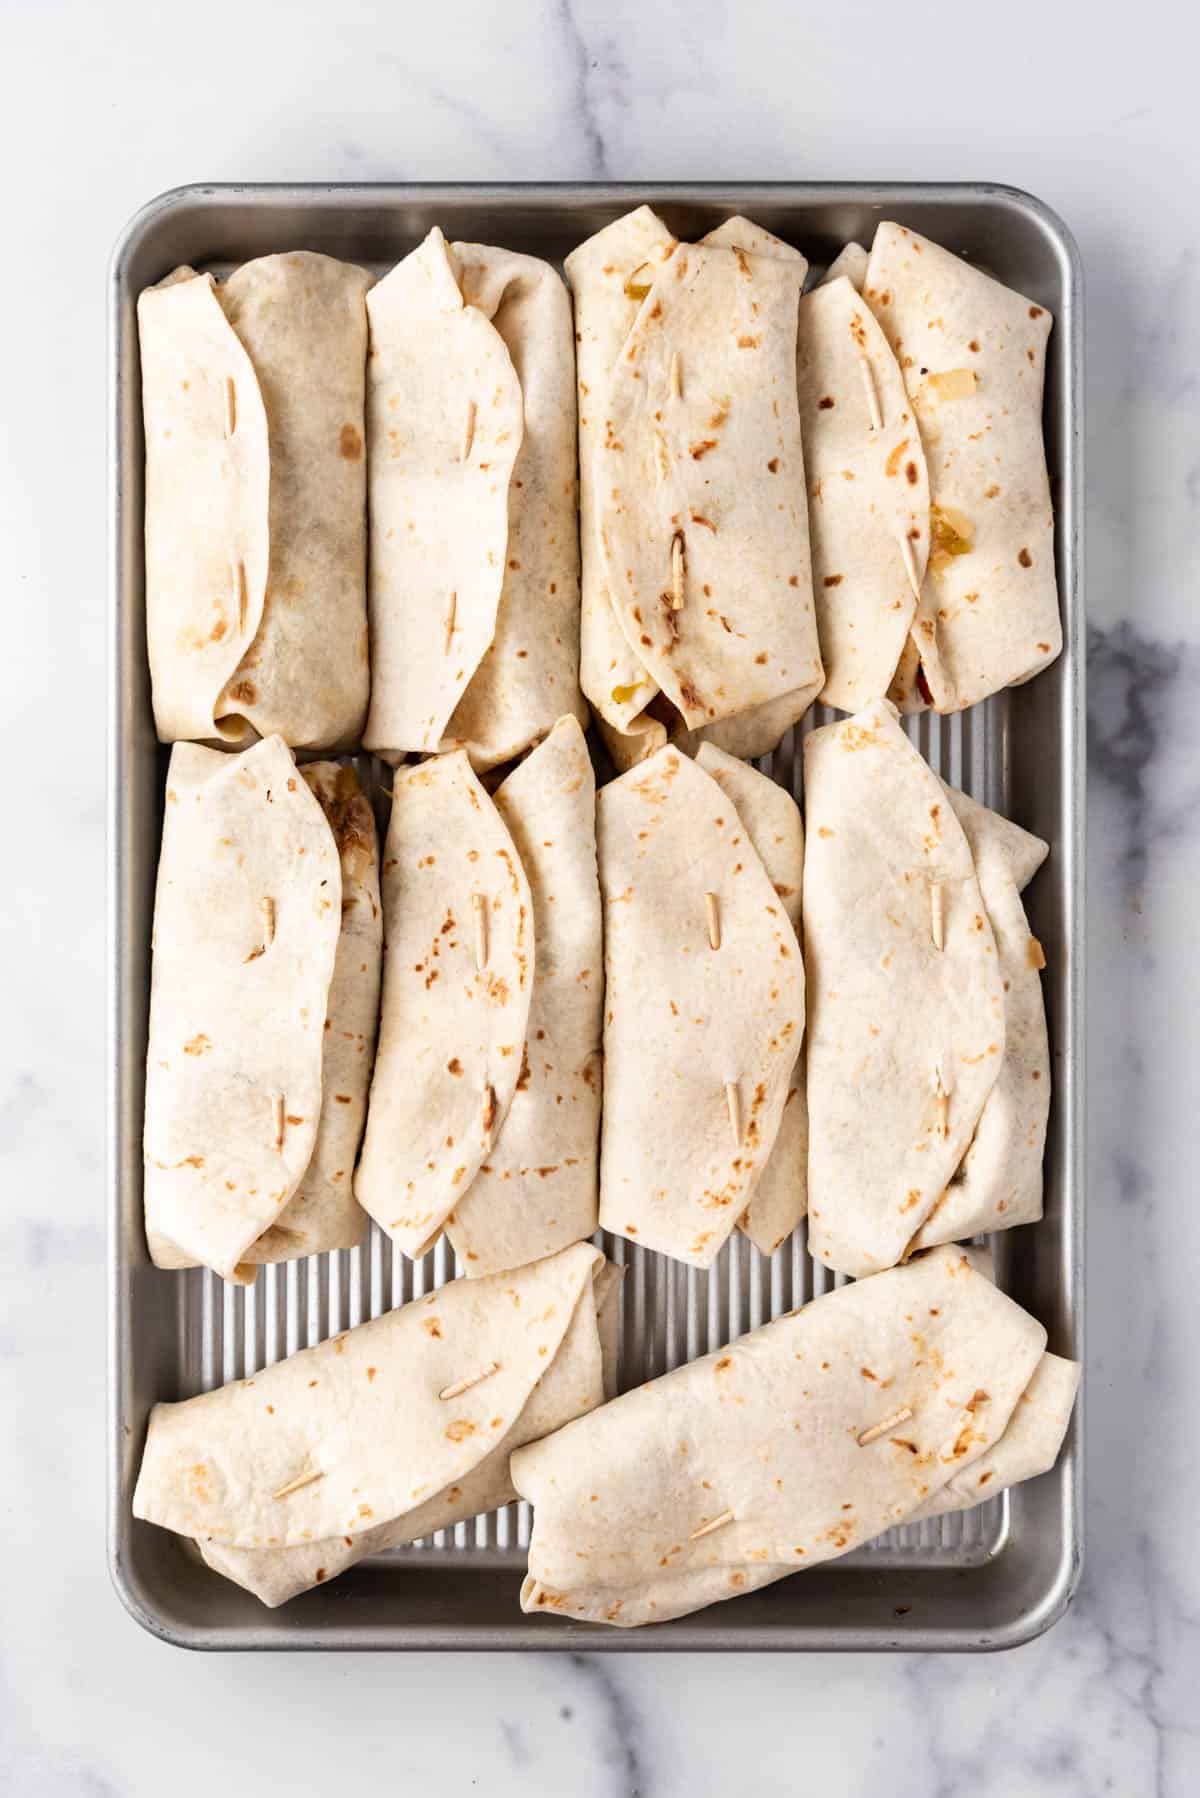
- Begin folding tortillas. Fold both sides of each tortilla toward the middle.

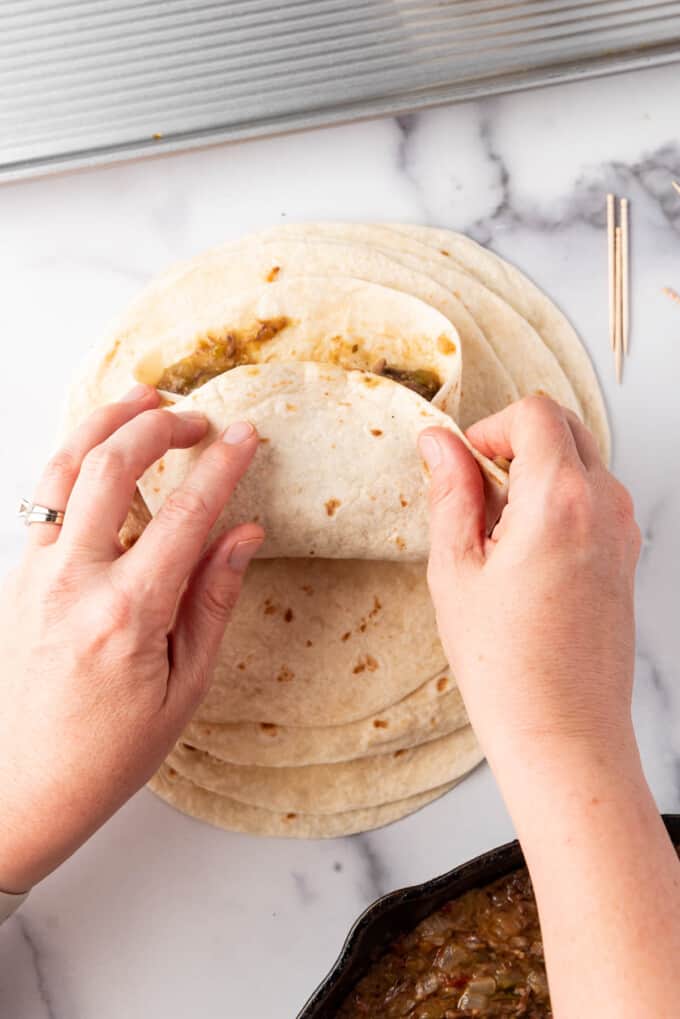
- Finish folding tortillas. Next, fold the bottom side over and roll them up tightly, ensuring the filling is completely enclosed.
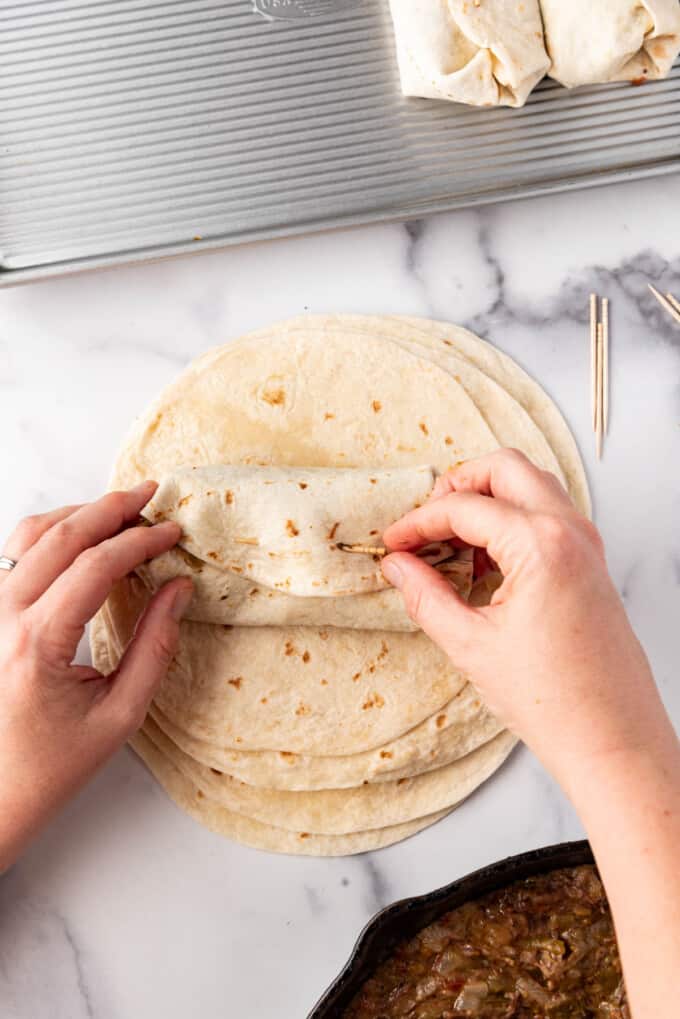
- Secure filled tortillas. Secure each chimichanga with a toothpick or two to hold everything together during frying.
- Make the others. Repeat with remaining tortillas and shredded beef.
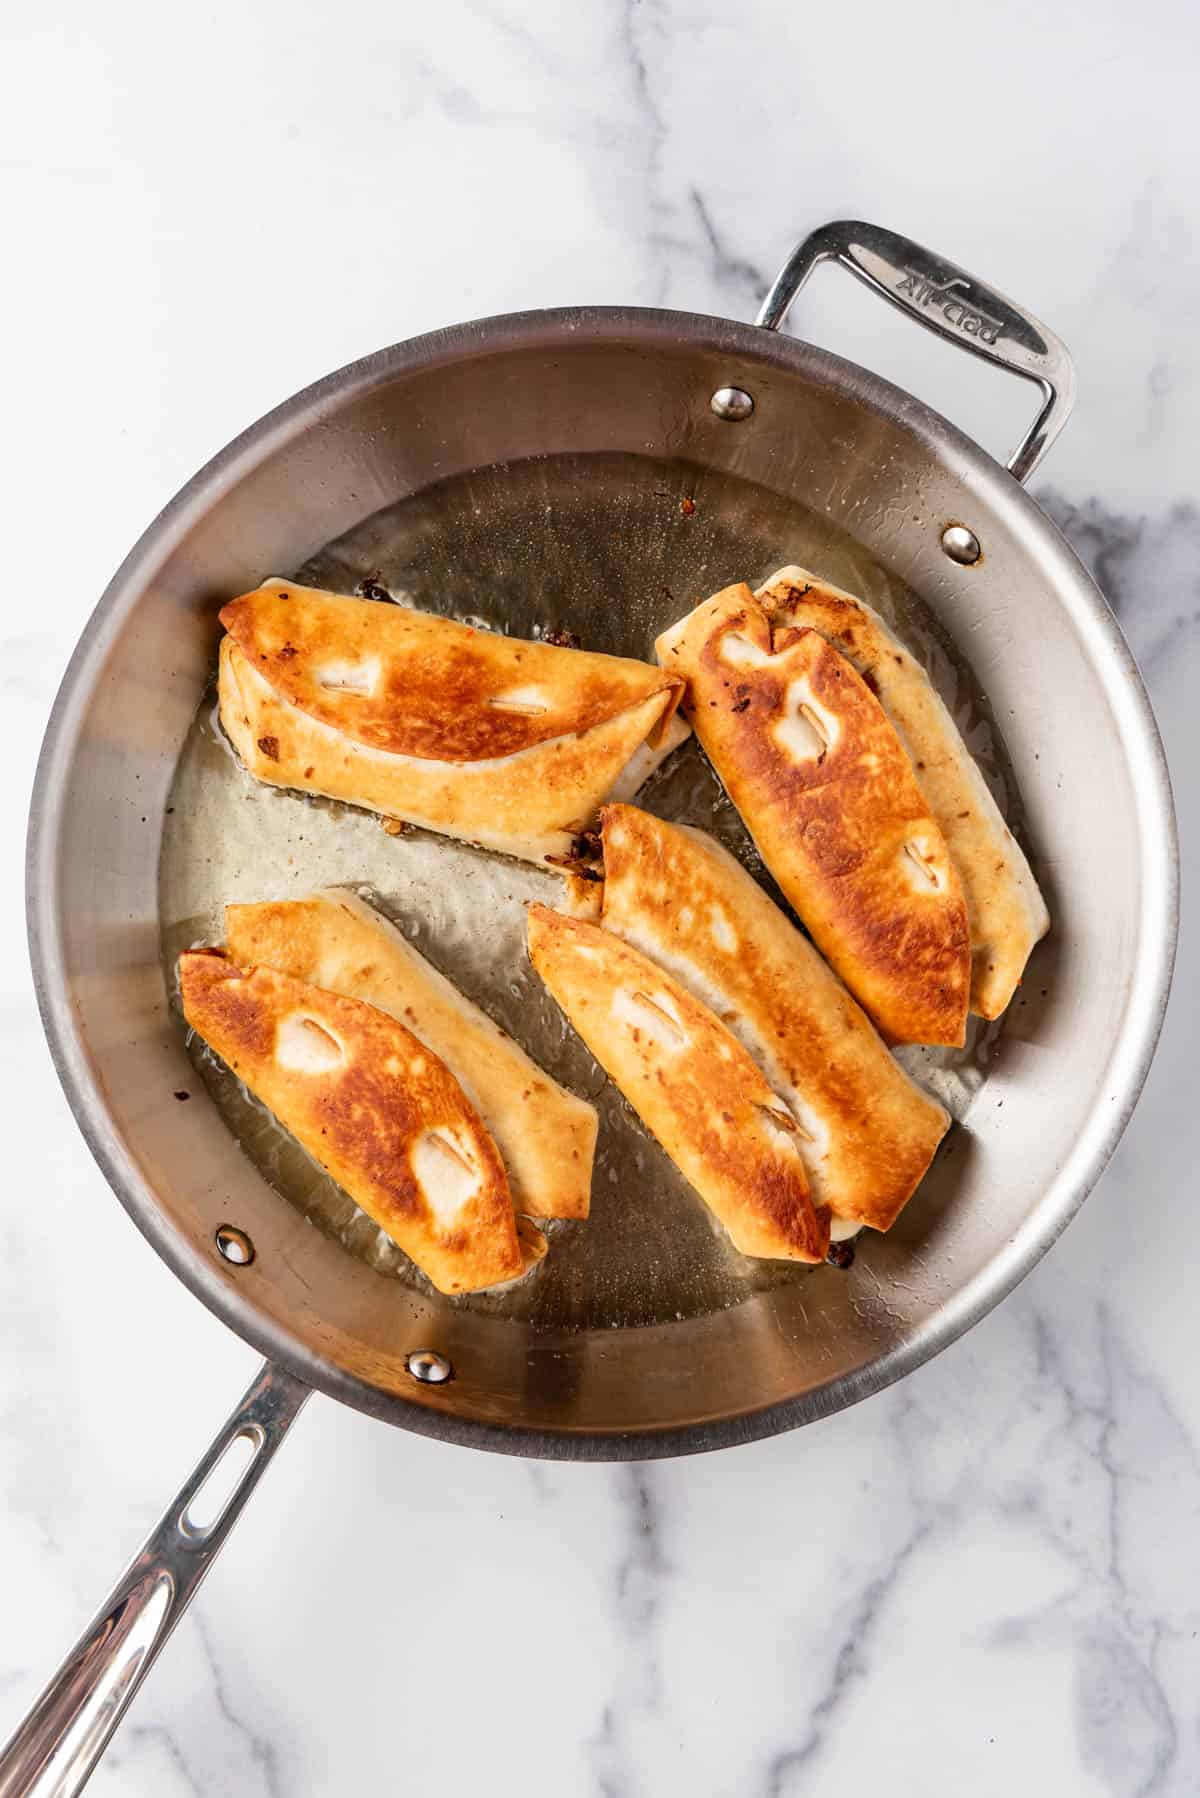
- Fry the filled chimichangas. Pour enough vegetable oil into a large frying pan to cover the bottom by about an inch and heat over medium-high heat until the oil shimmers (approximately 350°F if using a thermometer). Fry them in batches of 2-3, carefully placing the chimichangas into the hot oil seam side down. Always use tongs to handle the chimichangas to prevent burns.
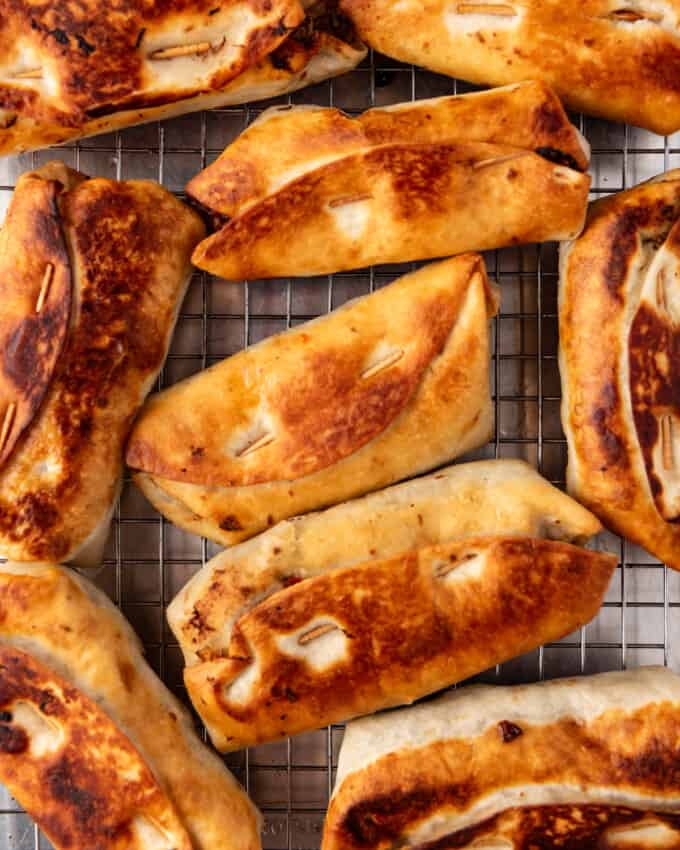
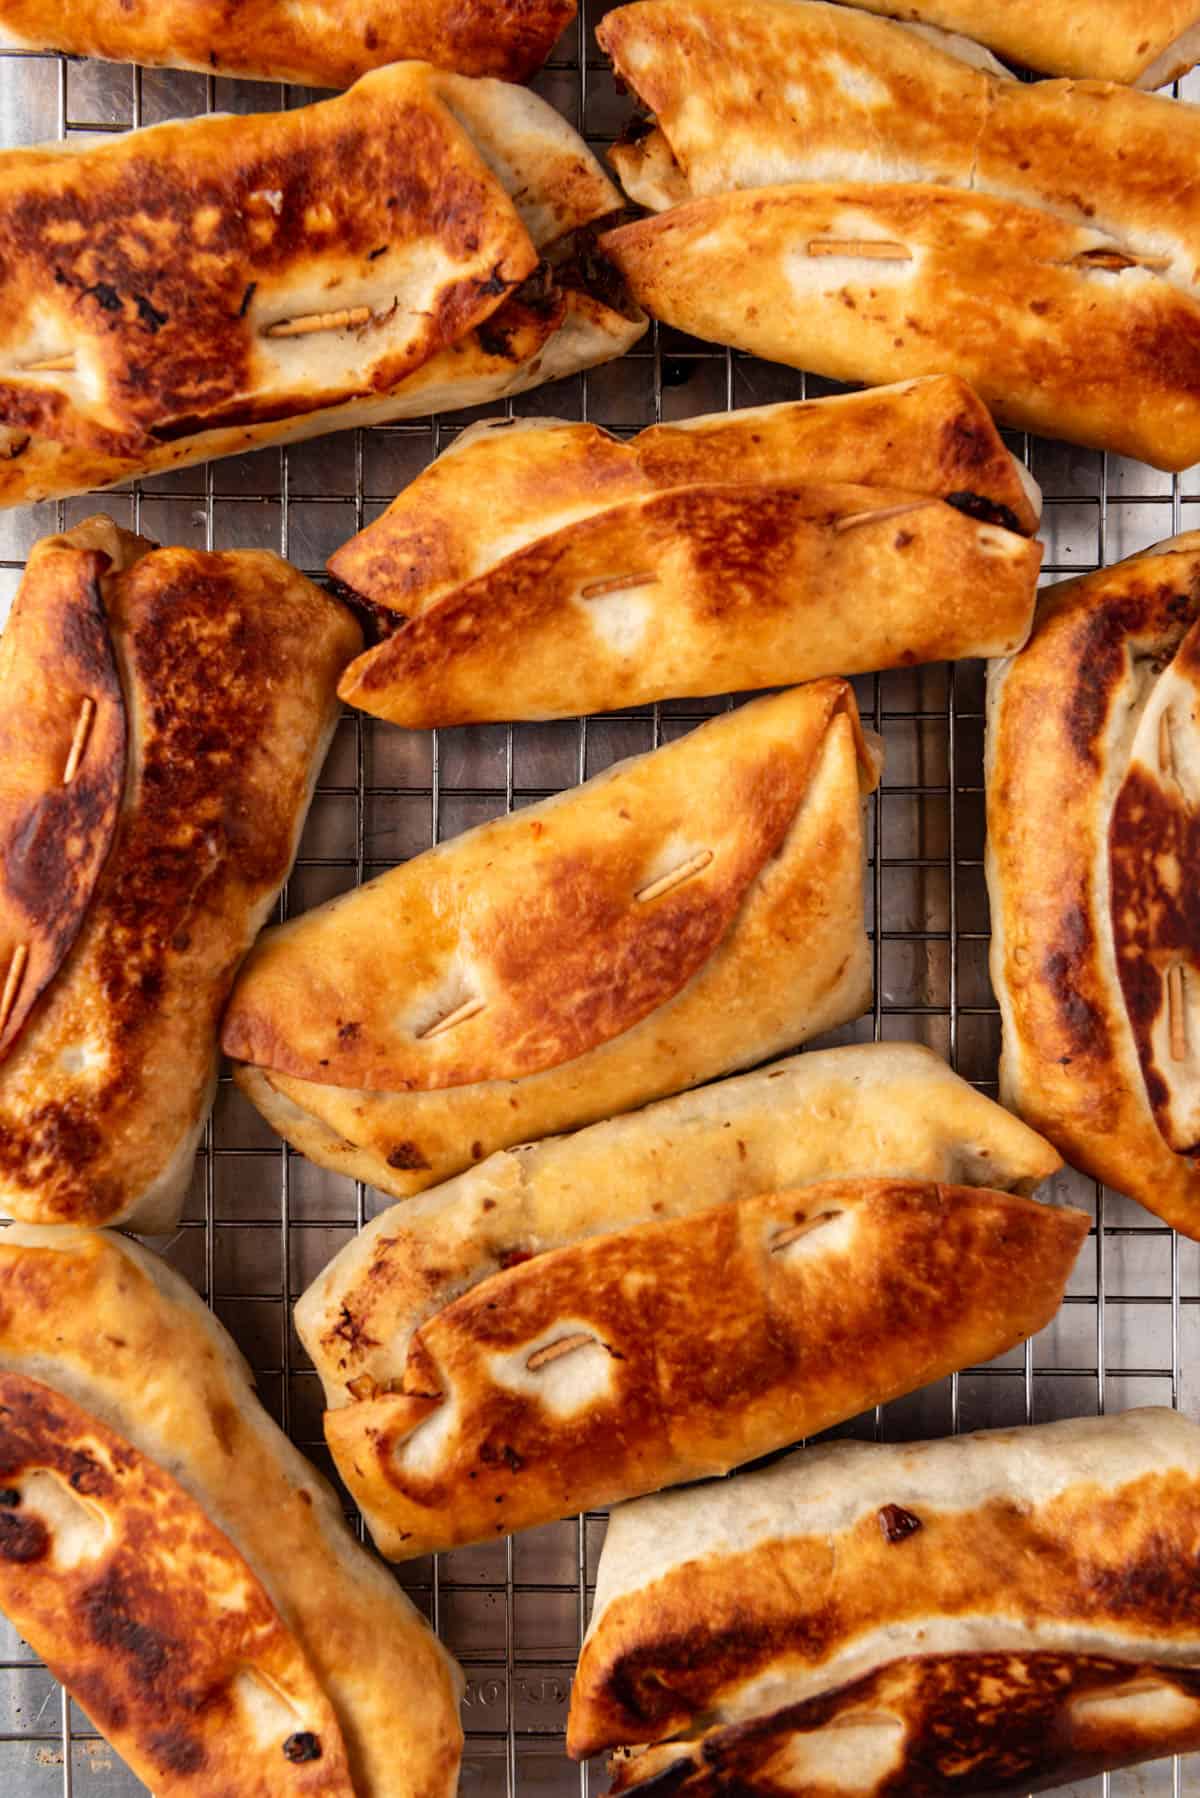
- Finish frying chimichangas. Cook, turning occasionally, until they are browned and crispy all over, which usually takes about 4-6 minutes.

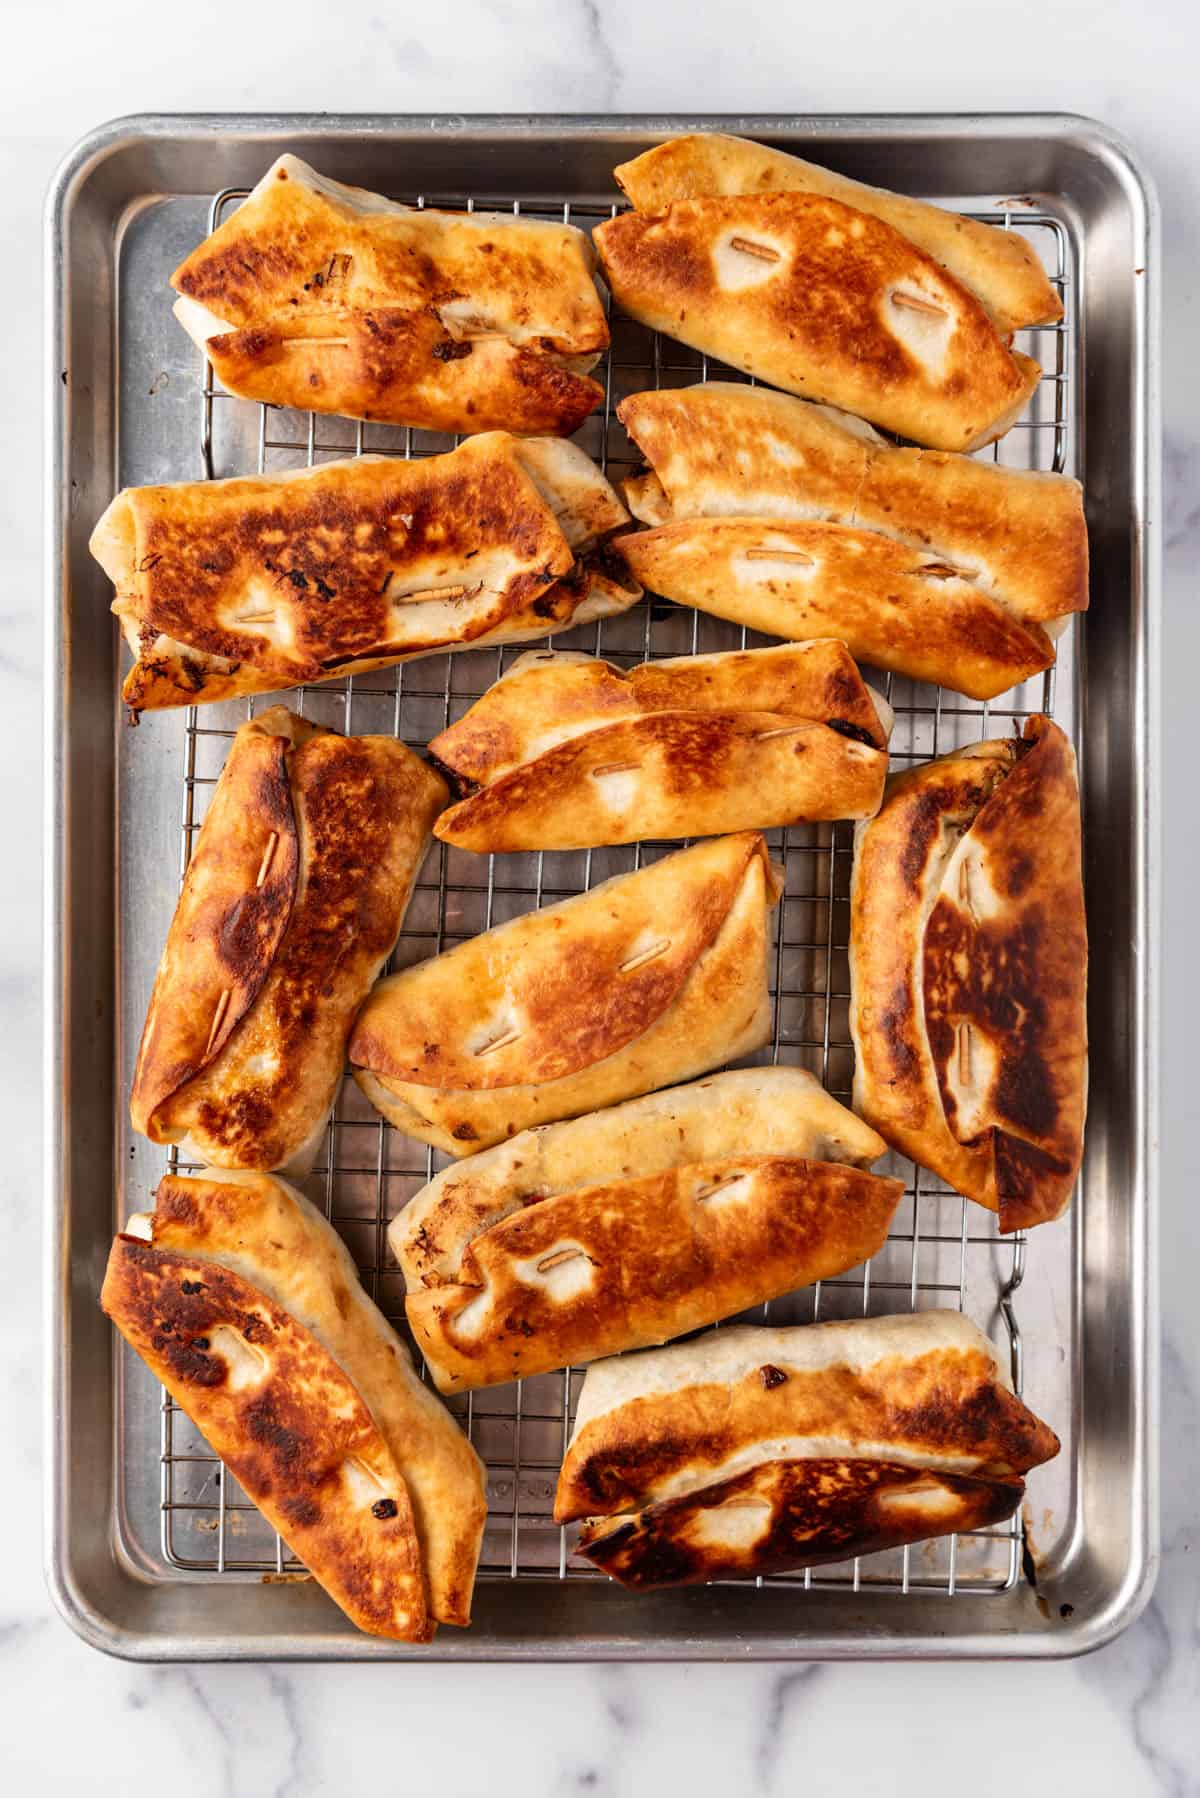
- Transfer to cooling rack. Once fried, remove the chimichangas from the oil and let them drain on a wire rack lined with paper towels. This step helps to remove any excess oil, keeping them crispy.
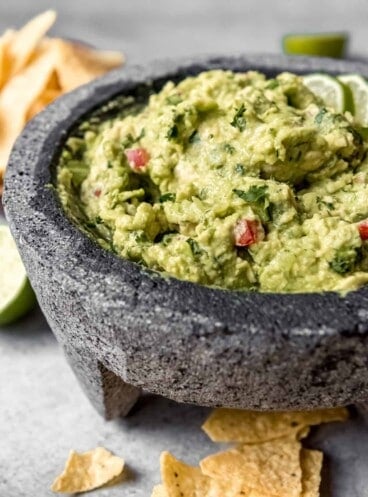
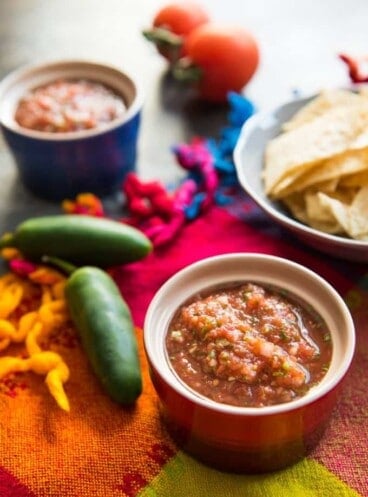
- Serve. Make sure to remove all toothpicks before serving on a platter or individual plates. I like to top mine with shredded lettuce, cheese, tomatoes, sour cream and guacamole, but you might also put out salsa or pico de gallo, or serve Colorado sauce or salsa verde with your shredded beef chimichangas. And to have a truly authentic Mexican restaurant experience, you could serve Spanish rice and refried beans on the side!
Recipe FAQ's
For chimichangas, chuck roast is ideal because it shreds beautifully after slow cooking, which is perfect for the filling.
Yes, air fryer chimichangas are a healthier option because they aren't "fried" in oil. Simply prepare them as usual, then arrange them in the air fryer so there is space between each chimichanga for air to circulate (you will have to air fry them in batches). Spray the tops of each chimichanga with cooking spray, then cook in the air fryer at 400°F for about 8 minutes, turning halfway through to spray the other side with cooking spray and cook them until golden and crispy.
Absolutely! Prepare the chimichangas up to the frying stage, then store them in the refrigerator for a day or freeze for longer storage. Fry or bake when ready to serve for best results so the tortilla is crisp. If frying, you might want to microwave the chimichanga for a minute or two first to warm up the inside filling since frying cold chimichangas doesn't always heat them all the way through. If baking or air frying to reheat, you are probably fine doing it straight from the fridge.
Securing them with toothpicks and frying seam-side down first helps hold them together. Make sure the oil is hot enough so they start to crisp up immediately, which helps seal the seams.
Allow them to cool to room temperature and place chimichangas in an airtight container to store them in the refrigerator for up to three days. When ready to eat, place the chimichangas on a baking sheet in a preheated oven at 350°F for about 15-20 minutes, or until thoroughly heated through and crispy on the outside.
For longer storage, wrap each chimichanga individually in plastic wrap and then place them in a freezer bag. They can be frozen for up to three months. When you're ready to enjoy one, there's no need to thaw; you can reheat them directly from frozen as described above, adding 15 minutes to the cooking time.
Tips for Success
- Get my recipe for Slow Cooker Mexican Shredded Beef here! This recipe makes a lot of meat for chimichangas, so if you don't want to make them all at once, you can freeze part of it for up to two months, then defrost and reheat to make more chimichangas another day.
- Don’t forget to taste the meat mixture before assembling the chimichangas. Adjusting the seasoning before wrapping ensures the final product is flavorful.
- Using tortillas that are too small can make wrapping difficult. Regular-size tortillas are usually the best choice for a good balance between filling and tortilla. The larger burrito-size tortillas make for easier wrapping, but then you end up with a lot more tortilla to meat ratio.
- Heating the tortillas makes them more pliable and less likely to crack when you roll them. Use damp paper towels wrapped around a stack of tortillas in the microwave for 60-90 seconds for best results.
- While it’s tempting to load up the tortillas, overfilling can cause breakages and make them difficult to fry. Stick to the recommended amount of filling.
- Make sure the toothpicks are placed effectively to keep the filling inside during frying. This prevents the filling from leaking out and the tortilla from unfolding.
- Start frying with the seam side down to help seal it with the heat, which keeps the chimichanga together better.
- If you want to bake your chimichangas instead of frying them, try setting the rolled-up chimichangas seam side down on a baking sheet and spraying the tops of each with cooking spray or brushing them with a little melted butter, then bake for 10-15 minutes in a 350°F oven until they turn a crispy golden brown on top.
Achieving the Perfect Crisp
Maintaining the oil at the right temperature (around 350°F) is crucial for making crispy tortillas for the best beef chimichangas.
If the oil is too hot, the chimichangas will burn on the outside before heating through. If it’s too cool, they’ll absorb too much oil and become greasy.
Fry in batches if necessary as overcrowding can lower the oil temperature and lead to soggy chimichangas.
Substitutions and Variations
- If beef isn't your preference, try shredded chicken, or pork. Each option offers a unique flavor and can be prepared similarly to the beef.
- The spice level can easily be adjusted by using a hot green chili salsa instead of mild, by increasing or decreasing the amount of chili powder, or by adding fresh jalapeños or other hot peppers to the filling for those who like it extra spicy.
- Experiment with different types of cheese for a new flavor. While cheddar is common, trying Monterey Jack, Pepper Jack, or even a Mexican cheese blend can add a different dimension to your chimichangas.
- Change up the toppings and sides based on what’s available or preferred. Instead of traditional salsa or pico de gallo, try mango salsa for a sweet twist, or add a dollop of Greek yogurt instead of sour cream for a tangier flavor.
- If you don’t have green chili salsa, any type of chunky salsa will work, although it will alter the flavor profile slightly.
- For those who need a gluten-free option, swap the flour tortillas for gluten-free tortillas and use a gluten-free flour blend to thicken the filling.

More Mexican Food Recipes You'll Love
- Green Chili Chicken Chimichangas
- Tex-Mex Doritos Taco Salad
- Blackened Salmon Tacos
- Vegetarian Swiss Chard and Pinto Bean Burritos
- Authentic Carne Asada Recipe
- Grilled Mexican Street Corn Recipe
- Whole Roasted Mexican Chicken with Vegetables
- Grilled Pork Tacos al Pastor

Did you make this recipe?
Let me know what you thought with a comment and rating below. You can also take a picture and tag me on Instagram @houseofnasheats or share it on the Pinterest pin so I can see.

Shredded Beef Chimichangas
Ingredients
Chimichangas
- 1 batch [Slow Cooker Shredded Mexican Beef]
- 2 tablespoons vegetable oil
- 1 large yellow onion, chopped
- 4 ounces diced green chilies
- 4 tablespoons all-purpose flour
- 1 teaspoon table salt
- 1 teaspoon ground cumin
- ¼ teaspoon garlic powder
- 1 cup green chili salsa or salsa verde
- ¾ cup beef broth
- 8 regular size flour tortillas
Supplies
- Vegetable oil, for frying
- Toothpicks
- Tongs
Toppings
- Sour cream, guacamole, shredded cheese, diced tomatoes, shredded lettuce, and salsa or pico de gallo for topping
Instructions
- Heat oil in a very large skillet or pot over medium-high heat.
- Add the onions to the hot oil and cook for 3-4 minutes, just so they begin to soften. Add the diced green chilies and saute for another minute.
- Sprinkle the flour, salt, cumin and garlic powder over the onions and chilies and cook for another minute, stirring to combine and prevent burning.
- Add the shredded meat, green chili salsa, and beef broth. Cook, stirring occasionally, for about 5 minutes, giving the mixture time to thicken a bit and for the meat to absorb some of the salsa and broth. Taste and adjust salt, if necessary. Remove from heat.
- Warm the tortillas in the microwave between two damp paper towels for one minute so they are pliable and easy to work with.
- Working with one tortilla at a time, fill with a good amount of the chimichanga shredded beef. The exact amount will depend on the size of tortillas you have but you want to be able to wrap the tortilla around the meat to create a tight burrito-like packet. When I use regular size tortillas, anywhere from ¾ to 1 cup of the shredded beef mixture is about right.
- Fold both sides of the tortilla in towards the middle, then fold the bottom side over and roll the chimichanga up, creating a tight burrito-like packet with all of the meat securely enclosed inside the tortilla. Secure with a toothpick or two to create each chimichanga and hold it together. Repeat with remaining tortillas and shredded beef.
- When ready to begin frying, pour enough oil into a large skillet to cover the bottom of the pan by about an inch. Heat over medium-high heat until oil begins to shimmer (about 350 degrees if you have a thermometer to set in the oil). Working in batches of 2-3 chimichangas at a time, carefully place each chimichanga into the hot oil, seam side down, using the tongs and cook, turning occasionally to brown and crisp the chimichanga on all sides, about 4-6 minutes, total.
- Remove each chimichanga from the hot oil and transfer to a wire rack lined with paper towels, allowing any excess oil to drip off before transferring to a serving platter or individual plates. Repeat with remaining chimichangas, replacing the oil in the pan and bringing it up to temperature if needed, until all chimichangas have been fried.
- Remove all toothpicks and serve with sour cream, guacamole, shredded cheese, tomatoes, lettuce and salsa or pico de gallo.
Notes
- Store: Store cooled chimichangas in an airtight container in the refrigerator for up to three days. To reheat, place the chimichangas on a baking sheet in a preheated oven at 350°F for 15-20 minutes, or until thoroughly heated through and crispy on the outside.
- Freeze: Wrap chimichangas individually in plastic wrap and place in a freezer bag in the freezer where they can be frozen for up to three months. Reheat directly from frozen as described above, adding 15 minutes to the cooking time.
Nutrition
Originally published April 2017. Updated in April 2024 with new images and more helpful content, although the recipe is the same.

I have never attempted a chimichanga at home! What was I thinking? 😉 I love that you also give a baking option!
These chimichangas look amazing!! I love how easy it is!
I love chimichangas, the crispy outside holds the soft spicy beef and with the freshness of the salad, it goes just perfectly
That sounds like one great Mexican meal!
These chimichangas are so easy to make. I will have to try this for my family. Love it.
This is the best shredded beef for any mexican dish. Just enough spice to please the more delicate palates and a great start for those who like it hotter. You can always add hot sauce it you like it hotter. Great!!