
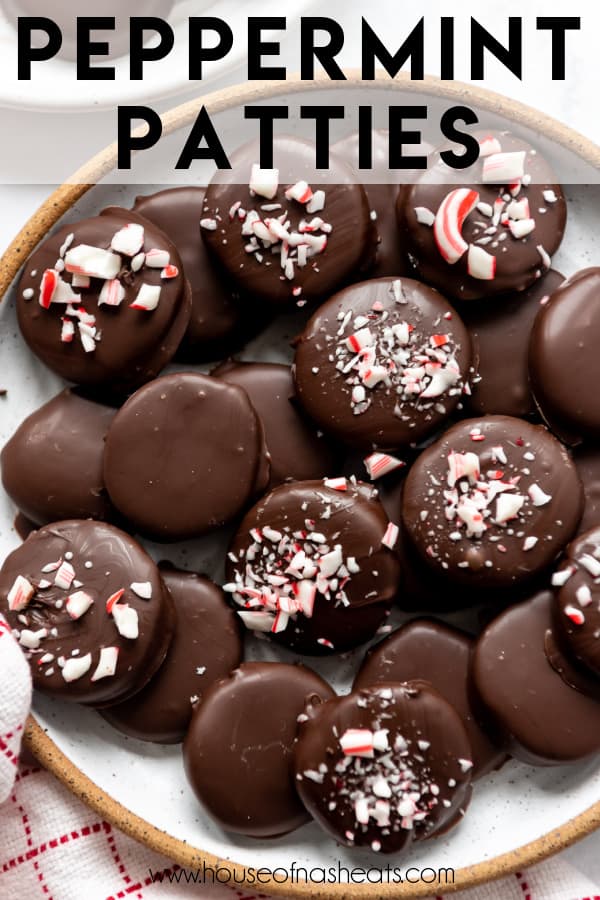
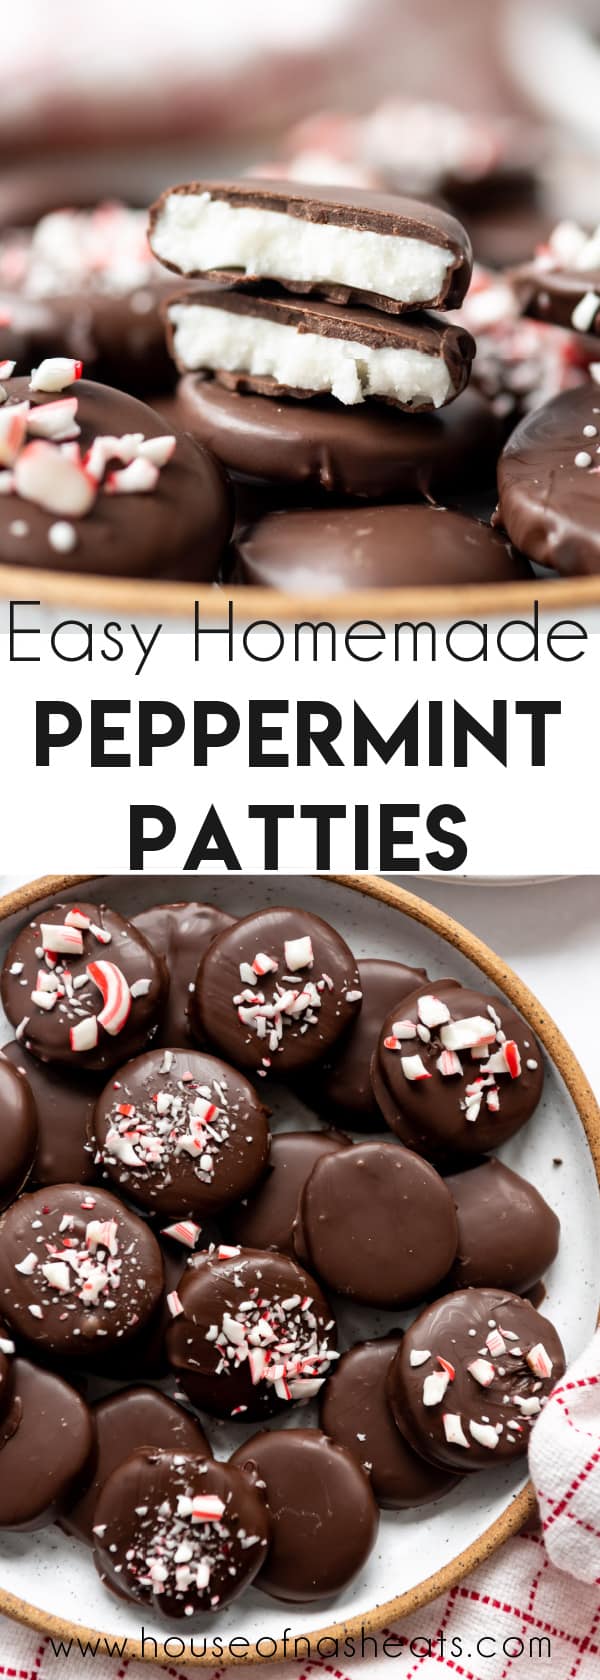
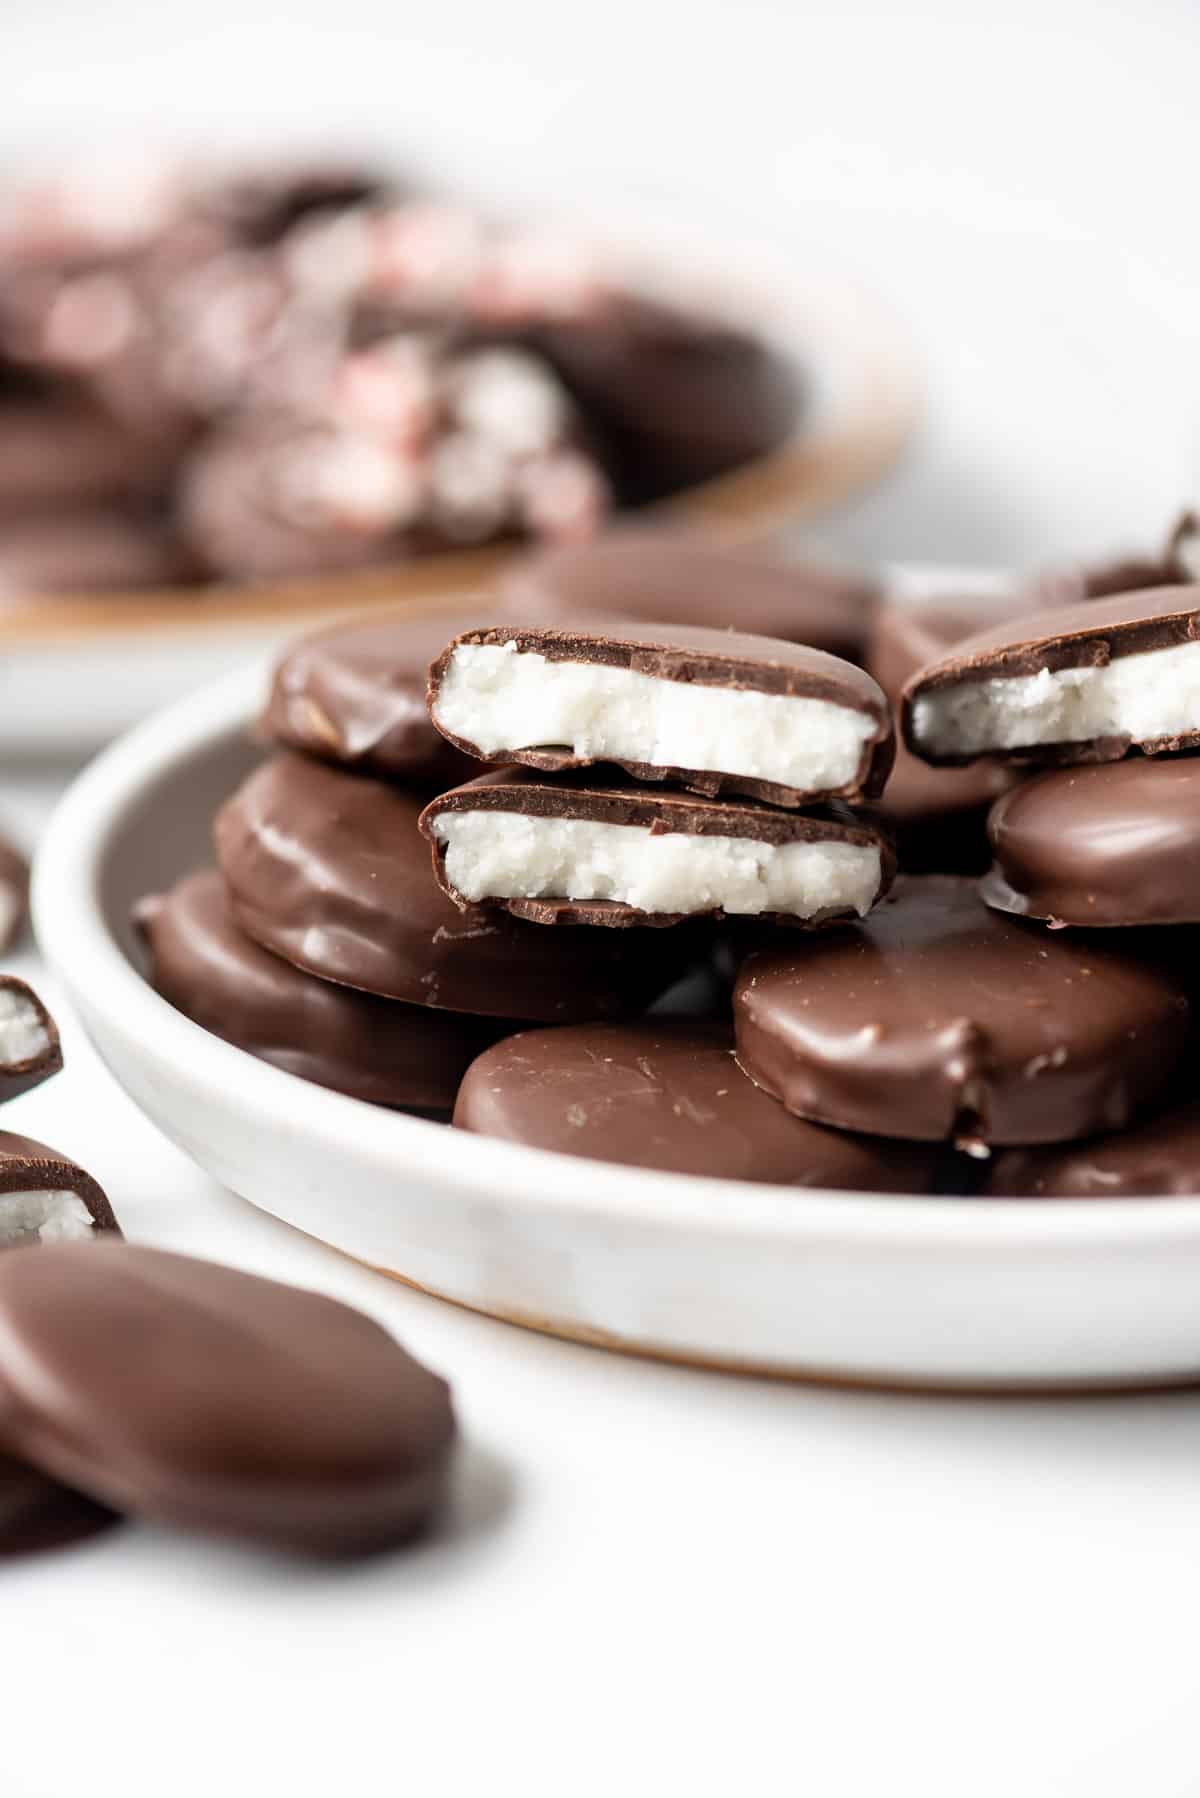
Dark chocolate shells surround a creamy, soft peppermint filling in this easy Homemade Peppermint Patties recipe that is sure to be a hit with family, friends, or coworkers! They are a simple and easy Christmas candy to make without needing a thermometer or major baking skills!
My sister, Jennie, is an excellent baker and cook, so it’s unsurprising that whenever we go to visit her and her family I usually leave with recipes that I want to make and share on here. These homemade peppermint patties are something that she made when we stayed with her and her family for Christmas one year, and I love them!
I mean, my love for all things chocolate & mint is well established already. Case in point: Dark Chocolate Mint Chip Cookies, Chocolate Peppermint Blossoms, and Fudgy Frosted Chocolate Mint Brownies to name just a FEW of my favorites.
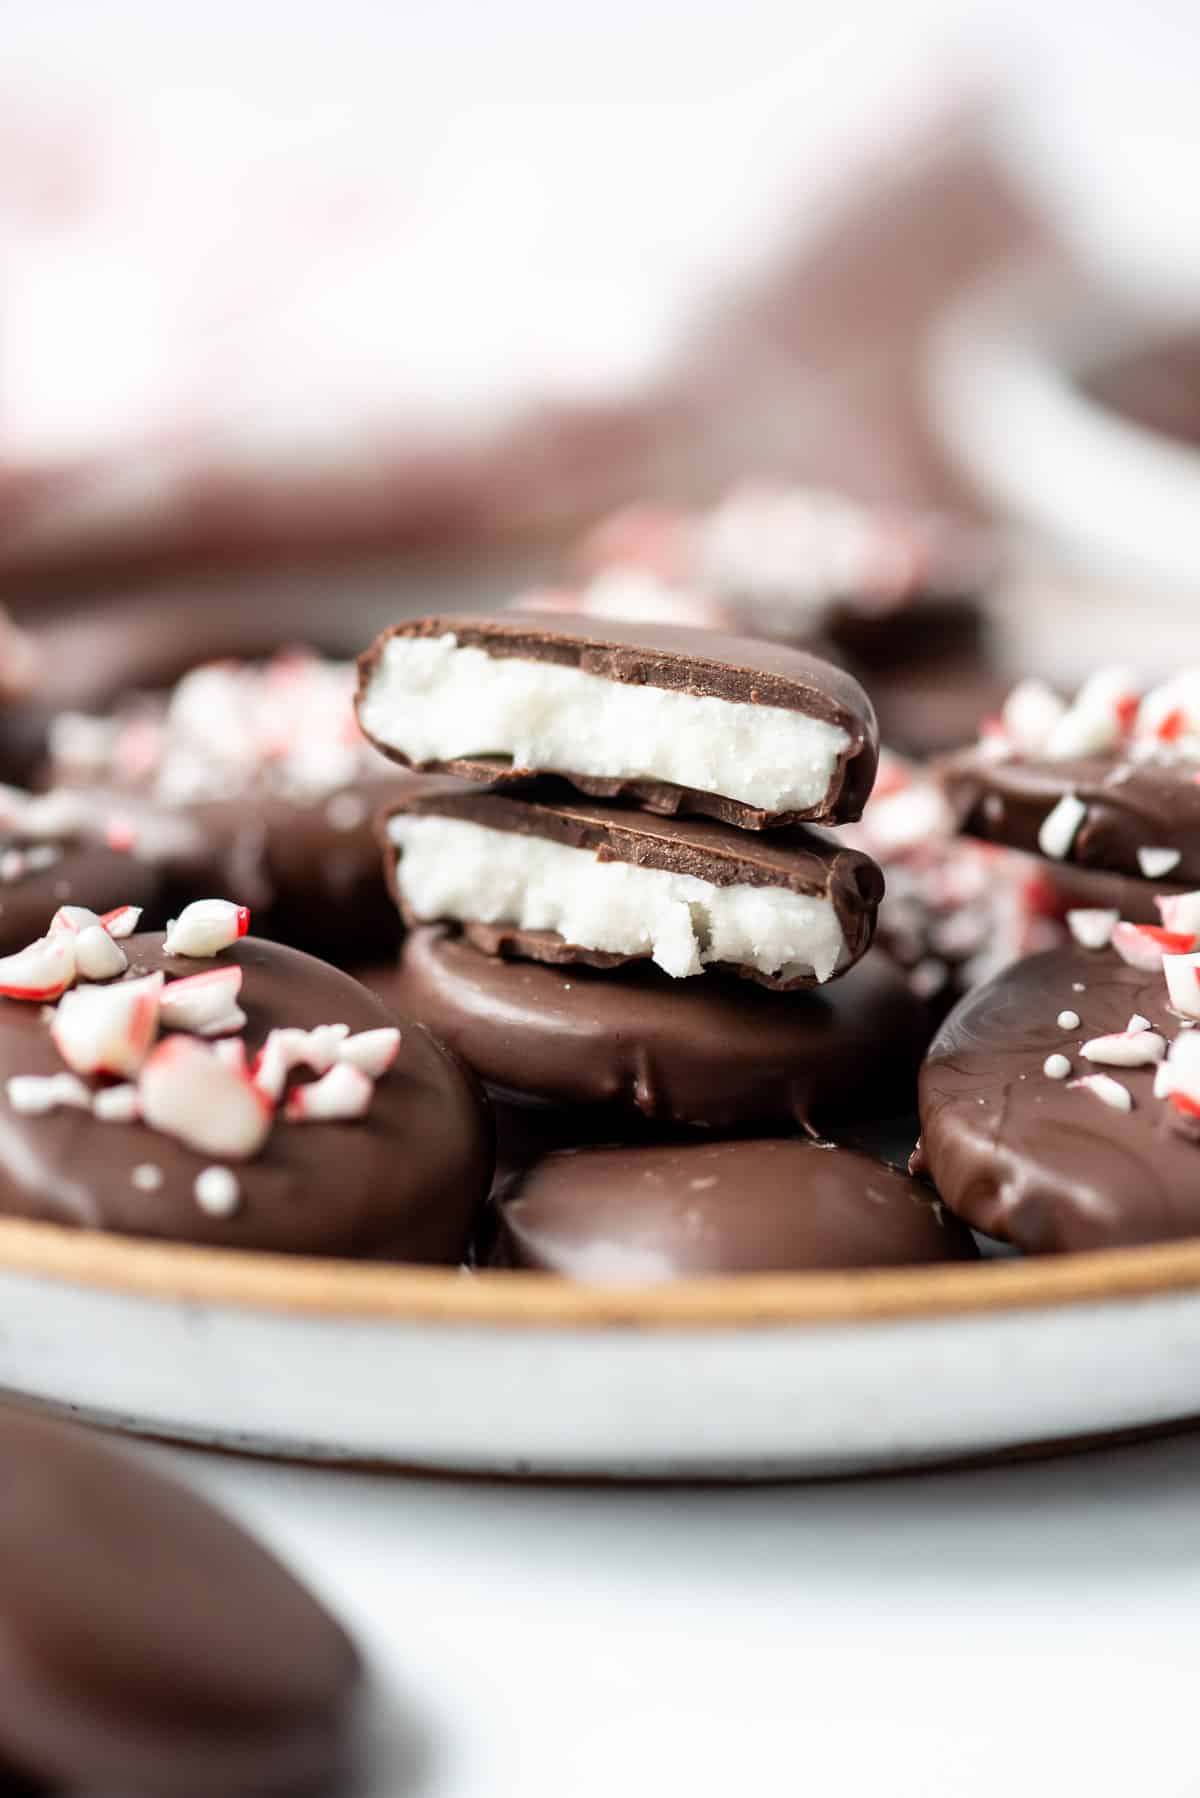
But the creamy, firm but soft centers of these copycat York peppermint patties are minty sweet perfection. And the thin (but not too thin) layer of dark chocolate on the outside is the perfect compliment. Plus, they are an easy Christmas candy recipe that is fun to make because you aren’t worrying about cooking caramels or burning fingers with molten sugar or anything.
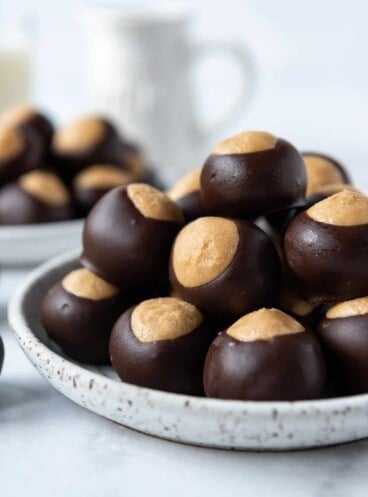
If you are planning a candy-making day during the holiday season, be sure to also check out our Oreo Balls, Rolo Pretzels, and Peppermint Marshmallows.
Why this recipe works
- It’s just six ingredients and no baking or candy thermometers involved!
- We tested other popular versions including ones made with sweetened condensed milk and found that a combination of evaporated milk, light corn syrup, and coconut oil produced the best flavor and texture.
- You can do it in stages by making the creamy centers one day and dipping them the next if you are going to be in a time crunch or you are planning a candy-making day.
- These honestly taste EVEN BETTER than real York peppermint patties because they are fresher and the chocolate is better on the outside.
Ingredient Notes
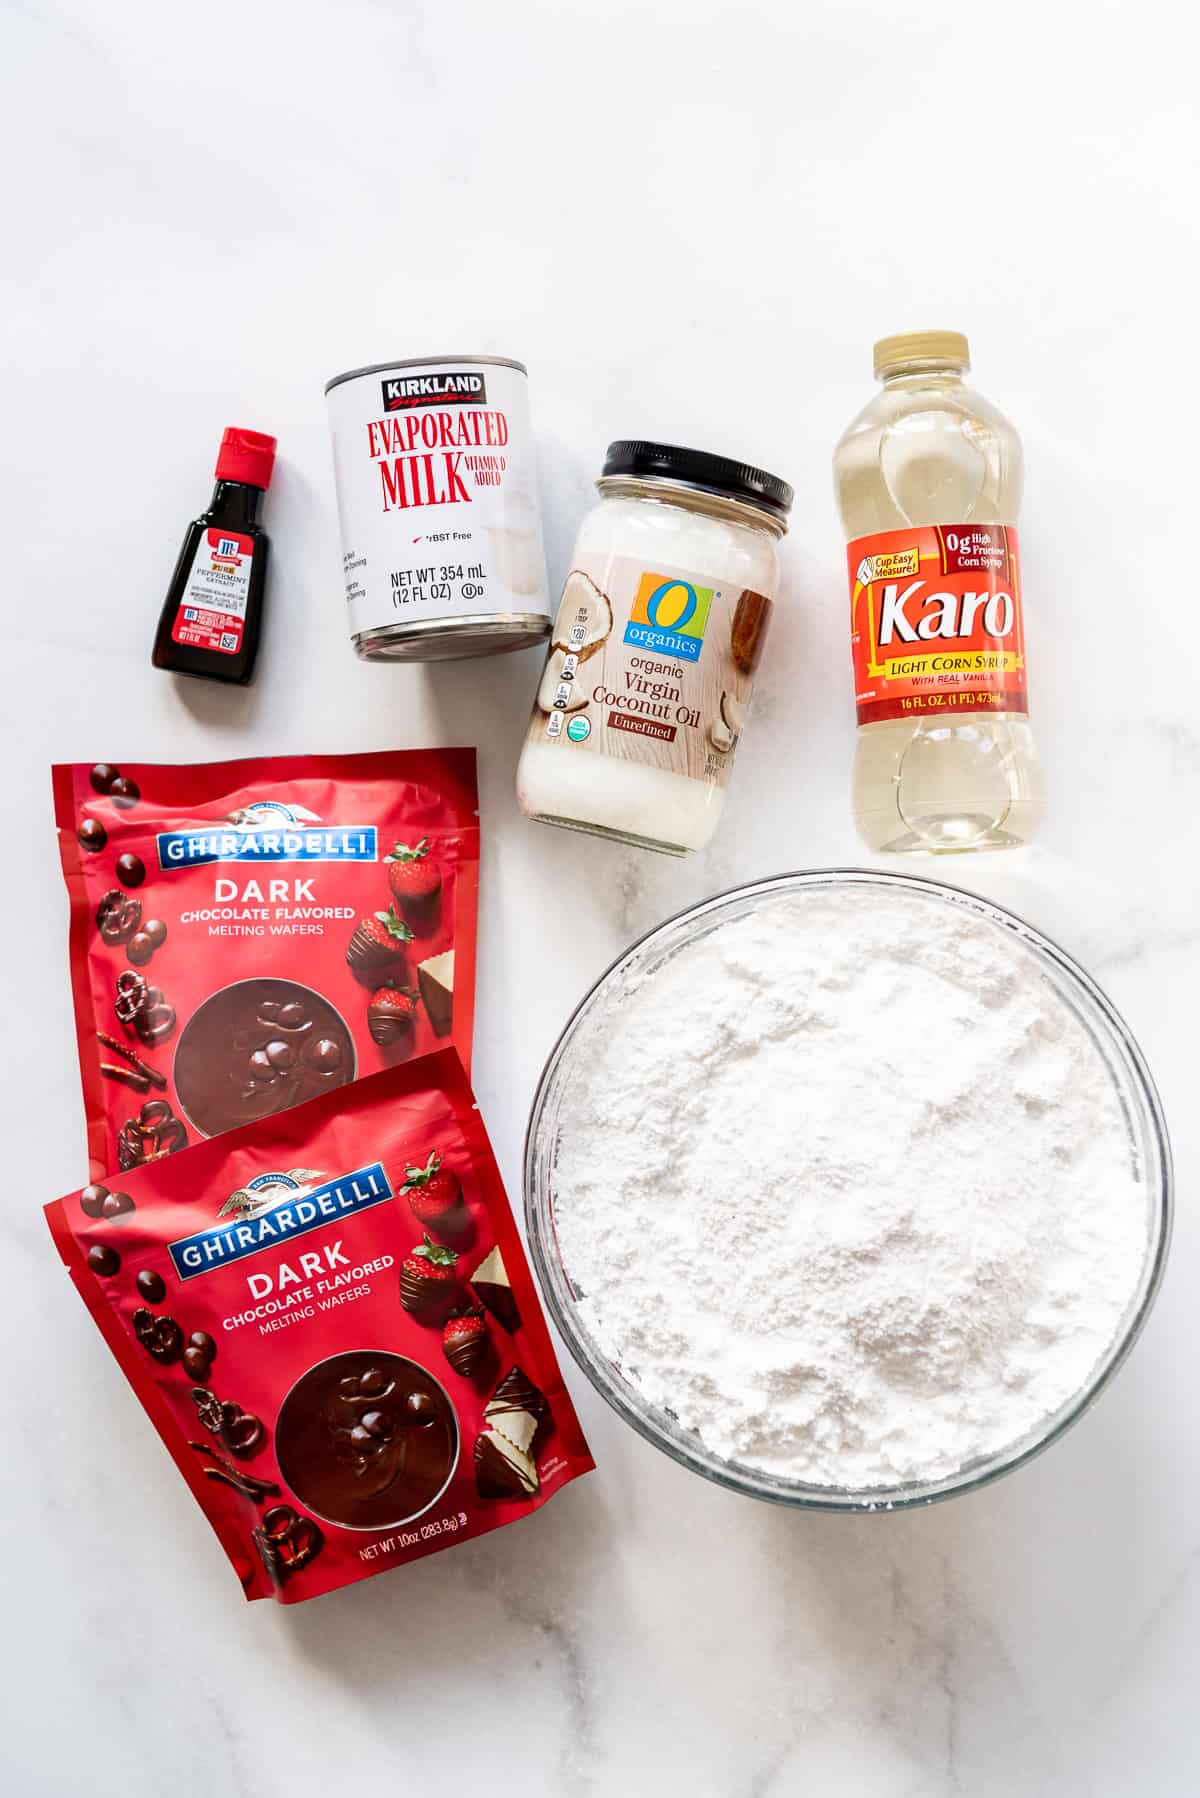
- Chocolate: I love, love, love the Ghiradelli dark chocolate melting wafers. They melt easily in the microwave and have wonderful flavor. Plus, they set up beautifully with a wonderful snap to the chocolate.
- Coconut oil: If you don’t have coconut oil on hand, you can replace it with an equal amount of shortening instead.
- Peppermint extract: I’ve learned over the years that not all peppermint extracts are alike. The one that we like best for flavor is the McCormick’s peppermint extract (not the mint extract, which tastes more like spearmint).
How to Make This Recipe
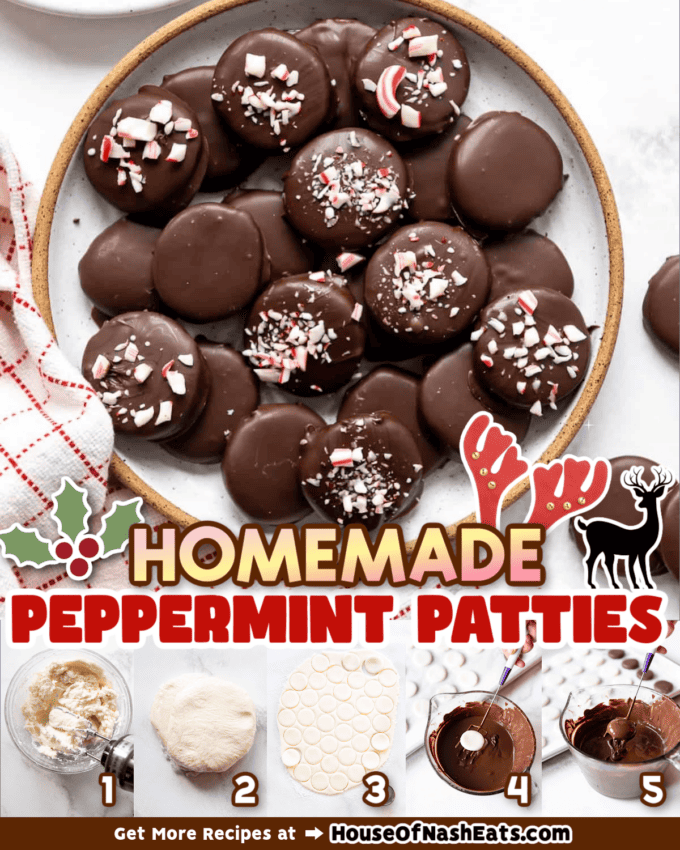
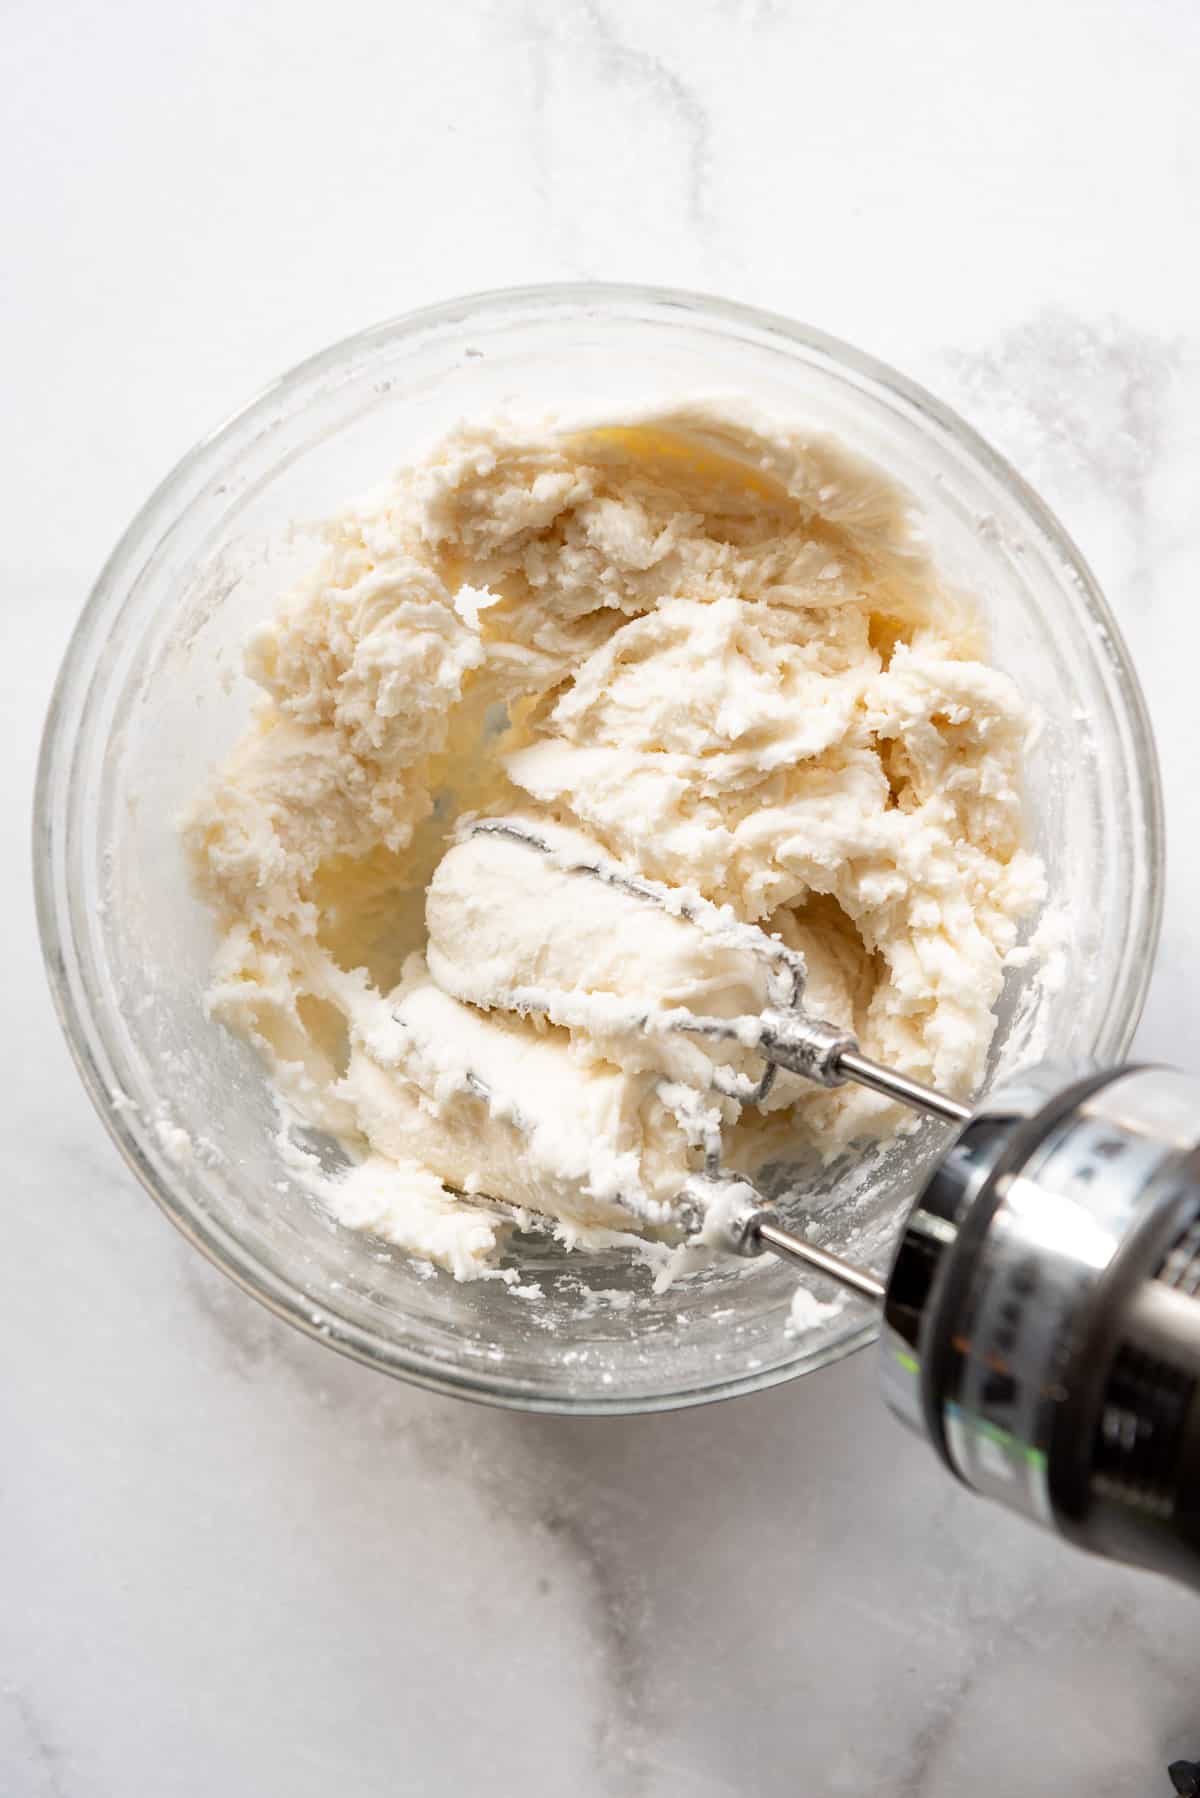
- Make the filling: Start by combing the powdered sugar in a large bowl with the evaporated milk, melted coconut oil, and peppermint extract. Use a mixer to beat everything together together until creamy and smooth, about 3-4 minutes. If it looks like it’s not coming together, just keep beating it a little longer or add additional evaporated milk, 1 teaspoon at a time.
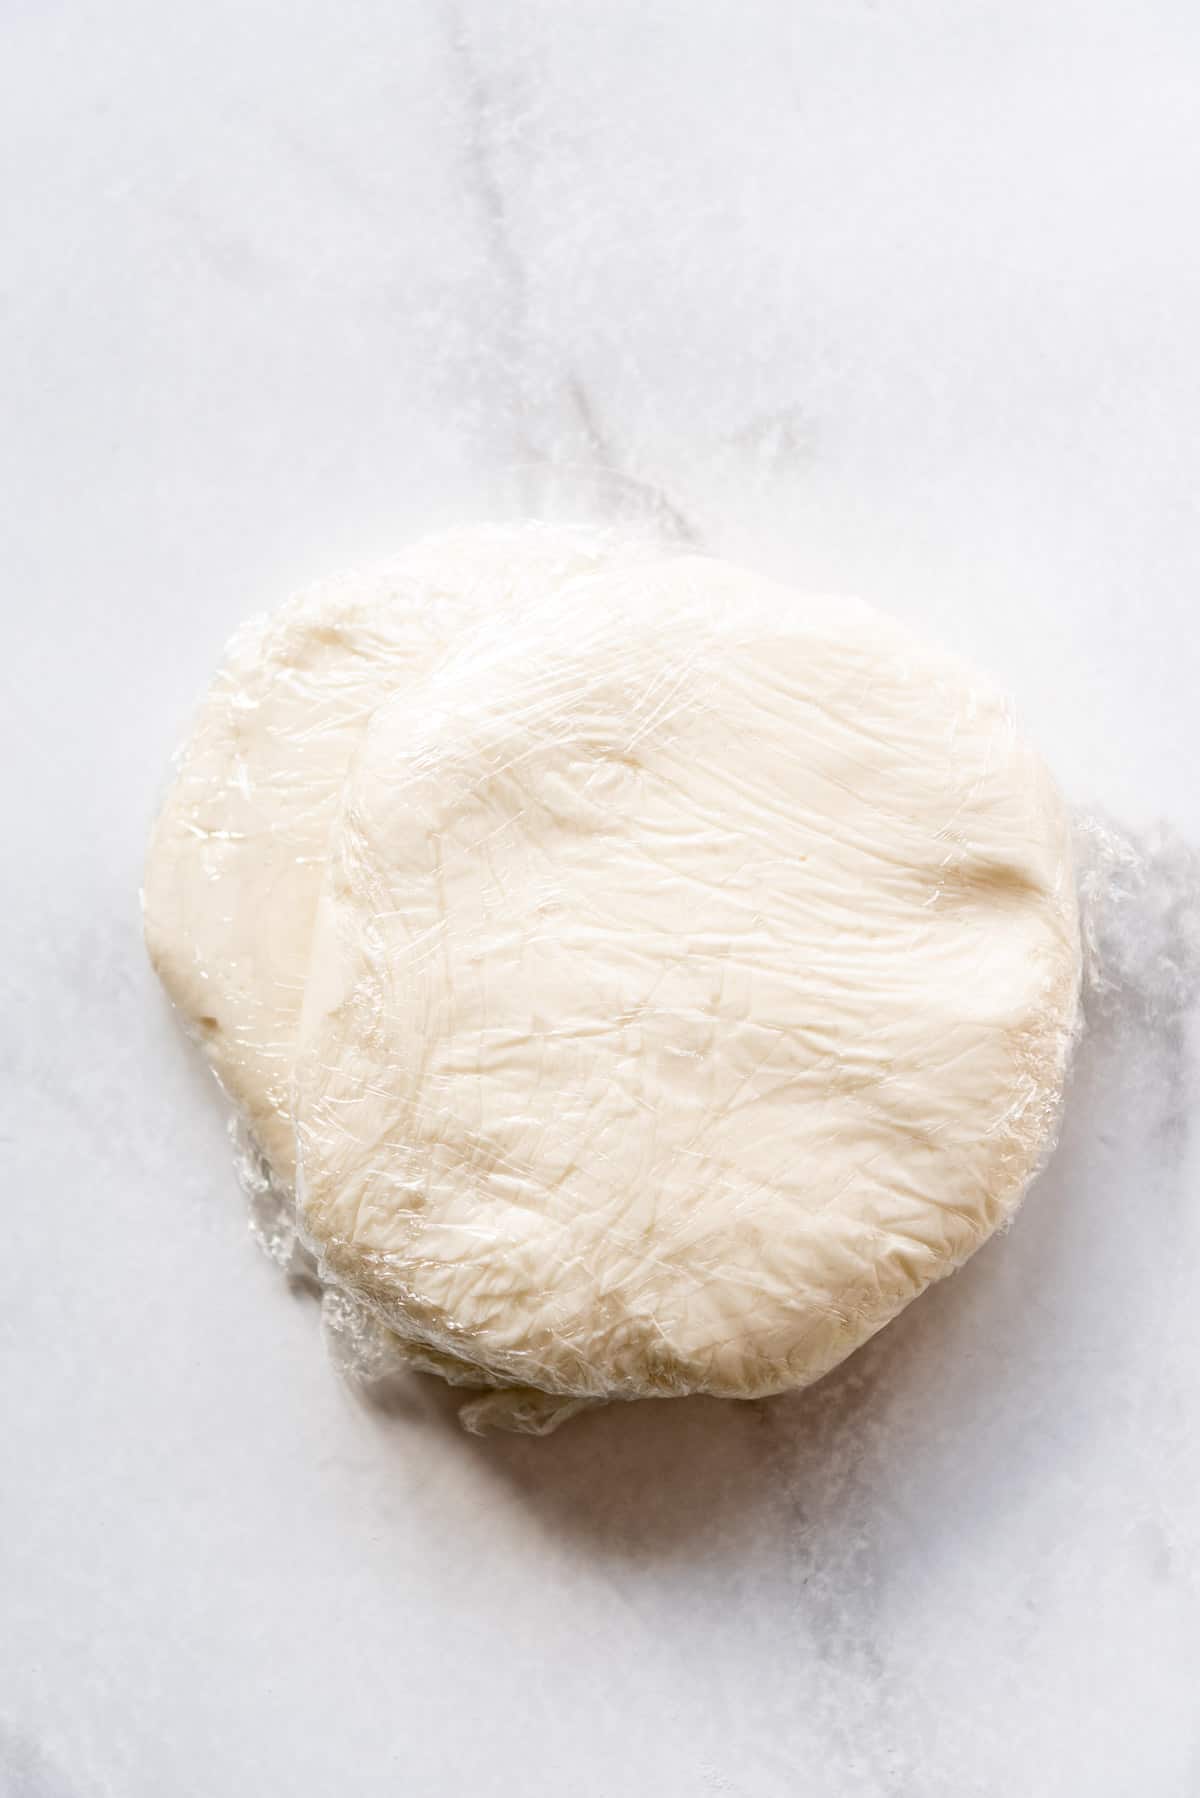
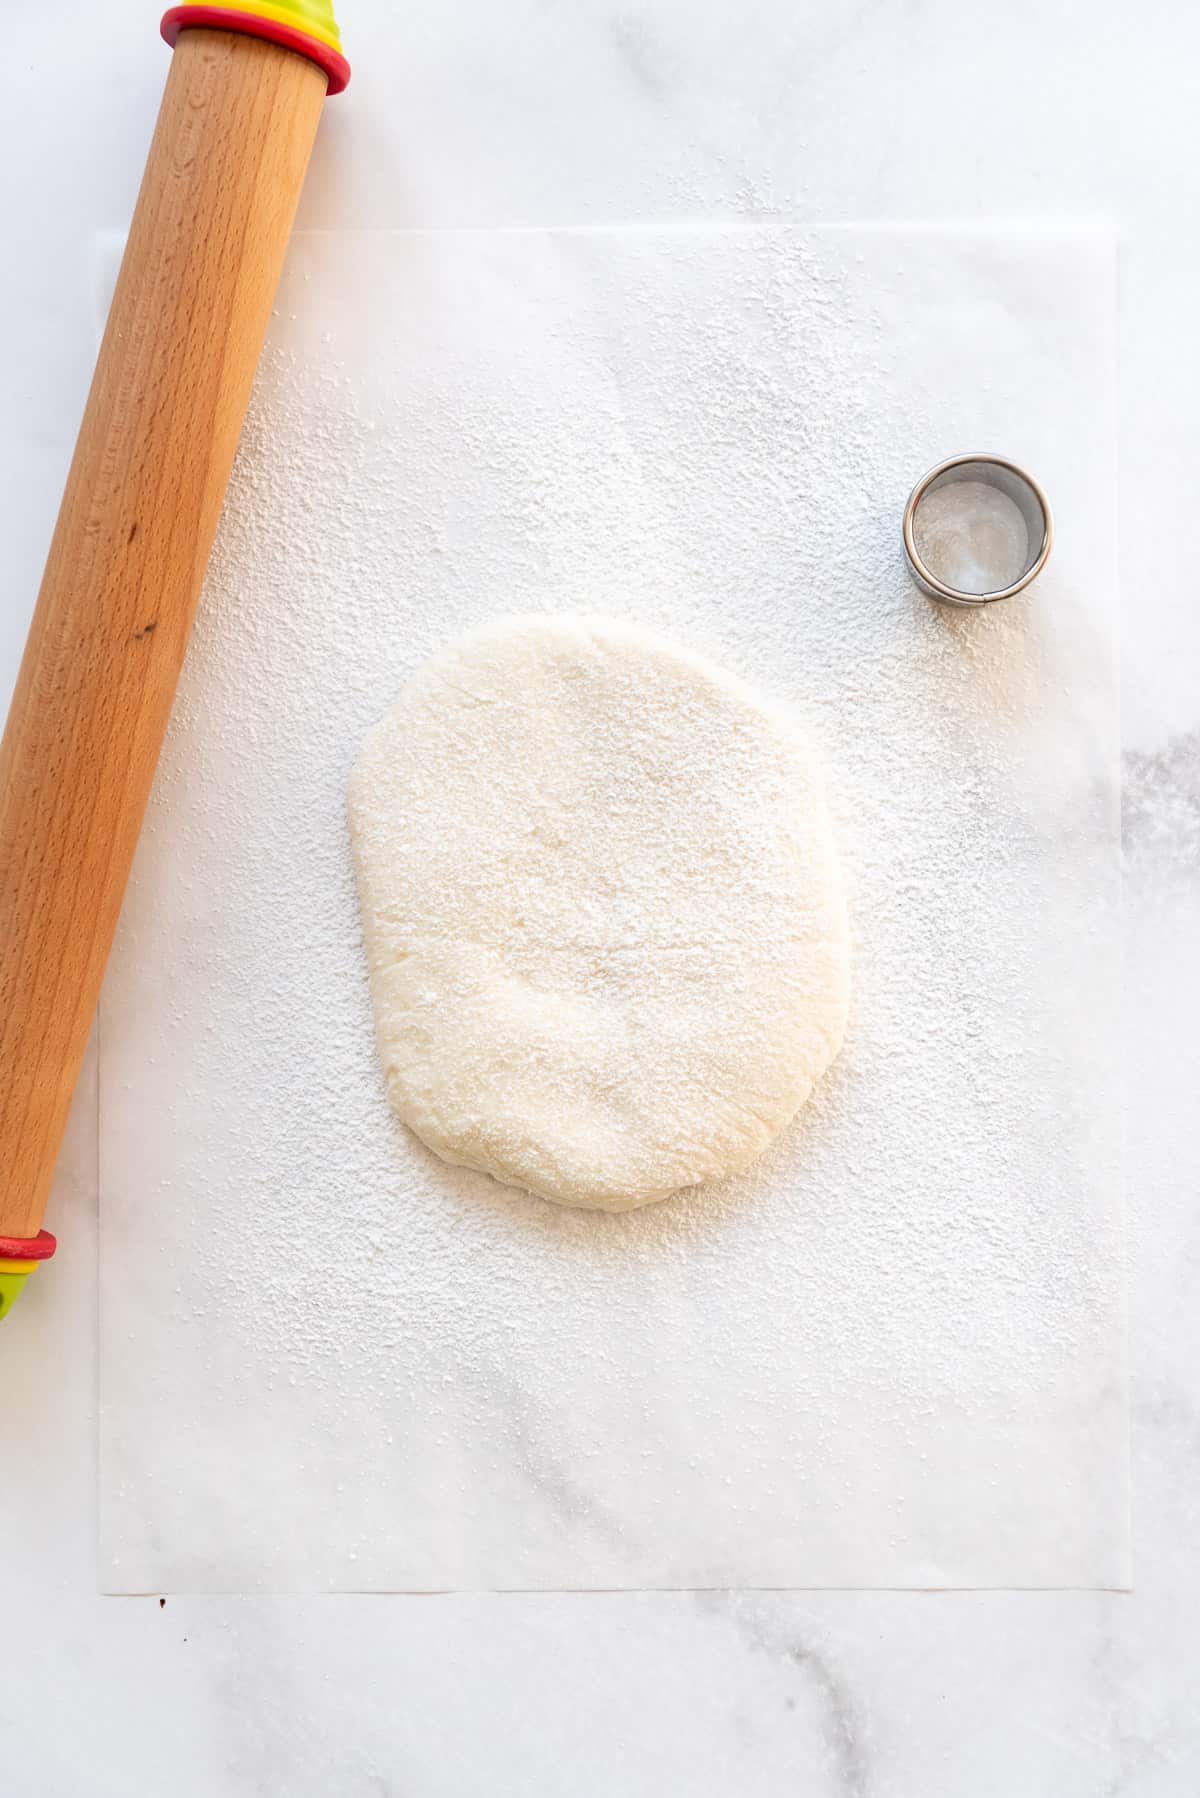
- Chill in the fridge: Divide the filling into two discs and wrap them in plastic wrap to chill in the fridge for an hour so they are easier to roll out. It should be a stiff, but workable dough that you can touch with your hands.
- Roll out the filling: Dust your rolling surface with powdered sugar to help keep the filling from sticking. I like to roll this out between two sheets of parchment paper just to be on the safe side. Roll approximately 1/4-inch thick with a rolling pin (affiliate link).
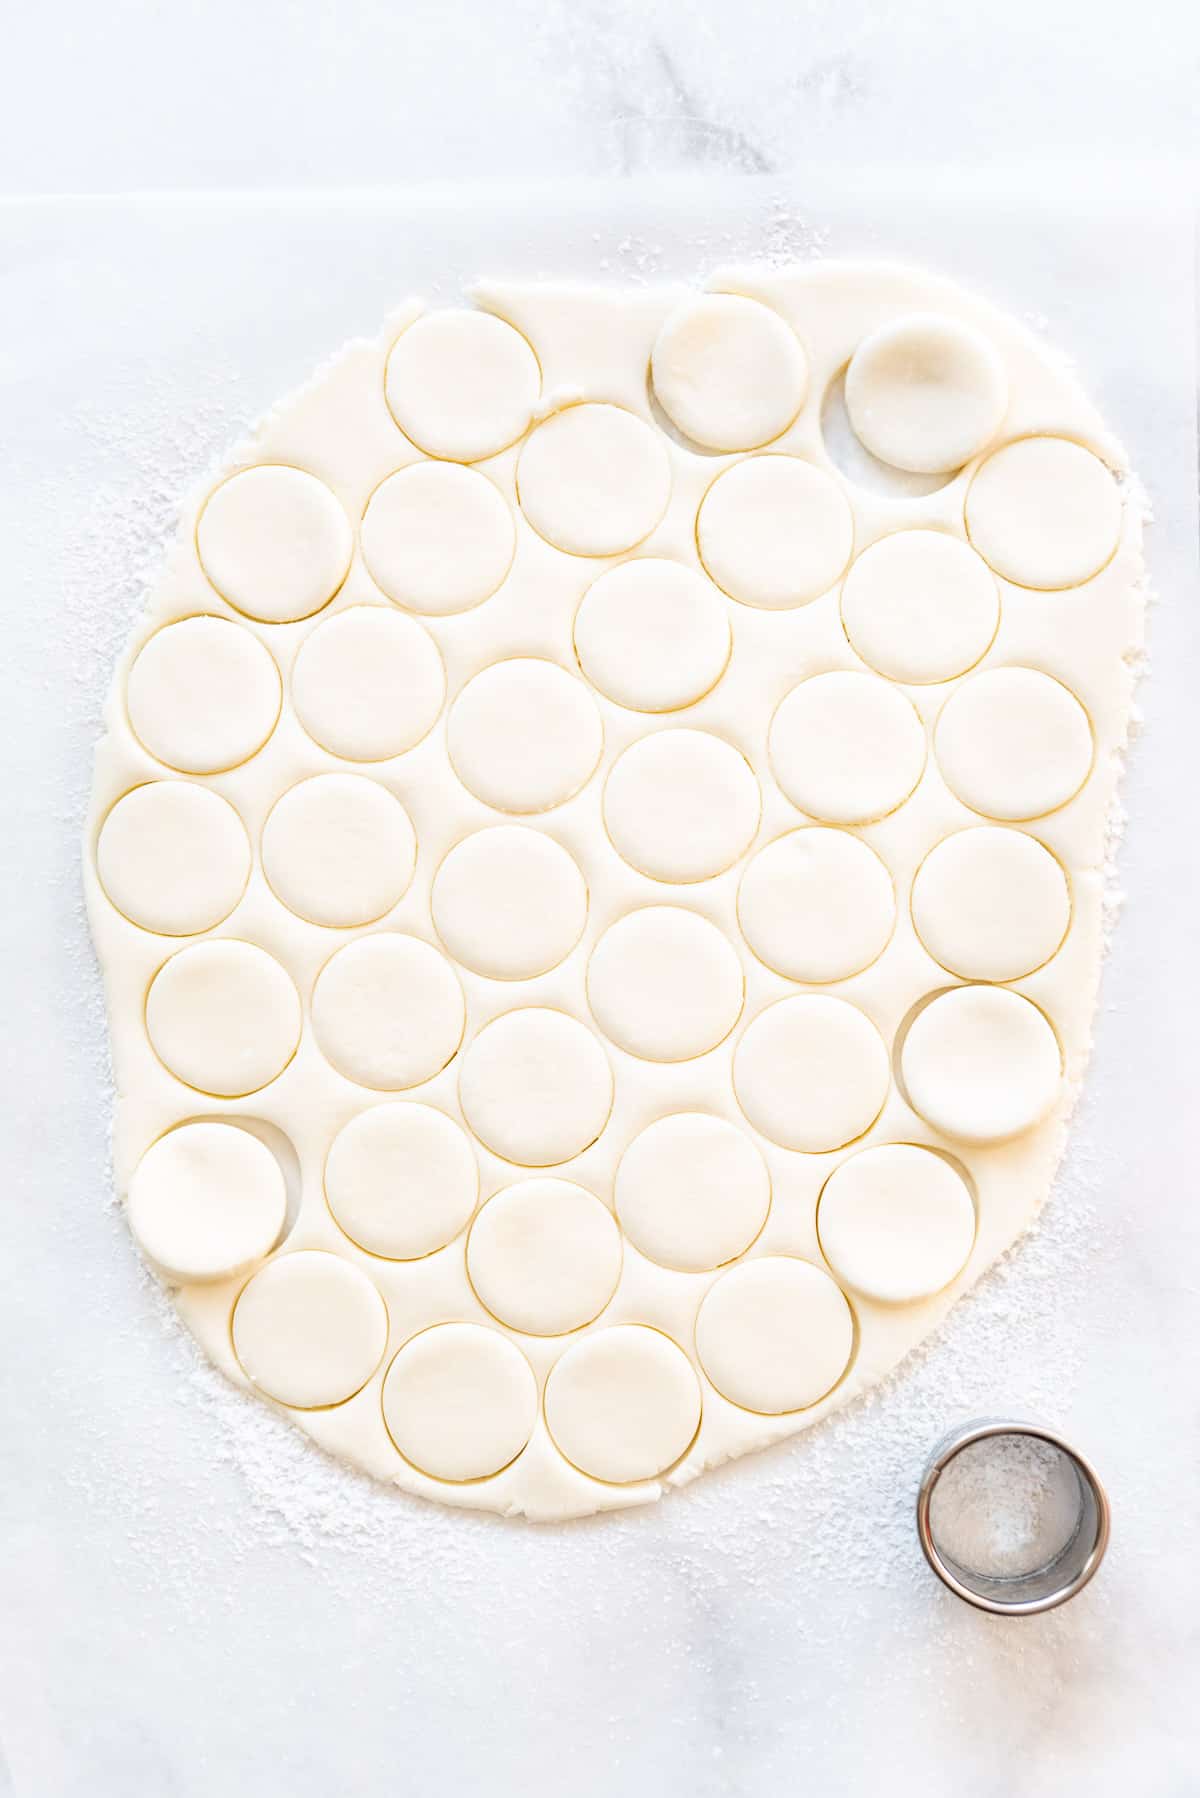
- Cut out small circles: Use a small 2 to 2 1/2-inch round cutter to cut out circles for the peppermint patties centers. You can smash the scraps together and re-roll until it has all been used up. Transfer the cut circles to a baking sheet lined with parchment paper and stick them in the freezer for 20 minutes while you melt the chocolate.
- Alternate shaping approach: If you want to try a different approach, I have also made these by just pinching off small pieces that are about 2 teaspoons worth, rolling them between my hands to make little balls, then pressing them flat with the bottom of a cup. It works almost just as well, but feels more tedious and time-consuming for me over just rolling out the dough and using a cutter. But either approach works!
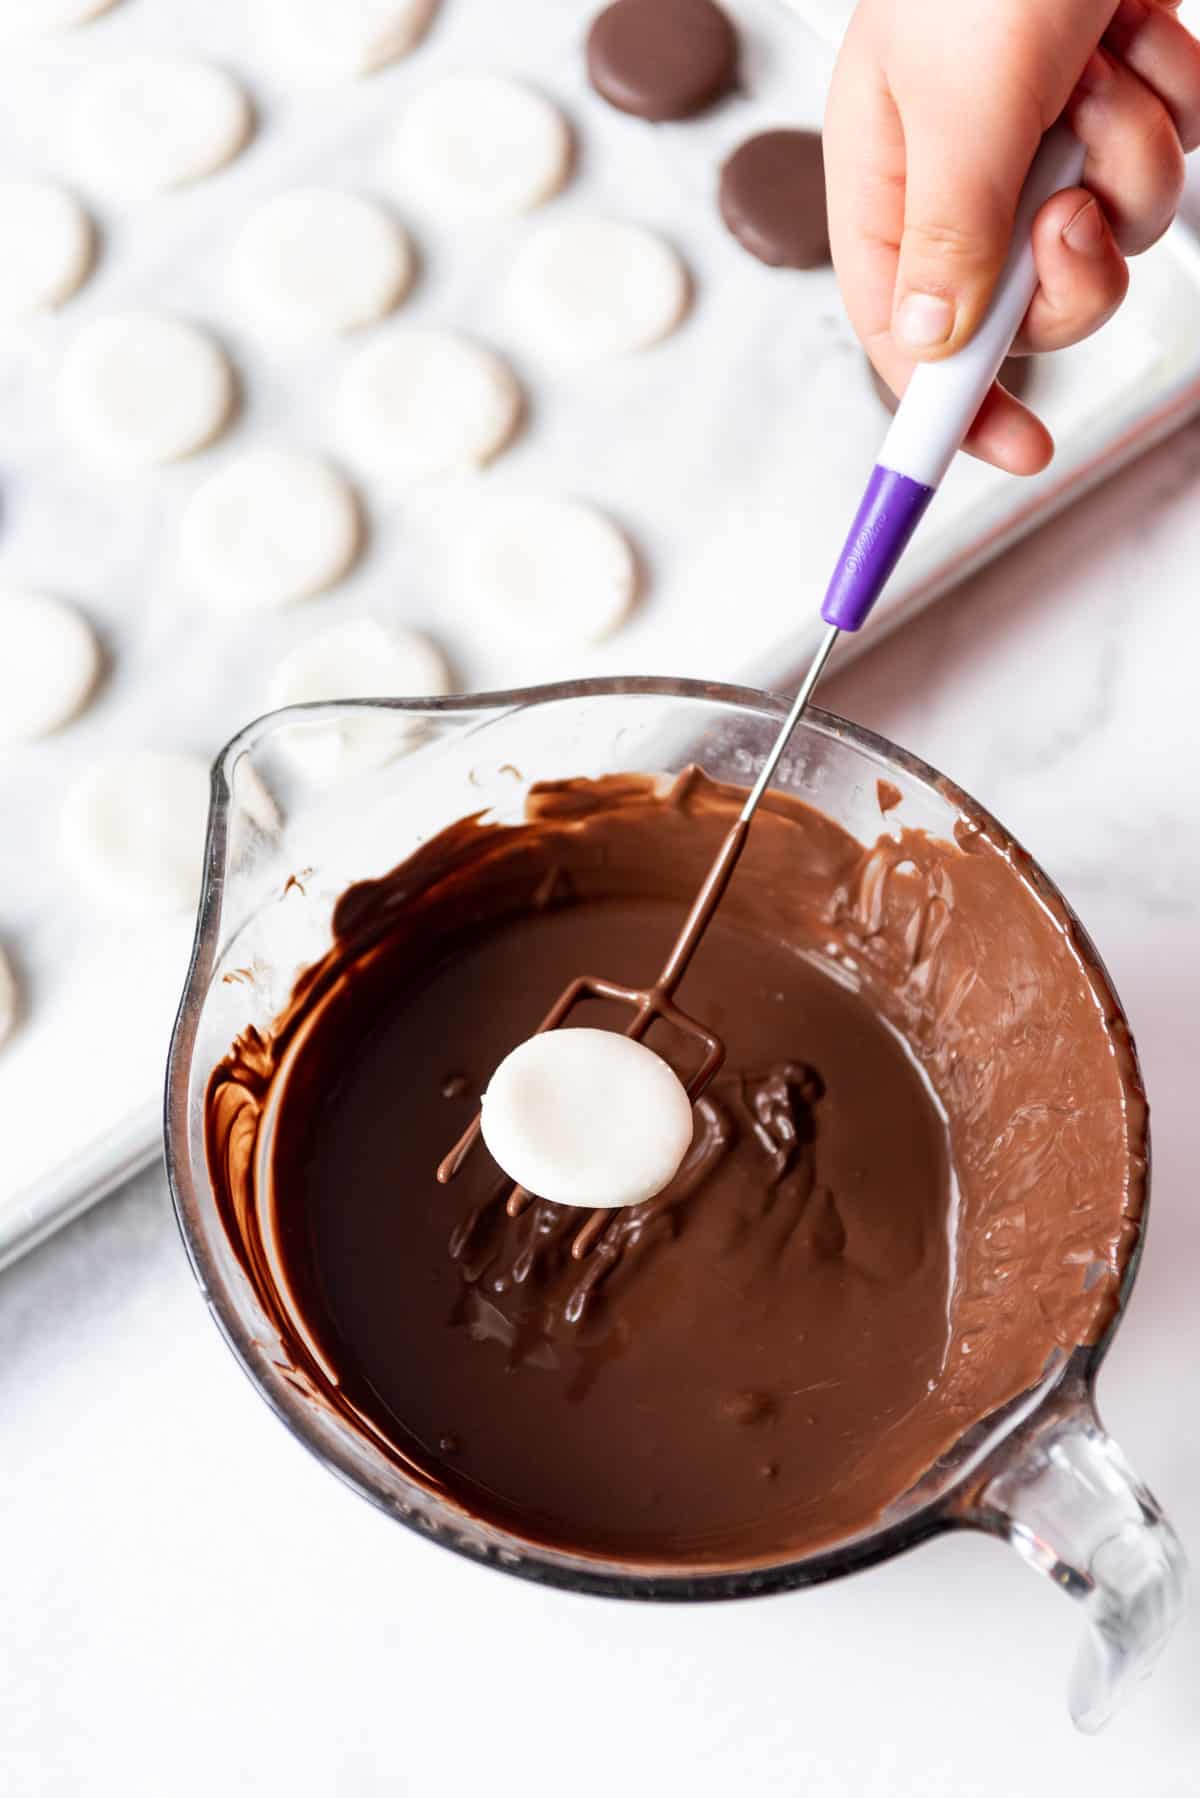
- Melt the chocolate: While the centers chill in the freezer, melt the dark chocolate coating in a microwave-safe bowl in the microwave or the top of a double boiler set over simmering water. It’s best to use short 20-second bursts of heat in the microwave, then stop and stir between each burst until mostly melted. The last few bits of chocolate should finish melting from the residual heat rather than microwaving until everything is totally molten, which is when you sometimes see whitish streaks on the outside of your chocolate. Sometimes the chocolate won’t look melted at first, but once you stir it for a few seconds it will start to smooth out.
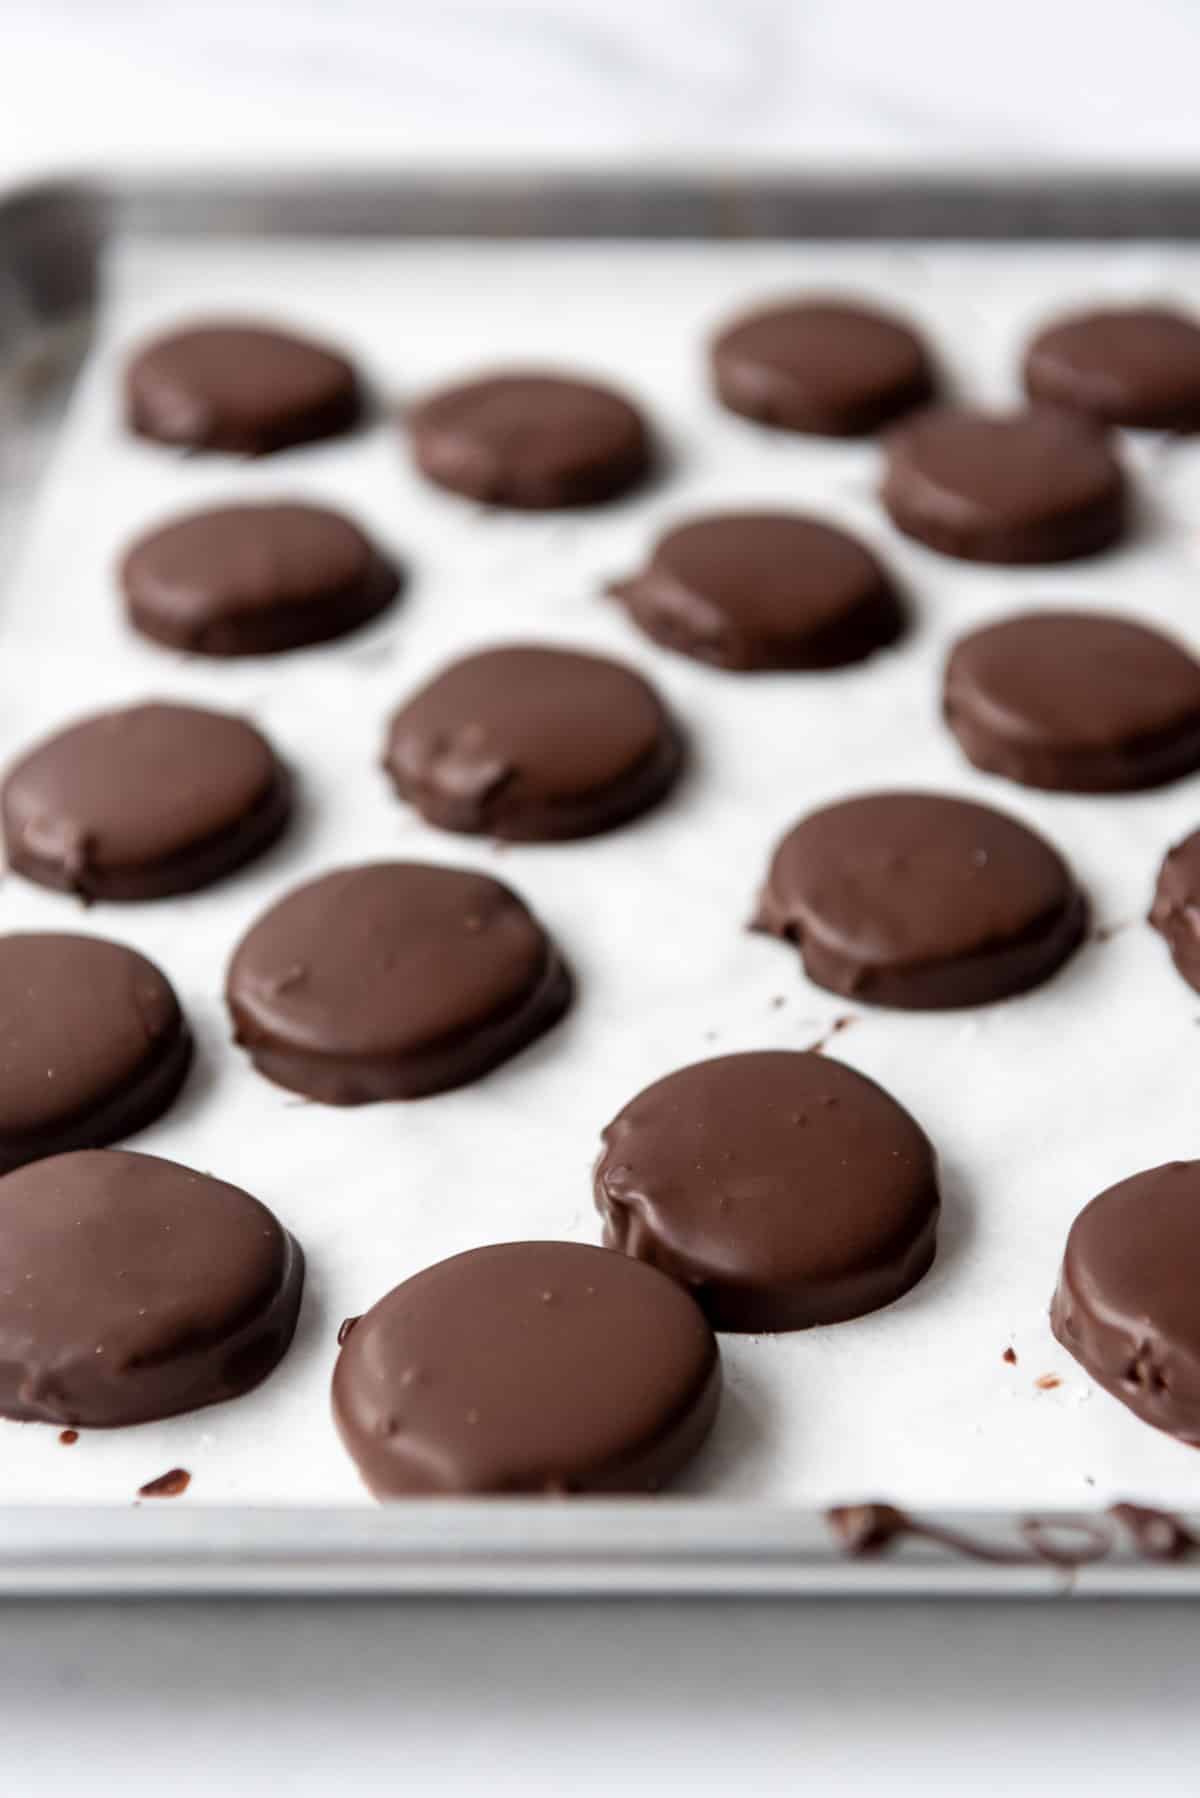
- Dip the centers: Take the chilled centers out of the freezer and dip them one at a time in the melted chocolate. The first few might be a little tricky while you get the hang of it, but really you just dunk, lift, shake or tap against the side of the bowl so excess chocolate drips off, then transfer back to the parchment-lined baking sheet. This is easiest when done with a fork (or dipping tool like you see here which I picked up at a local craft store) and a knife to scrape them off, if necessary.
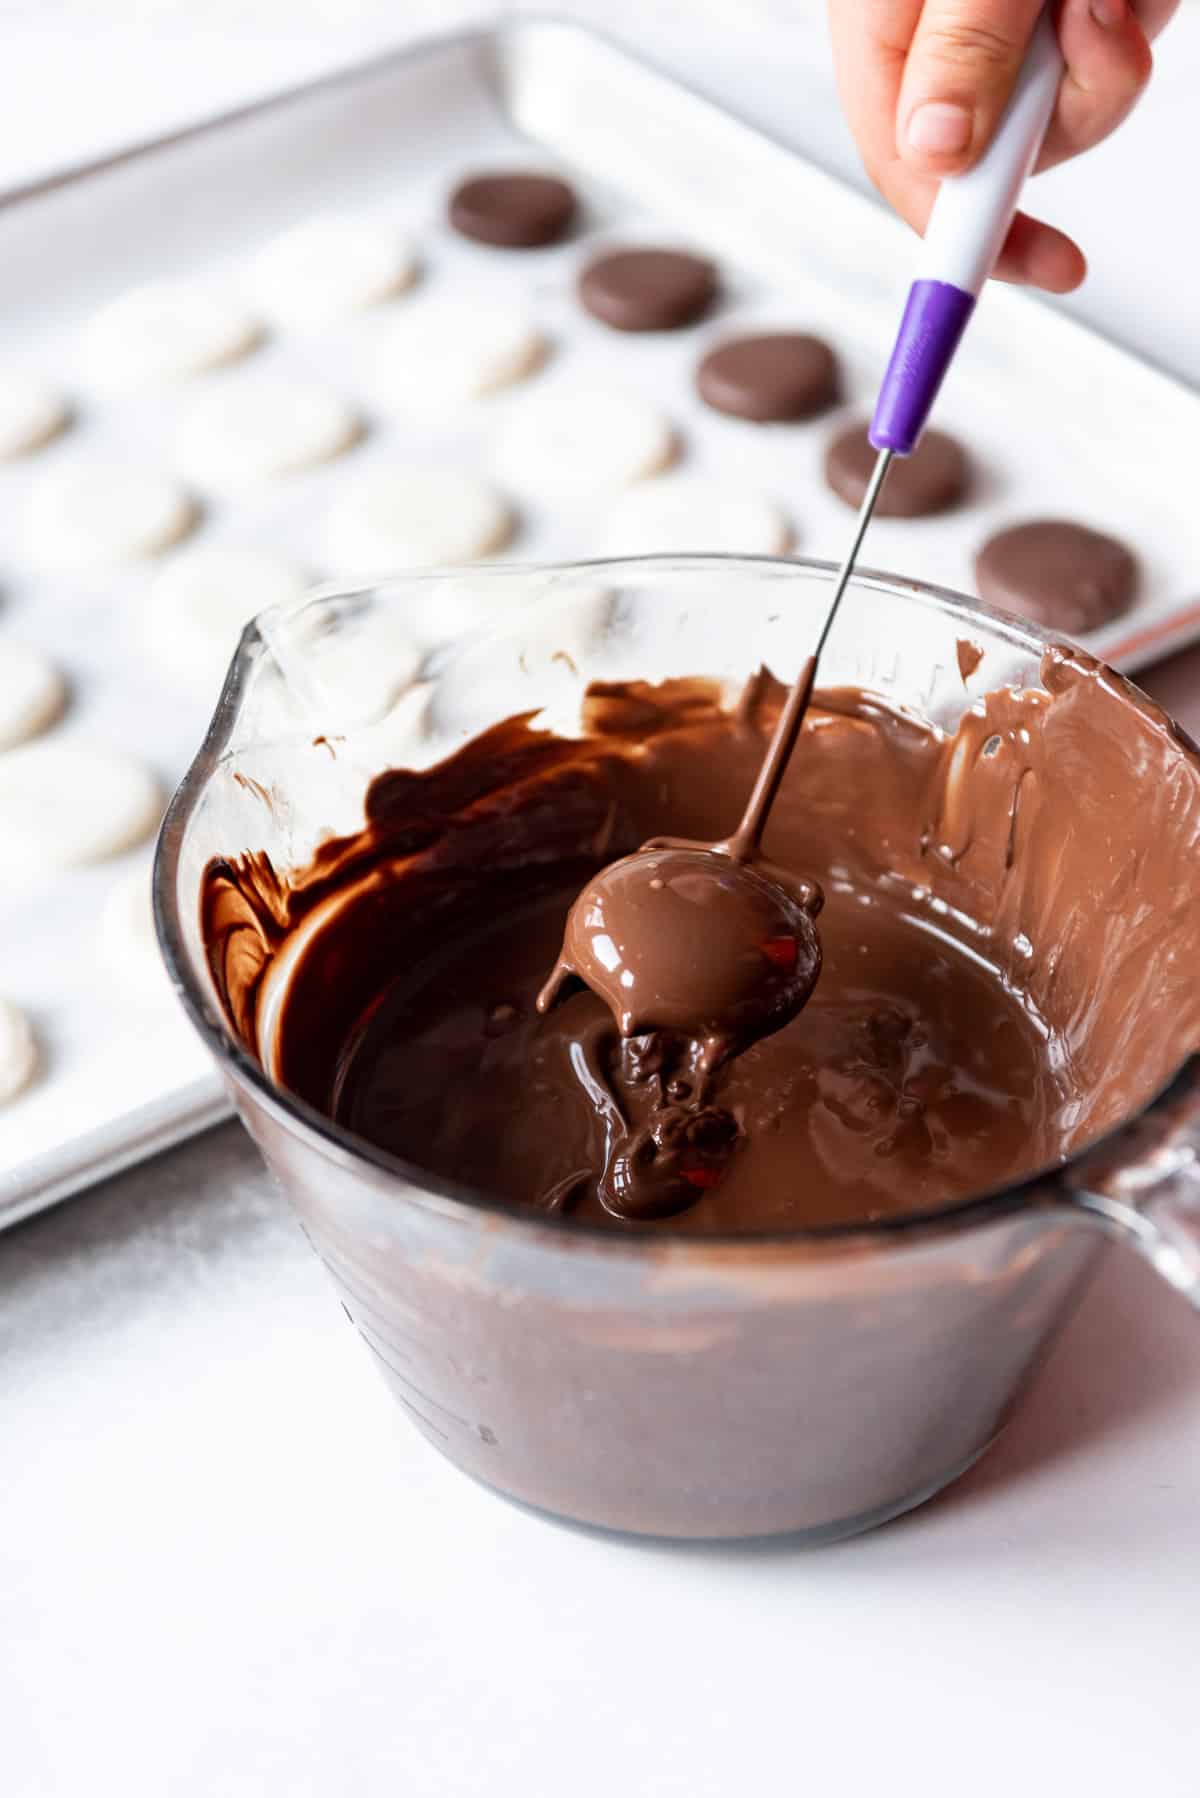
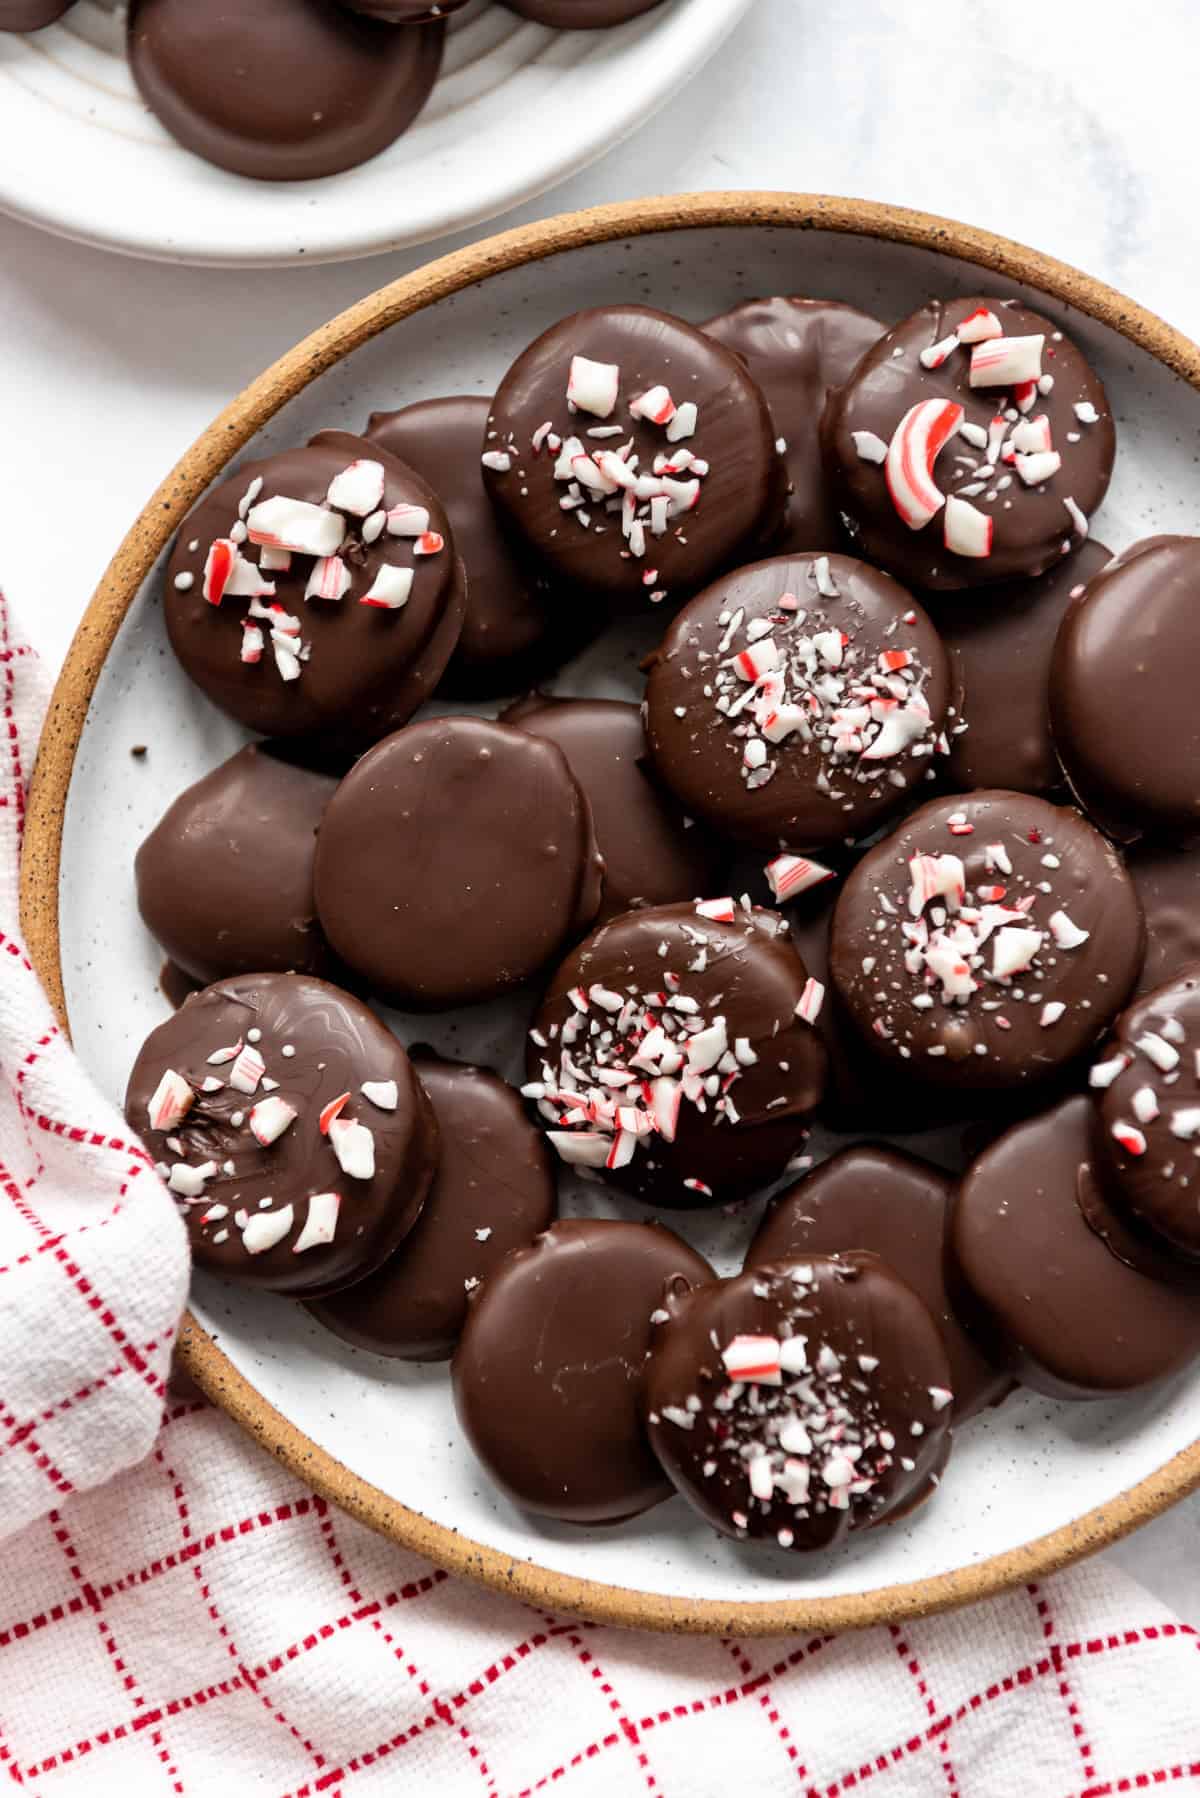
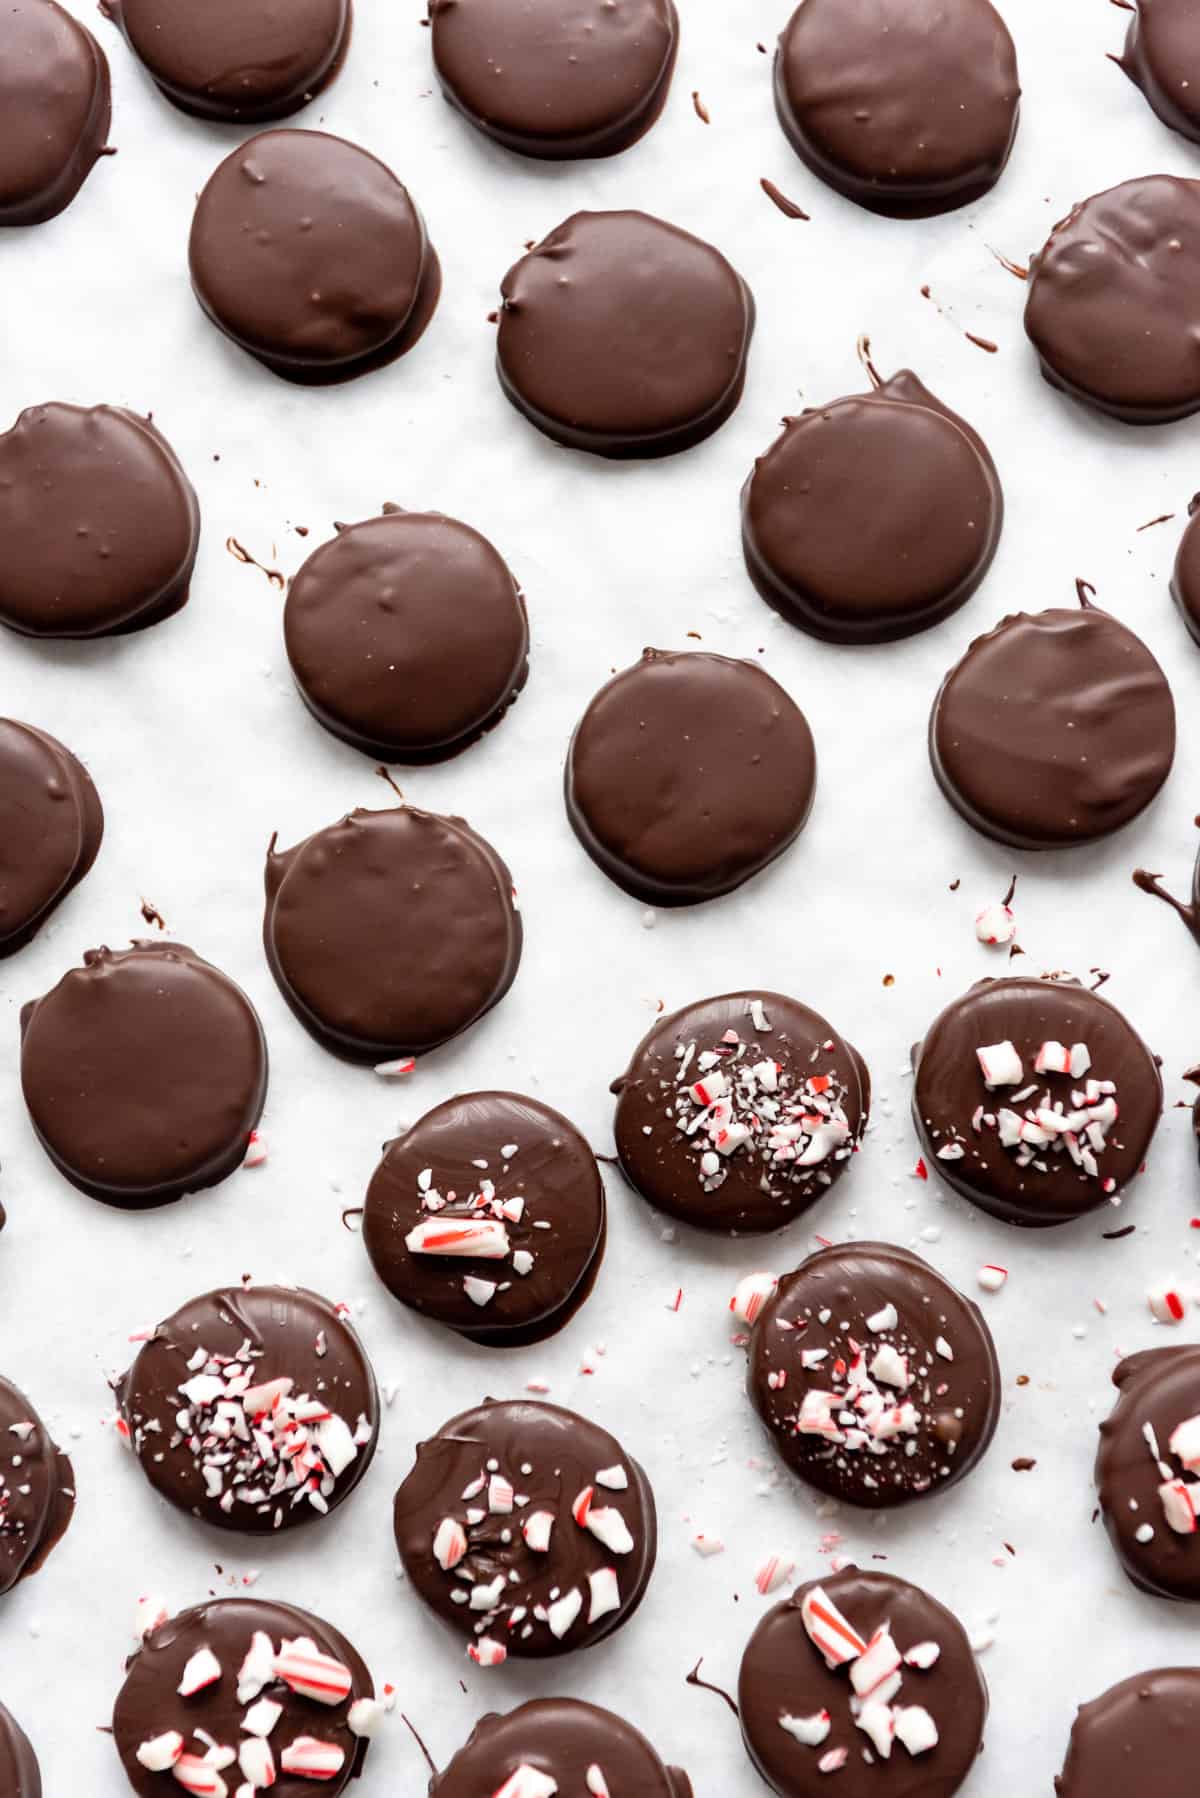
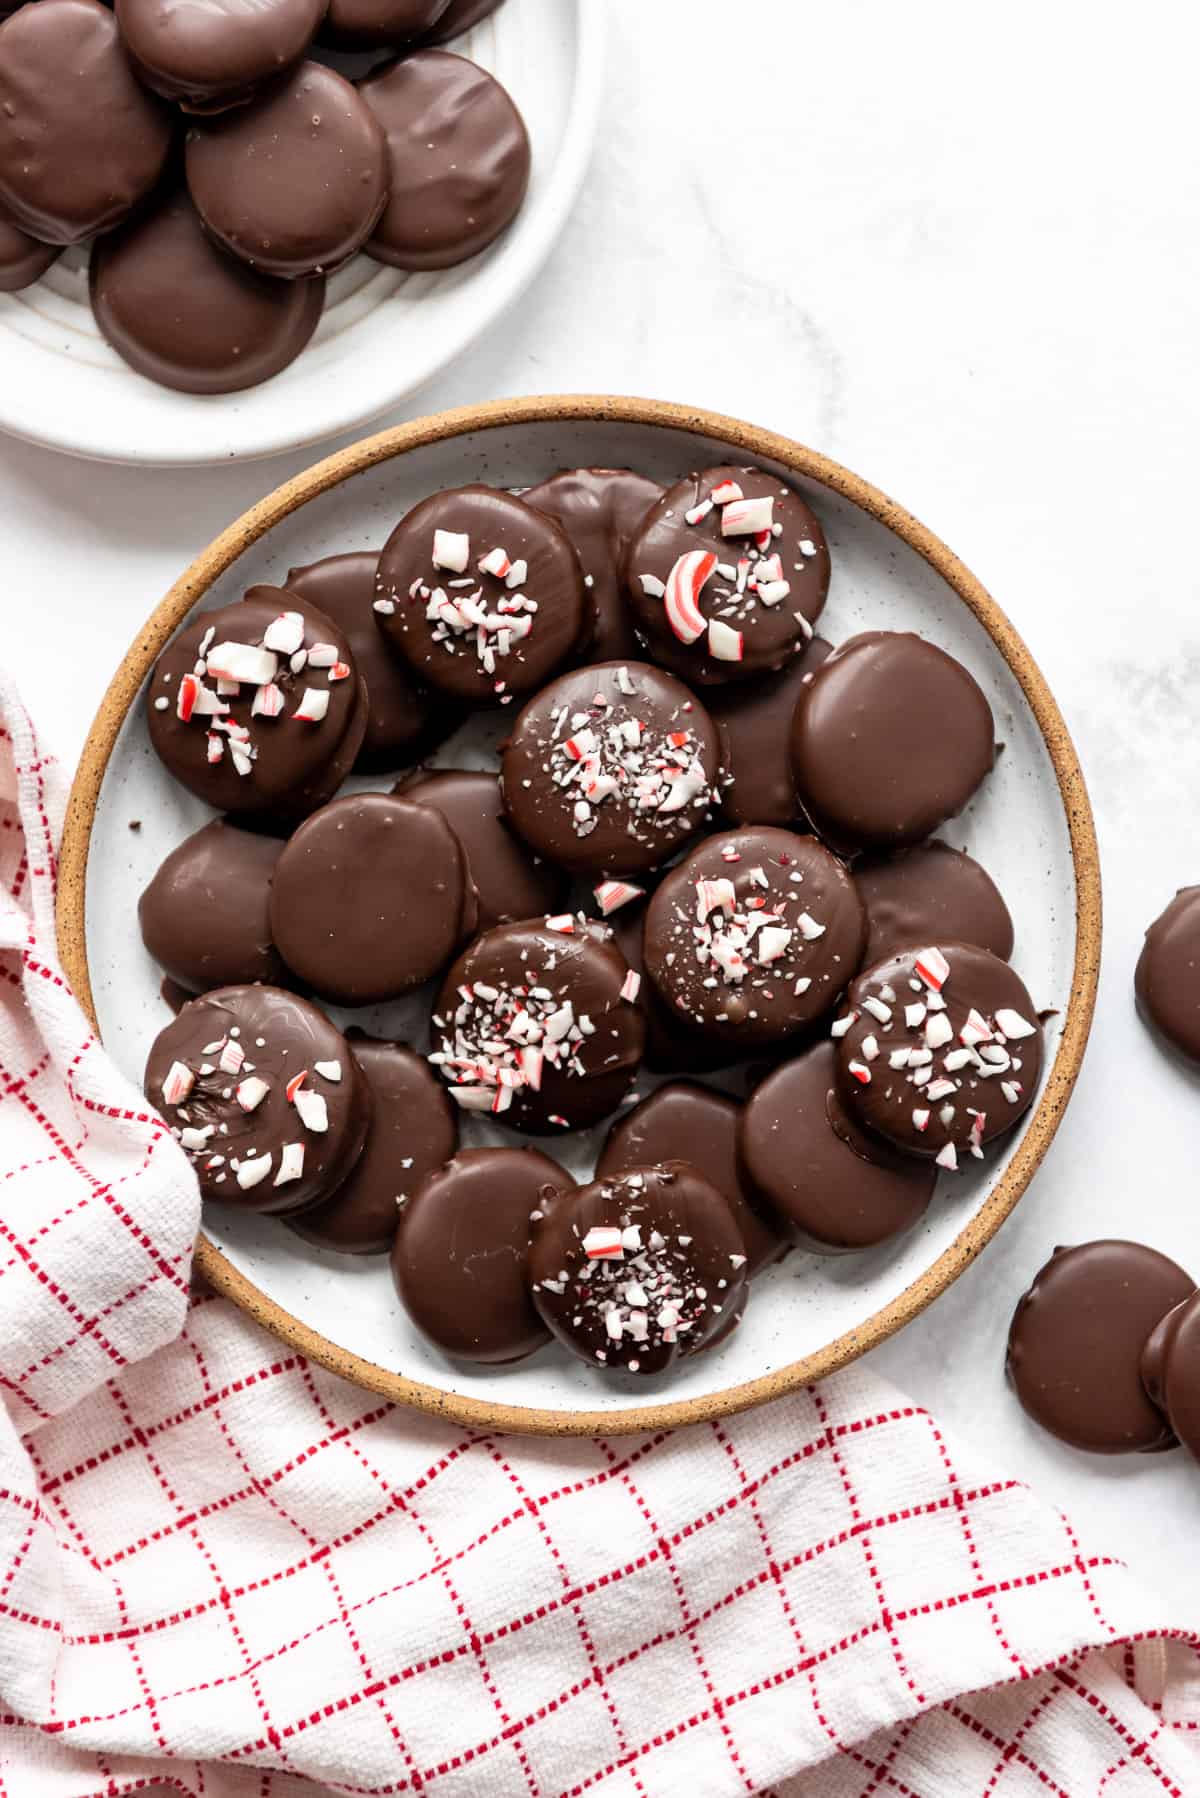
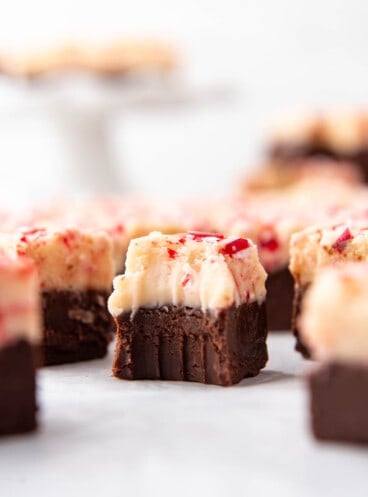
- Decorate immediately: If you are planning to decorate any of these with crushed candy canes or sprinkles, you will need to pause after every 4-5 and sprinkle them because the chocolate will harden quickly and then your sprinkles won’t be able to stick. I actually like the plain ones best, but doing a few with crushed candy canes makes them look extra festive.
Recipe FAQ’s
Peppermint patties have been around since 1940! Unlike Junior Mints, which have a gooey center, peppermint patties have a drier, firmer center that breaks clean when you snap them in half while still being soft.
You can totally get away with just using a fork and knife to dip chocolates, but I really do love the 3-pronged dipping fork made by Wilton. I picked it up as part of a three-piece set at Joann’s a few years ago. It’s really helpful because there is less contact with the candy since the prongs are narrower.
If your filling is too sticky to work with, add a little more powdered sugar, a couple tablespoons at a time. If it is too thick for your mixer, just knead it in with your hands. Chilling the dough also helps it be a little less sticky and easier to work with.
Absolutely! Just decrease the amount since the essential oils are stronger. I would start with ¼ teaspoon and go from there.
I have found these at every grocery store in my area next the chocolate chips in the baking aisle. You can also order them on Amazon.
Recipe Tips
- Don’t skip the chilling stage: Freezing the centers for 20 minutes before dipping makes them easier to dip and helps set the chocolate quicker on the outside.
- Storage: These will be fine kept in an airtight container on the counter at room temperature for 5-7 days. Or store for 2 weeks in the fridge.
- Freezing: Peppermint patties freeze really well for 3-4 months. I love to eat them straight out of the freezer for a cool treat!
- Flavor variations: You can actually flavor the centers with any extract you like like lemon, cherry, or orange just be switching out the peppermint extract. Also, you could dip these in milk chocolate or even white chocolate if you prefer!
- Decoration: Sprinkle them with chocolate or colored jimmies, crushed candy canes, or drizzle with melted white chocolate for contrast.
More Easy Candy Recipes
Did you make this recipe?
Let me know what you thought with a comment and rating below. You can also take a picture and tag me on Instagram @houseofnasheats or share it on the Pinterest pin so I can see.

Homemade Peppermint Patties
Equipment
Ingredients
- 7 1/2 cups powdered sugar sifted so there are no clumps (755g)
- 1/3 cup evaporated milk
- 1/3 cup light corn syrup
- 3 Tablespoons extra-virgin or refined coconut oil melted
- 1 1/2 teaspoons peppermint extract
- 20 ounces Ghiradelli dark chocolate melting wafers (two 10-ounce bags)
- Crushed candy canes, sprinkles, or melted white chocolate for decorating
Instructions
- Combine powdered sugar, evaporated milk, corn syrup, melted coconut oil, and peppermint extract in a large bowl. Beat with an electric mixer until creamy and smooth, about 3-4 minutes. You can knead by hand if it gets too thick.7 ½ cups powdered sugar, ⅓ cup evaporated milk, ⅓ cup light corn syrup, 3 Tablespoons extra-virgin or refined coconut oil, 1 ½ teaspoons peppermint extract
- Divide the filling into two discs and wrap them in plastic wrap. Chill in the fridge for an hour so they are easier to roll out. It should be a stiff, but workable dough that you can touch with your hands.
- Dust your rolling surface with powdered sugar to help keep the filling from sticking. I like to roll this out between two sheets of parchment paper just to be on the safe side. Roll ¼-inch thick with a rolling pin (affiliate link).
- Use a small 2 to 2 ½-inch round cutter to cut out circles. You can smash the scraps together and re-roll until it has all been used up. Transfer the cut circles to a baking sheet lined with parchment paper and freeze for 20 minutes.
- Melt the dark chocolate coating in a microwave-safe bowl using short 20-second bursts of heat. Stop and stir between each burst until melted.20 ounces Ghiradelli dark chocolate melting wafers
- Dip the chilled centers one at a time in the melted chocolate using a fork or chocolate dipping tool. Tap them against the edge of the bowl a few times to remove excess chocolate and use a toothpick or knife to slide them onto the parchment-lined baking sheet. If desired, decorate with crushed candy canes or sprinkles before the chocolate has a chance to set.Crushed candy canes, sprinkles, or melted white chocolate
Notes
- Substitutions: You can replace the coconut oil with an equal amount of shortening or softened butter.
- Dairy-free version: You can sub almond milk or coconut milk for the evaporated milk.
- Peppermint essential oils: If you want to use essential oils instead of extract, just decrease the amount since the essential oils are stronger. I would start with ¼ teaspoon and go from there.
- Sticky filling: If your filling is too sticky to work with, add a little more powdered sugar, a couple tablespoons at a time. If it is too thick for your mixer, just knead it in with your hands.
- Using chocolate chips: If you can’t find the Ghiradelli dark chocolate melting wafers, you could melt 3 cups semisweet chocolate chips with 2 teaspoons of coconut oil instead. The coconut oil will help add shine and snap to the chocolate chips.
- Alternate shaping approach: If you want to try a different approach, I have also made these by just pinching off small pieces that are about 2 teaspoons worth, rolling them between my hands to make little balls, then pressing them flat with the bottom of a cup. It works almost just as well, but feels more tedious and time-consuming for me over just rolling out the dough and using a cutter. But either approach works!


These gave all the store bought peppermint patties a run for their money! These were a fan favorite!
What do you do with the Karo syrup? These look delicious!
Add it along with the other ingredients like powdered sugar, evaporated milk, and melted coconut oil. I mistakenly left it out of that part of the instructions, but have edited it to make sure it’s included there!
Hi, I don’t see Karo syrup mentioned anywhere, can you clarify if it’s needed and how much?
Sure! It’s right there in the ingredient list (1/3 cup) and in the first step of the instructions. I call it “corn syrup” instead of Karo syrup, which might be why you missed it.
I want to make some and it looks so good.
List the amount of each ingredient needed to make receipt.
This recipe would benefit from a measurement of ingredient list… like a real recipe.
It lists light corn syrup in the ingredients, then later, when it talks about assembly, it fails to state when or where the syrup is added.
Not a very helpful recipe.
At the top of the page under the recipe title there is a button that says “jump to recipe”. The recipe card will list all the ingredients, measurements, and instructions. Corn syrup is listed in the first step. I would never talk about a recipe without including detailed instructions on how to make it.
I have not made these yet, but I plan to. Not sure anyone else will eat them, but I know I will….and like the fact that they are freezable. All the more reason to make them. Will save money making them instead of buying York. and these will be better.
Thanks for the recipes.
You will love them Barb! Let me know if you make them!