


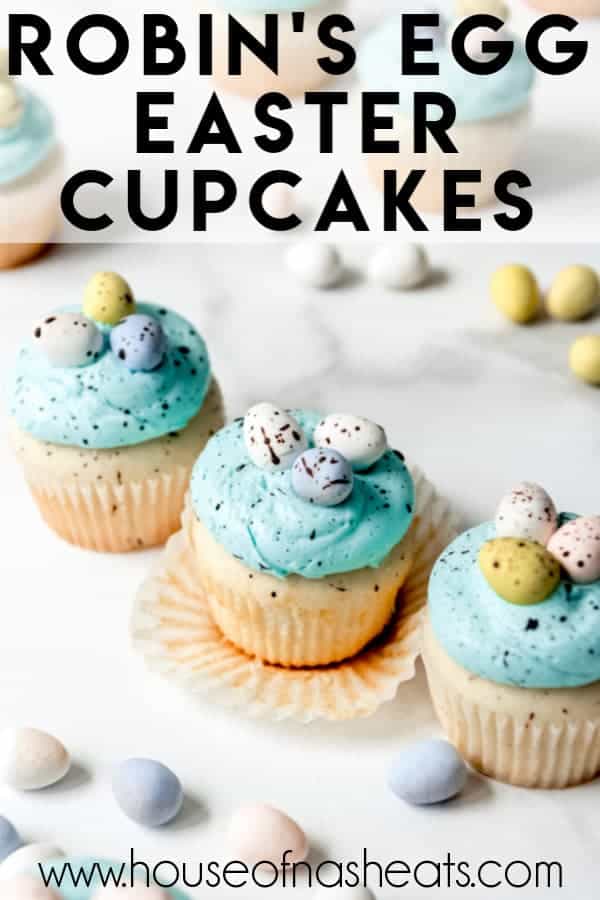
Soft white cupcakes with pale blue buttercream are decorated with Cadbury mini eggs and speckled with spots to make these Robin’s Egg Easter Cupcakes that are the perfect festive dessert for a Spring occasion!

Spring is finally here and all around us there are blossoms blooming and birds chirping!
Which also means it’s time to pick up bags of those addictive Cadbury mini eggs again! I don’t know what it is about the candy shell surrounding the milk chocolate center, but they are just about the most irresistible candy of them all!
I saw these robin’s egg blue speckled cupcakes on Pinterest years ago and haven’t stopped thinking about them ever since. So I literally had to buy a bag of Cadbury mini eggs early and hide them just so I could make these before the candies all vanished!
Planning your Easter menu? Be sure to include my Brown Sugar Glazed Ham, Scalloped Potatoes, and Italian Peas!

But instead of a chocolate base like the original inspiration cupcake, I wanted a classic white cupcake. And of course I made it from scratch instead of using a cake mix.
It’s not that I have anything against cake mixes, but once you try these homemade vanilla cupcakes I doubt you will ever be able to go back to the boxed variety.
Don’t say I didn’t warn you.
The inspiration also called for canned frosting. For that, I probably will judge you. I won’t want to, but it’ll likely happen. Make some homemade frosting. It’s like just a few ingredients, 4-5 minutes of your time, and it’s vastly superior to the canned stuff.


How to make robin’s egg Easter cupcakes
- Bake a batch of your favorite cupcake. I strongly recommend a classic vanilla, but you could do coconut, chocolate, cherry chip, or almost any flavor you like really.
- Make a batch of classic vanilla buttercream frosting and tint it with a little blue food coloring (affiliate link). Don’t go overboard with the food coloring here because you want it a nice pale blue shade like a robin’s egg.
- Pipe or spread a generous amount of frosting on each cupcake. I use my fattest round tip to pipe the frosting on rather than a swirled or ruffled one, but you could even just use a heavy duty ziploc bag with one corner snipped off with scissors.
- Arrange 3 Cadbury mini-eggs on top of each cupcake.
- In a small bowl, whisk together cocoa powder and vanilla extract. Then use a stiff pastry brush or even a clean (probably new) paintbrush and your finger to flick and splatter the chocolate “paint” on each cupcake, creating this speckled effect.
Honestly, my artistic talent is next to zero and I am practically giddy over how pretty and fun these turned out. It’s just my kind of decorating – simple, sweet, and effortless. Anybody can do it.
I will warn you that the chocolate splatter kind of goes everywhere. I found the best way to keep it under control was to just prop up a baking sheet behind where I was working, which made for easier cleanup.


How to store cupcakes
Frosted and decorated cupcakes will keep on the counter in an airtight container for 2-3 days, although if you want them to last longer, you can store in the fridge for up to 5 days. Just allow them to come up to room temperature before serving.
If you want to make these cupcakes farther in advance, you can freeze the unfrosted cupcakes for up to 2 months, then pull out, frost, and decorate before serving.
The buttercream frosting can also be made in advance and kept in the fridge for 1 week or in the freezer for up to 2 months. Just allow it to thaw completely and come to room temperature, then beat it with a mixer again so it is fluffy and smooth enough to use.

More Easter dessert recipes
- French Fruit Tart
- Sour Cream Blueberry Pie
- Cottage Cheese Jello Salad
- Mini Easter Cakes from A Latte Food

Robin’s Egg Easter Cupcakes
Ingredients
Cupcakes
- 1 1/2 cups (212g) all-purpose flour
- 1/4 cup cornstarch
- 1 teaspoon baking powder
- 1/4 teaspoon baking soda
- 1/4 teaspoon salt
- 1/2 cup (113g) salted butter room temperature
- 1 cup (200g) granulated sugar
- 3 egg whites room temperature
- 3 teaspoons pure vanilla extract or vanilla bean paste
- 1/2 teaspoon almond extract (optional)
- 1/2 cup sour cream room temperature
- 1/2 cup whole milk room temperature
Frosting
- 1 cup (227g) salted butter room temperature
- 4 cups (480g) powdered sugar
- 2-3 Tablespoons heavy cream or milk
- 2 teaspoons pure vanilla extract
- 1/2 teaspoon coconut extract (optional)
- Pinch of salt
- Blue food coloring (affiliate link)
Decorating
- 1 Tablespoon cocoa powder
- 3-4 teaspoons pure vanilla extract
- Cadbury mini eggs
Instructions
Make the cupcakes
- Preheat oven to 350℉ (177℃). Line muffin pans with cupcake liners. Whisk the flour, cornstarch, baking powder, baking soda, and salt together in a large bowl.1 ½ cups (212g) all-purpose flour, ¼ cup cornstarch, 1 teaspoon baking powder, ¼ teaspoon baking soda, ¼ teaspoon salt
- Beat the butter on high speed in a stand mixer or using a handheld mixer for 1 minute until creamy and light. Add sugar and beat another 2 minutes. Scrape sides and bottom of the bowl.½ cup (113g) salted butter, 1 cup (200g) granulated sugar
- Add eggs, vanilla and almond extract, beating on medium-high speed until combined. Beat in sour cream.3 egg whites, 3 teaspoons pure vanilla extract, ½ cup sour cream, ½ teaspoon almond extract
- Add the dry ingredients, mixing on low speed just until combined, then scrape the bottom and sides of the bowl.
- With the mixer running on low speed, add the milk, stirring just until combined. Do not overmix.½ cup whole milk
- Fill each cupcake liner about 2/3 full with batter, then bake for 19-22 minutes, until a toothpick inserted in the center of a cupcake comes out clean.
- Cool completely before frosting.
Make the frosting
- In a large bowl using a stand mixer or electric mixer, beat the butter for 2-3 minutes until light and creamy.1 cup (227g) salted butter
- Add 2 cups of the powdered sugar and beat well. Add remaining powdered sugar and beat again.4 cups (480g) powdered sugar
- Add the heavy cream, vanilla, coconut extract, and salt, beating well to reach a nice spreadable consistency.2-3 Tablespoons heavy cream, 2 teaspoons pure vanilla extract, ½ teaspoon coconut extract, Pinch of salt
- Add food coloring (affiliate link), mixing until combined. Transfer the frosting to a piping bag fitted with a wide round tip or a ziploc bag with one corner cut off. Pipe a large circle or mound of frosting on top of each cooled cupcake.Blue food coloring (affiliate link)
Decorate the cupcakes
- Arrange 3 Cadbury mini eggs on top of each cupcake.Cadbury mini eggs
- In a small bowl, whisk together the cocoa powder and vanilla extract until thin.1 Tablespoon cocoa powder, 3-4 teaspoons pure vanilla extract
- Dip a stiff pastry brush or new, clean paintbrush into the cocoa mixture and use your fingers to carefully flick the cocoa mixture onto the cupcakes, creating a speckled effect.
Notes
- The coconut and almond extracts are optional and not overwhelming, but I think they add wonderful flavor to these cupcakes.
- Frosted cupcakes will keep on the counter for 2-3 days or in the fridge for up to 5 days. Bring to room temperature before serving.
- Unfrosted cupcakes or leftover buttercream can be frozen in airtight containers for up to 2 months in the fridge. Let thaw completely at room temperature before using. I recommend beating the frosting again to make it smooth and spreadable after thawing from frozen.


This looks so good! What a fun dessert to make with kids before Easter!
Thanks for sharing! How far ahead can I make it?
You can make the cupcake base a good month or more in advance and freeze them, then just thaw and frost when you are ready. Same with the frosting! But if you are talking assembled and decorated cupcakes, I wouldn’t make them more than 2-3 days in advance and keep them covered and refrigerated in an airtight container.
Where does the cornstarch go in?
With the dry ingredients in step 4. I will edit that instruction to make it a little more clear. Sorry!
Hi can you decorate these overnight or will the mini Cadbury eggs color bleed or get soggy?
Yes, they should be just fine! I have never had a problem with them the next day.
Hi which blue did you use for the food coloring? I really love the color.
Hi! In the blog post I link to the food coloring I love using! You can jump straight to the list of recipe ingredients and I linked the food coloring there. You only need a little bit of the blue to keep it the nice light blue color.