
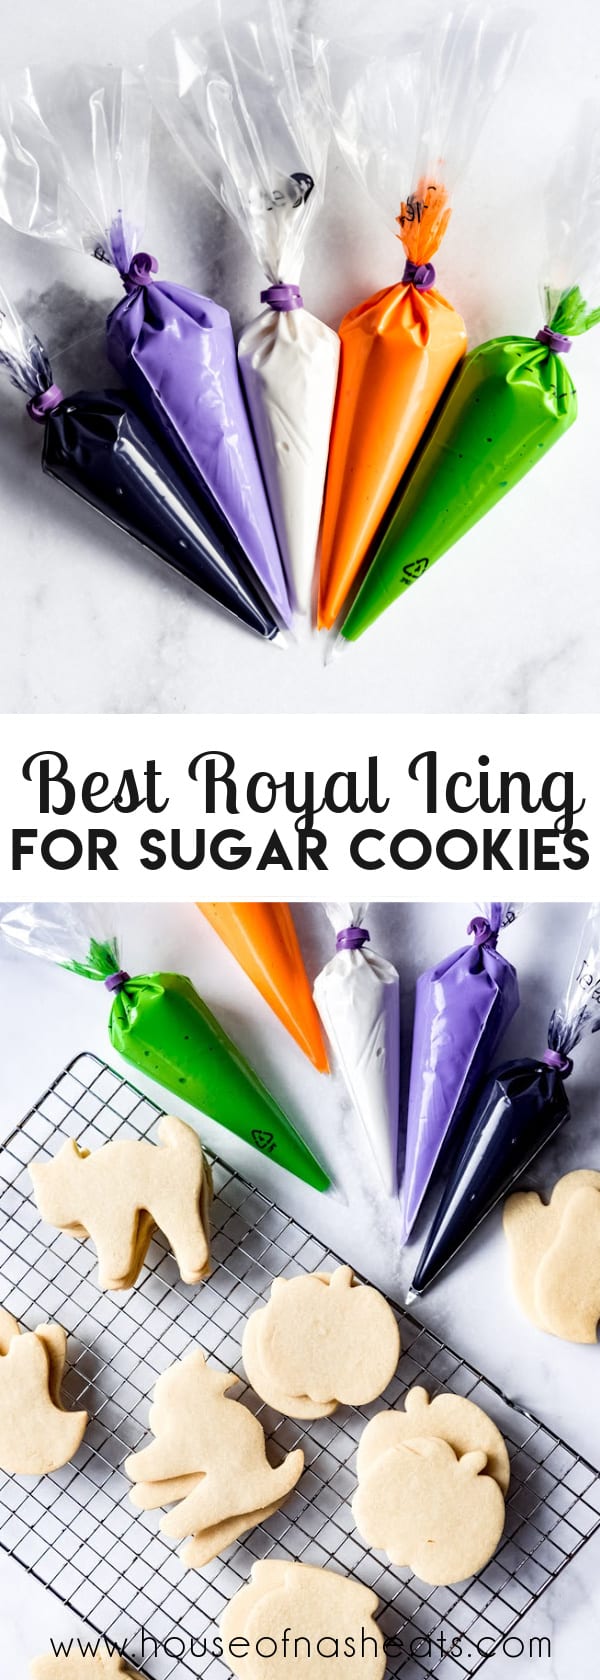

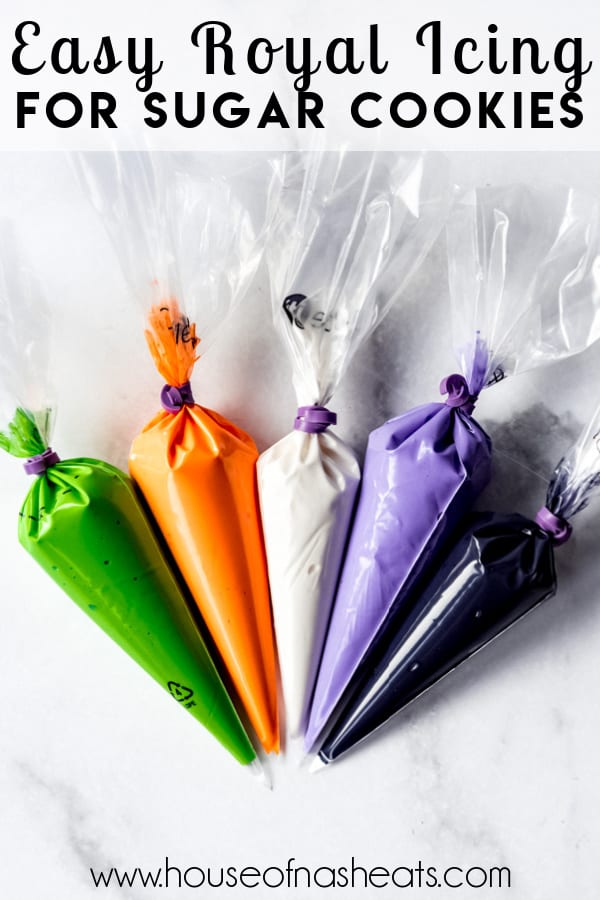
Make this easy royal icing recipe for sugar cookies and you can decorate beautiful sugar cookies for any occasion! I’m sharing all my tips & tricks to give you the confidence you need to try this technique yourself!

I didn’t like sugar cookies with royal icing for years but that’s only because I had only ever tried ones that tasted like cardboard with an edible cement icing on top that was hard enough to break a tooth. But then my friend Tiffany entered my life with her delicious edible works of art and showed me that there was a way to have your cake (erm, cookie?) and eat it too.
Tiffany made fancy sugar cookies for my oldest daughter’s birthday, but then she moved.
So I finally had to figure out royal icing for sugar cookies on my own. But armed with this classic royal icing recipe and my favorite cut out sugar cookie recipe, I realized it’s much more doable than I previously thought!
Myths About Royal Icing
I had some pretty strong misconceptions going in to this endeavor. Such as:
- You need to be an artist to create a beautiful sugar cookie decorated with royal icing. Totally not true. I mean, it’s not like I’m attempting intricate designs or heading to Cookie Con any time soon (yes, there is a convention for cookie artists!). But to make cute, easy cookie designs? You got this.
- Getting just the right consistency is practically impossible and one drop of water too much will cause your icing to run everywhere. False. Yes, thickness or fluidity is important when decorating sugar cookies with royal icing, but it can be demystified by knowing that the two main consistencies used are a thicker piping consistency (think the consistency of toothpaste or really soft cream cheese) and a thinner flood consistency (think the consistency of honey or shampoo).
What is Royal Icing?
Royal icing is a sweet, hard icing made from powdered sugar, egg whites or meringue powder, and flavorings like vanilla or a squeeze of lemon juice. It is used to decorate sugar cookies, gingerbread cookies, or a gingerbread house.
Royal icing dries out completely and almost makes sugar cookies look too perfect. Ya know, if they are decorated by a pro with mad piping and flooding skills instead of somebody like me with a shaky hand and general lack of patience for precision and perfection when I just want to be cramming the dang cookies in my mouth already!.


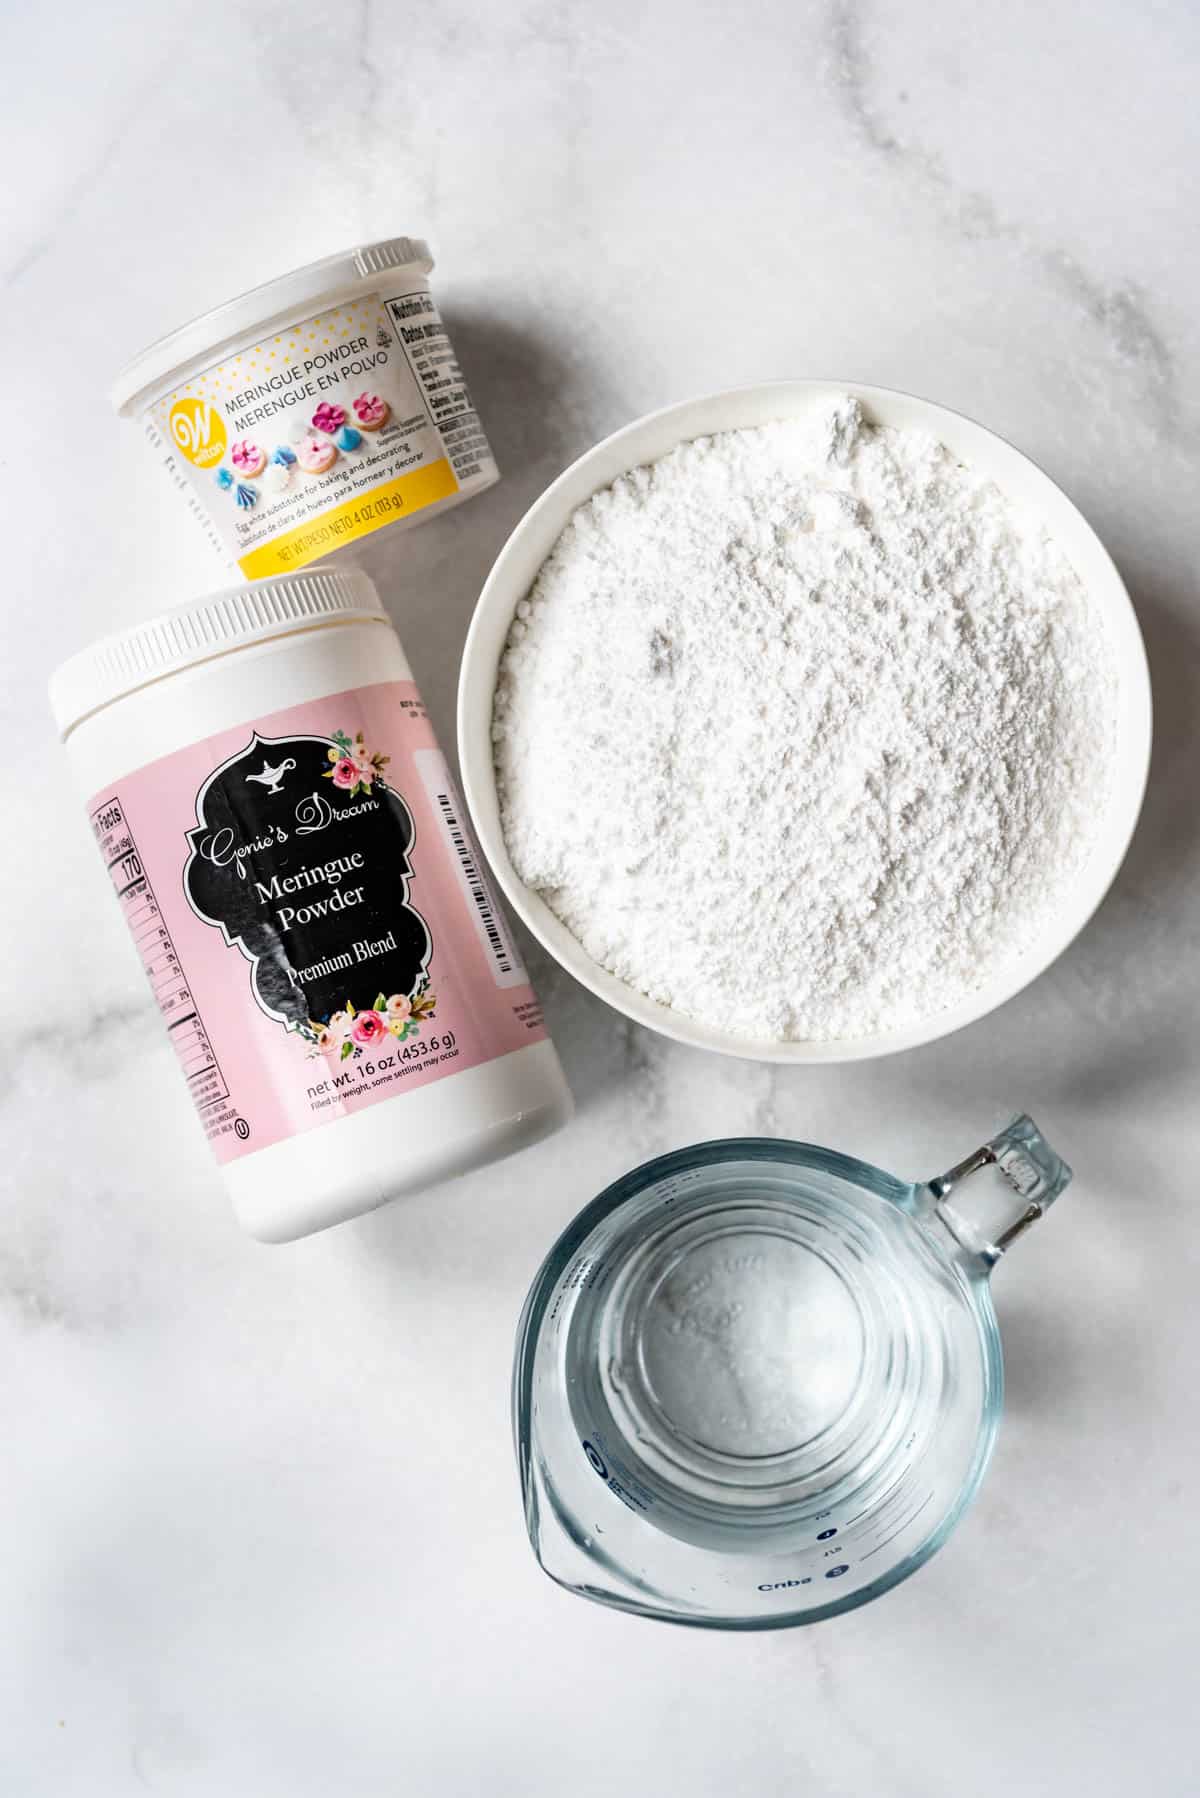
What You’ll Need
Scroll down to the recipe card below this post for ingredient quantities and full instructions.
- Meringue powder – This ingredient is easy to find at grocery stores, craft stores or you can order it online. My favorite brands are Wilton and Genie’s Dream.
- Powdered sugar – Also known as confectioners’ sugar, if it’s lumpy you might want to sift it first before mixing with the meringue powder and water.
- Water – For best results, use room temperature or slightly warm water.
- Optional flavorings – You can add vanilla extract, mint extract, almond extract, or other flavorings to your royal icing if you want.
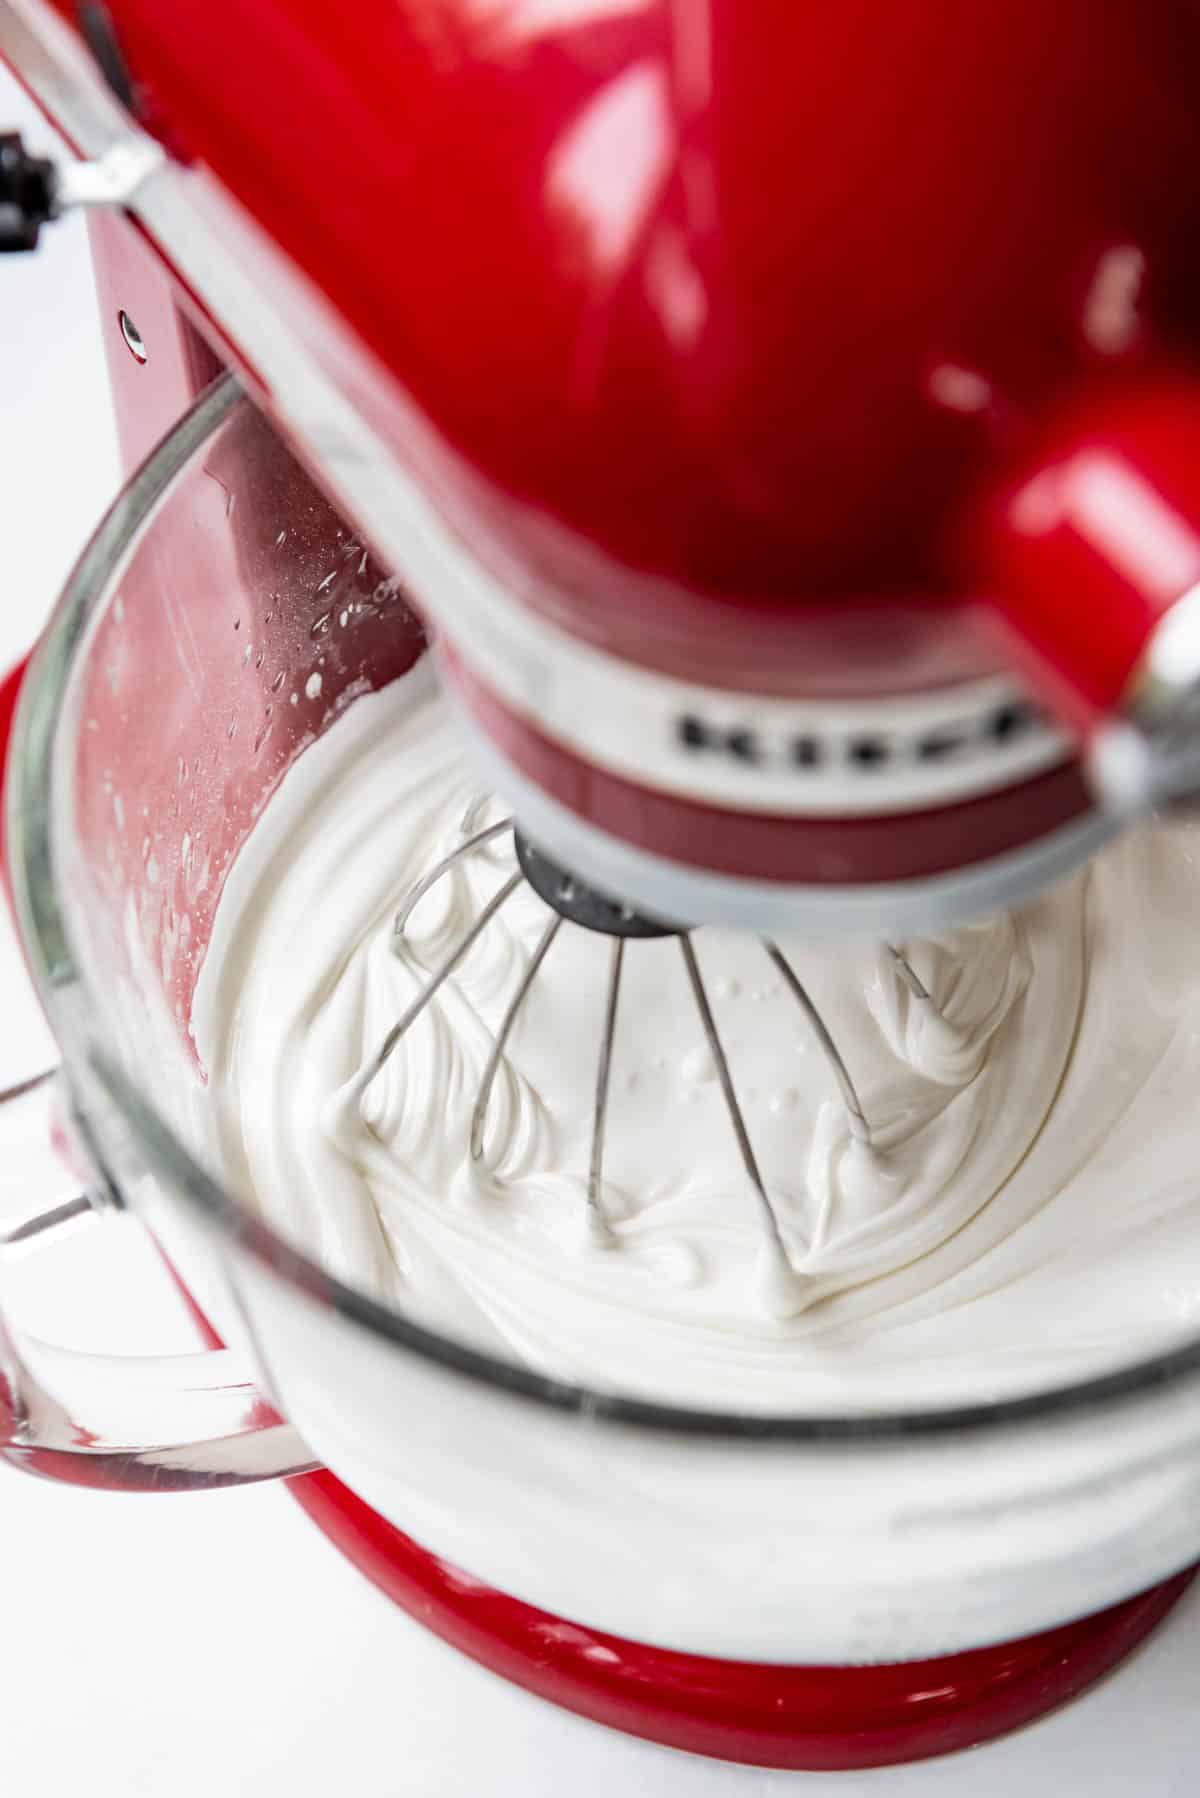
How to Make Royal Icing
Add the powdered sugar and meringue powder to a large bowl and whisk them together. I like to use my KitchenAid stand mixer fitted with the whisk attachment but the paddle attachment or hand mixer will also work.
Add the water and vanilla extract while the mixer is running on medium-low speed. Then increase to medium-high speed until it forms stiff peaks and the icing loses some of it’s glossiness, about 5 minutes.
I don’t like using high speed because I feel like it adds too much air to the royal icing.
Thick vs. Thin Royal Icing
I like to start off with a stiffer, thick consistency icing because it’s easy from there to thin the icing out to a flood consistency just by continuing to add a little water. A thicker royal icing should be spreadable and easy to pipe. It reminds me of the consistency of toothpaste or very soft cream cheese.
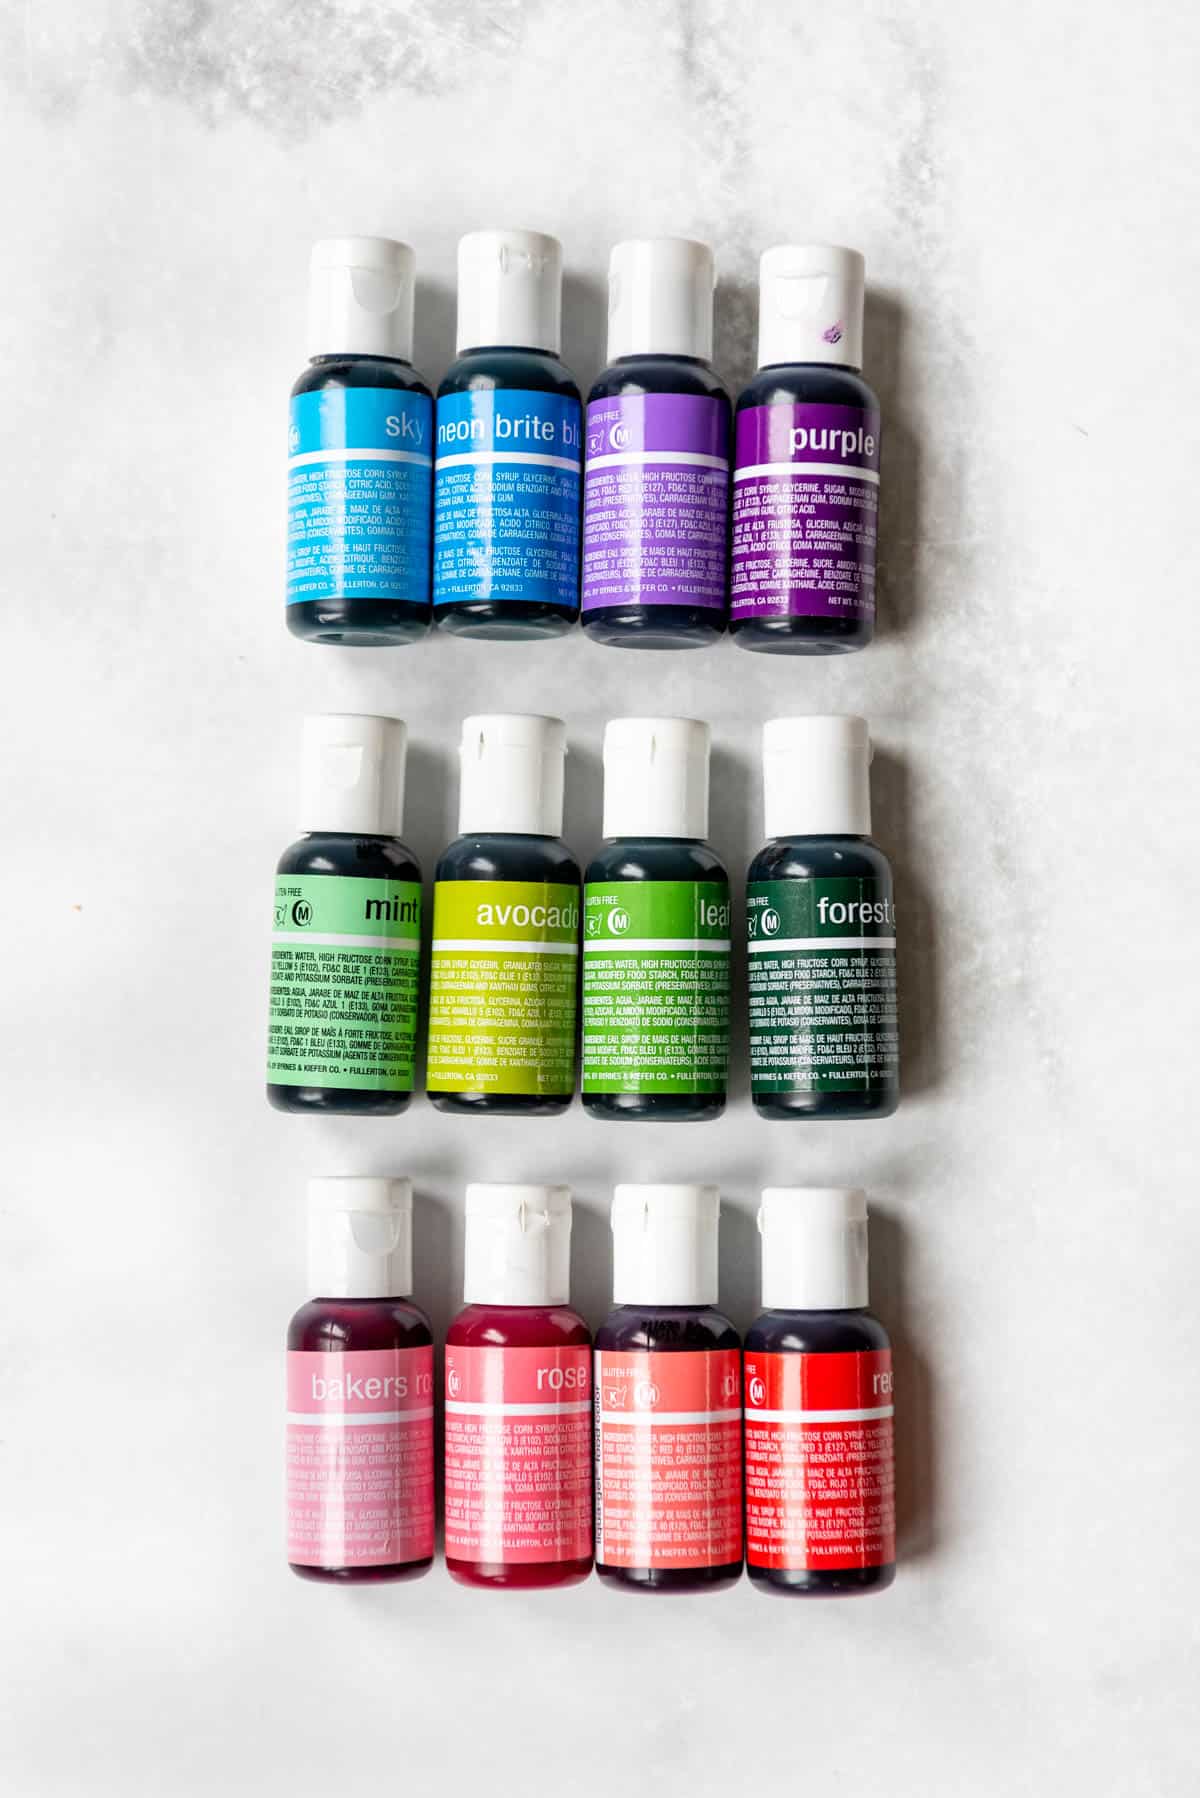
To color the icing, divide it between separate bowls for each color you want. Mix in gel food coloring (affiliate link) (I prefer AmeriColor or Chefmaster colors) until you get the shade you want.
You can use lighter colors first, then build on that color with darker colors to save yourself dirtying a separate bowl for every color. I will start with light pinks, blues, yellows, or greens, then move to darker reds, purples, oranges, etc.

Once colored, you can use the thick icing to pipe borders to decorate your cookies or go ahead and thin out the icing to a flood consistency by adding additional water a little at a time and stirring well after each addition.
For flooding, the royal icing should be thinned out enough to melt in on itself in about 10-15 seconds when you run a knife through it.
Think about the viscosity of honey or shampoo to help you gage flooding consistency. It should melt in on itself in about 10 seconds but not be so thin that it will run off the sides of the cookie.
If you go too far and add too much water to your flood icing it will be too thin. But you can save it by adding a spoonful or two of the thicker consistency icing and mixing that in.
Using Thick Royal Icing
When I was just starting out with royal icing, I found it much easier to use thick royal icing to pipe borders around the edges of my cookies, then fill them in with thinner flood icing. The thicker icing border helps create a barrier to hold in the flood consistency icing, which is advantageous if your flood icing is a little thinner than you meant it to be. The thicker consistency royal icing can also be good for piping some details on more intricate designs.
The main downsides of this approach is that it takes a little more effort and forethought, and the border of thicker icing is sometimes visible in the finished cookie. It’s also less forgiving if you have a shaky hand, but it’s a great learning approach if this is your first time using royal icing.
Using Flood Consistency Royal Icing
Alternatively, you can thin out all of your icing to flood consistency from the get-go and use it to both outline and fill your cookies by piping the border with flood icing and then immediately “flooding” the middle of the cookie to fill it in. I recommend using a toothpick or scribe tool to fill in gaps between the border and the flooded center or to pop any air bubbles, if needed.
The upside of this approach is that your border will completely blend in with the flooded center and be invisible. Also, you avoid the nuisance of having to make two consistencies of every icing color by using flood consistency for all your decorating.
The main downside is the risk that your flood consistency icing is too thin and it could run off the edge of the cookie. However, this is my preferred method because once you have figured out the right flood consistency you shouldn’t have any problems with your icing being too thin.
How to Decorate with Royal Icing
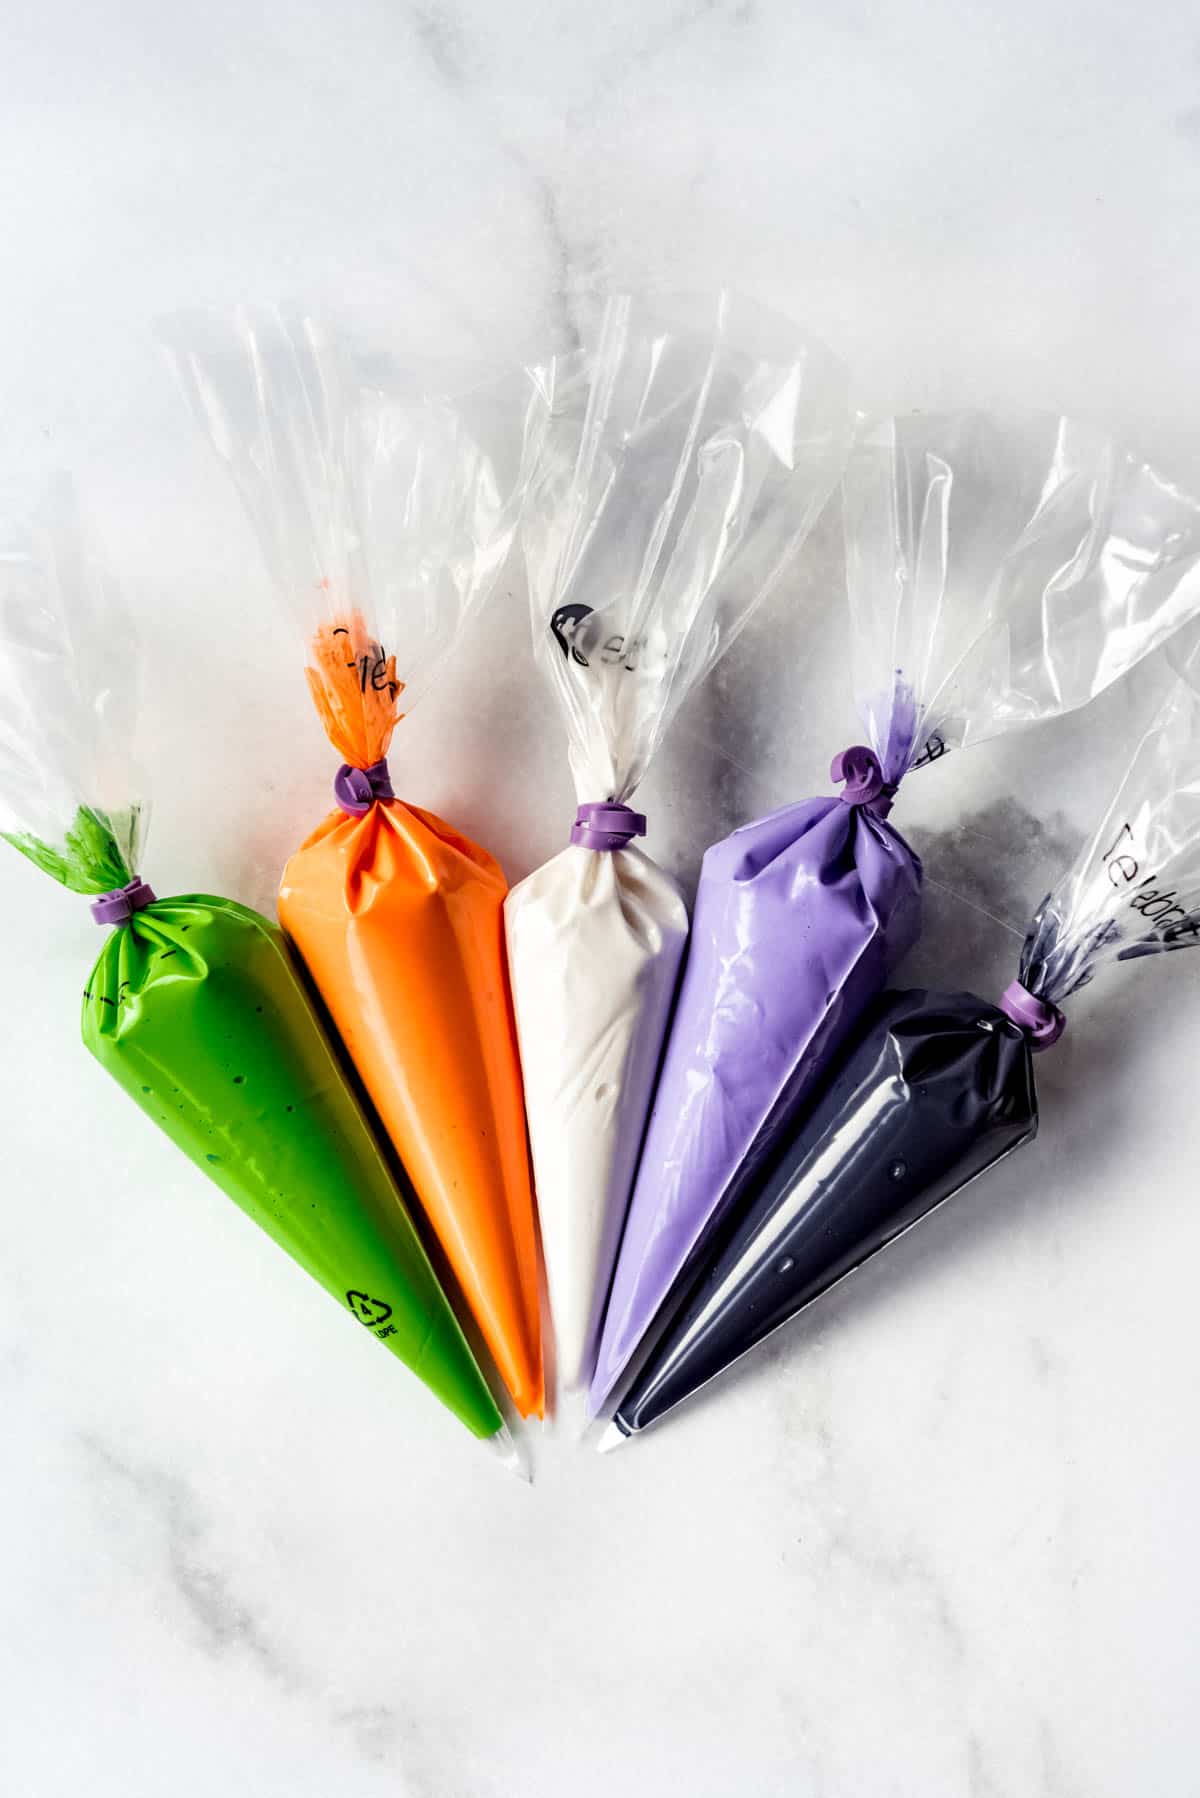
Once your icing is ready to go, transfer it to a piping bag or even a ziploc bag for decorating your sugar cookies. You can use a small piping tip if you have them, or just snip a tiny corner of the bag instead. Just start really small when snipping off the corner of the bag since it’s not like you can undo things if you snip too much and get too heavy of a flow, which will make it difficult to pipe borders around your cookie edges.
For borders, I find that it is easier to hold the piping bag slightly above the cookie so that the icing sort of just falls onto the cookie instead of dragging the tip right along the surface. You’ll get cleaner lines this way. It’s sort of like laying down a thin rope of icing along the edge and you can practice on a piece of plastic wrap or plate to get the hang of it before you actually start in on a cookie.
Also, if you have a shaky hand like me, it helps to stabilize your arms by resting them on the edge of your work surface.
Wet-on-wet technique
This technique is where you pipe a second color right on to the still-wet first layer of royal icing so that the design melts together. I used this technique to add eyes and mouths for the ghosts in the pictures below. A favorite easy design using the wet-on-wet method is polka dots which you can make by piping dots of a contrasting color onto the still wet flood colors covering your cookie.
Wet-on-dry technique
This approach requires a little more patience because you will pipe part of your design, then let it harden for an hour or two before piping on additional design details. You can see wet on dry technique in action in the image of holly leaves and pumpkins below.


Tips for Success
- If you cannot find meringue powder or would rather use raw egg whites, you could just replace both the water and meringue powder called for in the recipe with 3 large egg whites.
- Use clear vanilla extract if you have it to avoid tinting the icing. This will help it keep a pure white look.
- If your icing it too thin, don’t just add in more powdered sugar. Instead, add some of the thicker consistency icing to save it. Keep in mind that it is easier to thin out icing by adding a little extra liquid and more difficult to thicken the icing, so go slowly adding more water until you get the consistency you like.
Recipe FAQ’s
The biggest difference between royal icing and a frosting like buttercream is in the texture: buttercream is creamy and soft whereas royal icing hardens to an edible candy-like shell. Royal icing also doesn’t have the same buttery flavor as buttercream.
Yes, absolutely! Some recipe use raw eggs, but my version is for royal icing with meringue powder, which is perfectly safe to eat. If you want to try royal icing with raw eggs, I recommend using pasteurized eggs which are safe for consumption.
Once the cookies are decorated with royal icing, they will take about 6 to 8 hours to dry out at room temperature. Which means if you want to pipe more detailed designs without them settling in to the first layer of icing, you are most likely looking at a multiple day decorating process.
Can I freeze royal icing?
Yes! Royal icing can be frozen for up to 2-3 months. It’s a great way to plan ahead or to save any leftover icing you have after making sugar cookies. Just be sure to seal each color separately in a freezer-safe, airtight container or bag before freezing it.
Then when you are ready to use it, just transfer the icing to the fridge to thaw overnight and let it come to room temperature on the counter the next day and use like normal.
Sugar cookies decorated with royal icing can also be frozen as long as the icing has had time to set completely first. Just thaw at room temperature before enjoying.

More Dessert Recipes


Did you make this recipe?
Let me know what you thought with a comment and rating below. You can also take a picture and tag me on Instagram @houseofnasheats or share it on the Pinterest pin so I can see.

Easy Royal Icing Recipe for Sugar Cookies
Ingredients
- 4 Tablespoons meringue powder
- 4 cups powdered sugar (about 1 pound)
- 6 Tablespoons warm water + additional 3-4 additional tablespoons for thinning to flood consistency
- 1 teaspoon vanilla extract
- Gel food coloring (affiliate link) (I like AmeriColor or Chefmaster)
Instructions
- In a large bowl of a stand mixer, whisk together the meringue powder and powdered sugar, then slowly mix in the water and vanilla extract while the mixer is running on medium-low speed. Increase speed to medium-high and beat until stiff peaks form, around 5 minutes. This can be done with a hand mixer, but will take a couple minutes longer.
- Divide the thick white icing into individual bowls and add gel food coloring (affiliate link), a few drops at a time, mixing well until you achieve the shades you like. From there, you can reserve some of the thicker icing for piping borders as described in the post, or thin all of the icing to flood consistency.
- To thin each color to flood consistency, add 1 teaspoon of water at a time and stir well, continuing to add water by ½ teaspoon increments until you reach your desired consistency. If you are thinning the entire batch of icing at once to flood consistency, it will take an additional 3-4 tablespoons for a total of 9-10 tablespoons of water.
- Once your icing is colored and the right consistency, scoop it into a piping bag fitted with a Wilton #2 or #3 tip. Decorate your sugar cookies by first outlining the border, then filling in the middle with flood icing which should settle into itself. Use a toothpick or scribe tool to fill in any gaps by spreading the icing around, then tap the cookie on the counter a few times to help the icing settle into a smooth, even layer.
- Dry cookies at room temperature for 6-8 hours until the royal icing is completely firm before adding additional layers or design or stacking for transport.
Video
Notes
- Be sure all bowls and utensils are totally grease-free or your icing will never reach the consistency you are going for.
- Using Egg Whites: If you cannot find meringue powder or would rather use raw egg whites, you could just replace both the water and meringue powder called for in the recipe with 3 large egg whites.
- How to Thicken: If you thin out your icing too much, you might be able to save the batch by continuing to beat the icing. This incorporates more air and lets some of the liquid evaporate to theoretically thicken the icing. Or if you have additional thick icing that you haven’t thinned, you can add that to the icing that is too thin to help save it.
Nutrition
This post was originally published in April, 2018. The photos and content were updated in November, 2022.


Hi, looking forward to trying this. Can I use cream of tartar instead of meringue powder? Thanks!
No, cream of tartar won’t work as a substitute for meringue powder. The only approach that I know of that works is to use actual egg whites instead.
Can you show turning the gingerman upside down to make a dearhead? I have made mine but no one has put a pix on how to decorate the cookie as a Dear. Will you do so and text me it is there on your site, l saw them earlier this year but now my photo has disappeared on my phone. I guess it is in cyberspace🤣😂. Thank you
I haven’t done that before but I’ve seen it too! It’s a very cute design.
I want to use glycerine, how much should I add to your recipe
I’ve never used glycerine, so I really can’t say. Sorry!
I made this and your sugar cookies and they were fantastic. The icing is smooth and sets beautifully.
Thanks so much, Marie!
How do you store leftover royal icing and for how long?
Thanks in advance.
Leftover royal icing can be stored in the fridge as long as you cover the surface with plastic wrap. It needs to actually touch the icing so that a shell doesn’t form on the top. I wouldn’t store if for longer than a couple of days, but I have heard that it actually freezes really well in freezer-safe ziploc bags for up to 1 month. Then you just thaw it on the counter before using!
Could we store it in a container in the freezer as well or only zip lock?
Yes, you can store it in an air tight container.
Can royal icing be frozen to save for later (before adding water to make it runnier)?
Yes! You can freeze your royal icing for up to about 2 months, even if you have already added the water to make it the right consistency. It’s a great way to save leftover royal icing rather than just tossing it.
If we can’t find meringue powder what is a alternative ?
If you can’t find meringue powder, you can use egg whites instead! Just leave out the water as well. There are instructions for substituting egg whites for meringue powder in the recipe notes.
Hi there, I know it’s an old post but wonder how this icing performs overnight. Can you make it the day before and store it in the piping bags?
Would you refrigerate or just keep in an airtight container?
How long does the icing stay runny in the piping bag ?
Yes, you can make this in advance and store it in the piping bags! As long as the bags are sealed and the recipe is made as written with meringue powder, you can leave the bags of icing at room temperature for up to 2 weeks!
The recipe call for 4 cups of powered sugar, which equals two pounds. I also used over 12 tablespoon of water. Just thought you might make a correction. It turned out good
Liz, actually when weighing powdered sugar, 4 cups is roughly equivalent to 1 pound. It is fluffy and light therefore you get more cups per pound.
How much icing does this recipe yield?
Thank you so much for sharing your ideas. They were very easy to follow. Happy Holidays to you and your family!
Can I use regular food coloring? I domt happen to have any gel!
The problem with regular food coloring is that it adds more liquid and isn’t as strong in color as the gel-based type. Yes, you can use it, but be sure to do it on thicker icing first so it doesn’t thin out too much.
My icing isn’t getting fluffy what do i do?
Is it runny? If it’s not thickening up, that sounds like a measuring issue. Either you are missing some of the powdered sugar, or too much water was added up front.
I keep a small spray bottle with water in it and that way I can thin the icing out by adding just a small amount of water at a time to achieve the desired consistency. If I need to warm the water just a little I pop the bottle into the microwave oven and zap it. As a novice at using royal icing with meringue powderI found this one little thing to be extremely helpful.
How long can we keep the royal icing in the fridge
I wouldn’t keep it in the fridge longer than a few days. Royal icing freezes really well, so my preferred choice would be to freeze it and just let it thaw when I’m ready to use it.
Thanks for a great recipe and directions for outline and flooding! It was my first time trying royal icing and it came out perfect!
I’m so happy to hear that!
This was so helpful! Since I’ve never made royal icing before, I appreciated all the info
I’m glad it was helpful!
I can’t wait to try this recipe! Would you have an alternative recipe for those of us who can’t eat wheat? I’m wondering if I can just substitute the all-purpose flour for either oat flower or gluten free flower
I can’t wait to try this recipe! Would you have an alternative recipe for those of us who can’t eat wheat? I’m wondering if I can just substitute the all-purpose flour for either oat flour or gluten free flour
Hi! I just made this recipe today! It’s great ! Except it is cracking…what did I do wrong!?! Did I over mix it? I mixed it for about 7 minutes. It was still pretty runny at 5 so I scraped the edges and then mixed for 2 more minutes then it was good. I used it right away & didn’t refrigerate or freeze it.
Thank you!!
easy and looks flop free!
This turned out so well! It hardened and tasted good! First Royal icing recipe that actually hardened and worked to decorate
So if I use the egg whites instead and don’t use the water either, how will it thin the icing out?
Natural egg whites have enough liquid on their own to get almost just the right consistency. Then you can add water as needed to thin it out to the perfect flooding consistency.
Amazing recipe and great results! Thank you!
Thank you for sharing the Royal icing recipe and tips. We made Christmas cookies and using the RI recipe. Worked perfectly! I will use this from now on.
I have been putting off using royal icing to decorate cookies for years – assuming it would be hard. This recipe was super easy to make and I am so glad I thinned my icing to spreading consistency & used thst for my border. It was super easy and fun!
I’m making this now and just wanted to point out that when you click the 2 to double or the 3 to triple the recipe, it doesn’t change the pounds of confectioners sugar. It says 1 pound for them all. I kept thinking something was wrong and finally figured it out … before I started making it thank goodness!
Yes, I wish the multiplier tool could do that but it can only increase the amount of the principal measurement choice I use. I keep hoping that the developers of the recipe card plug-ins that I (and most food bloggers) use will create a way for us to add a secondary measurement option that will adjust as well!
It turned out great and was super easy for my kids to create beautiful cookies! Thanks!
Hello 🙂
Im new at this, can you make cookies, put royal icing and then freeze it? I want to be able to make this in advance…at least a week!
Thank you so much
Yes, you sure can!
Why does it taste like plastic?!?!
Made this recipe for my first attempt at royal frosting. It was very beginner friendly. 🙂
Is it possible to leave the extras in the fridge over night? Or a couple days
Thanks?
Yes, they will do great in the fridge for a few days or you can even freeze it! Just be sure that the icing is completely enclosed so it doesn’t dry out.
How many egg whites for 1 1/2 cups powdered sugar?
If you cannot find meringue powder or would rather use raw egg whites, you could just replace both the water and meringue powder called for in the recipe with 3 large egg whites per 4 cups of powdered sugar. If you can, maybe just round it to 2 cups of powdered sugar and use 1 1/2 large egg whites. You could probably just use 1 large egg white for 1 1/2 cups powdered sugar.
This icing recipe was very delicious and my whole family really enjoyed the sweet crunch with the cookies.
I also love how organized this site is. It made it really easy to find and follow the recipe. Not only that but the recipe was very explicit, I had no questions!
GREAT JOB! 🫶
Wow that is really so nice of you to say! Thank you so much! I’m glad your family enjoyed it and thanks for making this recipe!
Love this recipe. I used the egg whites as substitute and it came out perfect! Will definitely use again!
My aunt, who was near my age, decorated Christmas cookies one year with a glaze that was transparent. When I asked her how she did that, she refused to answer. (Not out of character)
Could you please research and reveal how this was done?
It was as beautiful as your Royal Icing recipe and tips for success.
(I used to hate Royal Icing for the reasons you mentioned.)
It sounds like a simple glaze – just 1 cup powdered sugar + 2 tablespoons water, apple juice, or milk, whisked together until smooth. That wouldn’t be totally transparent, but it would be thin and possibly close to what you experienced? My only thought for a truly transparent glaze would be some kind of cooked sugar mixture to remove the cloudiness. It sounds very interesting!
Im going to try this recipe in the morning, so I haven’t an opinion on this. Let me say I love the extra info, little tricks of the trade
Love it! Thank you 👍
To dry out the icing, do you leave the cookies in the open air or in airtight containers? Wondering if the cookies would get dried out on the counter. Thanks!
Yes, leave them out in the open to dry out. The icing actually seals the top of the cookie and keeps it from drying out.
I would like to know how many cookies I can do with this reciept.
Easy peasy. Thanks
I bought my meringue powder this year at our bulk baking store. I found the icing to be really gritty. can I put the powder in a processor and grind it up more? I’m wondering if this is the reason my icing was gritty? Can you recommend a good quality meringue powder? So much money spent on baking, only to not turn out good at all
Yes! My favorite meringue powder is by Genie’s Dream. You can order it online (I usually get it at Amazon). It’s definitely the best.
Hi. Weird question. How hard does this icing become? I will be making cookies for a nursing home and I worry that the icing might be too hard for old teeth. Thanks!
That’s an understandable question. I don’t think it would be a problem. It’s not as hard as smarties or a thin sucker or something like that. Maybe more like the firmness of biting into a Tums? LOL. I can’t think of something else off the top of my head that might be comparable. It really isn’t bad and I think your residents would be fine.
Once cookies are decorated,how should they be stored?
Could they be frozen? Once decorated?
Can’t wait to try these.
Thank you
Yes they can be frozen once the icing has completely dried. When defrosting leave the cookies on the counter in the container until they are fully defrosted.
5 stars
Consistency was perfect. I had tried royal icing before and it was always a hit or miss for me. This recipe made it so easy. Thank you for sharing this!
Thank you for making it!
This is a great recipe and it was, as described, fairly easy to make. The watering down to get to the correct consistency can be a bit touch and go as explained, but this recipe works really well and yielded great results!
I made the royal icing today and I understand what you mean about the thickness now. I also shake from Essential Tremor so I have been staying away from decorating with icing till I found your site today. They are not perfect but will do and with more practice will be better I hope. Thank you+
That makes me so happy to hear! I am so glad you tried the royal icing! And believe me mine are never perfect but the royal icing is fun to use and decorate with. I would love to see any pictures you may have! You can email them to me!
My first time attempting royal icing! Was truly so easy and yummy!
Thank you Leigha! I would love to see pictures of your cookies! Royal Icing is so fun!
This has been the most delicious tasting royal icing I have ever made. This recipe is amazing thank you so much!!!
Thank you so much! I’m thrilled to hear it turned out well for you. Thanks for taking the time to leave a comment!