
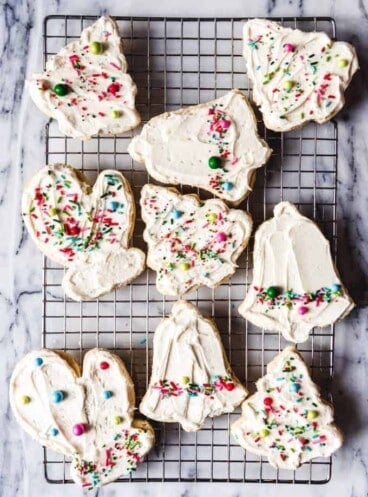
Make this easy royal icing recipe for sugar cookies and you can decorate beautiful sugar cookies for any occasion! I’m sharing all my tips & tricks to give you the confidence you need to try this technique yourself!

I didn’t like sugar cookies with royal icing for years but that’s only because I had only ever tried ones that tasted like cardboard with an edible cement icing on top that was hard enough to break a tooth. But then my friend Tiffany entered my life with her delicious edible works of art and showed me that there was a way to have your cake (erm, cookie?) and eat it too.
Tiffany made fancy sugar cookies for my oldest daughter’s birthday, but then she moved.
So I finally had to figure out royal icing for sugar cookies on my own. But armed with this classic royal icing recipe and my favorite cut out sugar cookie recipe, I realized it’s much more doable than I previously thought!
Myths About Royal Icing
I had some pretty strong misconceptions going in to this endeavor. Such as:
- You need to be an artist to create a beautiful sugar cookie decorated with royal icing. Totally not true. I mean, it’s not like I’m attempting intricate designs or heading to Cookie Con any time soon (yes, there is a convention for cookie artists!). But to make cute, easy cookie designs? You got this.
- Getting just the right consistency is practically impossible and one drop of water too much will cause your icing to run everywhere. False. Yes, thickness or fluidity is important when decorating sugar cookies with royal icing, but it can be demystified by knowing that the two main consistencies used are a thicker piping consistency (think the consistency of toothpaste or really soft cream cheese) and a thinner flood consistency (think the consistency of honey or shampoo).
What is Royal Icing?
Royal icing is a sweet, hard icing made from powdered sugar, egg whites or meringue powder, and flavorings like vanilla or a squeeze of lemon juice. It is used to decorate sugar cookies, gingerbread cookies, or a gingerbread house.
Royal icing dries out completely and almost makes sugar cookies look too perfect. Ya know, if they are decorated by a pro with mad piping and flooding skills instead of somebody like me with a shaky hand and general lack of patience for precision and perfection when I just want to be cramming the dang cookies in my mouth already!.


What You’ll Need
Scroll down to the recipe card below this post for ingredient quantities and full instructions.
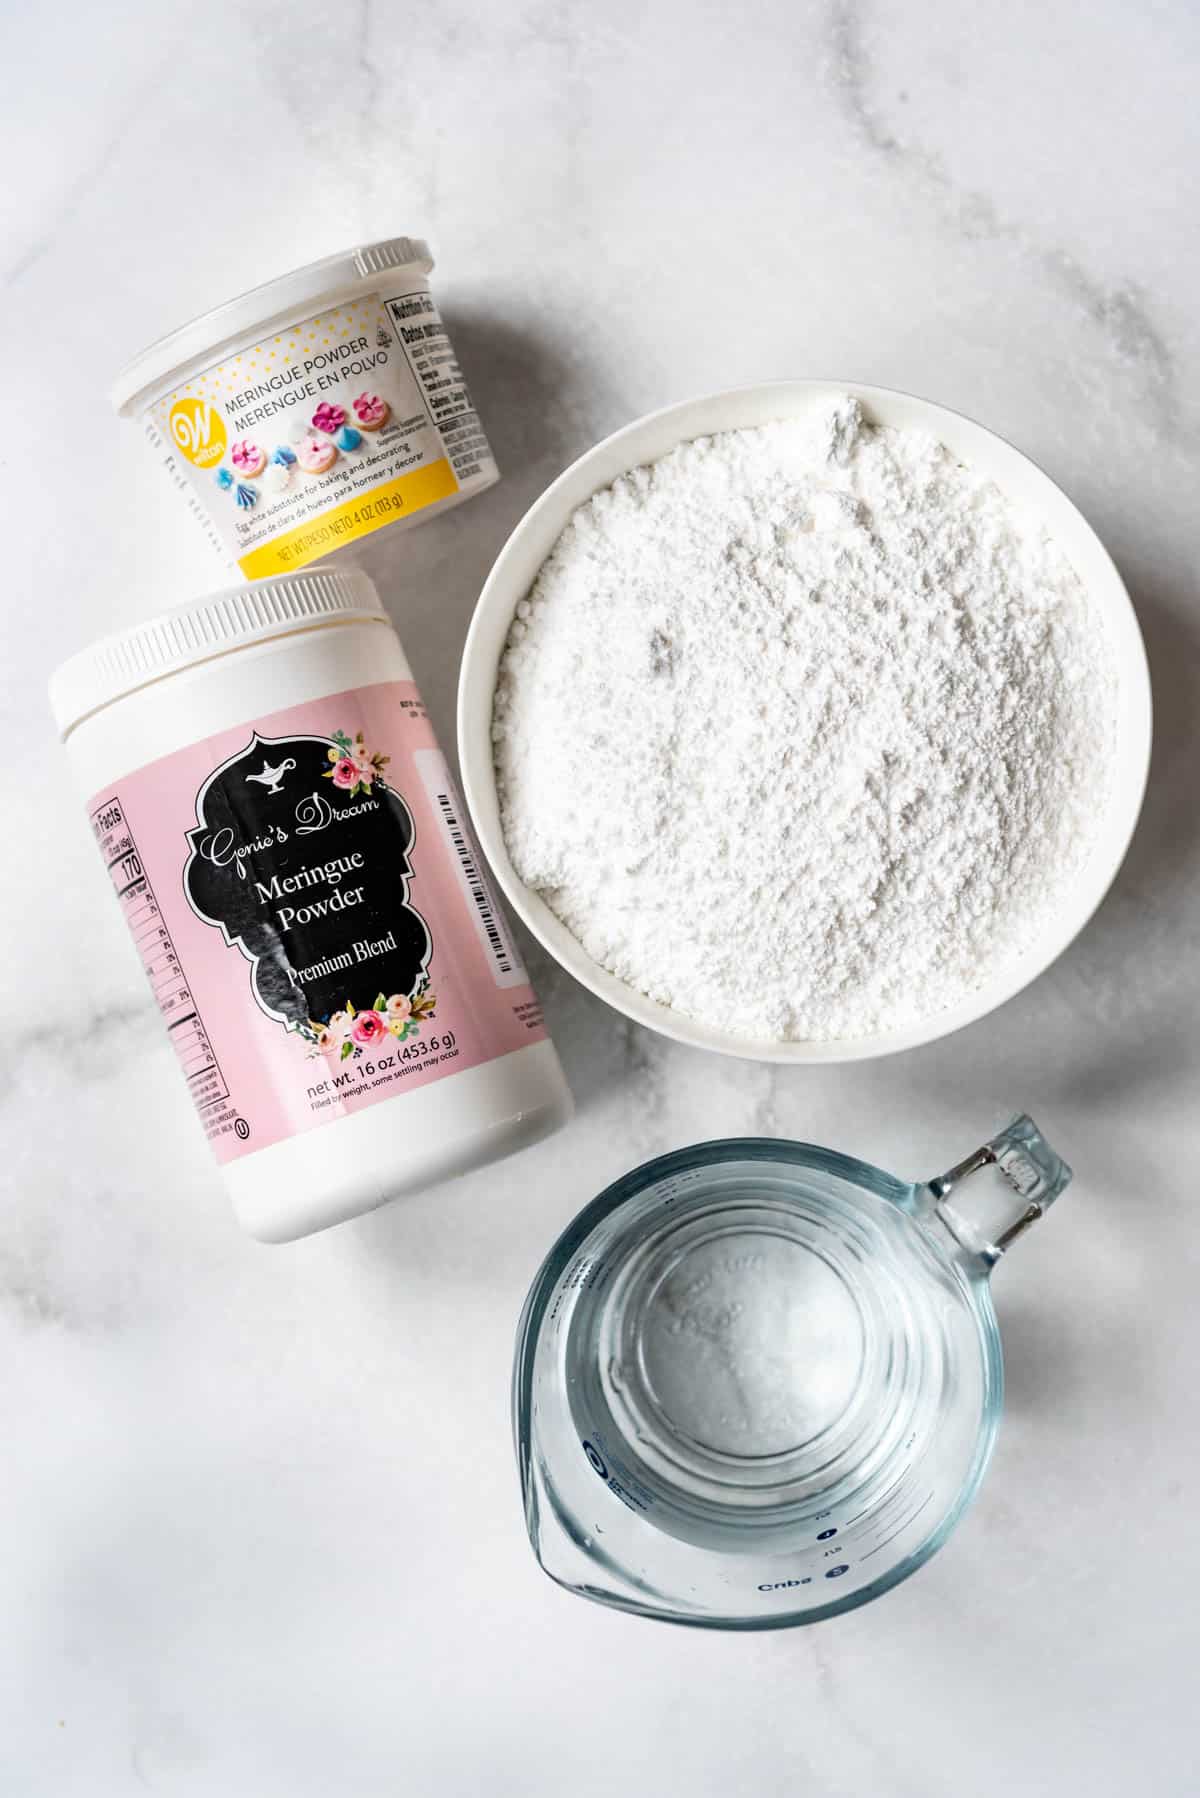
- Meringue powder – This ingredient is easy to find at grocery stores, craft stores or you can order it online. My favorite brands are Wilton and Genie’s Dream.
- Powdered sugar – Also known as confectioners’ sugar, if it’s lumpy you might want to sift it first before mixing with the meringue powder and water.
- Water – For best results, use room temperature or slightly warm water.
- Optional flavorings – You can add vanilla extract, mint extract, almond extract, or other flavorings to your royal icing if you want.
How to Make Royal Icing
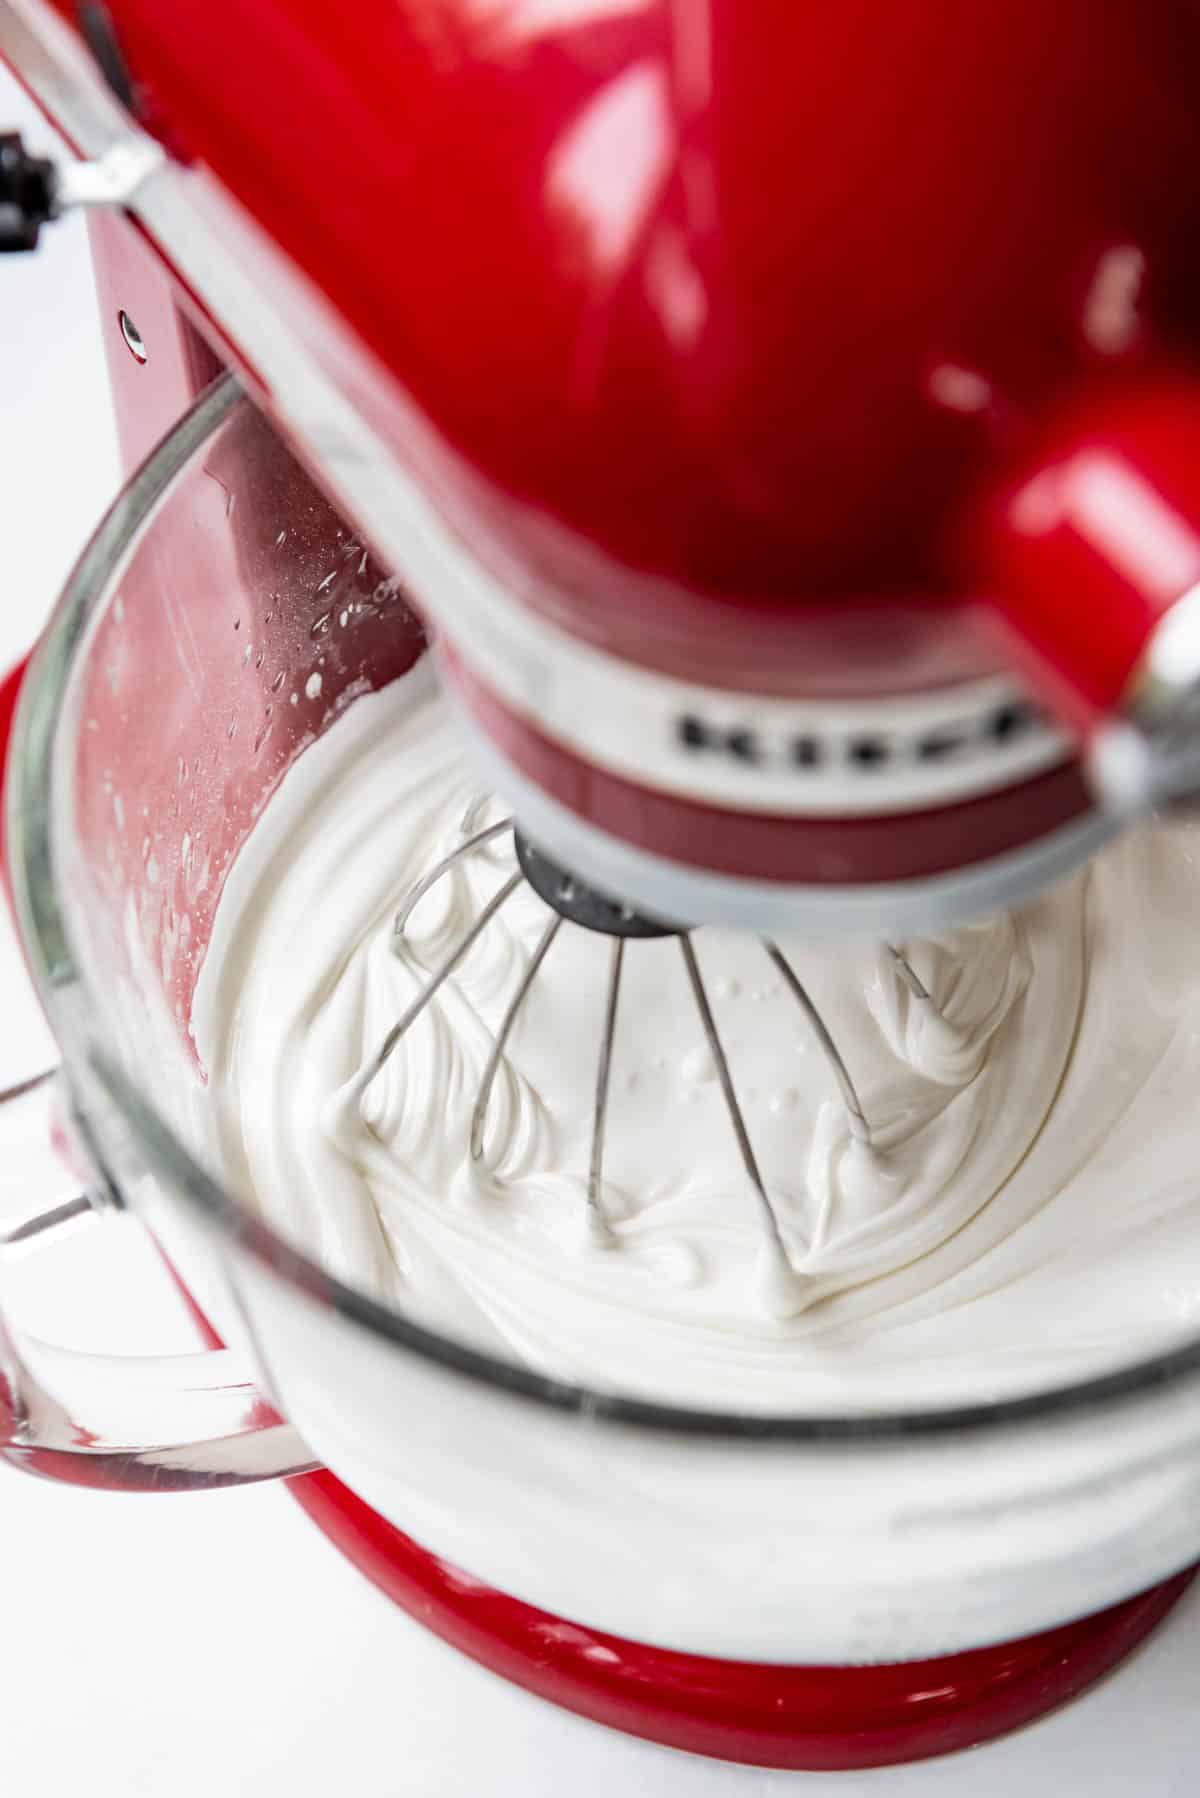
Add the powdered sugar and meringue powder to a large bowl and whisk them together. I like to use my KitchenAid stand mixer fitted with the whisk attachment but the paddle attachment or hand mixer will also work.
Add the water and vanilla extract while the mixer is running on medium-low speed. Then increase to medium-high speed until it forms stiff peaks and the icing loses some of it’s glossiness, about 5 minutes.
I don’t like using high speed because I feel like it adds too much air to the royal icing.
Thick vs. Thin Royal Icing
I like to start off with a stiffer, thick consistency icing because it’s easy from there to thin the icing out to a flood consistency just by continuing to add a little water. A thicker royal icing should be spreadable and easy to pipe. It reminds me of the consistency of toothpaste or very soft cream cheese.
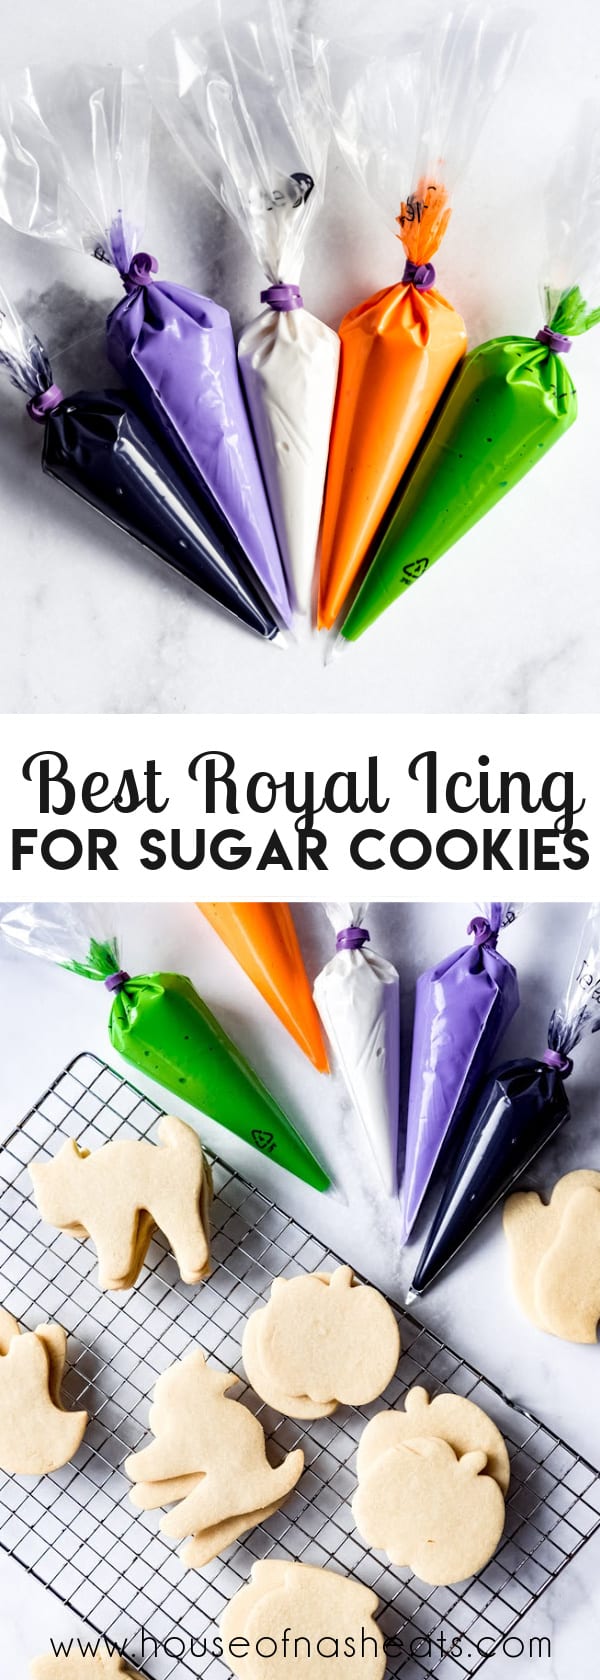
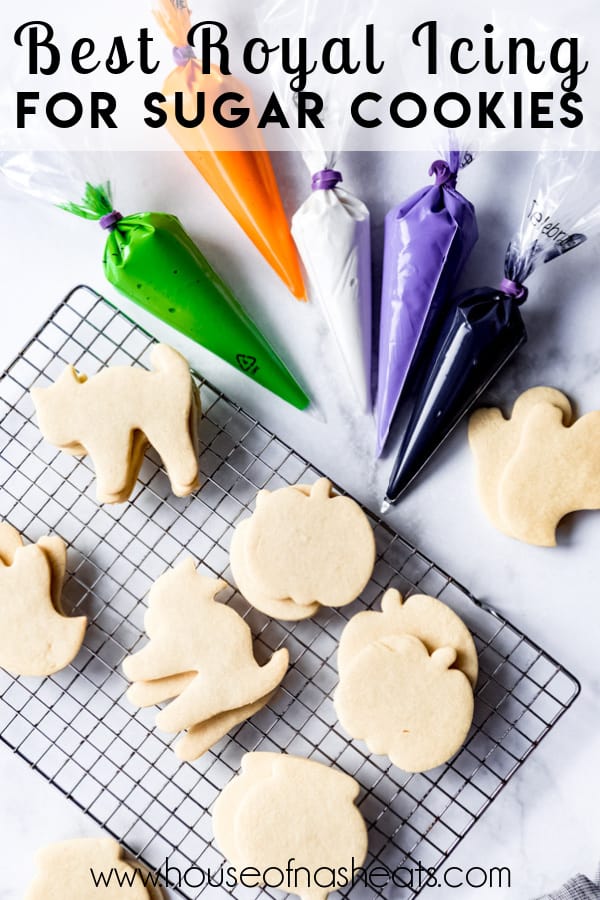
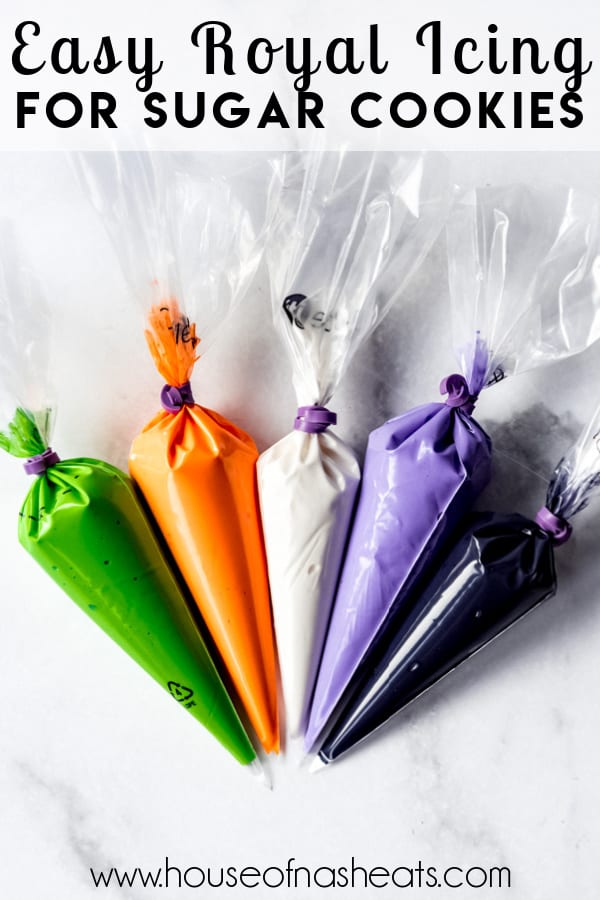
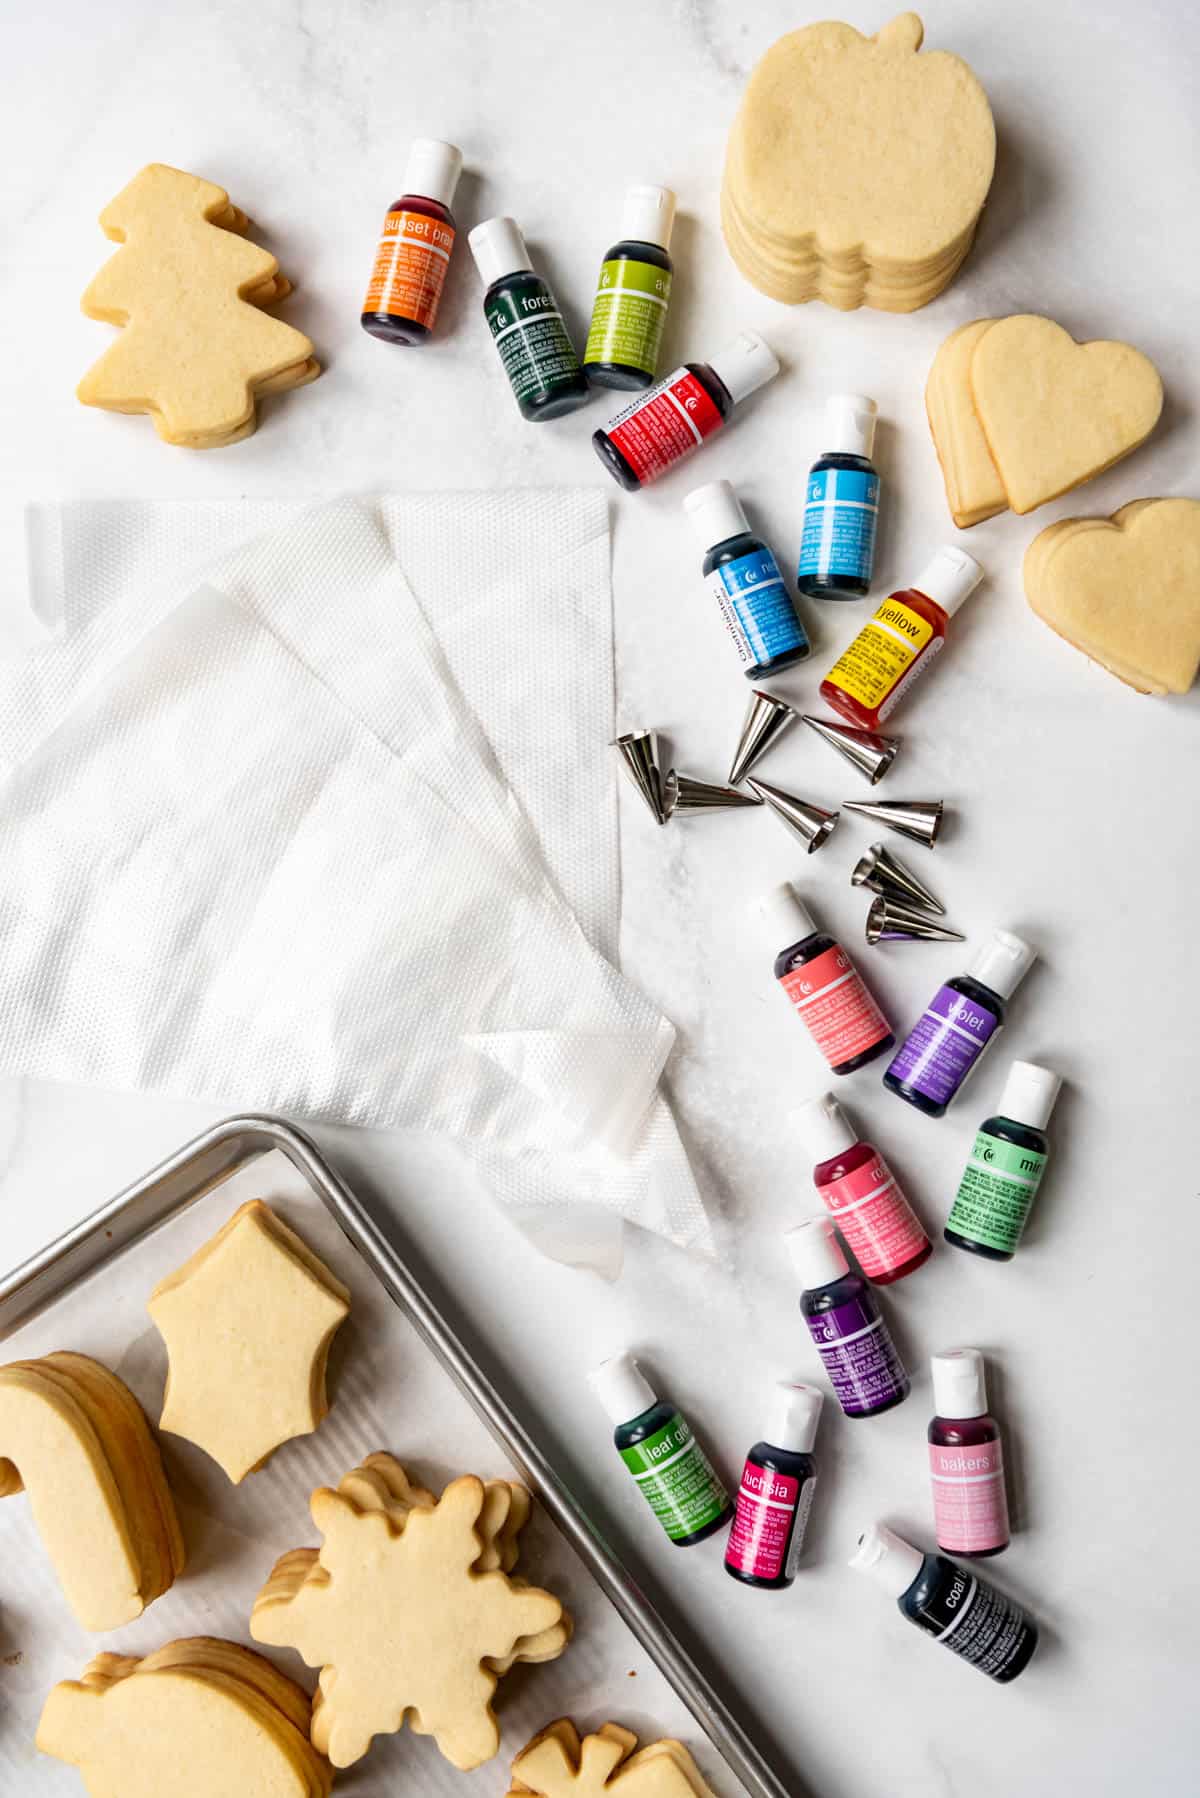
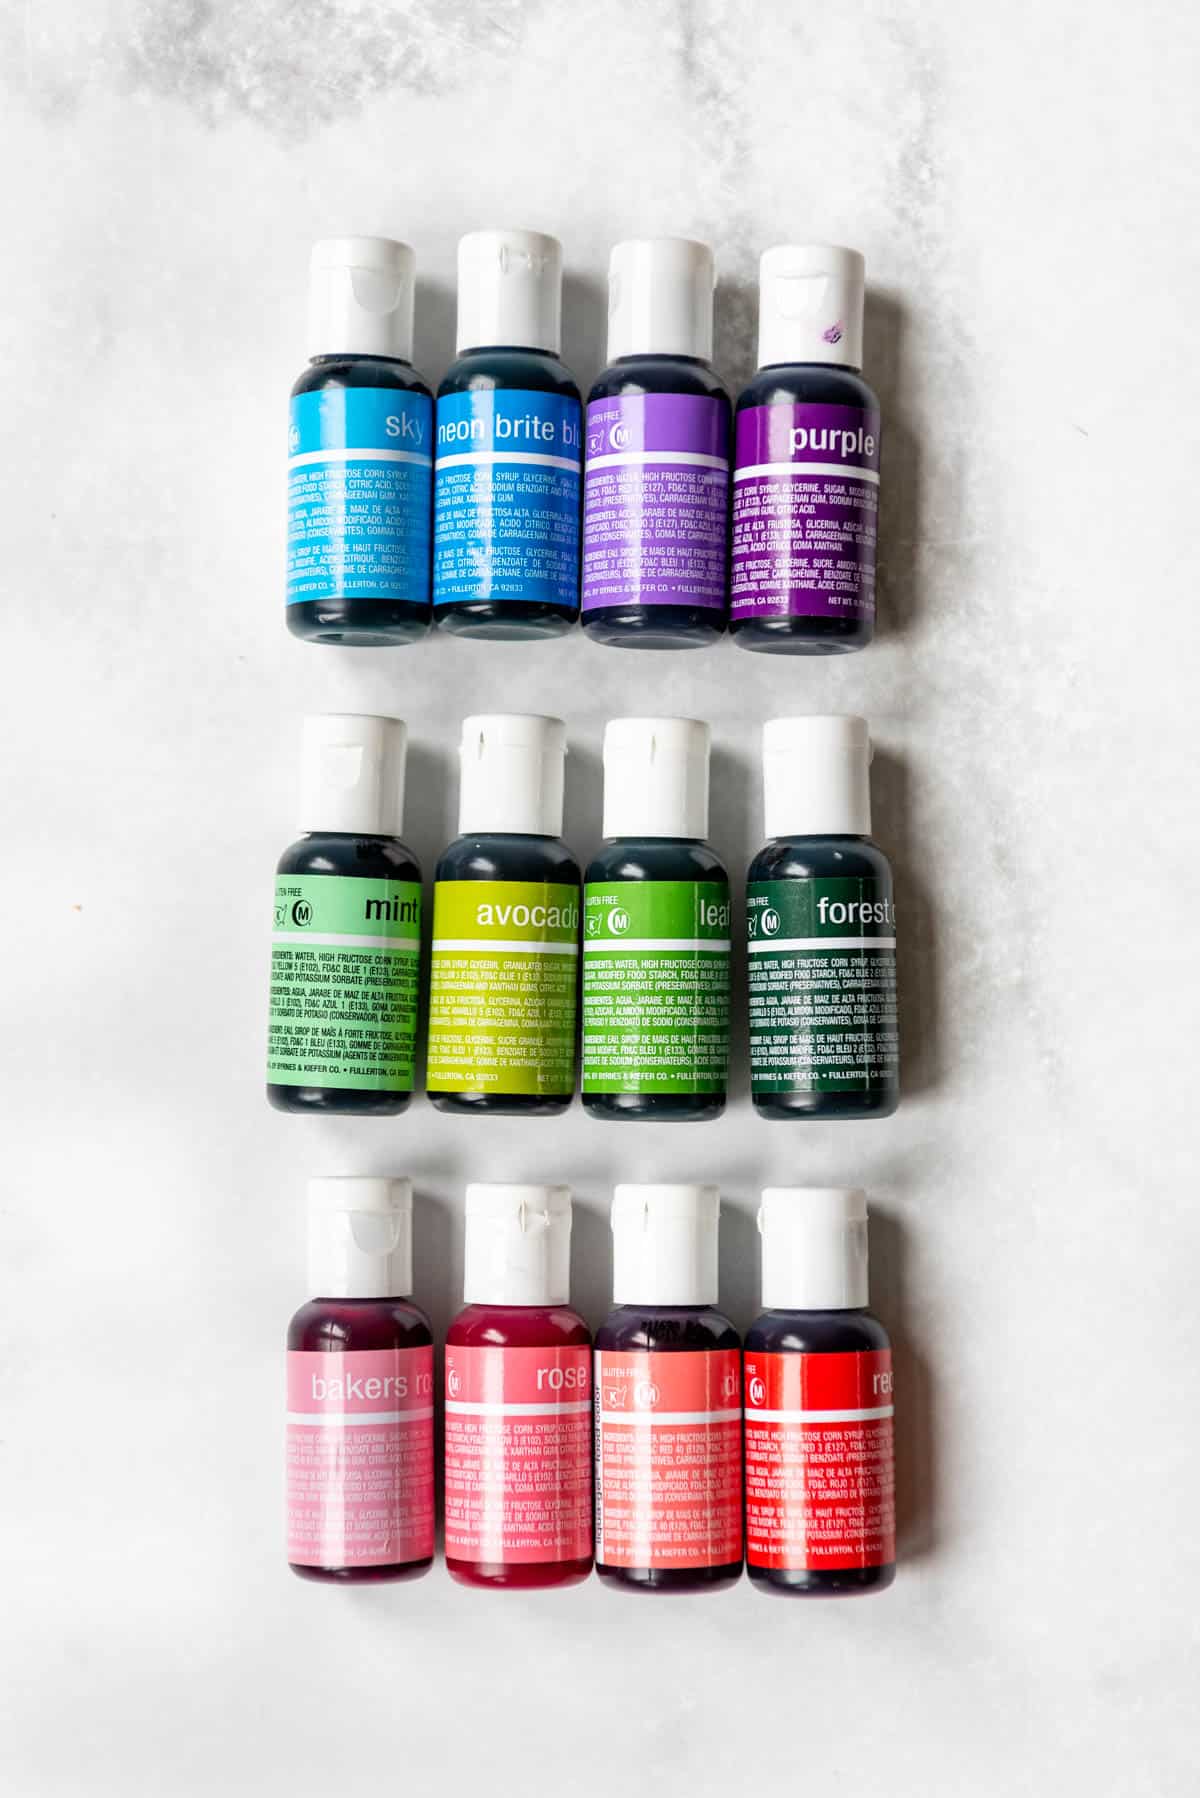
To color the icing, divide it between separate bowls for each color you want. Mix in gel food coloring (affiliate link) (I prefer AmeriColor or Chefmaster colors) until you get the shade you want.
You can use lighter colors first, then build on that color with darker colors to save yourself dirtying a separate bowl for every color. I will start with light pinks, blues, yellows, or greens, then move to darker reds, purples, oranges, etc.
Once colored, you can use the thick icing to pipe borders to decorate your cookies or go ahead and thin out the icing to a flood consistency by adding additional water a little at a time and stirring well after each addition.
For flooding, the royal icing should be thinned out enough to melt in on itself in about 10-15 seconds when you run a knife through it.
Think about the viscosity of honey or shampoo to help you gage flooding consistency. It should melt in on itself in about 10 seconds but not be so thin that it will run off the sides of the cookie.
If you go too far and add too much water to your flood icing it will be too thin. But you can save it by adding a spoonful or two of the thicker consistency icing and mixing that in.
Using Thick Royal Icing
When I was just starting out with royal icing, I found it much easier to use thick royal icing to pipe borders around the edges of my cookies, then fill them in with thinner flood icing. The thicker icing border helps create a barrier to hold in the flood consistency icing, which is advantageous if your flood icing is a little thinner than you meant it to be. The thicker consistency royal icing can also be good for piping some details on more intricate designs.
The main downsides of this approach is that it takes a little more effort and forethought, and the border of thicker icing is sometimes visible in the finished cookie. It’s also less forgiving if you have a shaky hand, but it’s a great learning approach if this is your first time using royal icing.
Using Flood Consistency Royal Icing
Alternatively, you can thin out all of your icing to flood consistency from the get-go and use it to both outline and fill your cookies by piping the border with flood icing and then immediately “flooding” the middle of the cookie to fill it in. I recommend using a toothpick or scribe tool to fill in gaps between the border and the flooded center or to pop any air bubbles, if needed.
The upside of this approach is that your border will completely blend in with the flooded center and be invisible. Also, you avoid the nuisance of having to make two consistencies of every icing color by using flood consistency for all your decorating.
The main downside is the risk that your flood consistency icing is too thin and it could run off the edge of the cookie. However, this is my preferred method because once you have figured out the right flood consistency you shouldn’t have any problems with your icing being too thin.
How to Decorate with Royal Icing
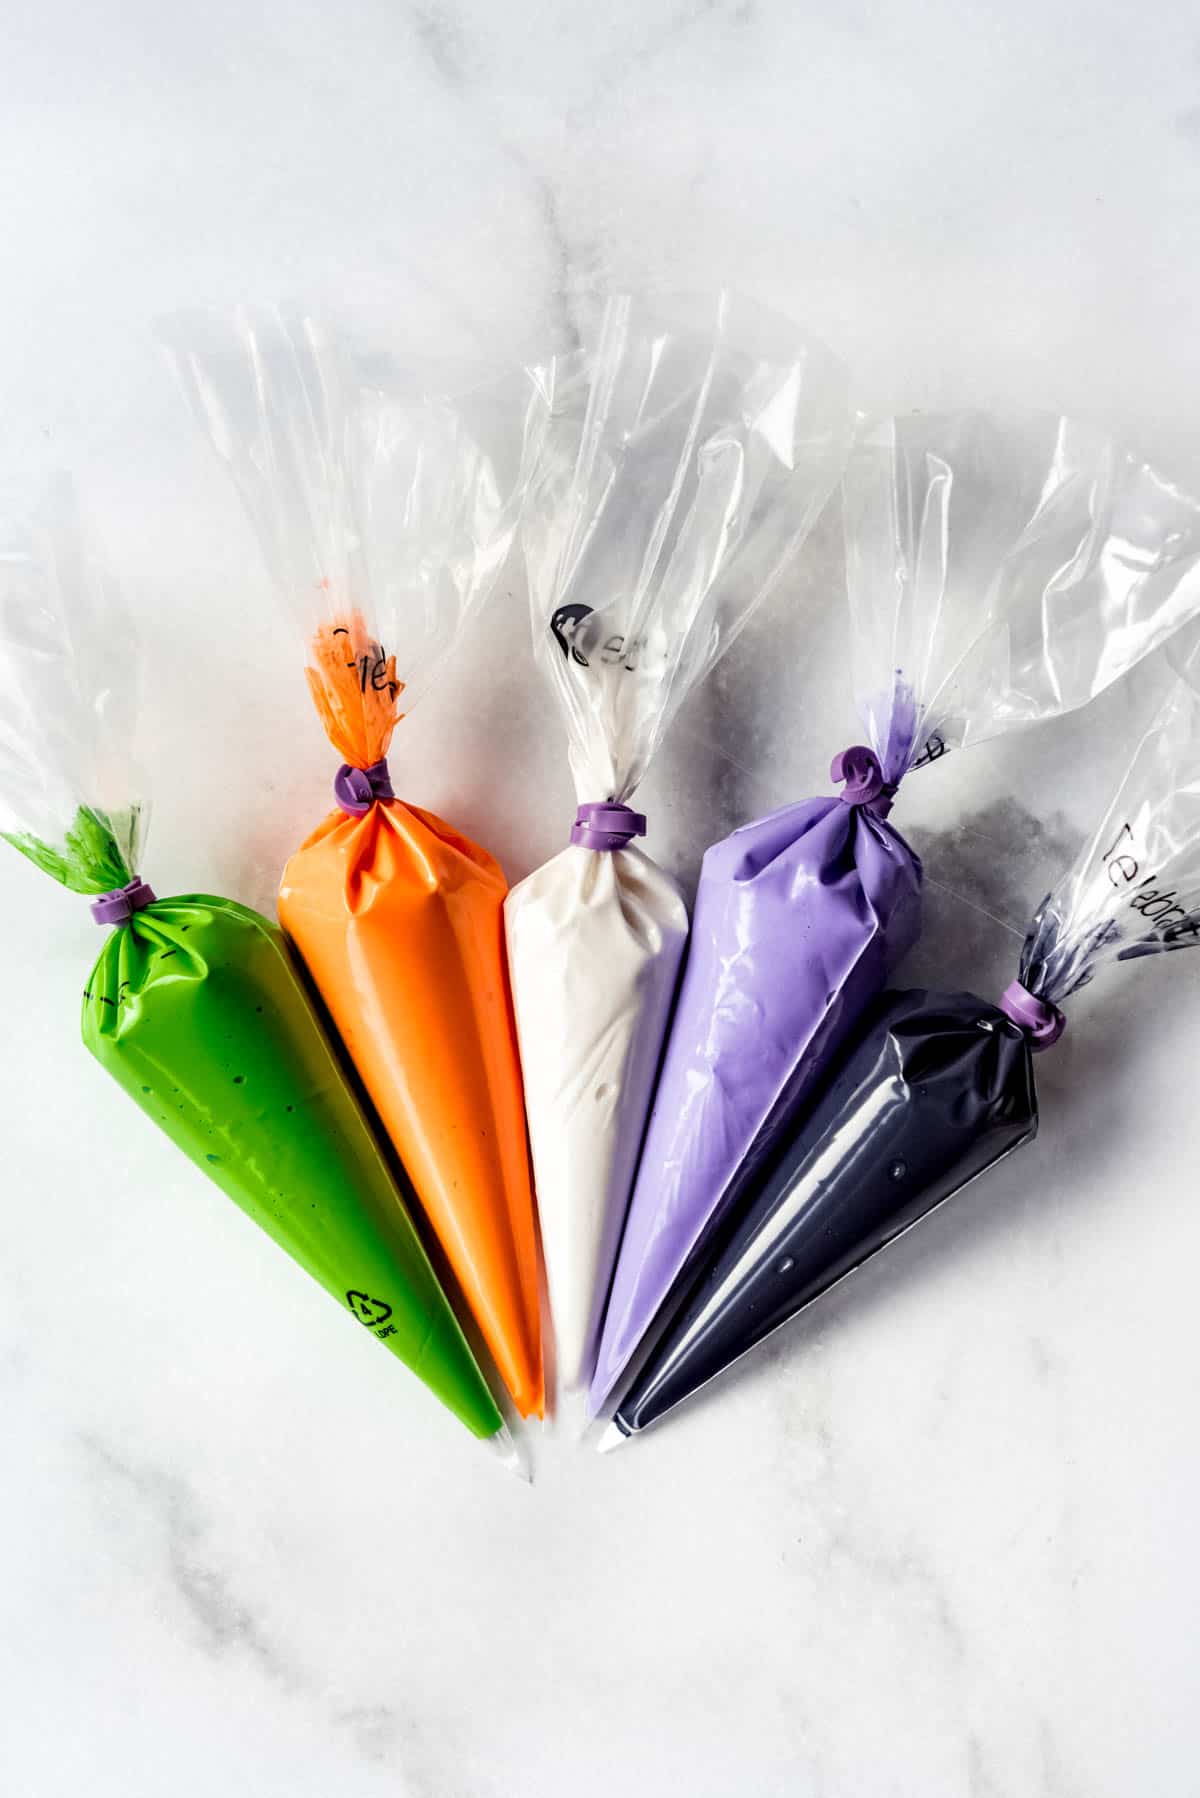
Once your icing is ready to go, transfer it to a piping bag or even a ziploc bag for decorating your sugar cookies. You can use a small piping tip if you have them, or just snip a tiny corner of the bag instead. Just start really small when snipping off the corner of the bag since it’s not like you can undo things if you snip too much and get too heavy of a flow, which will make it difficult to pipe borders around your cookie edges.
For borders, I find that it is easier to hold the piping bag slightly above the cookie so that the icing sort of just falls onto the cookie instead of dragging the tip right along the surface. You’ll get cleaner lines this way. It’s sort of like laying down a thin rope of icing along the edge and you can practice on a piece of plastic wrap or plate to get the hang of it before you actually start in on a cookie.
Also, if you have a shaky hand like me, it helps to stabilize your arms by resting them on the edge of your work surface.
Wet-on-wet technique
This technique is where you pipe a second color right on to the still-wet first layer of royal icing so that the design melts together. I used this technique to add eyes and mouths for the ghosts in the pictures below. A favorite easy design using the wet-on-wet method is polka dots which you can make by piping dots of a contrasting color onto the still wet flood colors covering your cookie.
Wet-on-dry technique
This approach requires a little more patience because you will pipe part of your design, then let it harden for an hour or two before piping on additional design details. You can see wet on dry technique in action in the image of holly leaves and pumpkins below.


Tips for Success
- If you cannot find meringue powder or would rather use raw egg whites, you could just replace both the water and meringue powder called for in the recipe with 3 large egg whites.
- Use clear vanilla extract if you have it to avoid tinting the icing. This will help it keep a pure white look.
- If your icing it too thin, don’t just add in more powdered sugar. Instead, add some of the thicker consistency icing to save it. Keep in mind that it is easier to thin out icing by adding a little extra liquid and more difficult to thicken the icing, so go slowly adding more water until you get the consistency you like.
Recipe FAQ’s
The biggest difference between royal icing and a frosting like buttercream is in the texture: buttercream is creamy and soft whereas royal icing hardens to an edible candy-like shell. Royal icing also doesn’t have the same buttery flavor as buttercream.
Yes, absolutely! Some recipe use raw eggs, but my version is for royal icing with meringue powder, which is perfectly safe to eat. If you want to try royal icing with raw eggs, I recommend using pasteurized eggs which are safe for consumption.
Once the cookies are decorated with royal icing, they will take about 6 to 8 hours to dry out at room temperature. Which means if you want to pipe more detailed designs without them settling in to the first layer of icing, you are most likely looking at a multiple day decorating process.
Can I freeze royal icing?
Yes! Royal icing can be frozen for up to 2-3 months. It’s a great way to plan ahead or to save any leftover icing you have after making sugar cookies. Just be sure to seal each color separately in a freezer-safe, airtight container or bag before freezing it.
Then when you are ready to use it, just transfer the icing to the fridge to thaw overnight and let it come to room temperature on the counter the next day and use like normal.
Sugar cookies decorated with royal icing can also be frozen as long as the icing has had time to set completely first. Just thaw at room temperature before enjoying.

More Dessert Recipes


Did you make this recipe?
Let me know what you thought with a comment and rating below. You can also take a picture and tag me on Instagram @houseofnasheats or share it on the Pinterest pin so I can see.

Easy Royal Icing Recipe for Sugar Cookies
Ingredients
- 4 Tablespoons meringue powder
- 4 cups powdered sugar (about 1 pound)
- 6 Tablespoons warm water + additional 3-4 additional tablespoons for thinning to flood consistency
- 1 teaspoon vanilla extract
- Gel food coloring (affiliate link) (I like AmeriColor or Chefmaster)
Instructions
- In a large bowl of a stand mixer, whisk together the meringue powder and powdered sugar, then slowly mix in the water and vanilla extract while the mixer is running on medium-low speed. Increase speed to medium-high and beat until stiff peaks form, around 5 minutes. This can be done with a hand mixer, but will take a couple minutes longer.
- Divide the thick white icing into individual bowls and add gel food coloring (affiliate link), a few drops at a time, mixing well until you achieve the shades you like. From there, you can reserve some of the thicker icing for piping borders as described in the post, or thin all of the icing to flood consistency.
- To thin each color to flood consistency, add 1 teaspoon of water at a time and stir well, continuing to add water by ½ teaspoon increments until you reach your desired consistency. If you are thinning the entire batch of icing at once to flood consistency, it will take an additional 3-4 tablespoons for a total of 9-10 tablespoons of water.
- Once your icing is colored and the right consistency, scoop it into a piping bag fitted with a Wilton #2 or #3 tip. Decorate your sugar cookies by first outlining the border, then filling in the middle with flood icing which should settle into itself. Use a toothpick or scribe tool to fill in any gaps by spreading the icing around, then tap the cookie on the counter a few times to help the icing settle into a smooth, even layer.
- Dry cookies at room temperature for 6-8 hours until the royal icing is completely firm before adding additional layers or design or stacking for transport.
Video
Notes
- Be sure all bowls and utensils are totally grease-free or your icing will never reach the consistency you are going for.
- Using Egg Whites: If you cannot find meringue powder or would rather use raw egg whites, you could just replace both the water and meringue powder called for in the recipe with 3 large egg whites.
- How to Thicken: If you thin out your icing too much, you might be able to save the batch by continuing to beat the icing. This incorporates more air and lets some of the liquid evaporate to theoretically thicken the icing. Or if you have additional thick icing that you haven’t thinned, you can add that to the icing that is too thin to help save it.
Nutrition
This post was originally published in April, 2018. The photos and content were updated in November, 2022.


Royal icing is so much fun to work with. I have only made it once before, and this seems similar to what I used. Great way to decorate cute cookies….and the grandkids love when I make them cutout cookies.
I have to be honest — I’ve always been intimidated by rolling out sugar cookies and cutting with a cutter – because they inevitably stick — so I’ve never actually made it to the Royal icing phase of cookie baking. After reading through your very thorough breakdown, I can see the benefits of the flooding approach done in two stages and I love the way your cookies turned out. Now I’m going to have to get over my gun-shy nature of the cookies themselves… You’re nudging me in that direction. Thanks!
Oh no! That would definitely be a problem if your cutters stick to your cookies! I haven’t experienced that myself, but I wonder if it’s a problem with the cookie dough or with the cutters?
keep a mound of flour close by. Dip cutter into flour between cuts. This will keep dough from sticking to cutter.
Lisa, try chilling out your dough first. First roll dough out with rolling pin and some flour, then chill in freezer a couple of minutes (only to chill NOT to freeze), then pull out of freezer and start cutting shapes. (Warm dough always sticks to everything.) Additionally after cutting shapes put cookies back on a cookie sheet and freeze again for a minute or two, then put straight in the oven. If your quick you could chill once cut and put in the oven but I’m never that savvy LOL This helps cookies keep from spreading when they’re being baked!
I had the same problem with sticking and almost gave up on cutout cookies until I read the freezing after rollout tip. It works great! My biggest problem now is finding people to give cookies to because I definitely don’t need to be eating sugar cookies! 🙂
Everyone keeps says dust the cookie cutter with flour….nope…dust it with powder sugar. Why would you want a flour tasting cookie? Learned that trick from a pastry chef years ago. Also cough must always be chilled, so work in small sections. What you aren’t using, keep in the fridge, covered. And don’t over handle your dough. The butter in the dough will get too warm and you’ll end up with flat and more than likely over done cookies.
I seldom read something I haven’t heard before but the chilling of the dough before putting in the oven to keep them from spreading is new for me. sure wish I had seen this like 4 hours ago as I just made sugar cookies and they did indeed spread. I’ll have to remember the chilling part. As they spread they tend to lose a lot of detail. thanks.
I have heard to dust your cutters in flour. This helps with the dough sticking.
Use flour on the cutter and get a thin metal spatula and rub some flour on that as well to get them off the counter.
Try dipping your cutters in four before you cut. It definitely helps keep them from sticking…most of the time. 😉
I roll my cookies between two layers of parchment paper so they don’t stick to the counter or the rolling pin. Make sure you don’t roll them too thin and your cutters really shouldn’t stick to them either. We love roll out cookies at Christmas!
I also use parchment paper to roll out the cookie dough between & I also like to use a sheet of parchment paper to line the baking sheet so the cookies are easy to take off of the pan after they’ve baked.
Tip: Dip your cutters in a bowl of flour, cocoa powder, or confectioners sugar before cutting your cookies out (depending on what type of cookie you’re making) – this keeps fine detail in cutters from holding onto the dough
I dip my cutters in confection sugar or flour each time I cutout. This keeps it from sticking to the cookie cutter.
Try flouring your cutter
Royal icing is such a fun thing to play with! I made some for a youth activity once for cookie decorating. I’ll be sending people your way for royal icing awesomeness.
My friend and I LOVE to make cookies! I’ve been meaning to try making royal icing so we can decorate the cookies. I’ll have to try it with AmeriColor as your colours look amazing!
I am new to this page can not wait to make the cooks and the iceing ty for posting for everyone..
I have heard of royal icing but never tried it. This is great, thank you for the step-by-step pictures, that is very helpful. This would be so much fun to do with my daughter, definitely saving this for when she comes home next month:) She has a sweet tooth so I know she will be all over this.
It’s been years since I worked with decorating icing and I admit I need practice. I loved doing it. It was cupcakes for a bake sale and my daughter’s grade school. I made violets on the top. They were so cute — I lost the recipe for the icing so I truly appreciate having a recipe to pin. I’d love to be making cute cookies and cupcakes for the grandsons.
I have never made icing at home before, and didn’t know the difference in royal and buttercream!! This was so informative- I feel so much more cookie smart now 😉 Also these cookies are gorgeous- I’m so impressed!
What a fantastic tutorial for making royal icing and decorating cookies! I love the polka dots you got on your Easter cookies with the wet-on-wet technique. I haven’t tried my hand at cookie decorating in years, and this post is making me want to break out my piping bags and make some sugar cookies for spring!
Gahhh! These cookies are so pretty and I am in love with these pastels! I’ve never made nor worked with royal icing before, but I’ve always found it to make the prettiest cookies. I think I’m just afraid of screwing it up, because I don’t bake often. These have me tempted to try, though!
I have never made royal icing but am mesmerized by the sheer talent of some cookies designers. I can tell from your post, it’s not as intimidating as I once thought it was. And those polka dot cookies?! They scream Spring and I need all the reminders of Spring in my life right now as I stare out my window gazing at snow! Thanks for the great tutorial!
I love the idea of making my own royal icing rather than having to purchase it. Your recipe looks super easy and delicious. Plus, can I just say I love the colors you chose!
I just made some “Captain America” shield cookies and by the next day the colors are starting to bleed into each other. What can I do to prevent this for the next time?
I really don’t know what to recommend about this! I haven’t had that particular issue happen before! What kind of food coloring are you using?
Next time your icing needs to be less wet. Also, try to use as little food coloring as you can to achieve your desired color. Color depends over time so if you can, try coloring your icing the day before you need it so you can get away with even less color. Lastly, try to split your decorating over two days if possible. Allowing for longer dry times in between colors that could bleed would help. As far as Cap’s shield goes, I would start with the white part of the shield (not including the star) and let it dry completely and at the same time, pipe some stars onto some parchment and let them dry. You can use a template for help if you need to. Then, the next day or at least 6 hours later, pipe in the blue and top the blue with your now dry star (icing transfer) and fill in the rest of the shield with the red.
Thanks for the helpful input here Steph! These are some great tips!
A question for Steph. You suggested making the icing ahead of time. How would you recommend storing it until use? In or out of the fridge? How long will it last? I would love for this to be an option!
Amy, I am excited to try your method. Thanks for the great tutorial.
I having a problem with my icing. I usually buy it already made up ready to go but I got some of the meringue powder and made some but after a day and half its still pretty wet to touch . It started out stiff and I separated it in fee small containers for different colors but I don’t understand what I did wrong . I hope somebody can tell me I have alot of cookies laying here waiting to dry.
Oh dear! That definitely sounds like a problem and they shouldn’t take that long to dry at all. I’ve never had this particular issue happen, but my guess is that there is a measurement mistake that happened somewhere. My only other possible explanation that I can think of is that humidity could be playing a factor or that it’s an issue of the food coloring that was used? I’m sorry! I really wish I knew but this is an issue that hasn’t come up for me before.
This is the best, most descriptive post I’ve come across for this type of icing, what you’re even doing with it and how to do it so it turns out the way you want!
Thank you, Carolyn! I’m so glad you found this helpful!
How about using the eggwhites!? How to loosen or how to thicken? Do you have recipe for royal icing using ehg whites, I can’t find merengue powder please help i need to make cookies this week end and i dont have a idea of making toyal icing, thank you hope to hear from you soon 😉
Yep – just replace the meringue powder and water called for in the recipe with 3 egg whites. Then if you need to thin it out, just add a little water at a time, as explained in the instructions. Good luck! You can do this!
I was looking for a way to decorate cookies at a workshop with kids and this would be amazing- I’m just worried about drying time and transporting them home. Could you recommend anything to speed up drying time?
Honestly, it’s not something I have ever tried. I’ve heard that maybe you could put them under a heat lamp or food warmer to speed up the process a bit, but I haven’t researched it.
Will the icing harden in the bag if i let one layer harden overnight and then add another layer the next day?
Hmm, I’ve never tried that approach. I would think that small amounts like dots might be okay, but I would wonder about whether it would even be possible to get them into the bag without messing the design up in the first place.
Would this royal icing Harden like normal royal icing? Wondering if it can be used to hold together a gingerbread house?
Yes, the thick consistency would work for holding together a gingerbread house. Just don’t thin it out and maybe give some structural support to the gingerbread house while the icing dries.
Good Afternoon! I’m venturing out and making cut-out Sugar Cookies with Royal icing for the holidays, and, hopefully, for gifts to the most very special people !! Can you please tell me which meringue powder you have the best success with and which Meringue Powder tastes the best when made up into Royal Icing?
Thank you for your assistance and for your recipes !!
Wish me LUCK !!
Good luck! I have never done a taste comparison with different types of meringue powder but haven’t had any problems with the Wilton brand meringue powder that I just get at my local craft store.
Royal icing is a must every time i make sugar cookies. You have such detailed instructions!
Can the icing recipe be halved?
Yes, although I would recommend using a hand mixer rather than a stand mixer to mix it if you are halving the recipe.
Would you mind telling me where you got your icing bags and tips from?
They were just Wilton ones that I picked up at Joann’s, I think.
Thank you. I really love all the details! This is the first time I have tried icing and the cookies turned out great (I just need some practice to make them look good).
I’m so glad you found this helpful! I’m still practicing my decorating skills as well!
Survey is blank. Not clickable. 🧐🥺
Uh-oh! Hopefully it was only temporary, since I’ve been getting more responses again today.
Thank you for this! I’m trying to learn how to work with royal icing and this is everything I’ve been wondering all in one blog post. Perfection!
So very glad to find this site. I have 3 grand daughters ages 7, 9 & 11. They love to help me in the kitchen and this year they are wanting to make cookies and decorate them. The recipes for cookies and royal icing are going to be a welcome part of this venture. Thanks for all the information.
Hi,
Great post! I never thought of storing the colors of frosting in plastic wrap and inserting into the piping bags. Do you just pull one of the twisted plastic ends through and cut it off all together and then screw on the tip? How far ahead would you say the icing can be made and colored if stored air tight? Thanks!
Yep – just pull the twisted end through and cut it off, then screw on the tip. I wouldn’t make it more than a day in advance personally, although I think you could do it and keep it in the fridge for a couple of days.
Do you have to use gel food coloring? Or can you use the drops?
You can try using the drops but I find that they don’t get the same quality of coloring as the more concentrated gels.
I’m working with this recipe. Your ideas are great! I’m suspecting that I can keep the royal icing overnight in the fridge, so that I can take it over to my son & daughter-in-law’s home in the morning for decorating sugar cookies and gingerbread cookies after they bake. Is there any problem with how long in advance that the royal icing is made? Just wondering.
You should be just fine making this a day or two in advance, so long as you keep it covered so it doesn’t dry out.
If I substitute egg whites for meringue powder, how many should I use? Will this substitution affect the taste of the icing?
Thanks!
You would use 3 egg whites in place of the meringue powder and water called for in the recipe.
Thank you for the awesome recipe and guide Amy! Worked perfectly for my first sugar cookie attempt this holiday season!
You are welcome!
Great tutorial on making decorated sugar cookies! Thank you! I’ve been working on making beautiful cookies for several years and it really does get better with practice. The most helpful tip I found here was wrapping the icing in plastic wrap before placing it in the piping bag. I will try that this morning! I can only imagine how much this will cut down on messy icing seeping out of the top of the bag!
I was so disappointed and frustrated. I was making Valentine’s Day cookies for my class. I have taken cake decorating classes and consider myself pretty capable. I made the icing as instructed but ended up with fluffy meringue. I probably added 1/2C of water waiting for it to become more like honey. It never did. After an hour, I went to xxx sugar and water. The consistency was better. I really want to make these cookies. Help!!
Amy, it’s amazing! I just randomly found your blog looking for this recipe. Awesome! Good for you!
Thank you!!
Amy, it looks perfect and tasty! Can’t wait to have this anytime of the day, love it!
First, I love this post. It had plenty of detail and i cannot wait to try this whole Royal icing thing. Second, quick question, when decorating the cookies and letting then dry over night how do you keep the extra Royal icing left in the piping bags fresh? Well it not harden like the icing on the cookies? How Will I be able to use it the next day? Sorry newbie here!!
I’m glad you find this post so helpful! That’s how I was trying to write it because I couldn’t figure this stuff out easily when I was first starting too! As long as the royal icing is covered tight – like no air in the bag at all (including the tip, which should be sealed), it won’t harden into a lump! Just twist the end completely closed tight up against the icing and seal the tip with a little plastic wrap.
HOLY COW
Amazing how you can make this so wordy.
Maria, thank you for the details on chilling the dough to prevent sticking! I make dog treats and finally have my recipes tweaked to where there’s little sticking but when you’re turning out 5 lbs of treats per batch, even a little eats your time. A friend had suggested chilling the dough but not the details of how long and how.
Ok, folks. I need your help and expertise! I bake and sell dog treats and recently have tried my hand at decorating some. I’ve vastly improved – my last attempt did not look grainy after several days and fall off at a touch. Instead of working in different colored icing I used a base white and painted the treats with gel color and vanilla extract. Score. BUT… if I snap the treat in half for my dogs the icing shatters like glass. I’ve had issues with the icing not drying even 24 hours later so, per another site, I dried them in the dehydrator @ 95 degrees, with the door off. I had to leave the house, so, they ended up drying for 6 hours. Did I overdo it? Another thought, these treats are made with whole wheat dough. Could that be an issue? They’re dehydrated, but I see other people icing treats so that shouldn’t be the problem. Any help would be GREATLY appreciated!
What a great post!
Had a few questions:
once decorated and ready to dry… what do you store it in to dry at room temperature?
How many days can you make this in advance before serving? For example if I made the cookies and icing and decorated on Tuesday, would they be good for Friday?
You need to leave these out to dry. I also set the decorated cookies back onto baking sheets so I can move them over to a stove or countertop so I have free space. And these kind of decorated sugar cookies hold up well for at least 5 days or so, so yes, you would be totally fine to make them on Tuesday and serve on Friday.
After reading comments I was nervous because it didn’t seem very many had actually tried it. I bake custom cakes all the time but I’m too shaken for detailed piping. I’ve attempted royal frosting 2 other times. I can say this recipe is full proof. Measurements are spot on. I did add a bit more flavoring, but other than that. It was perfect. Your tips were helpful. If you have any trouble with this recipe then you had to miss measure or miss a step. They turned out perfect minus the fact I need a bit more practice. Ben my 8 year old could use it with no problems. Thanks for the recipe!
I’m so glad you find this post helpful!
If I were to want to use a 2lb bag of powdered sugar, would you recommend I just double everything?
Yes, that is what I would do.
Everyone always only shows 1 set of bags. Do you have multiple bags of same color? I’m so scared to even attempt this. I’ve made several dozen cookies and never decorated them because of intimidation
I completely understand how you feel! It took me ages to try royal icing because I was intimidated by it too! I typically only have one bag of each color, but I suppose that would depend on how many colors you are using and what your design will be.
I will looking forward to using your suggestions,thank you for your honesty. This will be my first attempt cookie coloring.
You’re welcome, and good luck! I would love to know how they turn out for you!
You can also dip the cookie cutters into some coconut oil (melted) to keep from sticking to the dough (or counter-I always flour my surface before putting dough down of any kind). Oil also works well for your hands to keep dough from sticking to your hands!
No directions for making the icing with egg whites.
Sorry – they were in the post but not in the recipe card itself. I updated the card to include instructions for how to substitute egg whites in the Notes section.
I never thought that making cookies would be this simple. I really want to go to the kitchen right now, feeling really excited to try. Thank you for sharing!
I love the use of Saran wrap for the frosting I will try that. When I cut-out cookies, I roll them out on aluminum foil and then just transfer the foil to the cookie sheet. You should leave a little bit of space between them when you cut them out, then I just shift them a little to add more space between them, but the dough should be cool. I always refrigerate my dough before rolling them out.
Totally love this recipe. I used pepermint oil instead of vanilla for my Christmas cookies and they were a huge hit! I went a little too heavy on oil not realizing the potency but again, people loved them.
I’m sure you put a time limit for how long the R/Icing is good for but I cant find it. Also can it be kept in the refrigerator or just left out? It is only going to be used for decorating a gingerbread house (not to be eaten). And can it be frozen to use at a later time? I have 3 G/B houses & a santa & sleigh w/reindeer to do as well with a 21/2 year old child so pretty sure they wont all be done at the same time. LoL
Thank you for any & all suggestions
If you use the meringue powder, you can store it at room temperature for up to 3 days. Just keep it covered tightly with plastic wrap so it doesn’t dry out. If you use actual eggs though, be sure to keep it in the fridge, again for up to 3 days. I have never tried freezing royal icing before but I did a little research and it looks like it would work! Just thaw in the fridge and then let it sit out on the counter for 30 minutes before using!