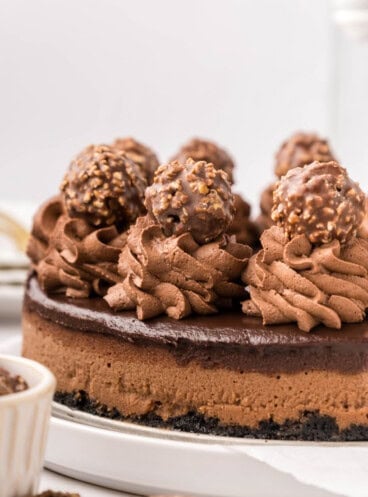
This creamy Oreo cheesecake has it all – a crunchy Oreo cookie crust, a rich and velvety cheesecake layer packed with chopped Oreos, and a glossy ganache topping that takes it over the top. It’s a total crowd-pleaser and the kind of dessert that disappears fast at birthdays, holidays, or any time you want to wow your favorite Oreo lovers.

I’ve been on a mission to perfect my cheesecake game for a few years now and they are so fun to bake and make into new flavors. Since Oreos are an all-time fave around here, I had to make a cookies-and-cream focused cheesecake with plenty of Oreos in the crust, the filling, and on top. This dessert combines everything you love about Oreos with the elegance of a baked cheesecake.
Best of all, it’s surprisingly simple to make. A cheesecake pan and a water bath are the secret to that perfectly smooth, crack-free top – no fancy skills required. Whether you’re making it for a birthday, a holiday table, or just because, this is the kind of cheesecake that never lasts long.
Don’t stop at cheesecake – I’ve got tons of Oreo-inspired treats you’ll love, from Oreo Cupcakes and Slutty Brownies, to my outrageous Oreo Frosting and No Bake Oreo Pie!
Why We Love This Recipe
- It’s an impressive dessert for birthdays or special occasions, but simple enough for a first cheesecake or easy dessert win.
- The Oreo cookie crust, creamy cheesecake filling, and smooth ganache create a crave-worthy mix of textures that slices cleanly and looks beautiful.
- Using full-fat cream cheese and room temperature ingredients helps the cheesecake bake evenly with a silky, crack-free top.


What You’ll Need
Here’s what you’ll need to make the best Oreo cheesecake. Measurements and full instructions are in the recipe card at the bottom of this post.
- Oreo Cookies – Crushed and chopped for the crust and filling, and a few extra for decorating.
- Salted Butter – Melted butter binds the crust and adds rich flavor.
- Cream Cheese – Full-fat cream cheese at room temperature makes the filling ultra creamy.
- Granulated Sugar – Sweetens the cheesecake without overpowering the Oreos.
- Sour Cream – Adds tang and smoothness to the filling.
- Heavy Cream – Lightens the texture and is used in both the batter and ganache.
- Vanilla Extract – Enhances the overall flavor of the cheesecake.
- All-Purpose Flour – Helps the filling hold its shape.
- Large Eggs – Bind everything together and add richness.
- Semisweet Chocolate Chips – Used to make a glossy ganache topping.
- Sweetened Whipped Cream (Optional) – A light, creamy topping for serving.

How to Make This Recipe
Preheat oven and prep pan. Preheat the oven to 350°F. Line a 9-inch springform pan with a circle of parchment paper to prevent sticking and ensure easy removal.
- Make cheesecake filling base. In a large bowl, combine full-fat cream cheese and granulated sugar. Beat with an electric mixer for 1-2 minutes until smooth and creamy. Add full-fat sour cream, room temperature heavy cream, all-purpose flour, and vanilla extract. Beat again on medium-low speed, scraping the sides and bottom of the bowl to make sure everything is well combined.
- Add eggs gently. Add large eggs one at a time, mixing on low speed between each addition just until incorporated. Scrape the bowl halfway through for even mixing and best results.


- Add Oreo mix-ins. Add chopped Oreo pieces and crushed Oreo cookie crumbs into the cheesecake batter for extra texture and flavor.
- Fold until combined. Gently stir the creamy Oreo cheesecake filling until the cookies are evenly dispersed throughout.


- Make Oreo cookie crust. In a large bowl, mix Oreo cookie crumbs with melted salted butter until the mixture resembles wet sand and sticks together. Press the buttery Oreo crust into the bottom and about 1 inch up the sides of the prepared springform pan. Bake for 10 minutes, then reduce oven temperature to 325°F.
- Assemble and bake. Pour the creamy cheesecake filling into the Oreo cookie crust. Tap the pan gently on the counter to release air bubbles from the cheesecake layer. Nest the 9-inch springform pan inside a larger 10-inch cake pan, then place both inside a 12-inch roasting pan. Carefully fill the outer pan halfway with hot water to create a water bath. Bake the Oreo cheesecake for 80-90 minutes until the edges are set and the center has a slight jiggle. Turn off the oven and leave the door cracked open to let the cheesecake cool gradually for 30 minutes.


- Heat cream for ganache. Heat cold heavy cream in the microwave for 50-60 seconds until nearly boiling. Pour it over semisweet chocolate chips in a bowl and let sit for 5 minutes.
- Stir until smooth. Stir the mixture until it becomes a smooth, glossy chocolate ganache.


- Cool and chill. Carefully remove the springform pan from the water bath. Run a thin knife around the inside edge of the pan to loosen the cheesecake. Let the cake cool at room temperature for 1-2 hours, then transfer it to the fridge and chill for 4-6 hours until fully set. Run the knife around the edge again before removing the springform ring.
- Top with ganache. Pour the chocolate ganache over the chilled Oreo cheesecake, letting it spread naturally over the top.


- Decorate and serve. Decorate the top of the cheesecake with additional crushed Oreos or whole Oreo cookies. Chill for 30 minutes to allow the ganache to set. Slice into individual servings and serve with sweetened whipped cream, if desired.

Recipe FAQ’s
Yes, but Double Stuf cookies add extra moisture from the filling, which can soften the crust or change the texture of the batter. Store-bought Oreo crumbs work too, but using whole Oreos (filling and all) gives the crust more flavor and richness.
No at all. You can absolutely bake this cheesecake without a water bath if you don’t mind slight cracking on top–just decrease the baking time by about 20 minutes. However, for that smooth, crack-free top and flawless creamy texture I recommend it. The water bath helps the cheesecake bake gently and evenly, which makes a big difference in the final result. And if you try my foolproof nesting approach with two larger pans instead of messing around with wrapping your springform pan in aluminum foil, you’ll never go back.
The edges should look set, while the center should still have a slight jiggle. It will continue to set as it cools and chills, so don’t overbake.
Store leftover slices in an airtight container in the fridge for up to 5 days. You can also freeze the cheesecake tightly wrapped for up to 2 months. Thaw overnight in the refrigerator before serving.
Absolutely. You can bake it 1-2 days in advance. Just chill it fully, cover it with plastic wrap or foil, and keep it refrigerated until ready to serve.


Tips for Success
- Always use room temperature ingredients like cream cheese, eggs, and sour cream to ensure a smooth, lump-free cheesecake batter.
- Use full-fat cream cheese and sour cream for the creamiest, most decadent texture and best flavor.
- Use a water bath for even baking and a smooth, crack-free top. Nesting the springform pan in a larger cake pan makes it leak-proof and mess-free.
- Gently tap the filled pan on the counter before baking to release any trapped air bubbles that could rise and cause surface cracks.
- Once the cheesecake is baked, let it cool in the oven with the door ajar, then chill completely before slicing. This gradual cooling process helps avoid sinking or cracks.
How To Prevent Cheesecake Cracks Every Time
One of the best ways to keep your cheesecake from cracking is to mix gently once you add the eggs. Overmixing at this stage can trap too much air in the batter, which expands during baking and causes the top to split. Mix on low speed just until each egg is combined, scraping the bowl as needed. It’s a small step that makes a big difference in getting that smooth, bakery-style finish!


More Cheesecake Recipes You’ll Love
- Chocolate Chip Cookie Dough Cheesecake
- Cinnamon Roll Cheesecake
- Black Forest Cheesecake
- White Chocolate Raspberry Cheesecake
- Chocolate Cheesecake
- No Bake Cheesecake
- Cheesecake Jars
- Nutella Cheesecake

Did you make this recipe?
Let me know what you thought with a comment and rating below. You can also take a picture and tag me on Instagram @houseofnasheats or share it on the Pinterest pin so I can see.

Oreo Cheesecake
Ingredients
Crust
- 2 1/4 cups Oreo cookie crumbs
- 6 Tablespoons salted butter melted
Cheesecake Filling
- 4 (8-ounce) packages cream cheese softened to room temperature
- 1 cup granulated sugar
- 1/2 cup sour cream room temperature
- 1/4 cup heavy cream room temperature
- 2 teaspoons vanilla extract
- 3 Tablespoons all-purpose flour
- 4 large eggs room temperature
- 1 cup broken up Oreo pieces
- 1/2 cup crushed Oreo crumbs
Ganache
- 1 cup semisweet chocolate chips
- 1/2 cup heavy cream
Topping
- Additional Oreos for decorating
- Sweetened whipped cream (optional)

Instructions
- Preheat oven to 350°F. Line a 9-inch cheesecake pan with a circle of parchment paper.
- Combine the Oreo crumbs with the melted butter until evenly moistened. Press the crust mixture into the bottom and about 1 inch up the sides of the prepared pan. Bake for 10 minutes. Reduce oven temperature to 325°F.2 ¼ cups Oreo cookie crumbs, 6 Tablespoons salted butter
- Combine the cream cheese and sugar in a large bowl. Beat for 1–2 minutes until creamy and smooth.4 (8-ounce) packages cream cheese, 1 cup granulated sugar
- Add the sour cream, heavy cream, flour, and vanilla extract. Beat again on medium-low speed until combined, scraping the bottom and sides of the bowl.½ cup sour cream, ¼ cup heavy cream, 2 teaspoons vanilla extract, 3 Tablespoons all-purpose flour
- Add the eggs one at a time, mixing on low speed between each addition just until incorporated. Scrape the bowl partway through to ensure even mixing.4 large eggs
- Stir in crushed Oreo cookie crumbs until evenly dispersed. Pour the cheesecake filling into the prepared crust and tap the pan gently on the counter to release air bubbles.1 cup broken up Oreo pieces, ½ cup crushed Oreo crumbs
- Place the 9-inch springform pan inside a larger 10-inch cake pan. Nest both inside a 12-inch cake pan or roasting pan. Transfer to the oven, then fill the outer pan halfway with boiling water to create a water bath.
- Bake for 80–90 minutes, just until the edges are set but the center still has a slight jiggle.
- Turn off the oven and leave the door slightly ajar. Let the cheesecake cool slowly in the oven for 30 minutes.
- Carefully remove the springform pan from the water bath. Run a thin knife around the inside edge to loosen the cake. Let cool at room temperature for 1–2 hours.
- Transfer the cheesecake to the fridge and chill for 6 hours until fully set. Run a knife around the edge again before removing from the springform pan.
- To Make the Ganache: Heat the cream in the microwave for 50–60 seconds until nearly boiling. Pour over the chocolate chips in a bowl and let sit for 5 minutes. Stir until the ganache is melted and smooth.1 cup semisweet chocolate chips, ½ cup heavy cream
- Pour over the chilled cheesecake and decorate with additional crushed Oreo cookies.Additional Oreos
- Chill for 30 minutes until the ganache is set. Serve with sweetened whipped cream on the side, if desired.Sweetened whipped cream
Notes
Storage & Make Ahead
- Store: Store leftover slices in an airtight container in the fridge for up to 5 days.
- Freeze: You can also freeze the cheesecake tightly wrapped for up to 2 months. Thaw overnight in the refrigerator before serving.
- Make Ahead: You can bake it 1-2 days in advance. Just chill it fully, cover it with plastic wrap or foil, and keep it refrigerated until ready to serve.