
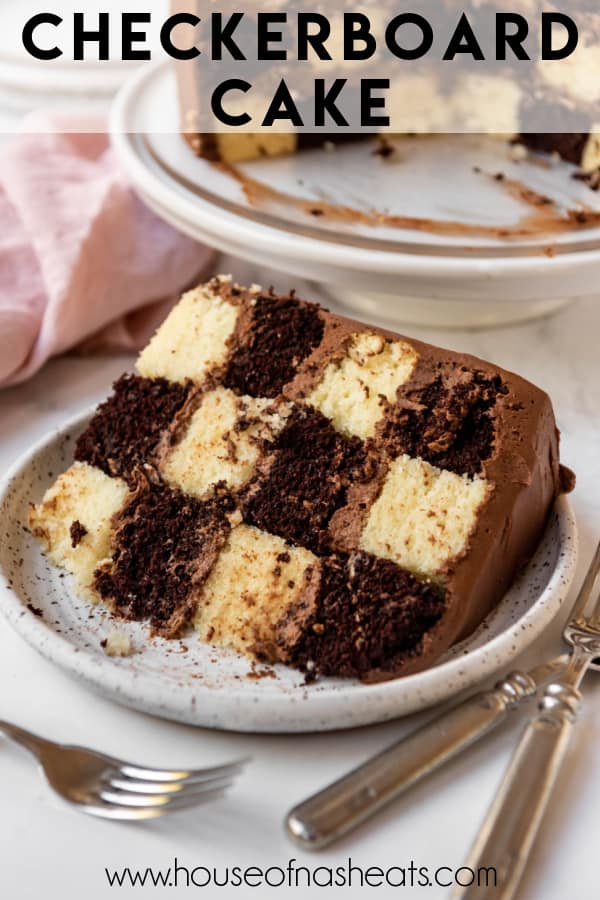
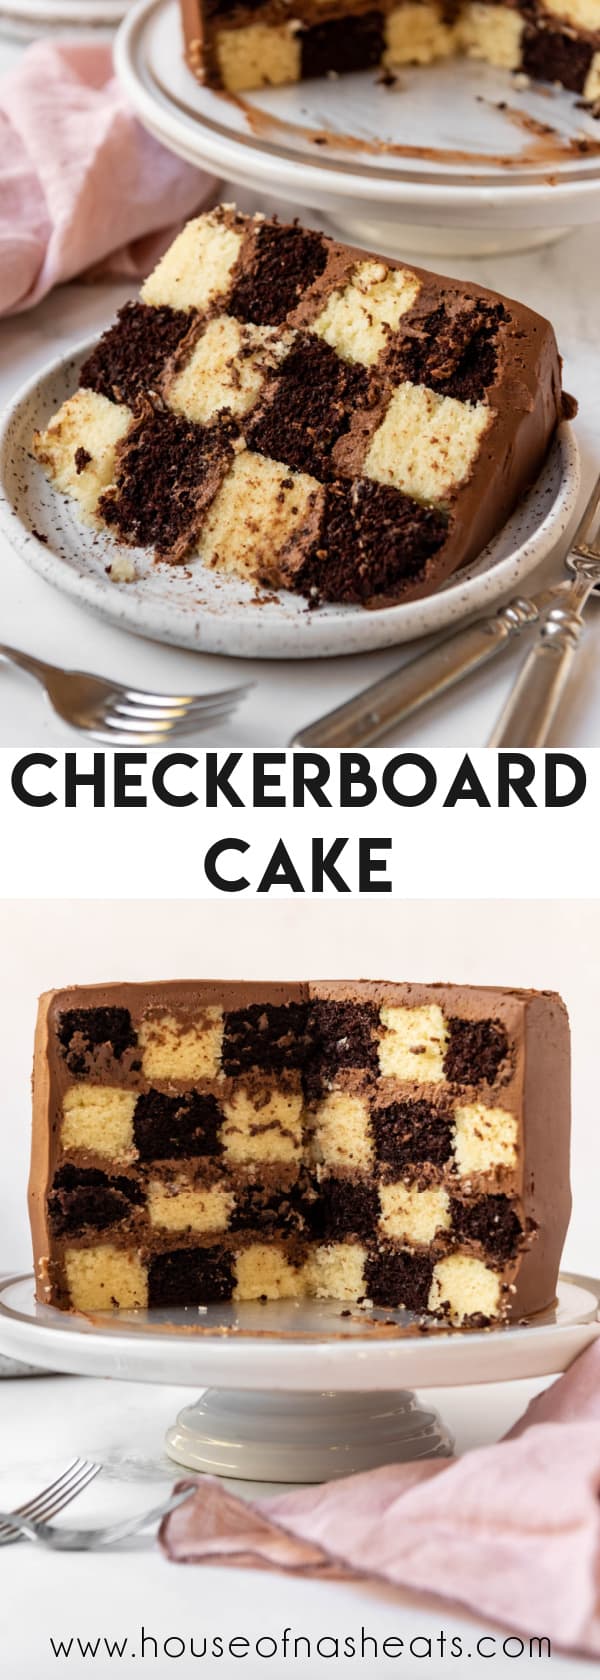
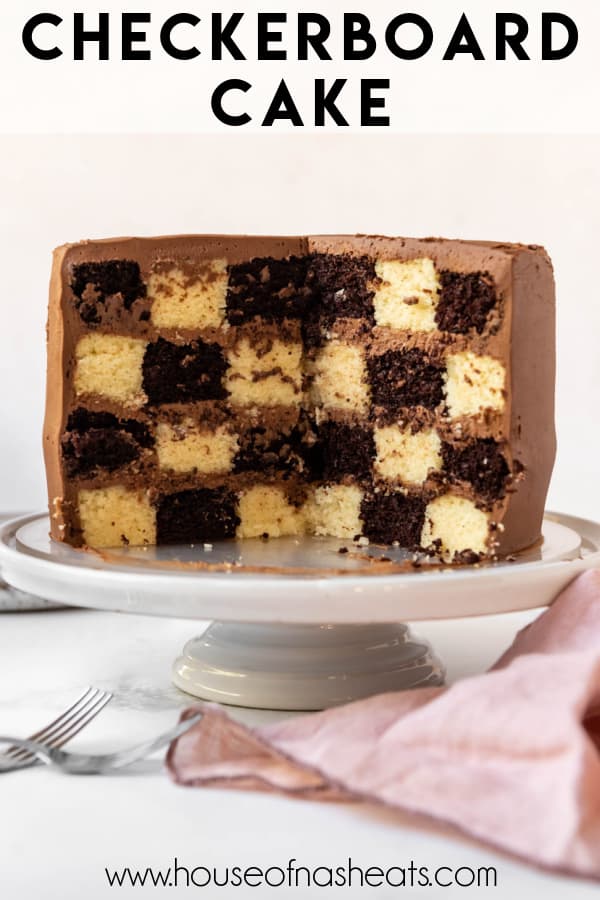
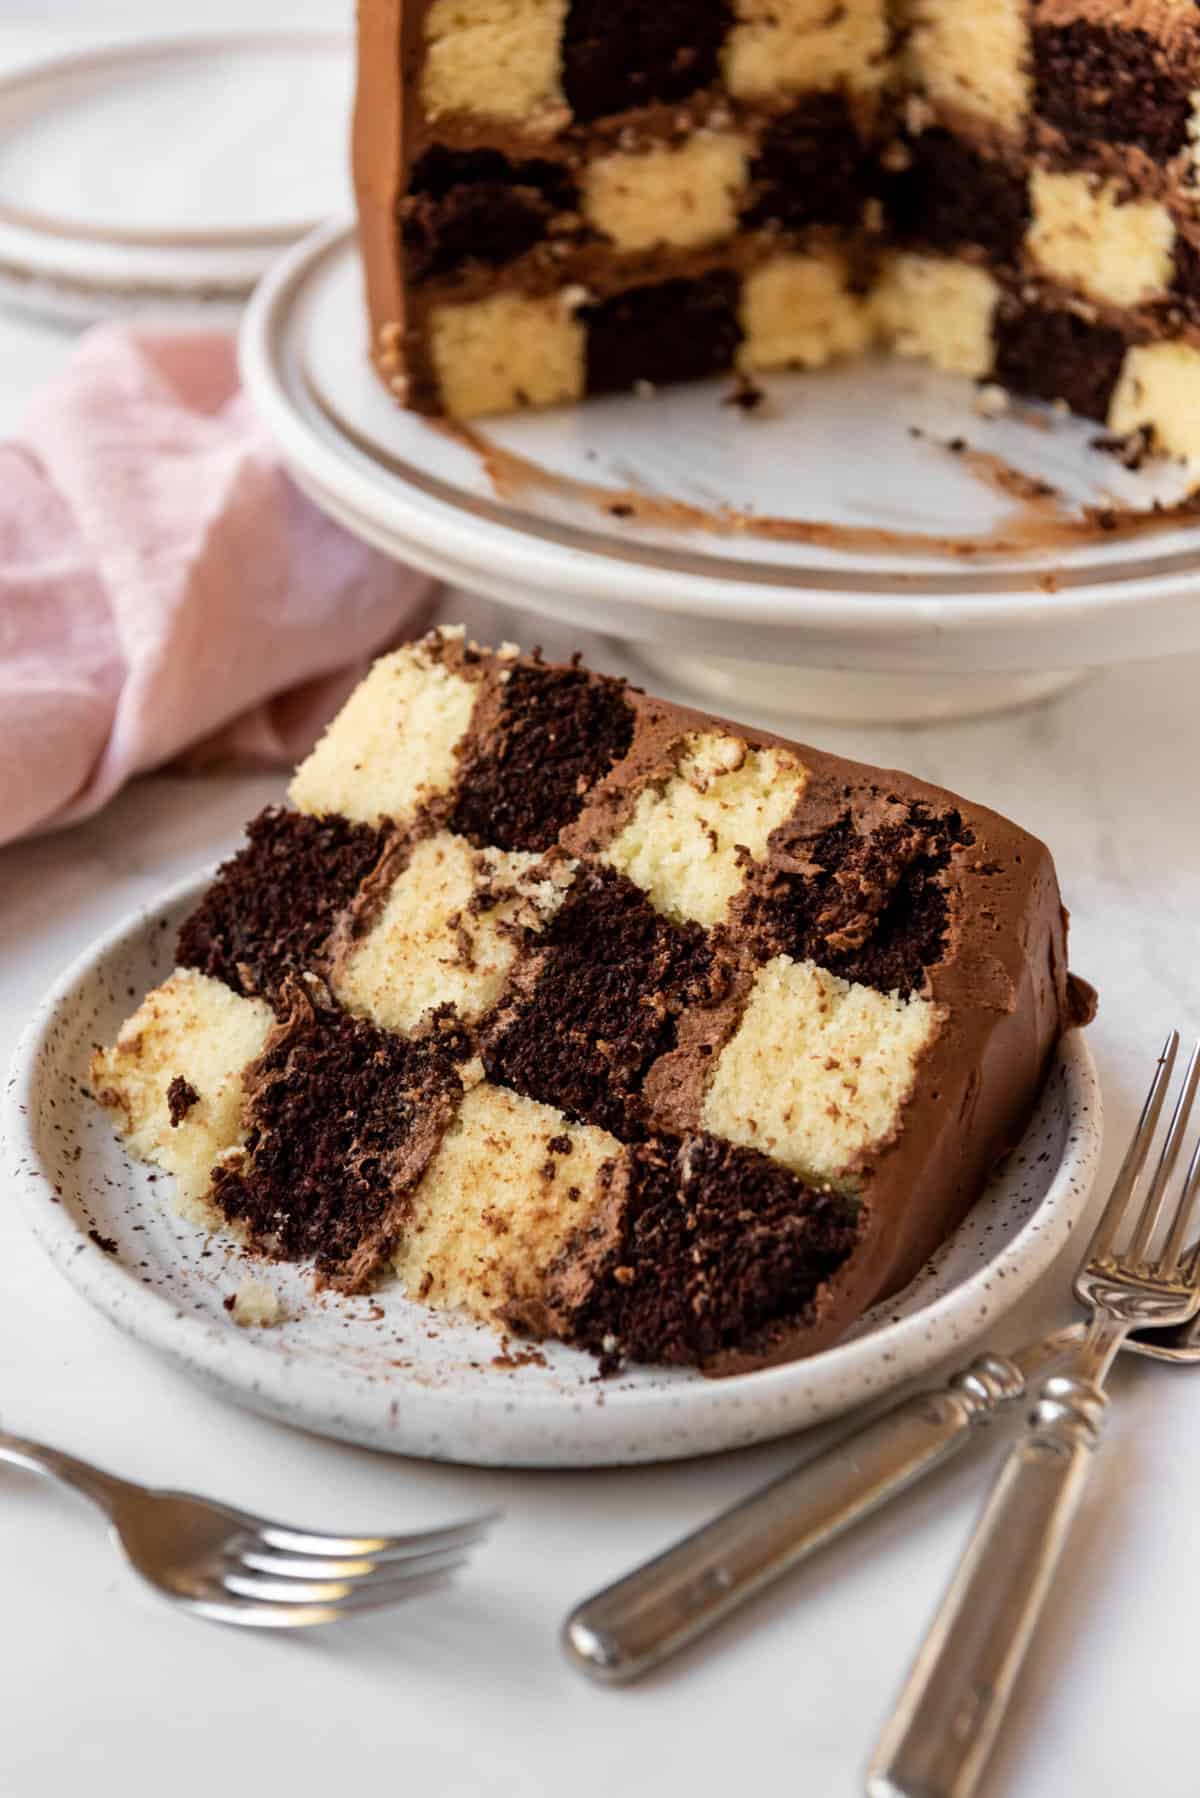
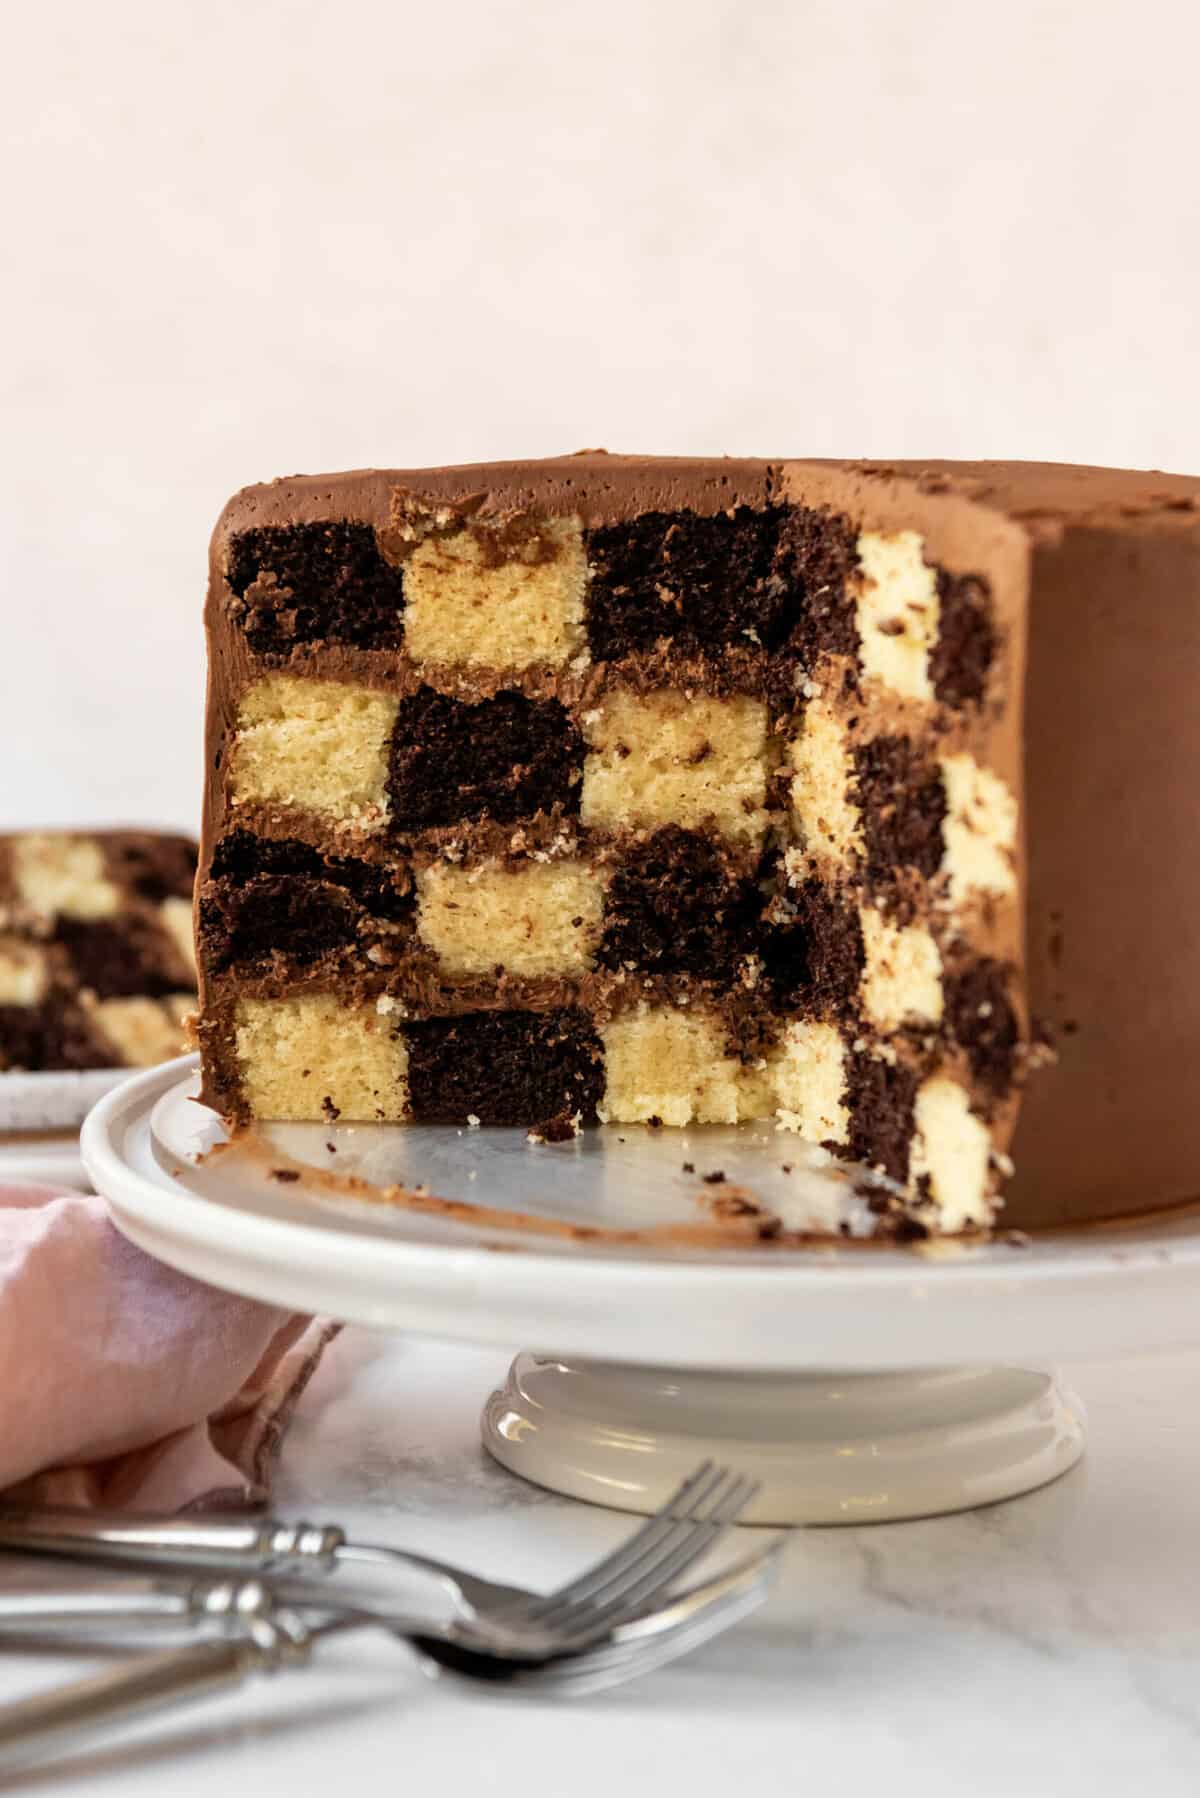
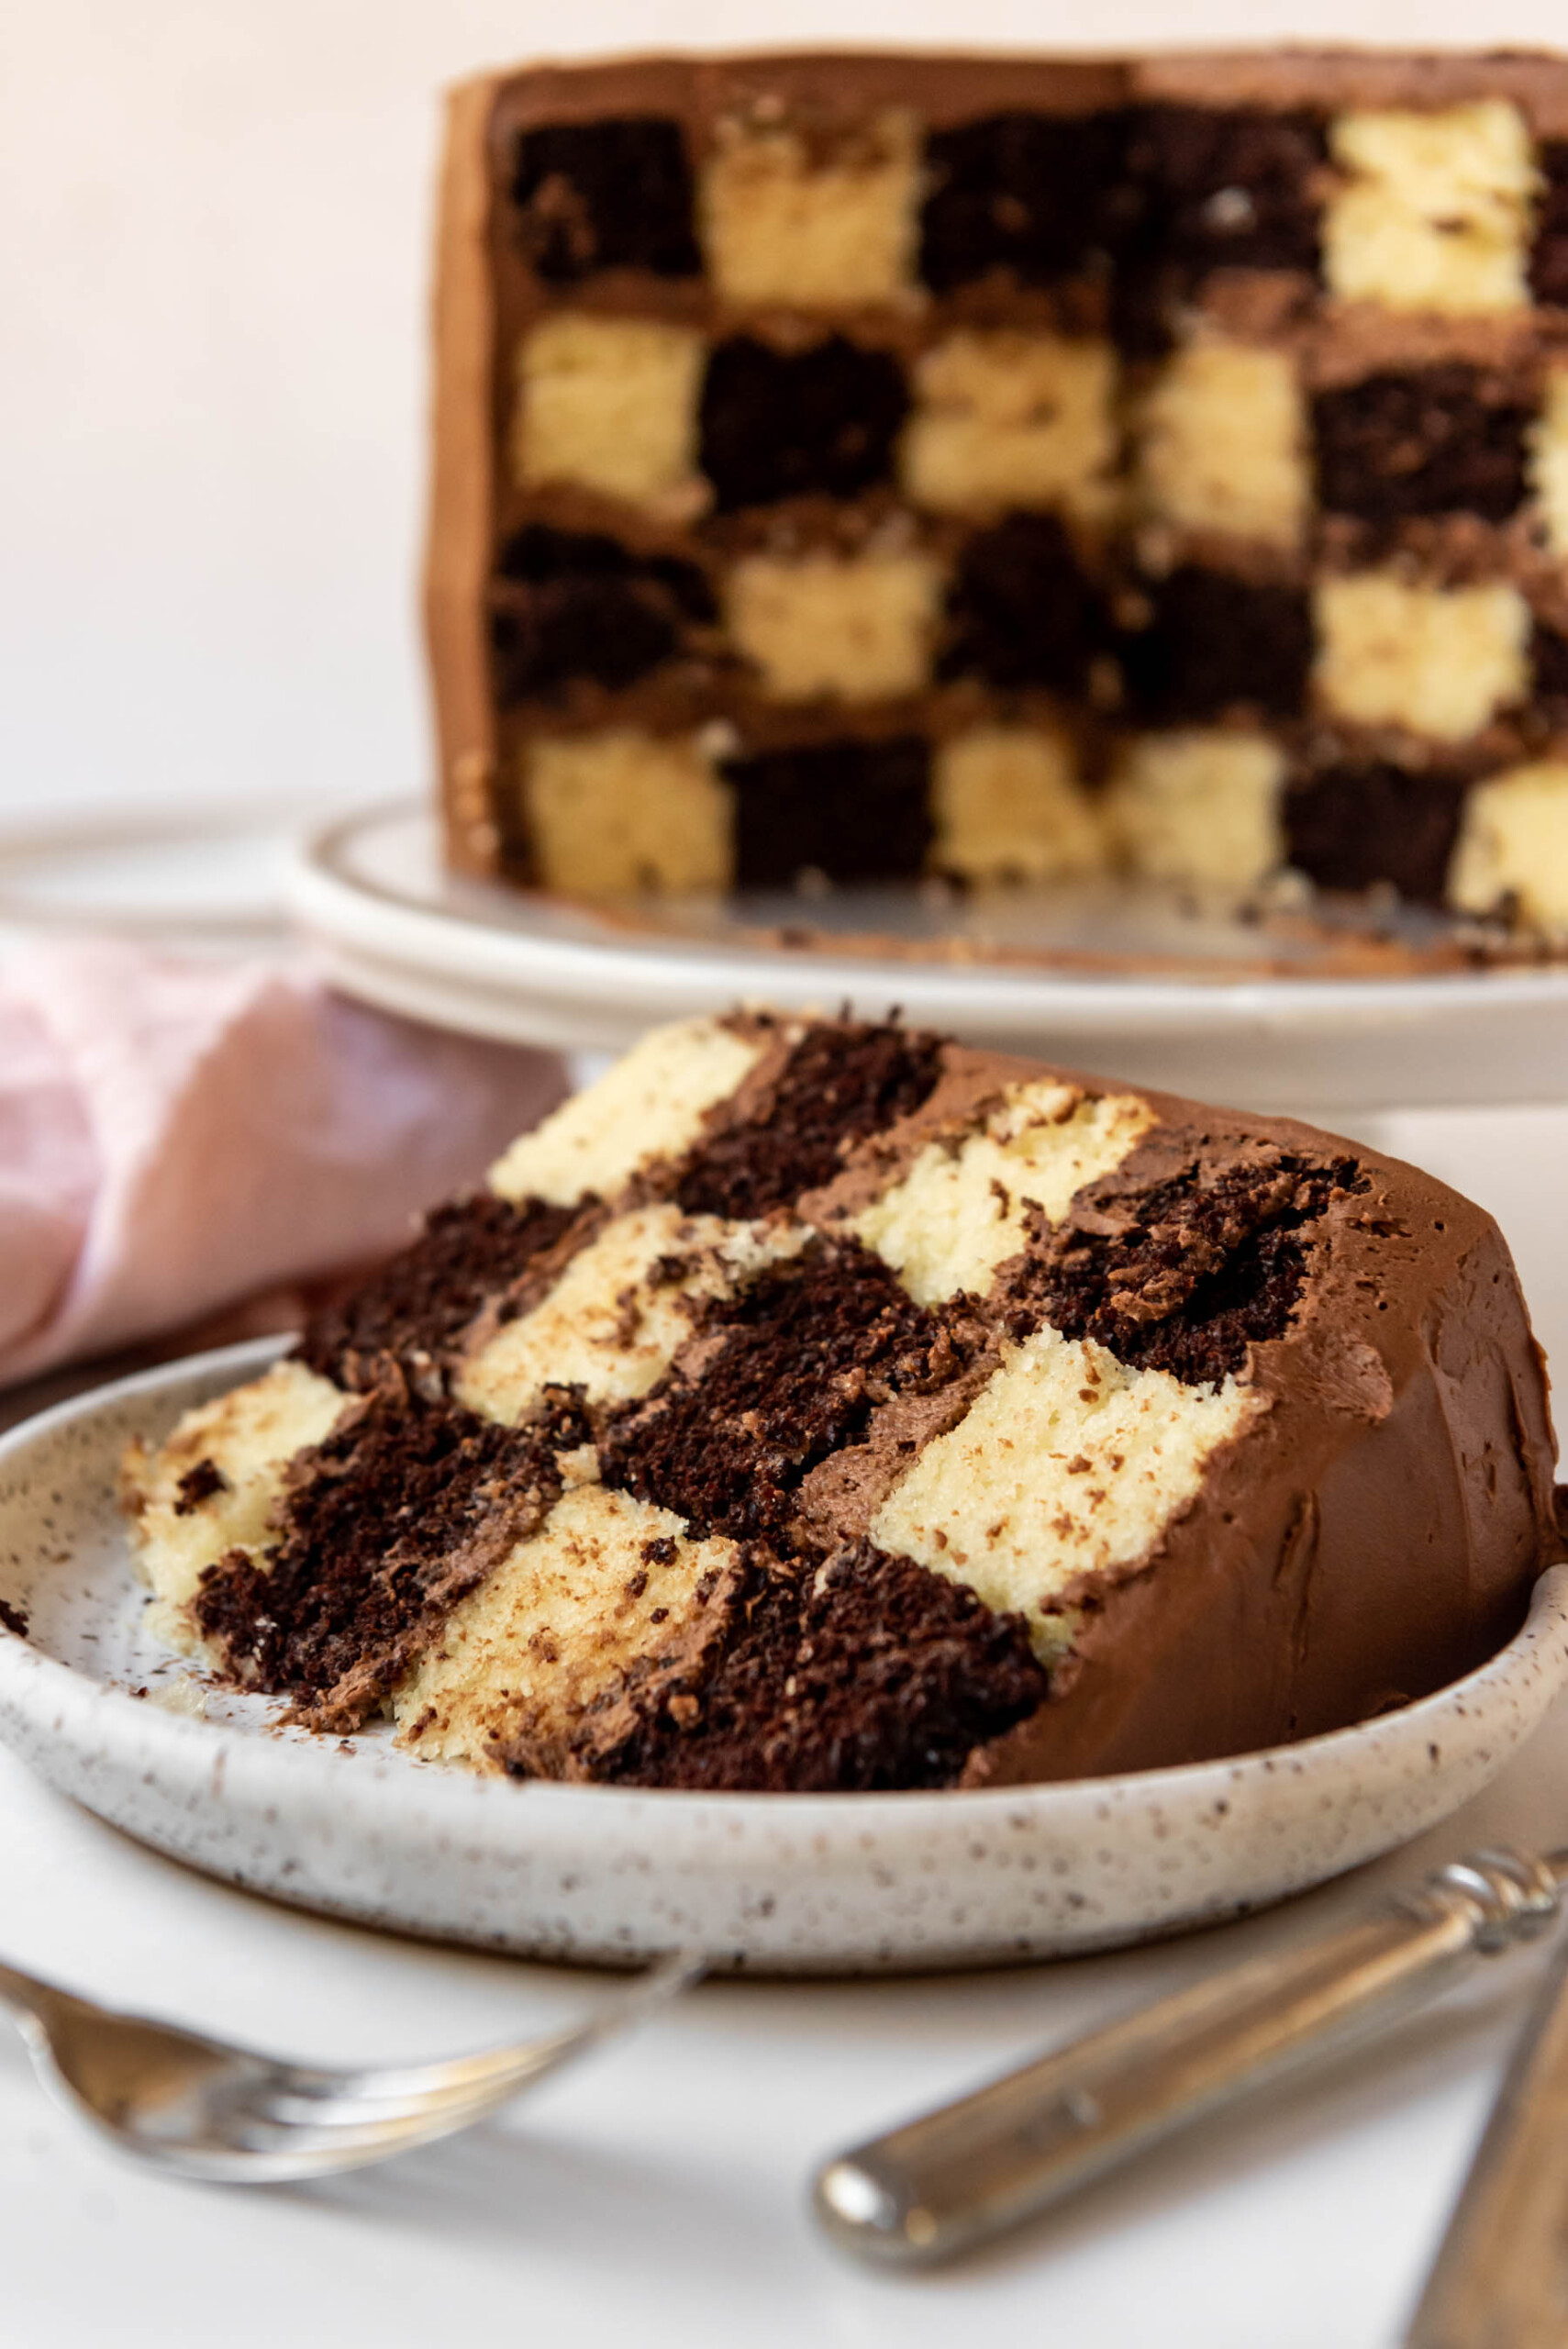
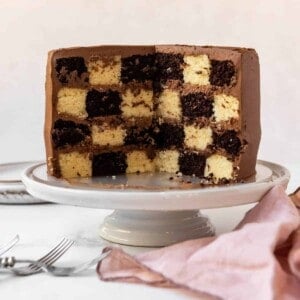
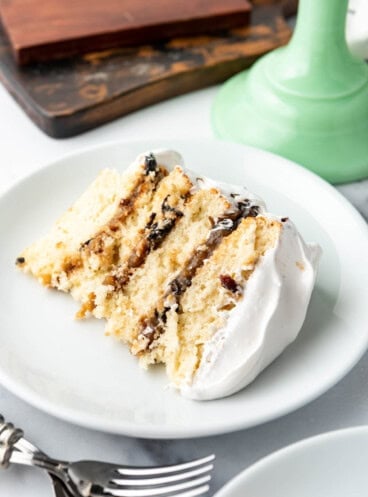
Surprise and delight your family with a scrumptious Checkerboard Cake with a patterned grid inside that is only revealed once you slice it! The from-scratch checkerboard cake features chocolate and vanilla cake flavors with a delicious homemade chocolate buttercream frosting.
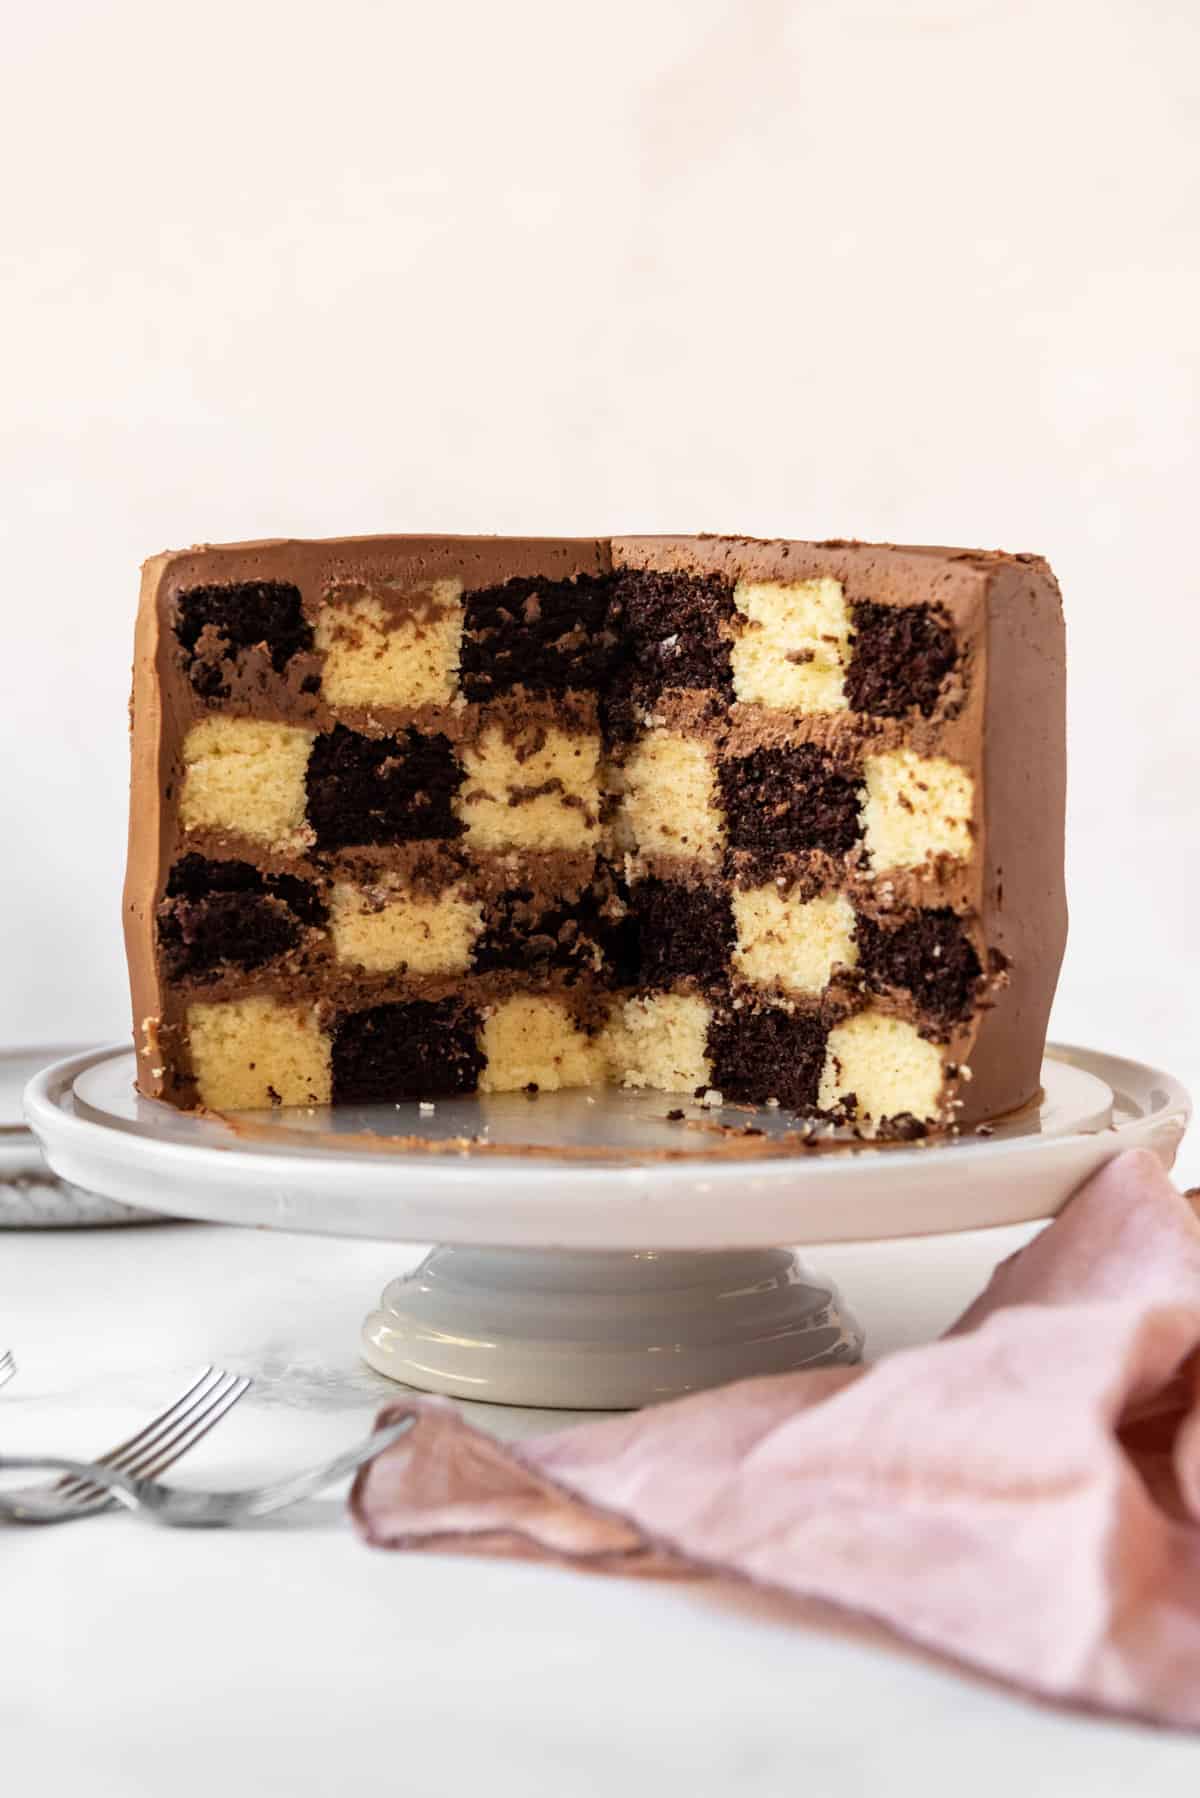
Table of Contents
When I asked our boardgame-loving youngest daughter what she wanted for her 9th birthday, she requested a checkers themed party. So naturally I had to make her a cake with a checkerboard design to go with the theme! She was so excited for this cake and I was thrilled with her reaction when we sliced into it for the reveal.
Fair warning that this makes a giant birthday party cake. It’s perfect for sharing with friends, or you can also freeze individual slices to enjoy later.
You are essentially making two different cake batters and baking them in 9-inch cake pans to make what would otherwise be a tricky math situation into an easy-to-follow method for a checkerboard layer cake.
It’s four layers or vanilla and chocolate deliciousness that looks complicated and over-the-top, but is actually way easier to pull off than you might think.
What You’ll Need
Scroll down to the recipe card below this post for ingredient quantities and full instructions.
- All-purpose flour
- Sugar – You’ll need both granulated sugar for the cake layers and powdered sugar for the frosting.
- Eggs – These should be brought to room temperature for best results.
- Cocoa powder – We used regular unsweetened natural cocoa powder for this recipe which is just one of my favorite chocolate cake recipes made in round pans.
- Oil – Vegetable oil or canola oil will result in super moist, delicious cake layers.
- Salted butter – I always use salted butter in all of my baking unless otherwise instructed.
- Baking soda
- Baking powder
- Salt
- Vanilla extract – I love using my homemade vanilla extract.
- Buttermilk – This adds a rich tanginess and moisture to the chocolate cake recipe.
- Milk
- Heavy cream – This is for the frosting to get a smooth, creamy consistency although milk can be substituted if needed.
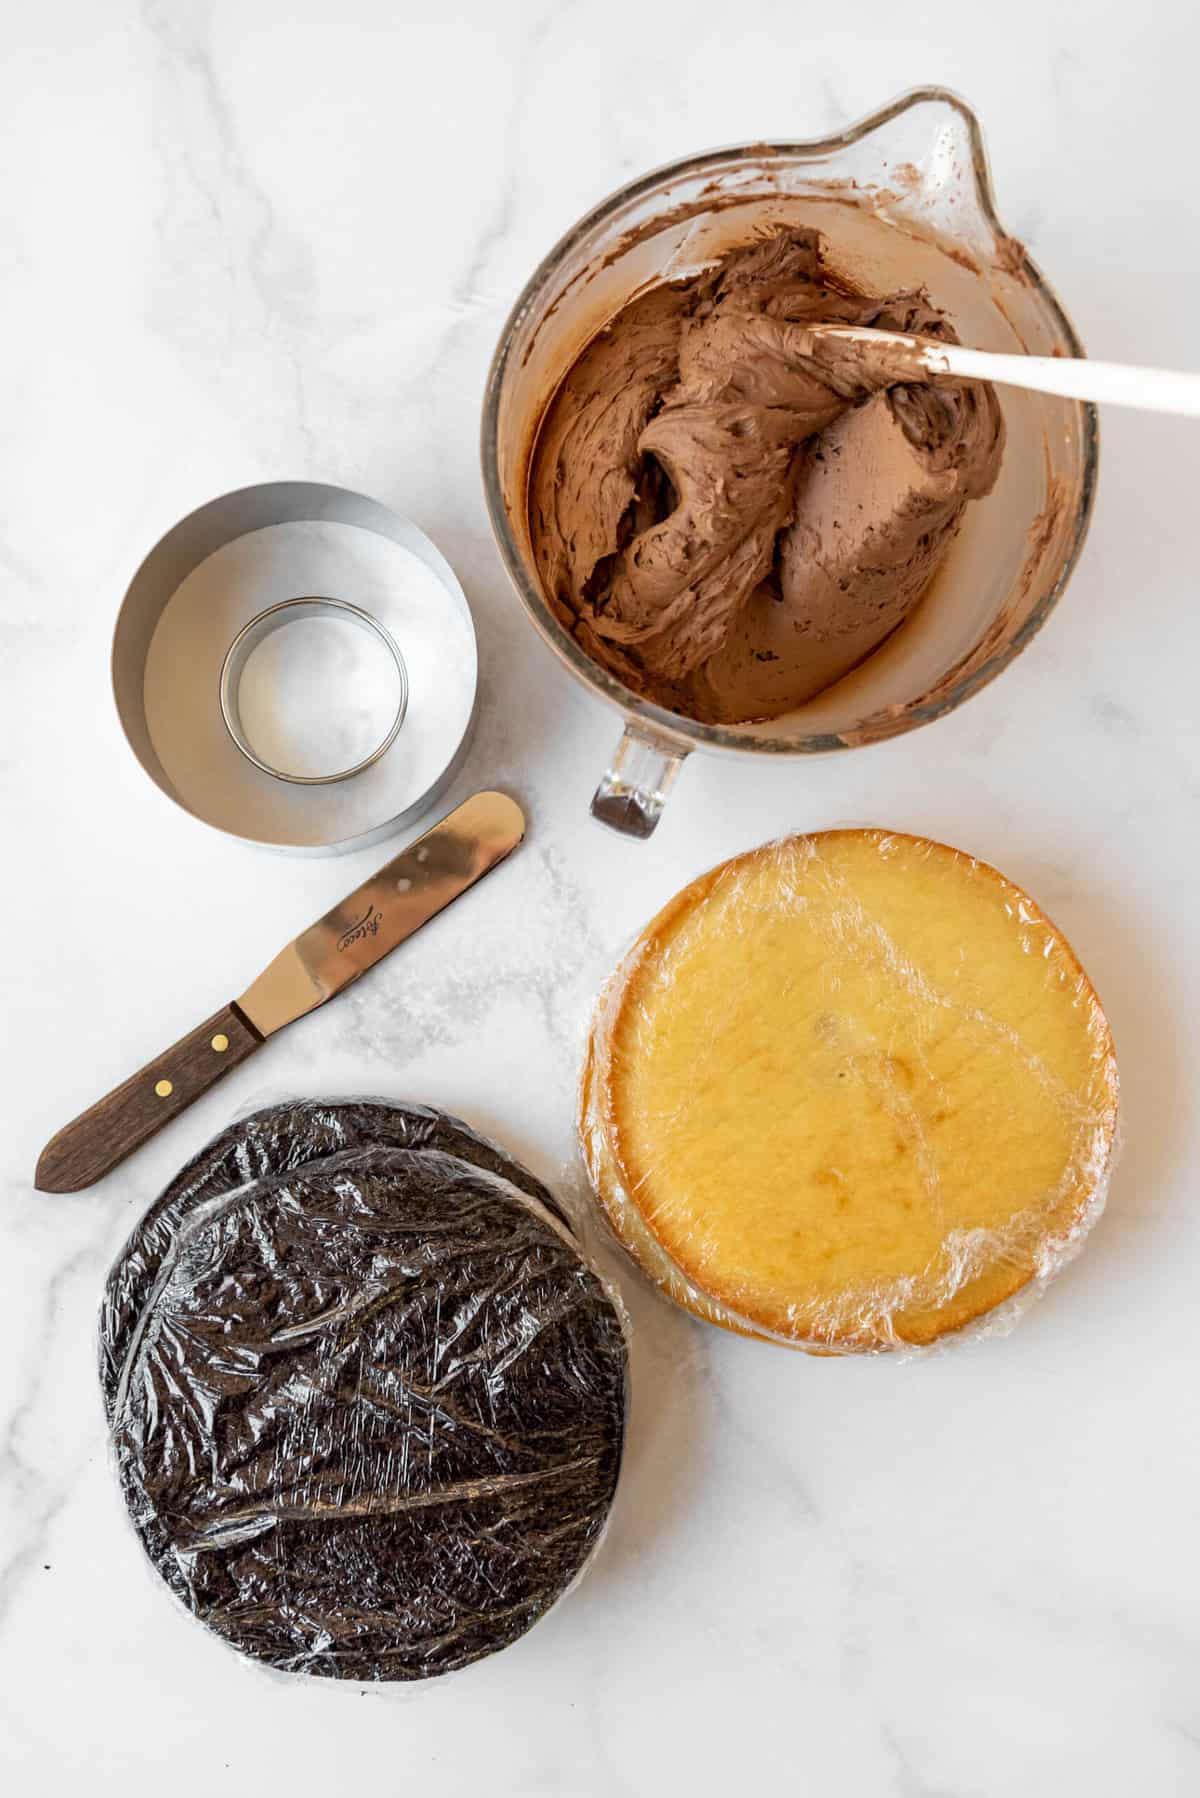
Equipment Needed
- 9-inch cake pans
- Cake leveler
- 6-inch round cake or cookie cutter
- 3-inch round cookie cutter
- Mixing bowls
- Spatula
How to Make a Checkerboard Cake
- Make and bake cake layers. I only have two 9-inch cake pans so I bake one batch of cake batter at a time. After cooling in the pan for about 10 minutes you can turn them out onto a wire cooling rack and use the same pans to bake the second set of cake layers in your alternating flavor.
- Make frosting. This is a very large cake so it takes quite a bit of frosting to cover it. If you want more frosting, I recommend doing 1.5x the batch below in order to have enough for piping on top. If you have leftover frosting, you can always freeze it or use it to make graham cracker sandwiches.
- Level cakes. It’s important to level off any rounded tops so you have completely cooled, flat cake layers to work with. You can do this with a long serrated knife or use a cake leveling tool that you can get a hobby and craft stores or order online. This is my favorite approach because it will ensure cake layers that are exactly the same height, which makes for the most clean look for a checkerboard cake.
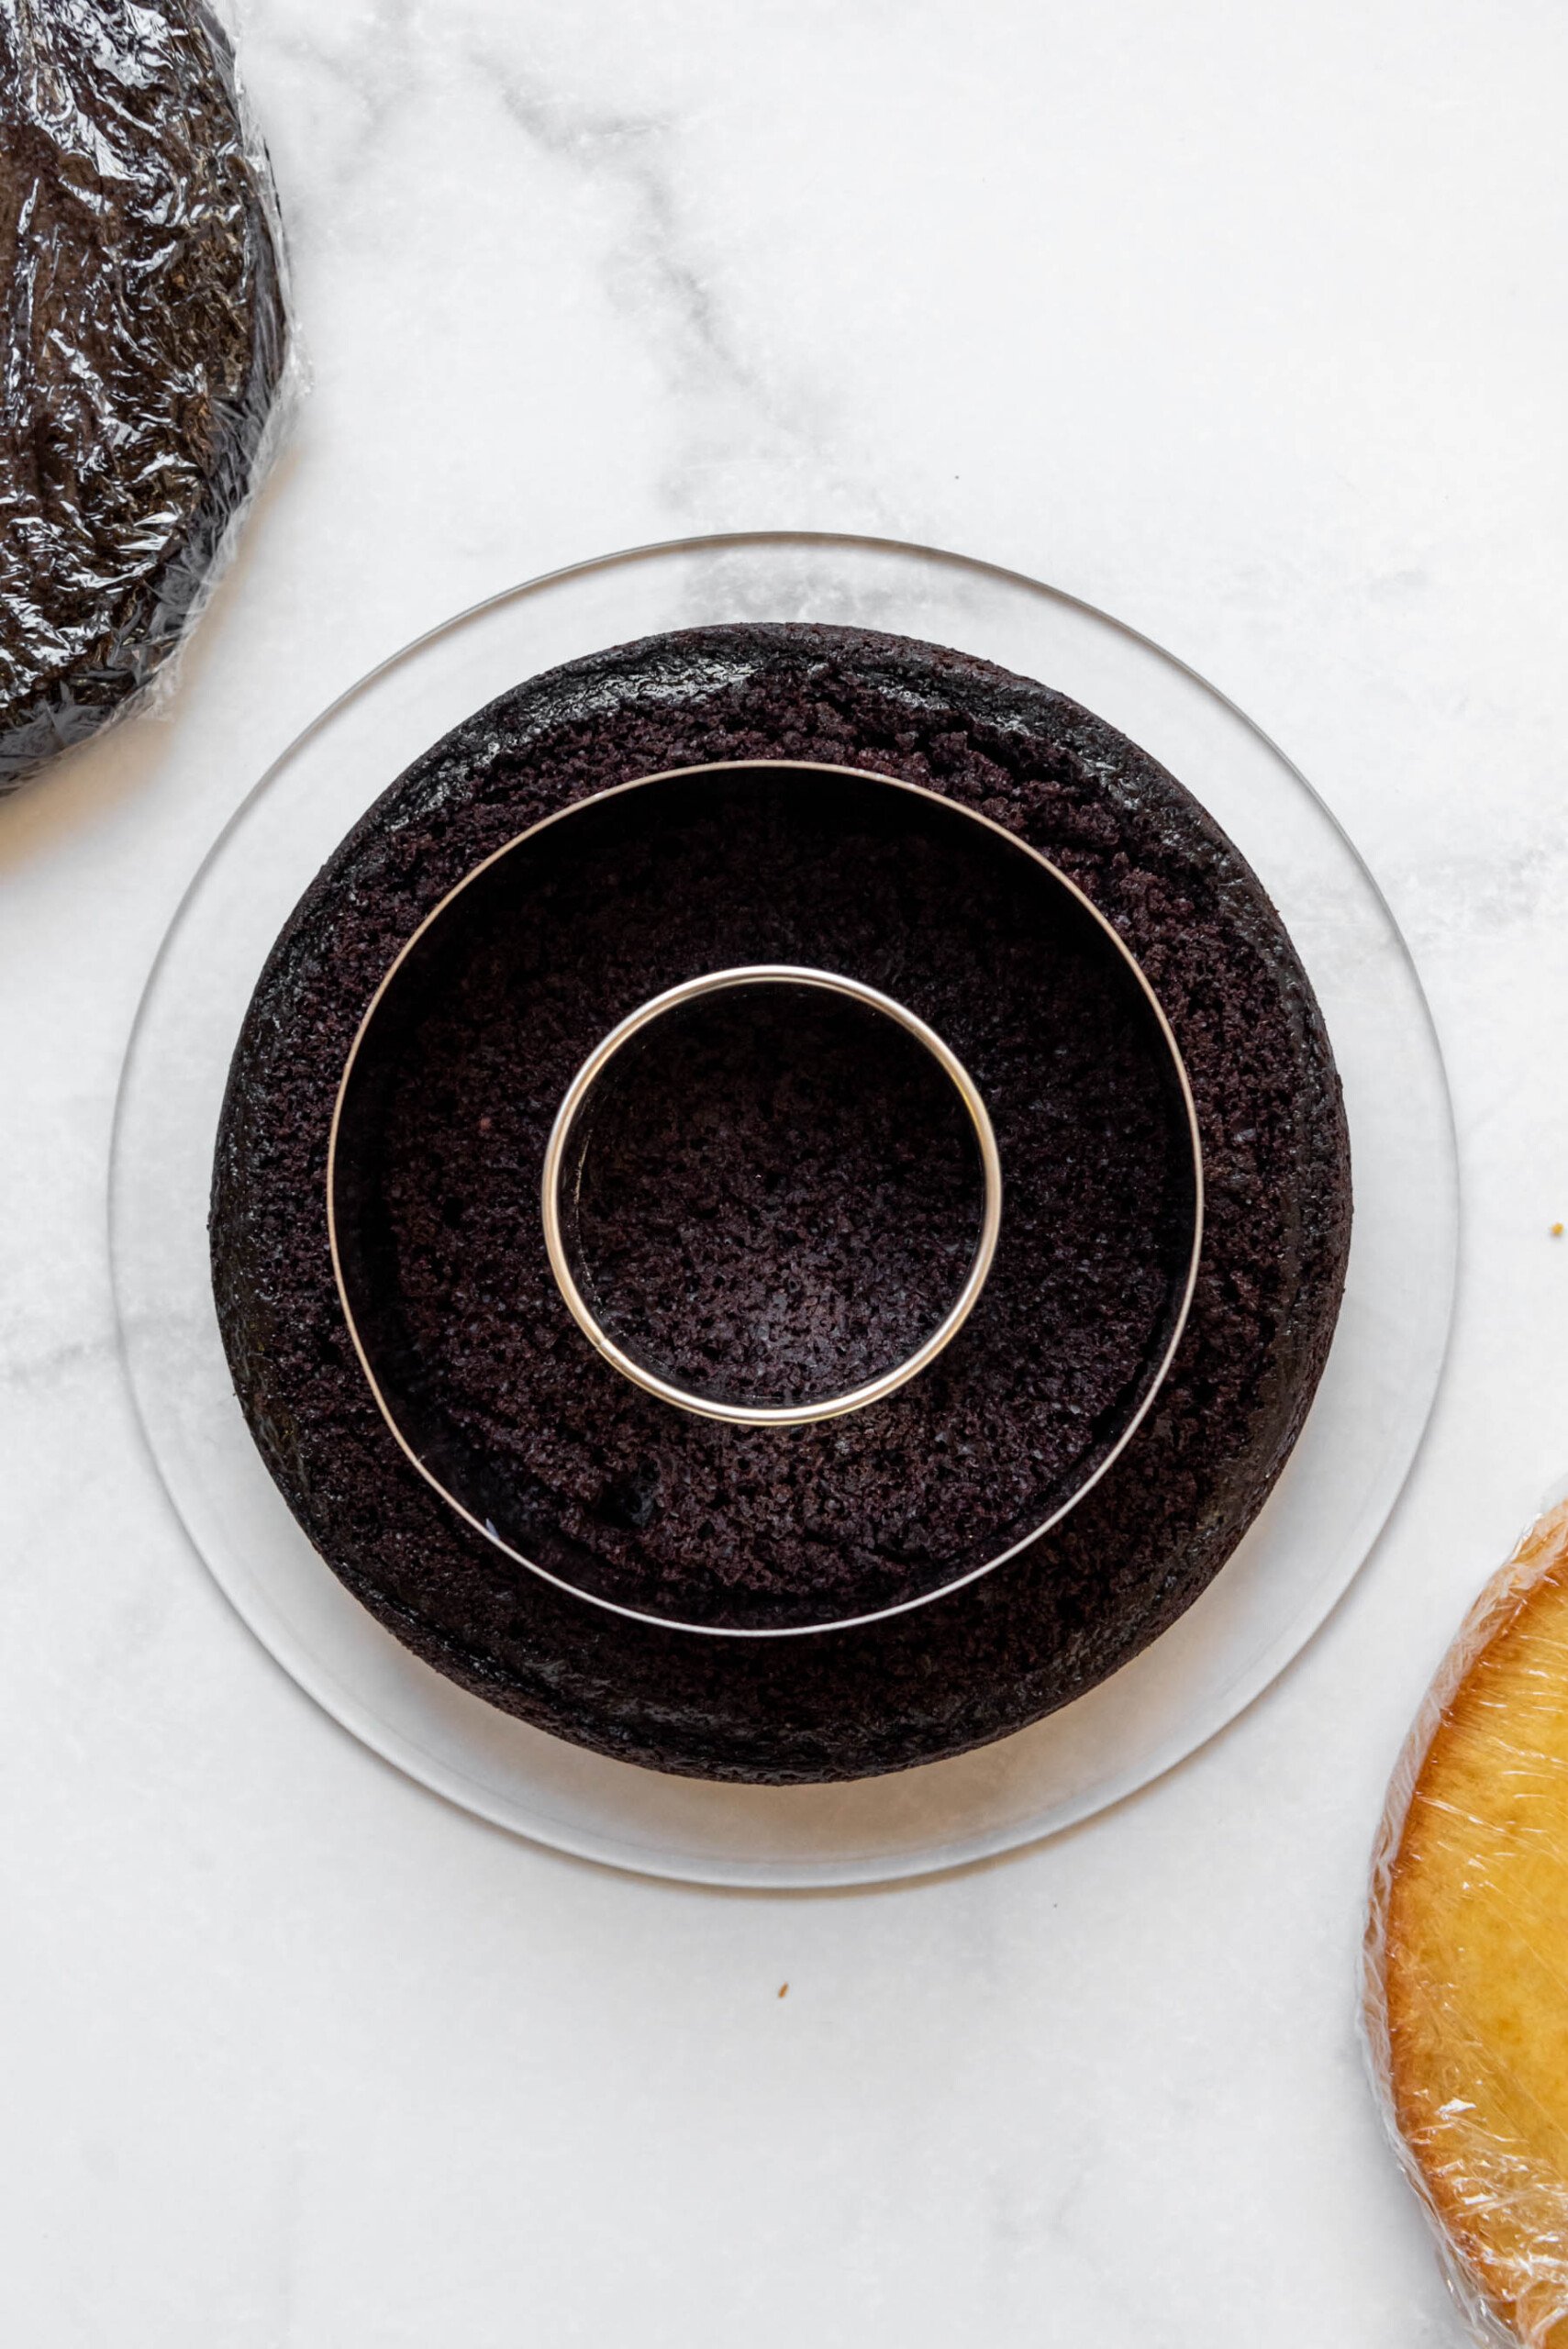
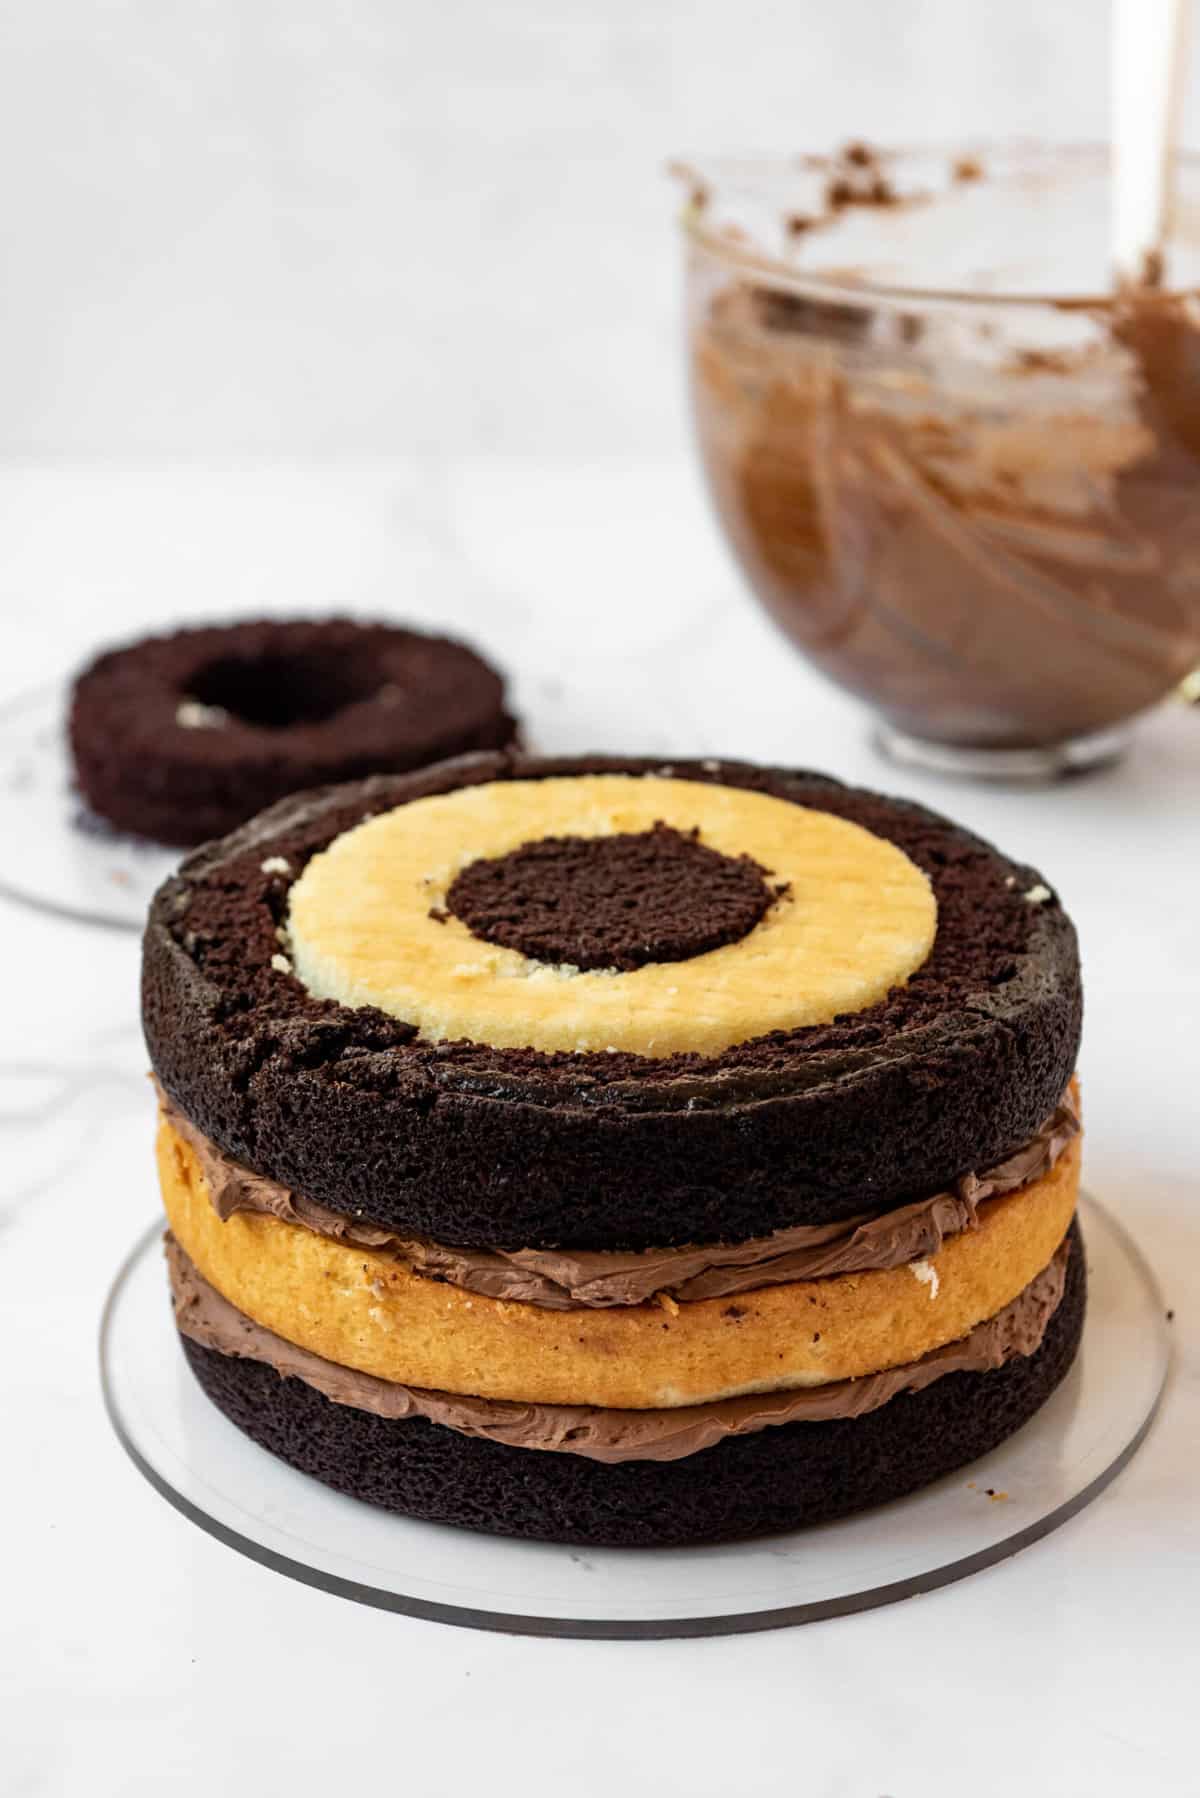
- Cut out cake rings. Use a 6-inch round cake ring or cookie cutter to punch out large 6-inch circles from the center of each of your cake layers. Then use a 3-inch cookie cutter to cut out smaller 3-inch circles from the center of each cake layer. Eyeball carefully so the circles are cut in the very center of each cake layer for the most precise results.
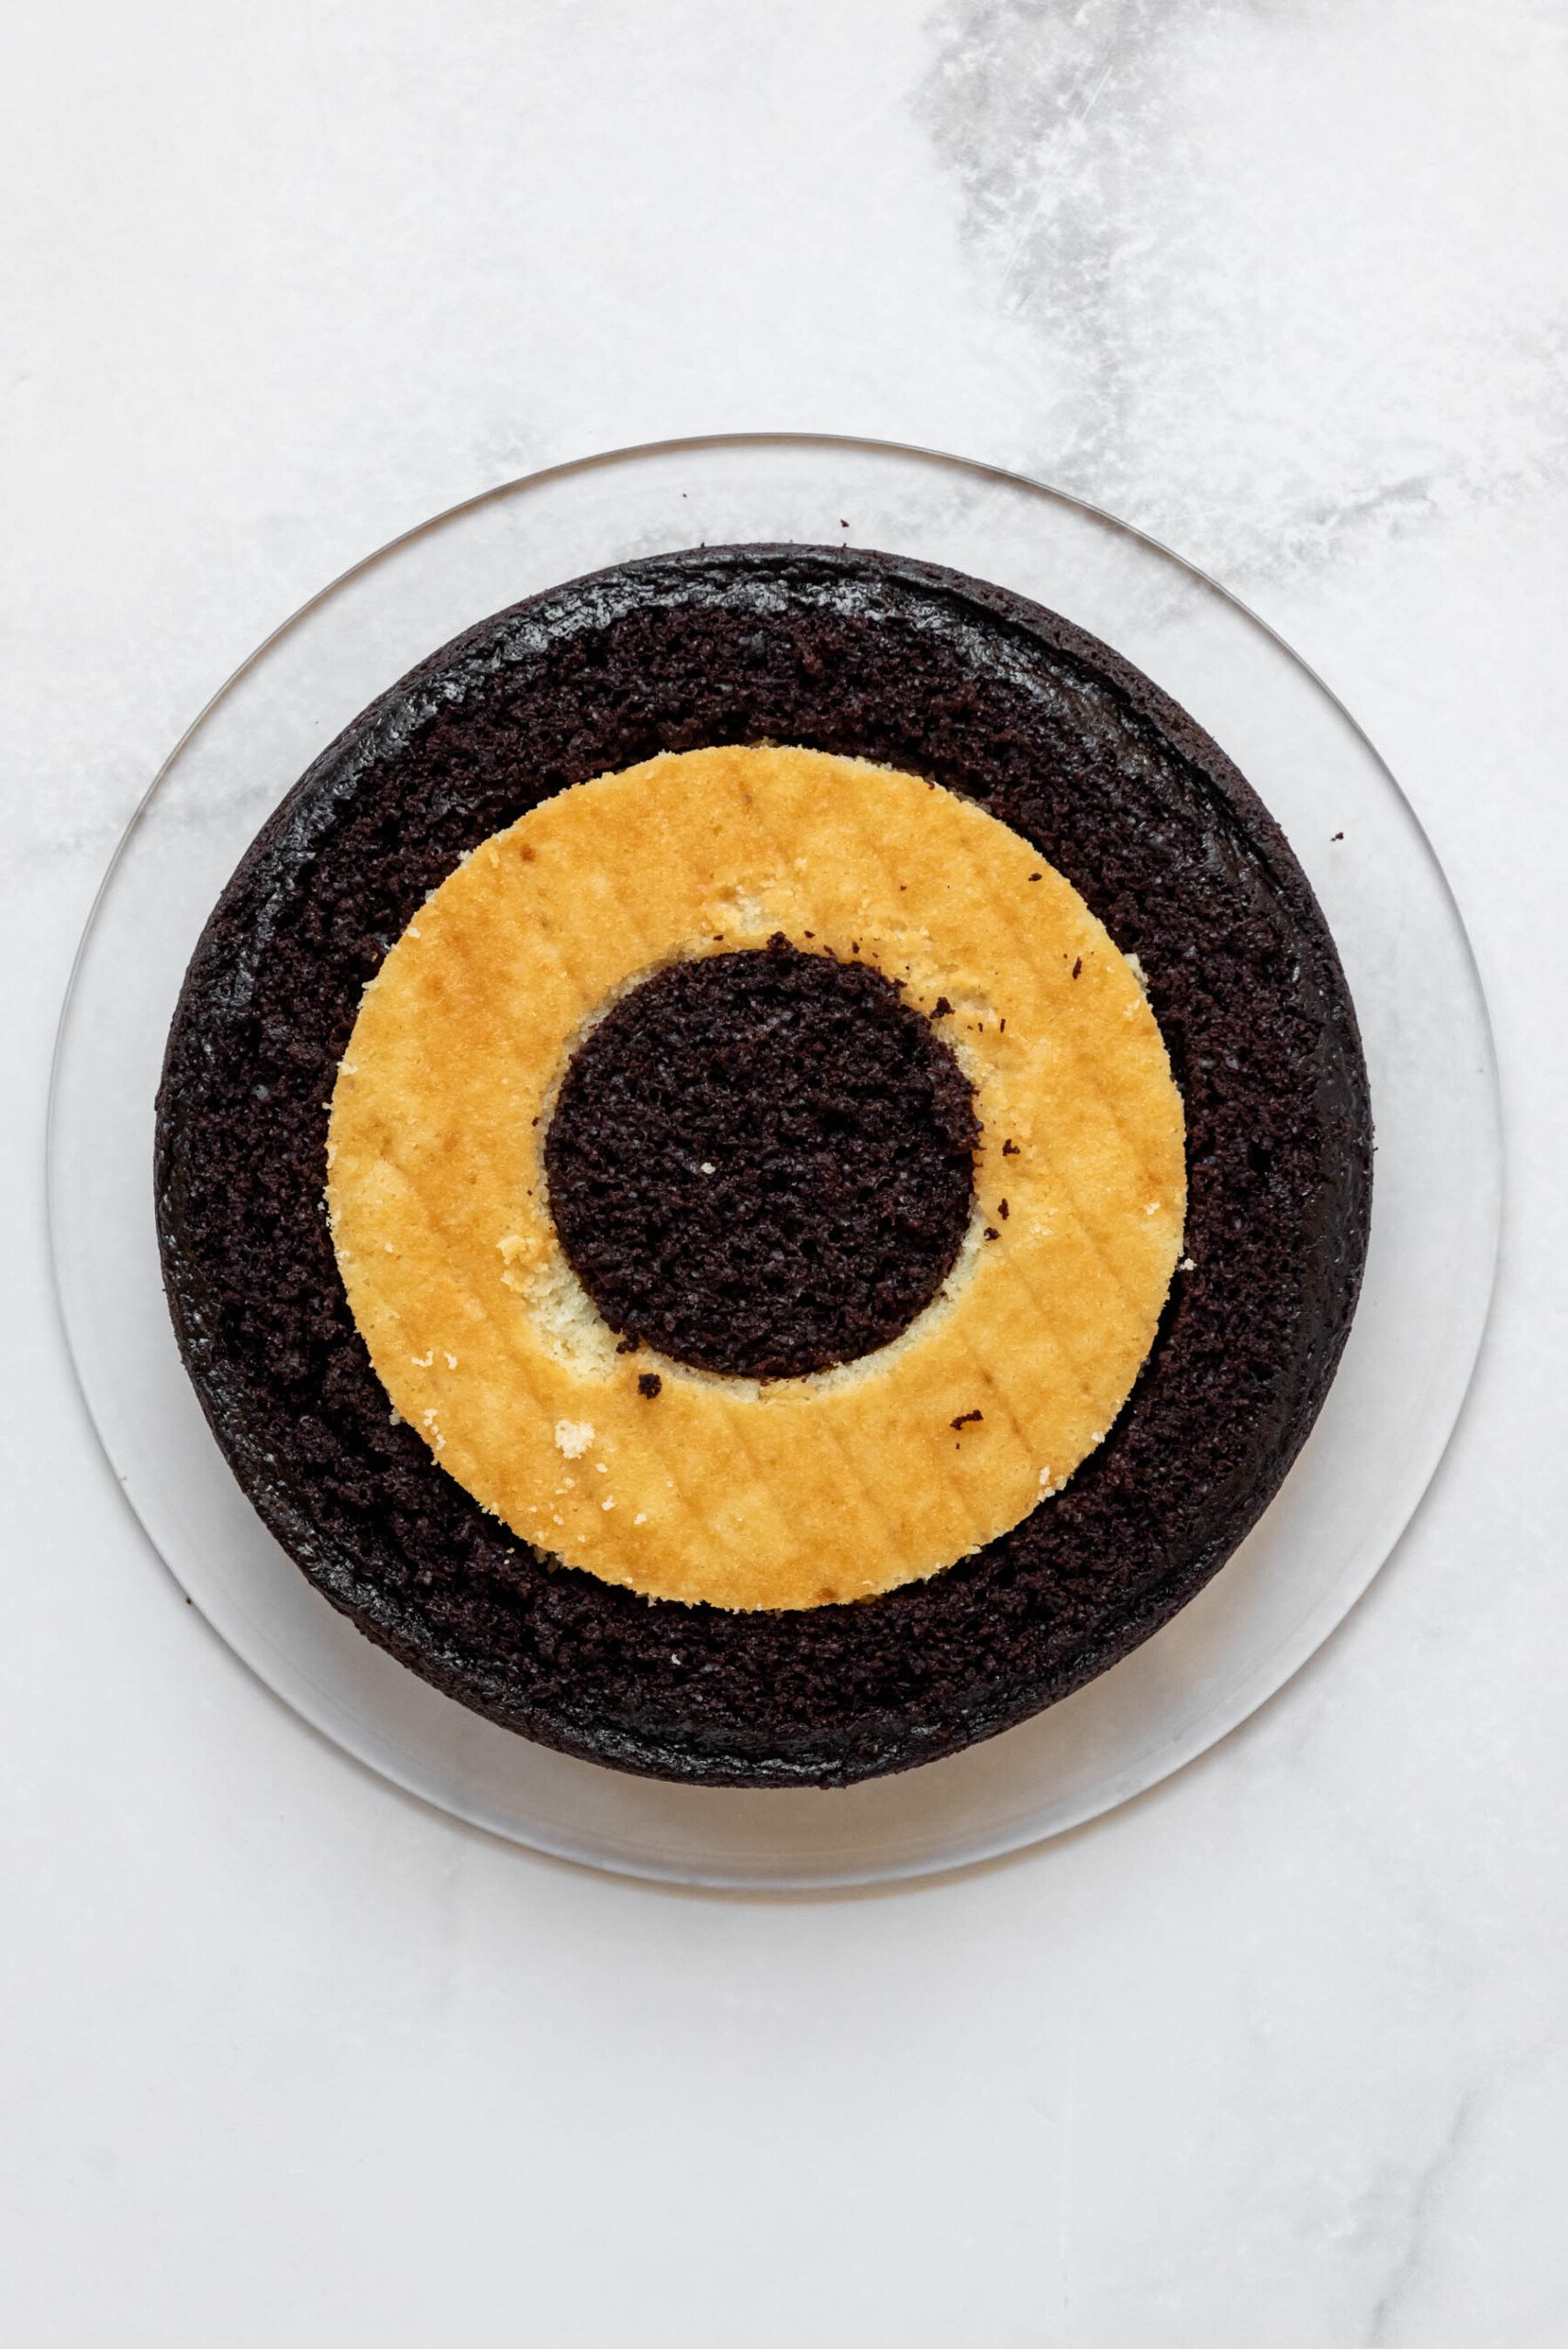
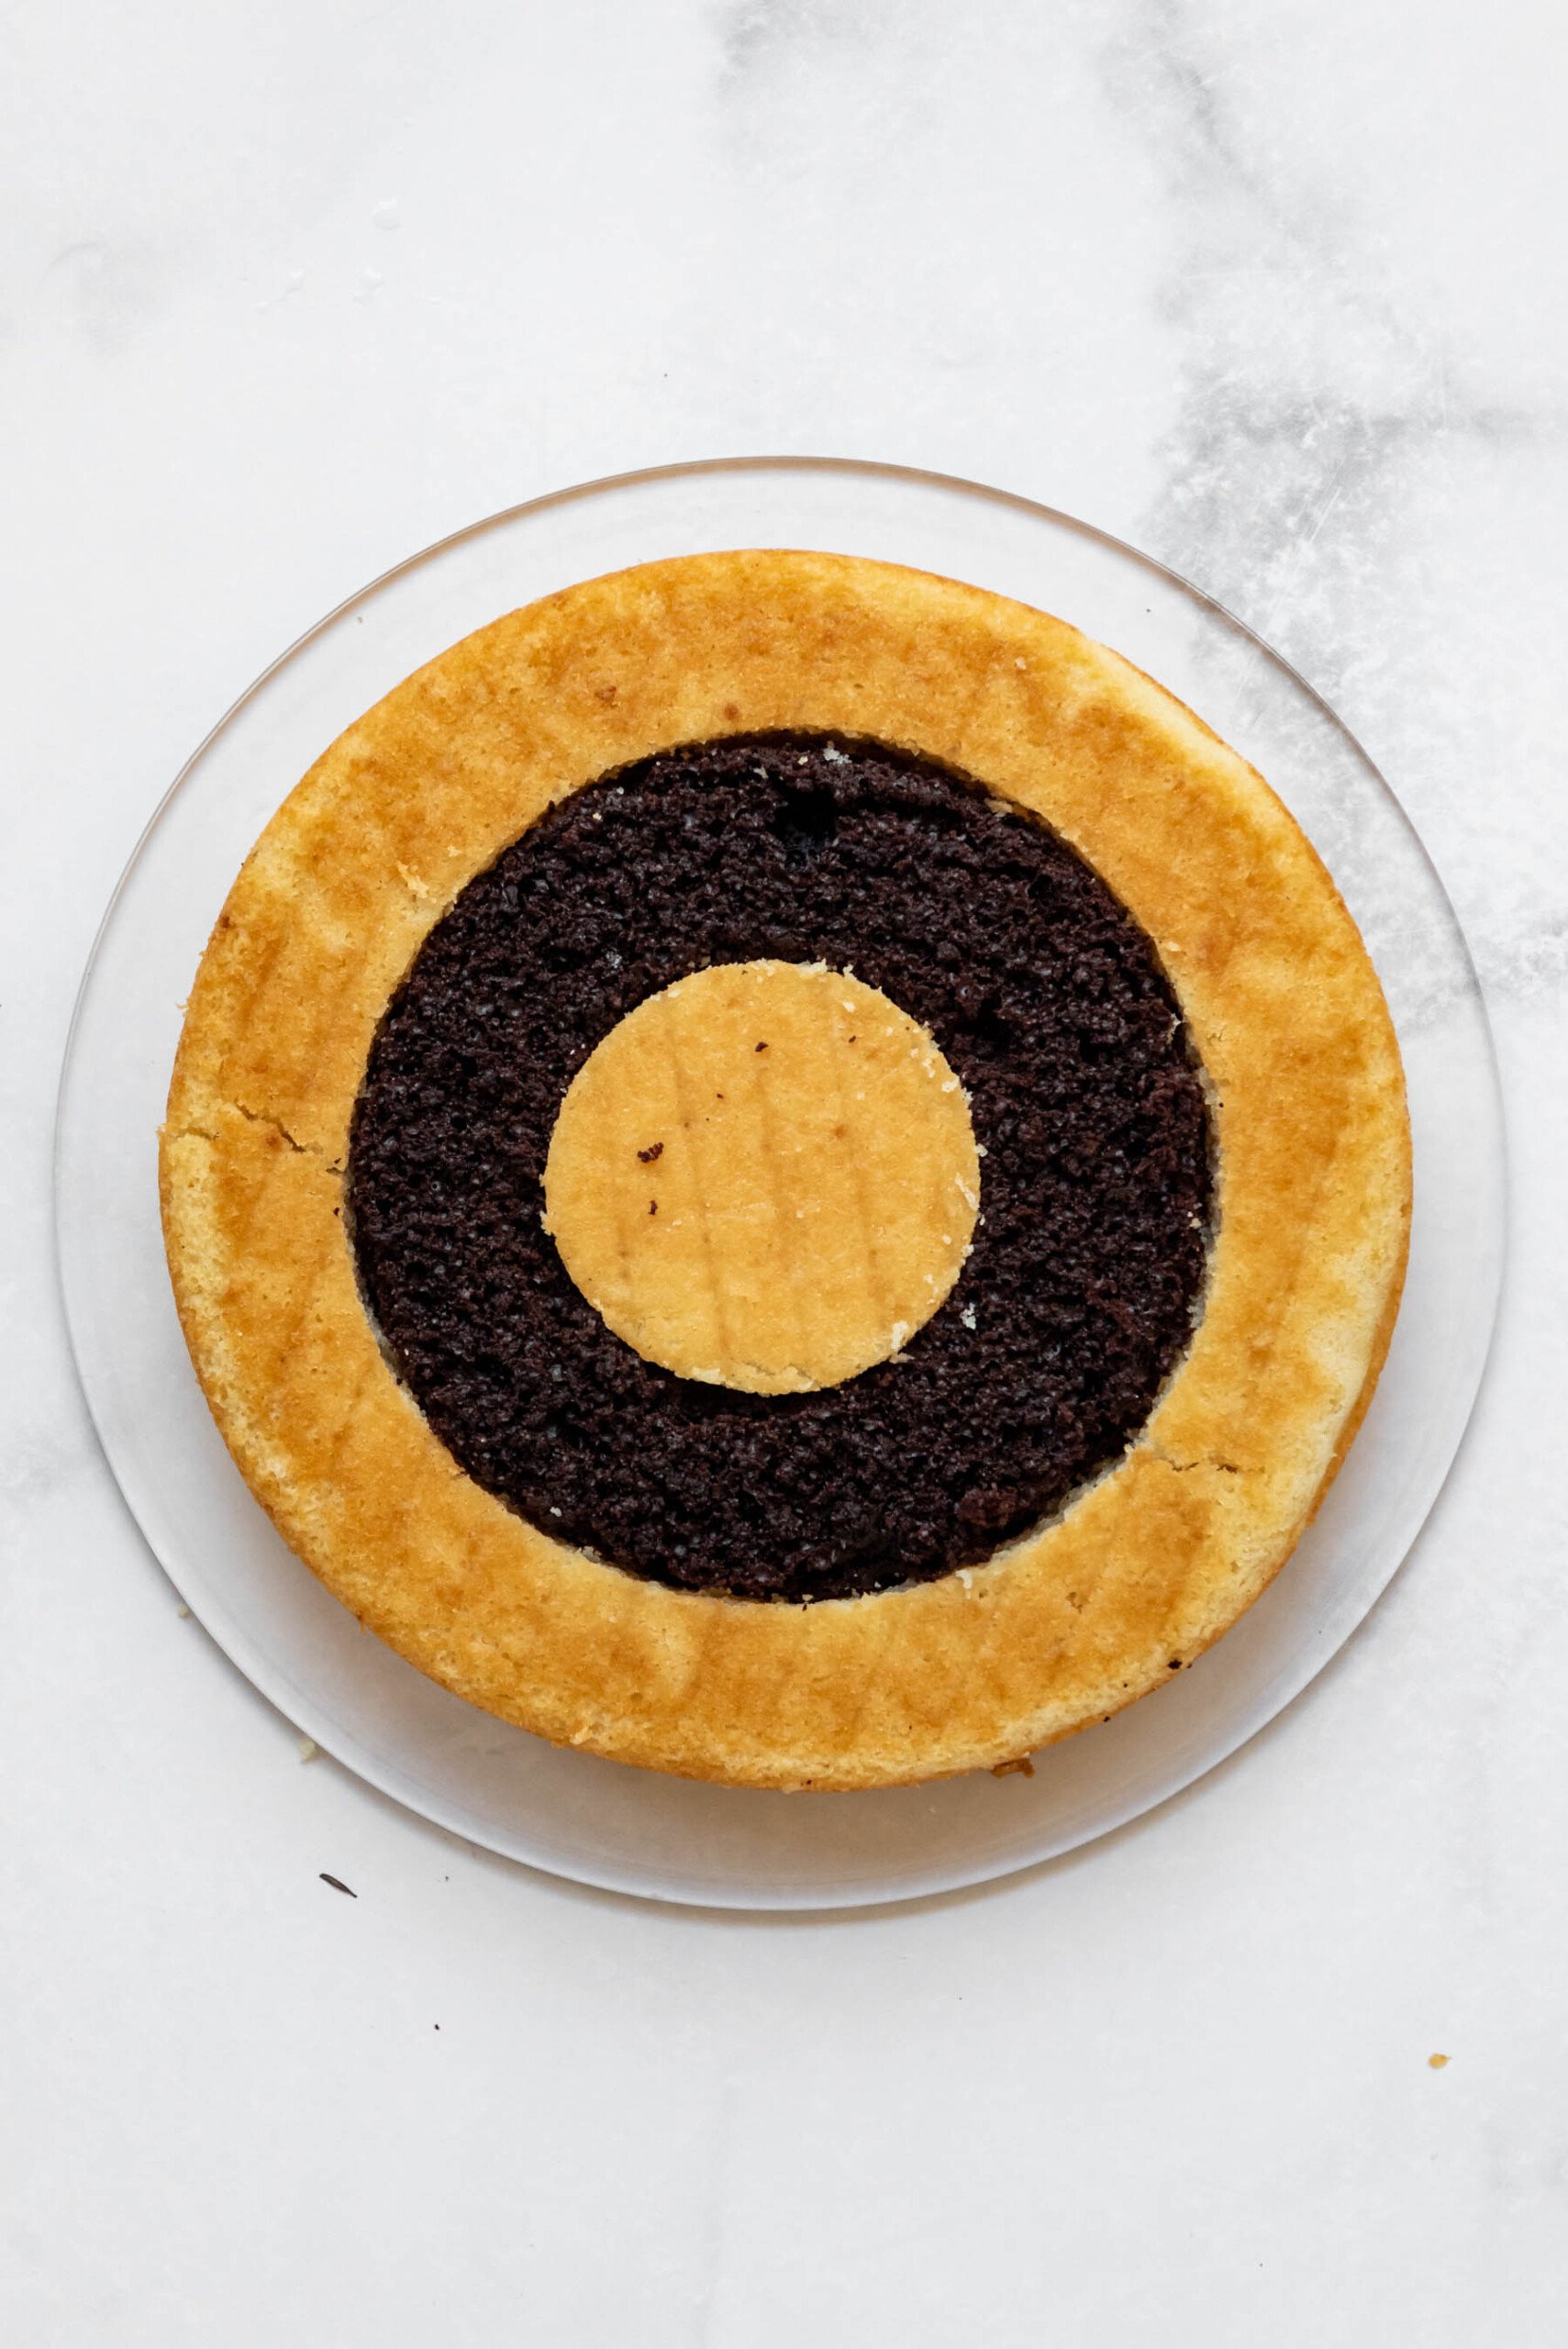
- Alternate flavors. Carefully separate cake rings and alternate the flavors for each layer creating a bullseye pattern that alternates with the vanilla layer or chocolate layer on the outside. The larger outer rings are the most difficult to lift and prone to breaking, so work carefully and assemble the layers on a sturdy plate that can be used to lift and flip the cake layers onto your cake plate later.
- Assemble. Generously frost the bottom cake layer with the prepared frosting. The frosting helps act as a glue holding the layers of cake together. Carefully place the next cake layer on top of the first layer, alternating the color of the outer ring to build the checkerboard effect. Continue adding frosting between each layer and alternating the colors to build the cake.


- Crumb coat. Once all four cake layers are in place, spread a thin layer of frosting around the top and sides of the entire cake for a crumb coat. This helps seal in any crumbs for a better look later when adding the final layer of frosting. Transfer the cake to the freezer for 20-30 minutes to set the crumb coat.
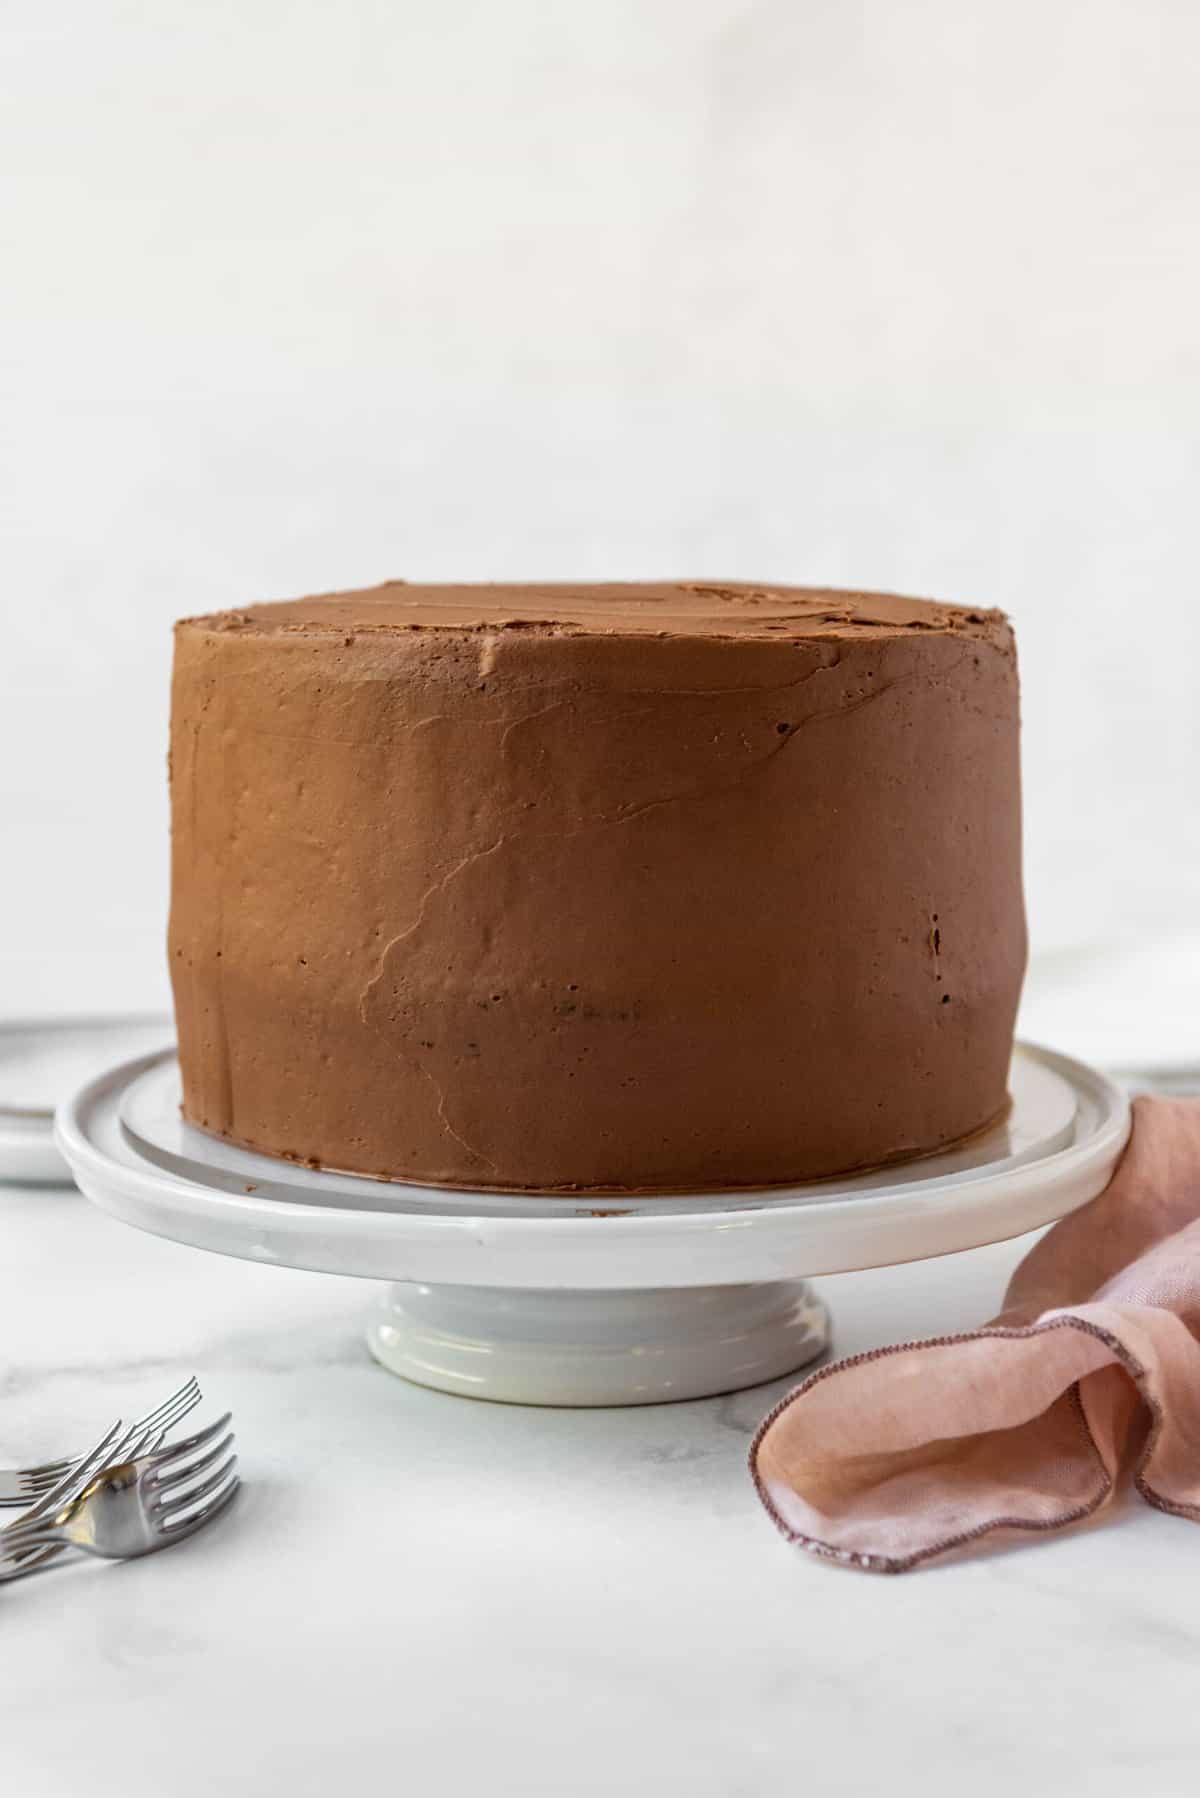
- Final coat. Once the crumb coat has had a chance to firm up, the cake will be much more stable and easier to frost the top and sides of the cake with an outer layer of the remaining chocolate frosting. I opted to keep things really simple and didn’t even pipe swirls of frosting on top of the cake this time because I wanted the main focus to be the final reveal, but you can go as fancy as you like!
- Slice and enjoy! I was worried about how well the cake would slice and whether pieces of the checkerboard would fall out, but the frosting did a pretty great job of holding it together! Just be sure to use a sharp knife to cut all the way through to the very center of the cake for a clean slice. Feel free to serve it with a scoop of ice cream if you would like!
Recipe FAQ’s
Yes, you can certainly use a yellow cake mix and chocolate cake mix here to achieve the same result when making your checkerboard cake. We just prefer the flavor and texture of homemade cake best, but do whatever works for you.
Absolutely! You can use practically any cake recipe to replace one or both flavors of this cake. I could see my red velvet cake or strawberry cake recipe working really well with either the chocolate or vanilla flavors here, but other combinations like pumpkin chocolate or lemon strawberry would be great too! Just be sure that the cake batters are different colors so you get the contrast of the checkerboard pattern when you slice into it.
If you don’t have a 6-inch cake cutter, you can just draw a 6-inch circle on a piece of paper and use it as a template to cut out your circles with a sharp paring knife. It’s a bit more work and you need to take care to cut vertically rather than slanted for a precise pattern, but it’s definitely doable.
If you want to try different flavors of cake, you could do a vanilla buttercream frosting or cream cheese frosting depending on the pairing.
Tips for Success
- Give yourself time. You can make and bake the cakes a day or two ahead, then assemble the entire cake the day ahead or day of when you have time rather than attempting to make the whole thing in one day. If you are freezing cake layers, let them cool completely, then wrap each layer tightly in plastic wrap and stack cakes in the freezer to freeze for up to 2 months. Let the cakes thaw partially before cutting circles of cake and assembling as directed.
- Use room temperature ingredients. You will get the best results if you use room temperature butter, eggs, and dairy for baking these cake layers. Not only will they mix together and bake more evenly for a more moist cake, but you will also have less doming on top of the layers so they are pretty flat to begin with and don’t need much leveling before stacking the cake.
- Don’t overmeasure, overmix, or overbake. These three are the biggest culprits when it comes to dry cake. While not completely necessary, if you have a reliable kitchen scale, I recommend using it to weigh your ingredients rather than relying on measuring cups. Also, don’t go crazy beating your cake batter once you combine the wet and dry ingredients or overbake the cakes as both of these common mistakes will cause the cake to dry out and not have a nice tender crumb.
- Use a crumb coat and freezer technique for frosting. Because you are cutting apart and then reassembling your cake layers, they won’t be quite as structurally sound as other cakes, which makes a crumb coat particularly important here. Also, freezing the crumb coat helps set the cake so it is sturdier and less prone to tearing when you add the final layer of frosting. Don’t skip!
Storage & Freezing Instructions
Storing: Keep any uneaten cake well-covered with plastic wrap or in an airtight container on the container for 3 to 4 days. You can refrigerate the cake if you want it to last a little bit longer, but you should let it come all the way to room temperature before eating it or it will taste stale.
Freezing: You can also freeze individual cake slices so you can enjoy a piece of checkerboard cake any time you feel like it! Wrap them well in plastic wrap, then store in an airtight container in the freezer for up to 2 months. Thaw on the counter for a few hours before enjoying.
More Cake Recipes
- Southern Caramel Cake
- Vintage Cherry Cake
- Devil’s Food Cake with Chocolate Frosting
- Momofuku Milk Bar Birthday Cake
- Aunt Becky’s Black Forest Cake

Did you make this recipe?
Let me know what you thought with a comment and rating below. You can also take a picture and tag me on Instagram @houseofnasheats or share it on the Pinterest pin so I can see.
Checkerboard Cake
Ingredients
Chocolate Cake
- 2 cups all-purpose flour (250g)
- 2 cups granulated sugar (400g)
- 3/4 cup unsweetened cocoa powder
- 2 teaspoons baking soda
- 1 teaspoon baking powder
- 1 teaspoon salt
- 1 cup buttermilk room temperature
- 1/2 cup vegetable oil
- 2 large eggs room temperature
- 2 teaspoons vanilla extract
- 1 cup boiling water
Yellow Cake
- 2 3/4 cups all-purpose flour (344g)
- 2 teaspoons baking powder
- 1/2 teaspoon baking soda
- 1 teaspoon salt
- 2 cups granulated sugar
- 1/2 cup salted butter softened
- 1/2 cup vegetable oil
- 6 egg whites room temperature
- 1 Tablespoon vanilla extract
- 1 cup whole milk
- 1/2 cup sour cream room temperature
Chocolate Frosting
- 2 cups salted butter softened
- 1 1/2 cups unsweetened cocoa powder
- 8 cups powdered sugar
- 1 Tablespoon vanilla extract
- 1/2 cup heavy cream
- 1/4 teaspoon salt
Instructions
- Preheat oven to 350°F. Line two 9-inch cake pans with parchment paper circles and spray sides with baking spray.
Chocolate Cake
- Whisk flour, sugar, cocoa powder, baking soda, baking powder, and salt together in a large bowl.2 cups all-purpose flour, 2 cups granulated sugar, ¾ cup unsweetened cocoa powder, 2 teaspoons baking soda, 1 teaspoon baking powder, 1 teaspoon salt
- Add the buttermilk, oil, eggs, and vanilla and mix on medium speed using a hand mixer or stand mixer until combined.1 cup buttermilk, ½ cup vegetable oil, 2 large eggs, 2 teaspoons vanilla extract
- Add the hot water and mix on low speed until combined. Scrape bottom and sides of the bowl and mix on medium speed for 30 seconds.1 cup boiling water
- Pour into the baking dish or divide evenly between cake pans. Bake for 30-35 minutes until a toothpick inserted into the center of the cake comes out clean. Cool in the pans for 10 minutes, then turn the cake layers out onto wire racks to cool completely.
Vanilla Cake
- Wash and dry the cake pans, then line them with parchment paper circles and spray sides with baking spray again for the next batch of cake batter.
- In a medium bowl, whisk together the flour, baking powder, baking soda, and salt. Set aside.2 ¾ cups all-purpose flour, 2 teaspoons baking powder, ½ teaspoon baking soda, 1 teaspoon salt
- In bowl of a stand mixer, cream sugar, butter, and oil together until light and fluffy, about 2-3 minutes, scraping down the sides of the bowl a couple of times during mixing.2 cups granulated sugar, ½ cup salted butter, ½ cup vegetable oil
- Add egg whites one at a time, beating well after each addition. Add vanilla extract. Stop and scrape the bottom and sides of the bowl.6 egg whites, 1 Tablespoon vanilla extract
- Add the flour mixture alternately with the milk and sour cream, about ½ of each at a time, mixing between additions just until combined.1 cup whole milk, ½ cup sour cream
- Divide the batter evenly between the two prepared pans. Bake for 24-28 minutes, until a toothpick inserted into the center of each cake comes out clean.
- Remove the cakes from the oven and cool for 10 minutes before running a sharp knife around the edges, then gently turning the cakes out onto a wire cooling rack to cool completely.
Frosting
- In a large bowl, beat butter and cocoa powder together until creamy and smooth.2 cups salted butter, 1 ½ cups unsweetened cocoa powder
- Gradually add powdered sugar 1 cup at a time, adding heavy cream or milk as needed and mixing well between each addition until you have a creamy, spreadable frosting. Stop and scrape down the bottom and sides of the bowl as needed.8 cups powdered sugar, ½ cup heavy cream
- Add vanilla and salt. Mix well, adjusting the consistency by adding powdered sugar or milk as needed.1 Tablespoon vanilla extract, ¼ teaspoon salt
Assembly
- Use a long serrated knife or cake leveling tool to level the cake layers so that they are flat on top and the same height, which makes for the most clean look for a checkerboard cake.
- Cut out large 6-inch circles from the center of each cake layer using a 6-inch round cutter. Then use a 3-inch cookie cutter to cut out smaller 3-inch circles from the center of each cake layer. Eyeball carefully so the circles are cut in the very center of each cake layer for the most precise results.
- Replace the middle ring of each cake flavor with the other flavor to create a bullseye pattern that alternates with the vanilla layer or chocolate layer on the outside. The larger outer rings are the most difficult to lift and prone to breaking, so work carefully and assemble the layers on a sturdy plate that can be used to lift and flip the cake layers onto your cake plate later.
- Generously frost the bottom cake layer with the prepared frosting. The frosting helps act as a glue holding the layers of cake together. Carefully place the next cake layer on top of the first layer, alternating the color of the outer ring to build the checkerboard effect. Continue adding frosting between each layer and alternating the colors to build the cake.
- Once all four cake layers are in place, spread a thin layer of frosting around the top and sides of the entire cake for a crumb coat. This helps seal in any crumbs for a better look later when adding the final layer of frosting. Transfer the cake to the freezer for 20 minutes to set the crumb coat.
- Once the crumb coat has had a chance to firm up, frost the top and sides of the cake with the remaining chocolate frosting.
- Slice and enjoy!
Notes
- Storage: Store this cake in an airtight container or covered in plastic wrap at room temperature for up to 3-4 days, or in the refrigerator for up to 7 days. Let the cake come to room temperature before serving.
- Freezing: Wrap individual slices of cake in plastic wrap then freeze in an airtight container for up to 2 months. Thaw at room temperature before serving.
- 6-inch and 3-inch cutters: If you don’t have a 6-inch cake cutter, you can just draw a 6-inch circle on a piece of paper and use it as a template to cut out your circles with a sharp paring knife. It’s a bit more work and you need to take care to cut vertically rather than slanted for a precise pattern, but it’s definitely doable.
- Variations: You can use practically any cake recipe or cake mix to replace one or both flavors of this cake. I could see my red velvet cake or strawberry cake recipe working really well with either the chocolate or vanilla flavors here, but other combinations like pumpkin chocolate or lemon strawberry would be great too! Just be sure that the cake batters are different colors so you get the contrast of the checkerboard pattern when you slice into it.


The baking time is way off on both cakes…not sure if anyone else had this issue?
I have a long serrated knife, but still found it very difficult to to achieve level tiers of cake and if the domes are high it wastes a lot of cake.
I have since read about baking strips. The reason cake layers dome when baking is the heat conductive perimeter of the baking pan allow faster baking aroun the edge. the central portion of the pan is bakes more slowly; the center has more time to rise. The baking strip are soaked in water and surround the exterior of the pan rim. The result is dead-level tiers with sawing or waste.
I also wish that this recipe include a tip about about getting equal heights from all 4 layers. The trick to equality is to use a kitchen scale to weigh the batter of each cake color and the weigh the portion of the batter to assure uniformity.
Batter for chocolate cake was supper runny and batter for vanilla was very thick. After cooking vanilla cake is very dense. Flavor is pretty good, icing is great and it’s a keeper but will be looking for a different cake recipe.
I want to make a red white and blue cake for the 4th. Can I do three layers instead of 4?
Sure!
It’s is very very good and it is so moist
Thank you!
Delicious, moist cake! Totally enjoyed putting it together to make the checkerboard cake my husband wanted for his birthday! This recipe saved the day!
Great! I am so happy you made this! If you have any pictures I would love to see them!
Wow, this was an incredible cake. My daughter and I made this for her father’s birthday. We are slapdash bakers, had to make some substitutions, and it still came out so good. Like, the best cake I have ever eaten! We did halve the recipe and made just two layers, which still made a beautiful and generously sized cake.
Yay Susannah! This makes me so happy! If you have any pictures I would love to see them!