


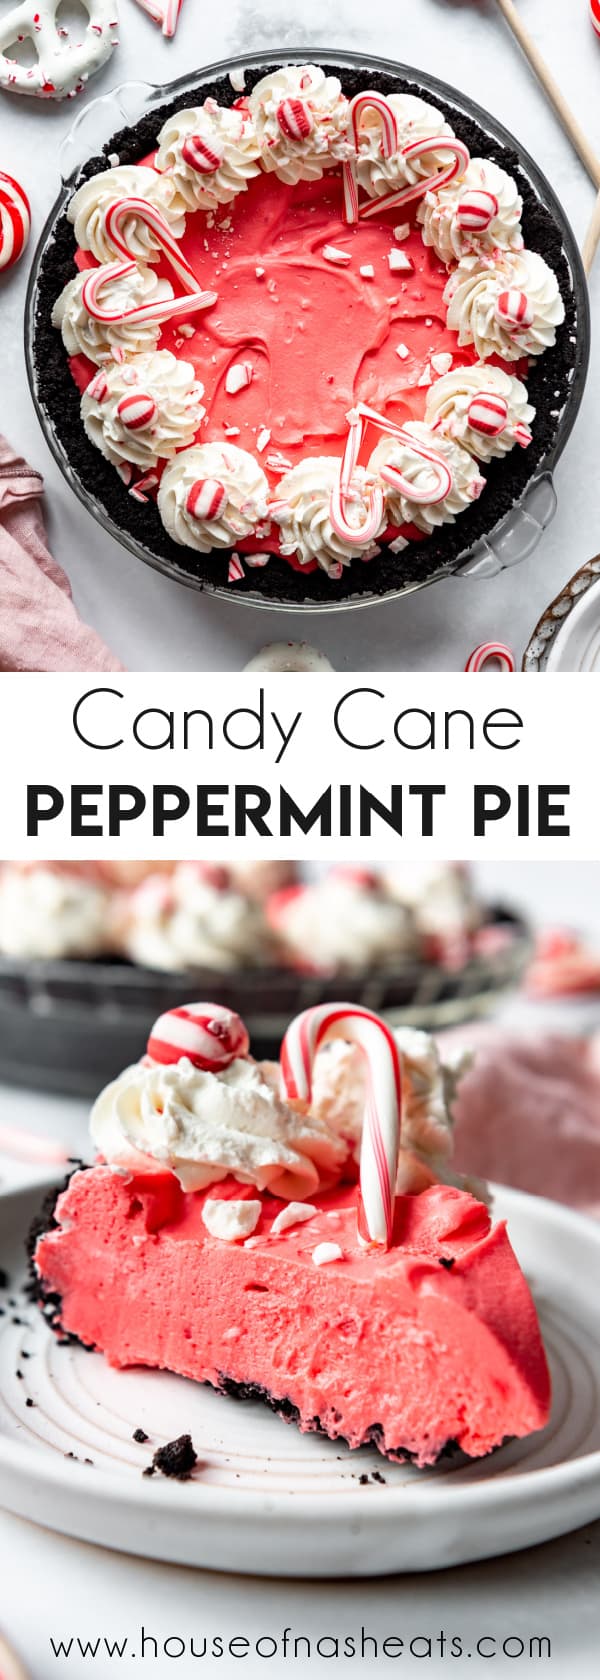
If you are looking for a fun and festive holiday dessert, this Candy Cane Peppermint Pie is a creamy, no-bake treat with an Oreo crust that everybody will love! Top with swirls of freshly whipped cream and broken up candy canes for an irresistible showstopper that only takes 15 minutes to whip up.

This time of year I am all about all things peppermint. As much as I love gingerbread and eggnog, I think the red and white stripes of candy canes are my favorite flavor of the holidays. So I thought it would be fun to experiment with a peppermint cream pie!
This pie reminds me of the chocolate covered Peppermint Joe-Joe’s that we get at Trader Joe’s this time every year. Those things are dangerous to have around because we can’t resist eating one whenever we pass through the kitchen!
It would be easy to make a peppermint ice cream pie that would be similar to this just using an Oreo crust and peppermint ice cream with some chocolate sauce drizzled on top, but I wanted something a little creamier and not frozen this time around. So I played with my no-bake cheesecake recipe and came up with this irresistibly cute red and white Christmas treat that is sure to bring smiles when friends and family see it on the dessert table.
Peppermint is one of our favorite holiday flavors! If you are candy-cane obsessed as well, be sure to try our Peppermint Chocolate Chip Cookies or homemade Peppermint Ice Cream next!
Why this recipe works
- It’s an easy no-bake pie unless you opt to make your own homemade Oreo crust. But store-bought will work just as well for this recipe.
- The filling can be made in under 10 minutes and garnishing the pie takes hardly any time at all. The hardest part is waiting for the pie to chill so it can set up before slicing.
- White chocolate, cream cheese, and peppermint were meant to go together. The flavors and textures are perfect for each other and make this essentially a no-bake peppermint cheesecake.
Ingredient Notes
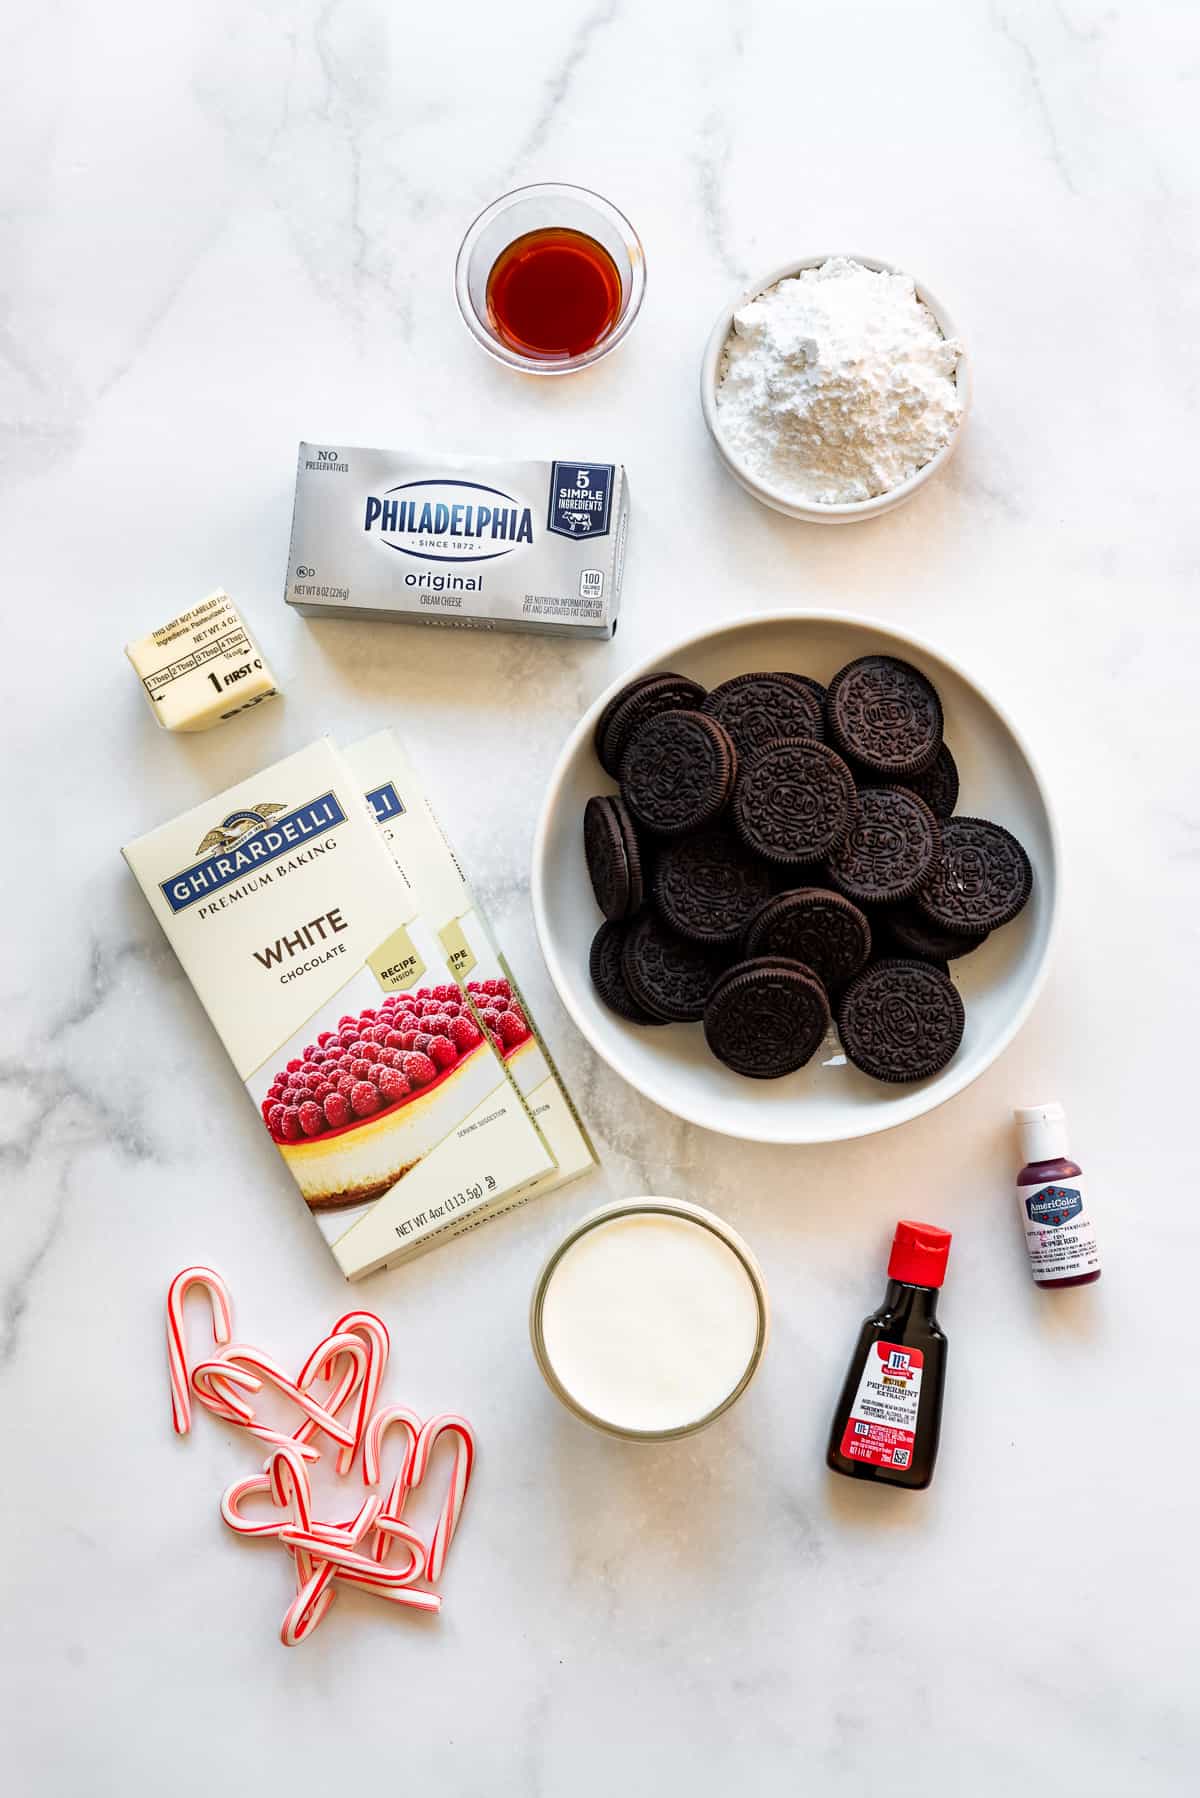
- White chocolate: I recommend using high quality white chocolate or white chocolate chips for the best results so it melts well. The Ghiradelli white chocolate baking bars are my personal favorite.
- Cream cheese: Use the kind that comes in bricks, not the kind from a tub. You will get best results with the full-fat original kind, but reduced-fat neufchatel works too.
- Peppermint extract: Make sure you are using peppermint extract and not just mint extract for that classic candy cane flavor in this pie. I prefer McCormick brand peppermint extract, both in terms of flavor and convenience.
- Oreos & butter: These are for making the Oreo crust, although a pre-made store-bought crust will serve just as well in this recipe that is all about making an easy but impressive Christmas dessert.
How to Make This Recipe
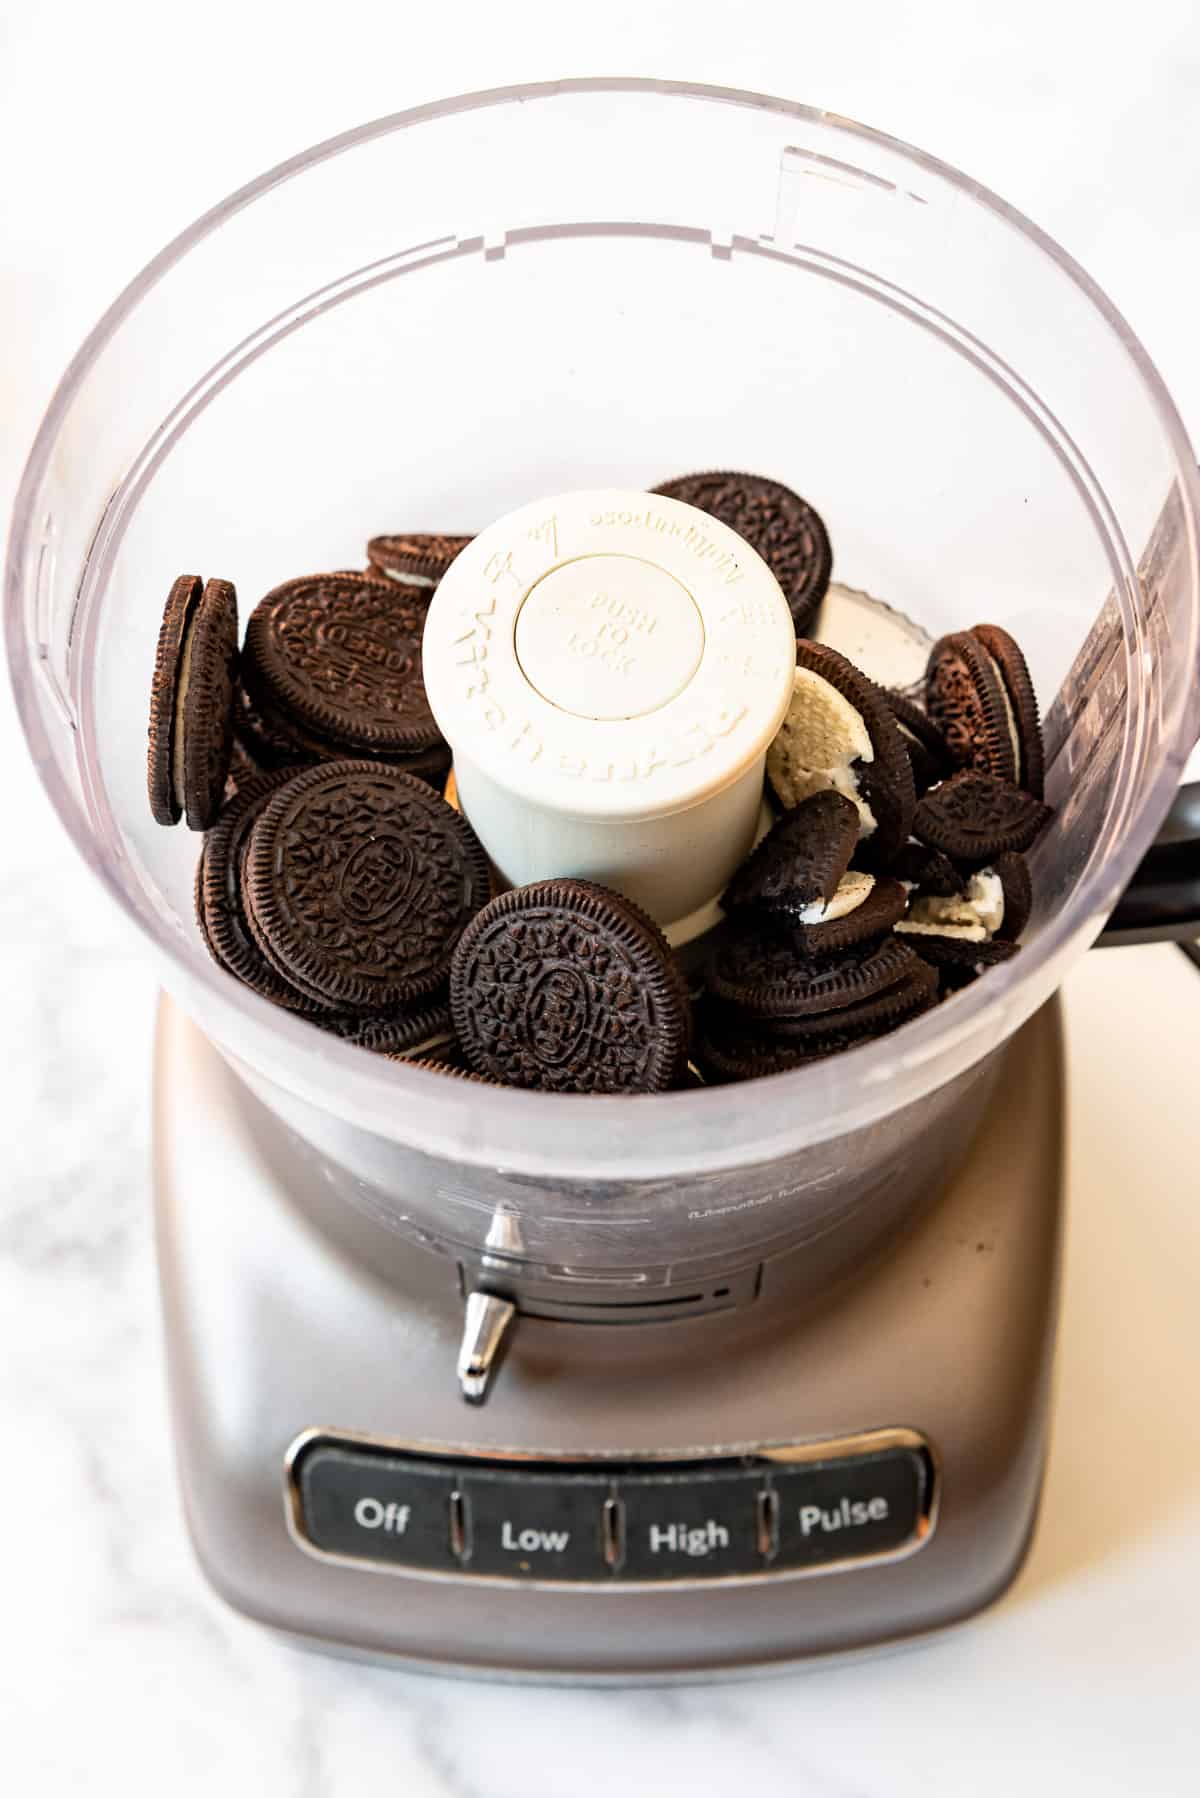
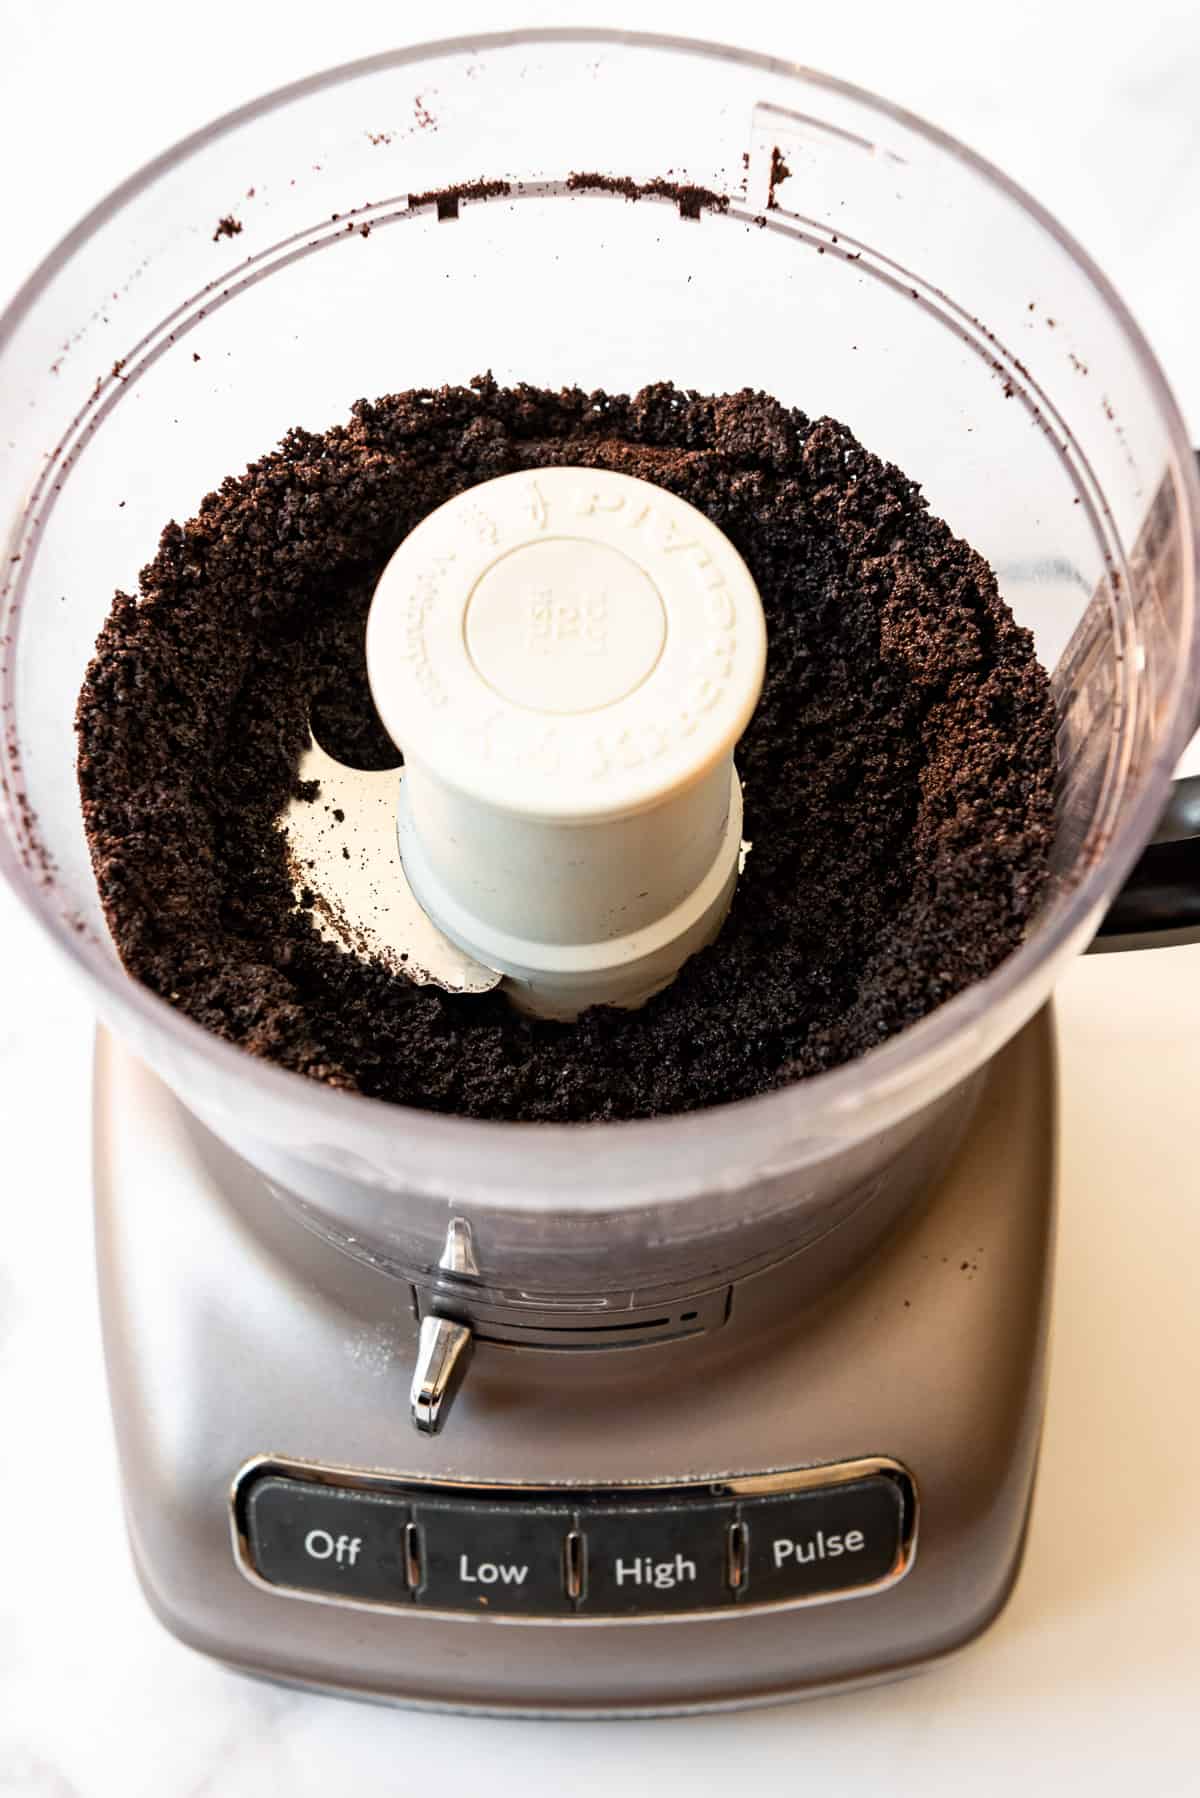
- Make the Oreo crust: If you are making a homemade Oreo crust rather than using a premade one, start by pulsing the Oreos in a food processor (affiliate link) until finely crushed. Don’t bother to remove the creamy filling first – it helps sweeten and bind the crust. Add the melted butter and pulse again to evenly moisten the crumbs.
- Shape the crust: Press the crust into a 9-inch pie plate (affiliate link) using a flat-bottomed measuring cup or glass to pack it tightly into the bottom and sides as best you can.
- Set the crust: I like to bake my Oreo crust in a 350°F oven for 8-10 minutes so it has a little crunch, but you could just stick it in the freezer for 15 minutes to set it up before filling instead if you want this to be a truly no-bake dessert.
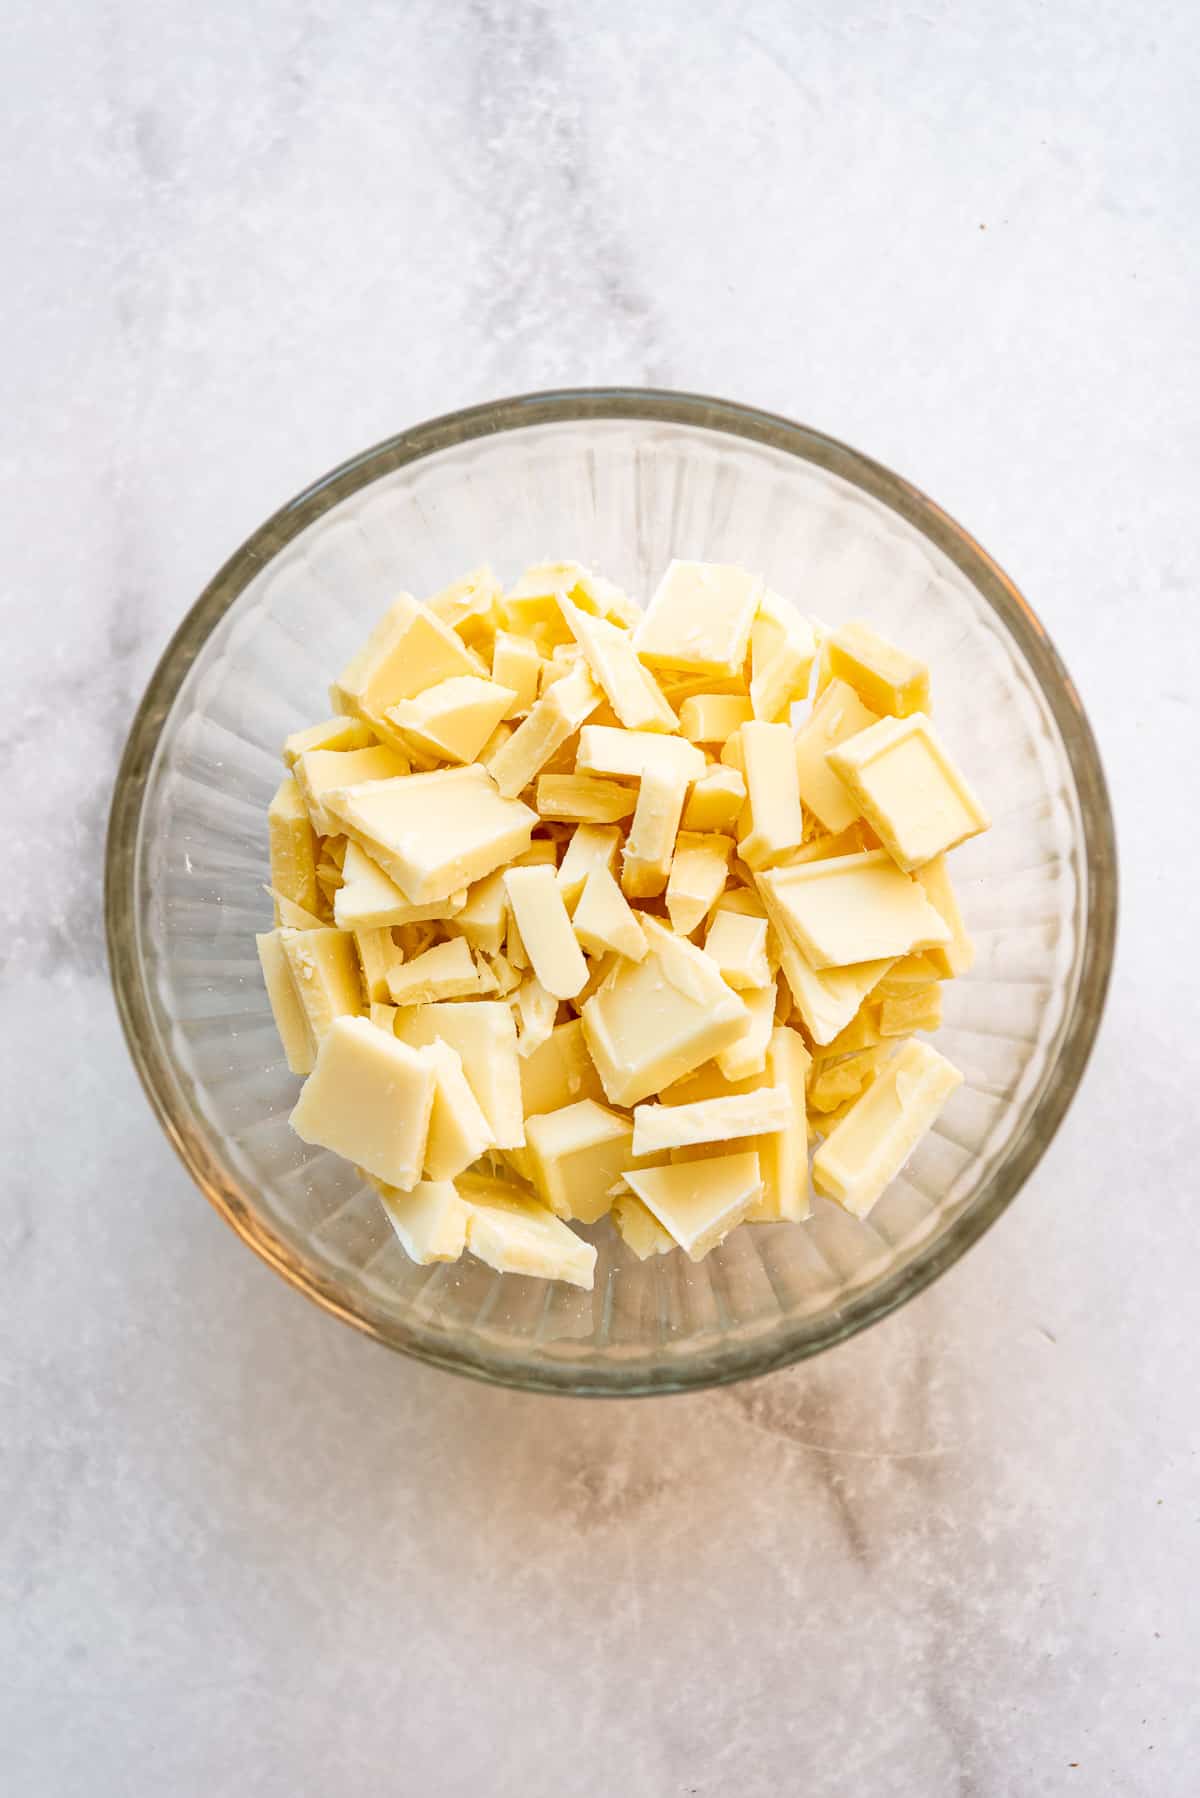
- Melt the white chocolate: To make the filling, you will first need to melt some white chocolate. This can be done in a heat-safe bowl set over simmering water or in the microwave, which is my preferred approach. Just heat in short 20 second bursts, stirring well between each burst, until the white chocolate has completely melted. Set aside to cool slightly.
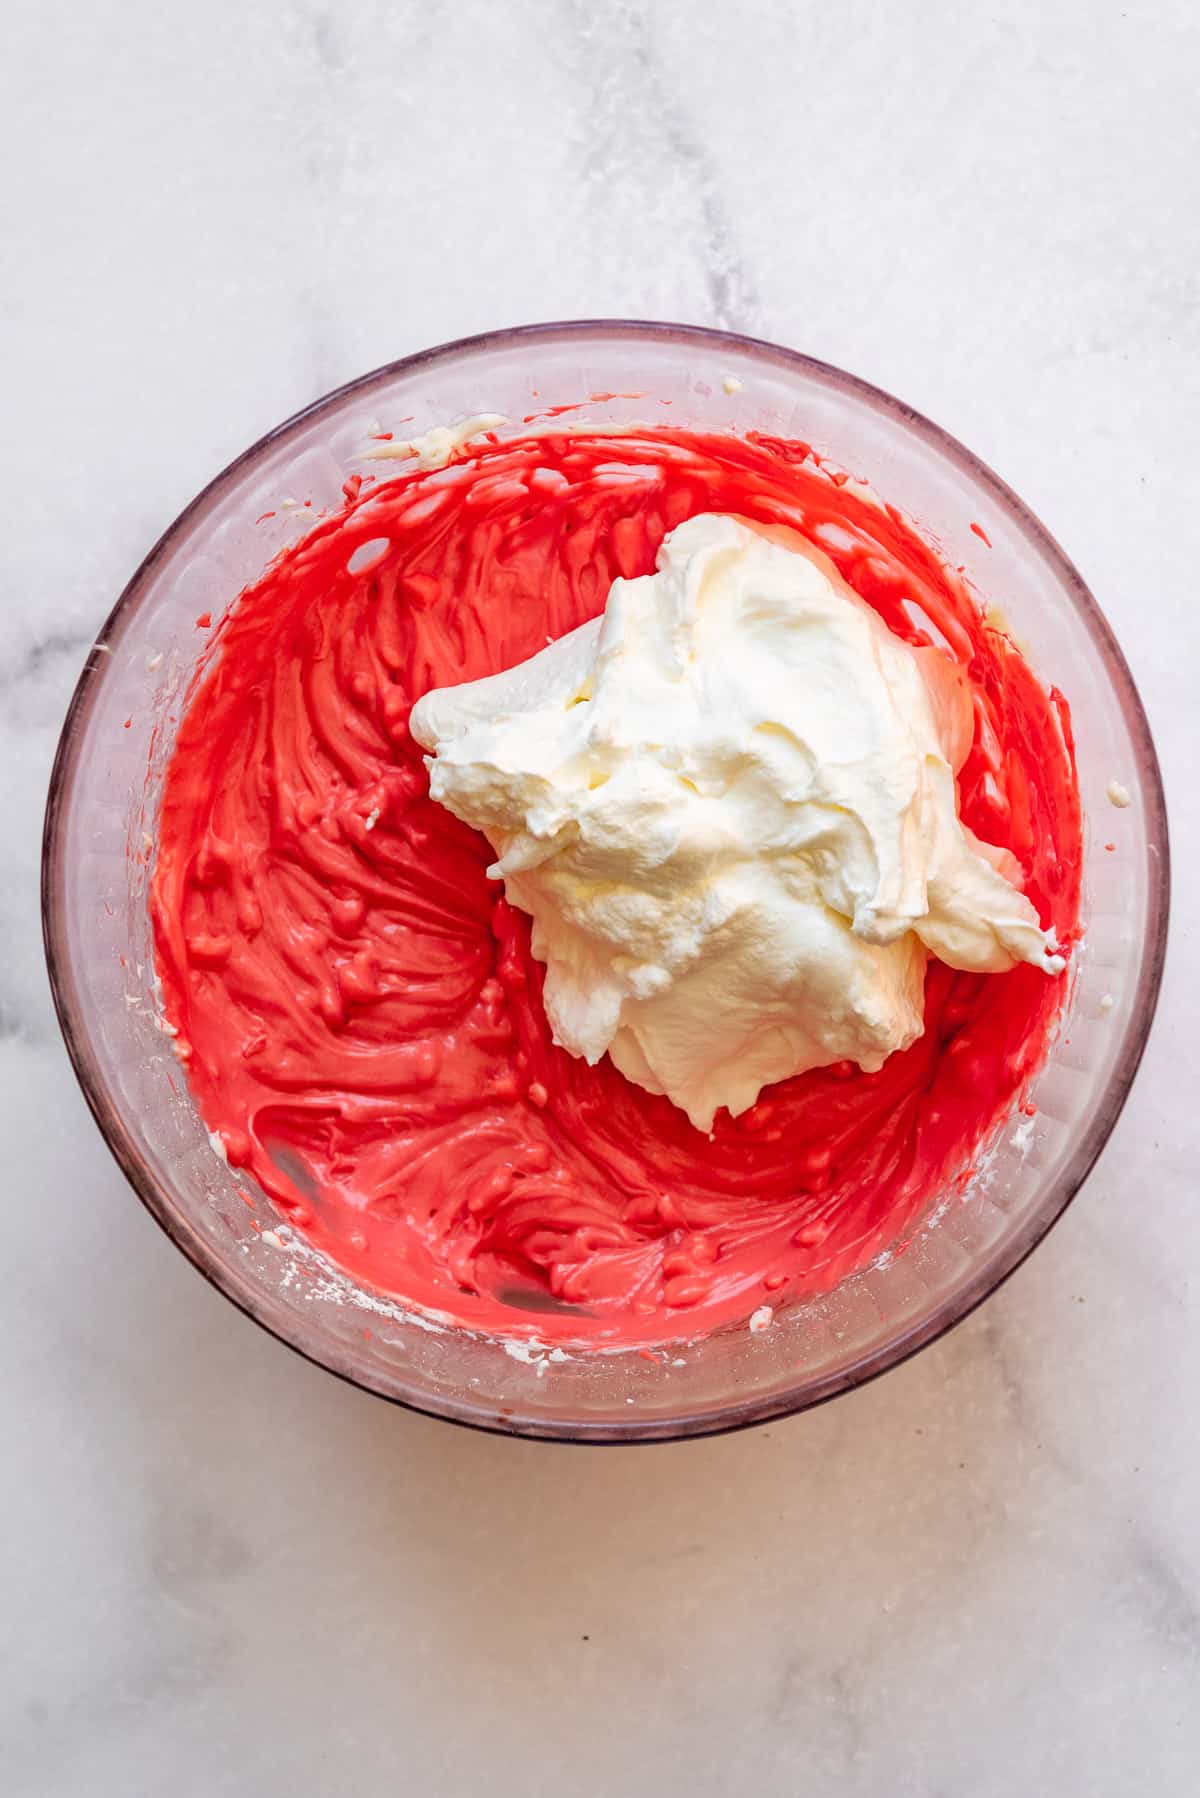
- Make the whipped cream: Beat the heavy cream with half of the powdered sugar in a large bowl until stiff peaks form. Set aside in the fridge since you will use some of it for the filling and the rest for the top of the pie.
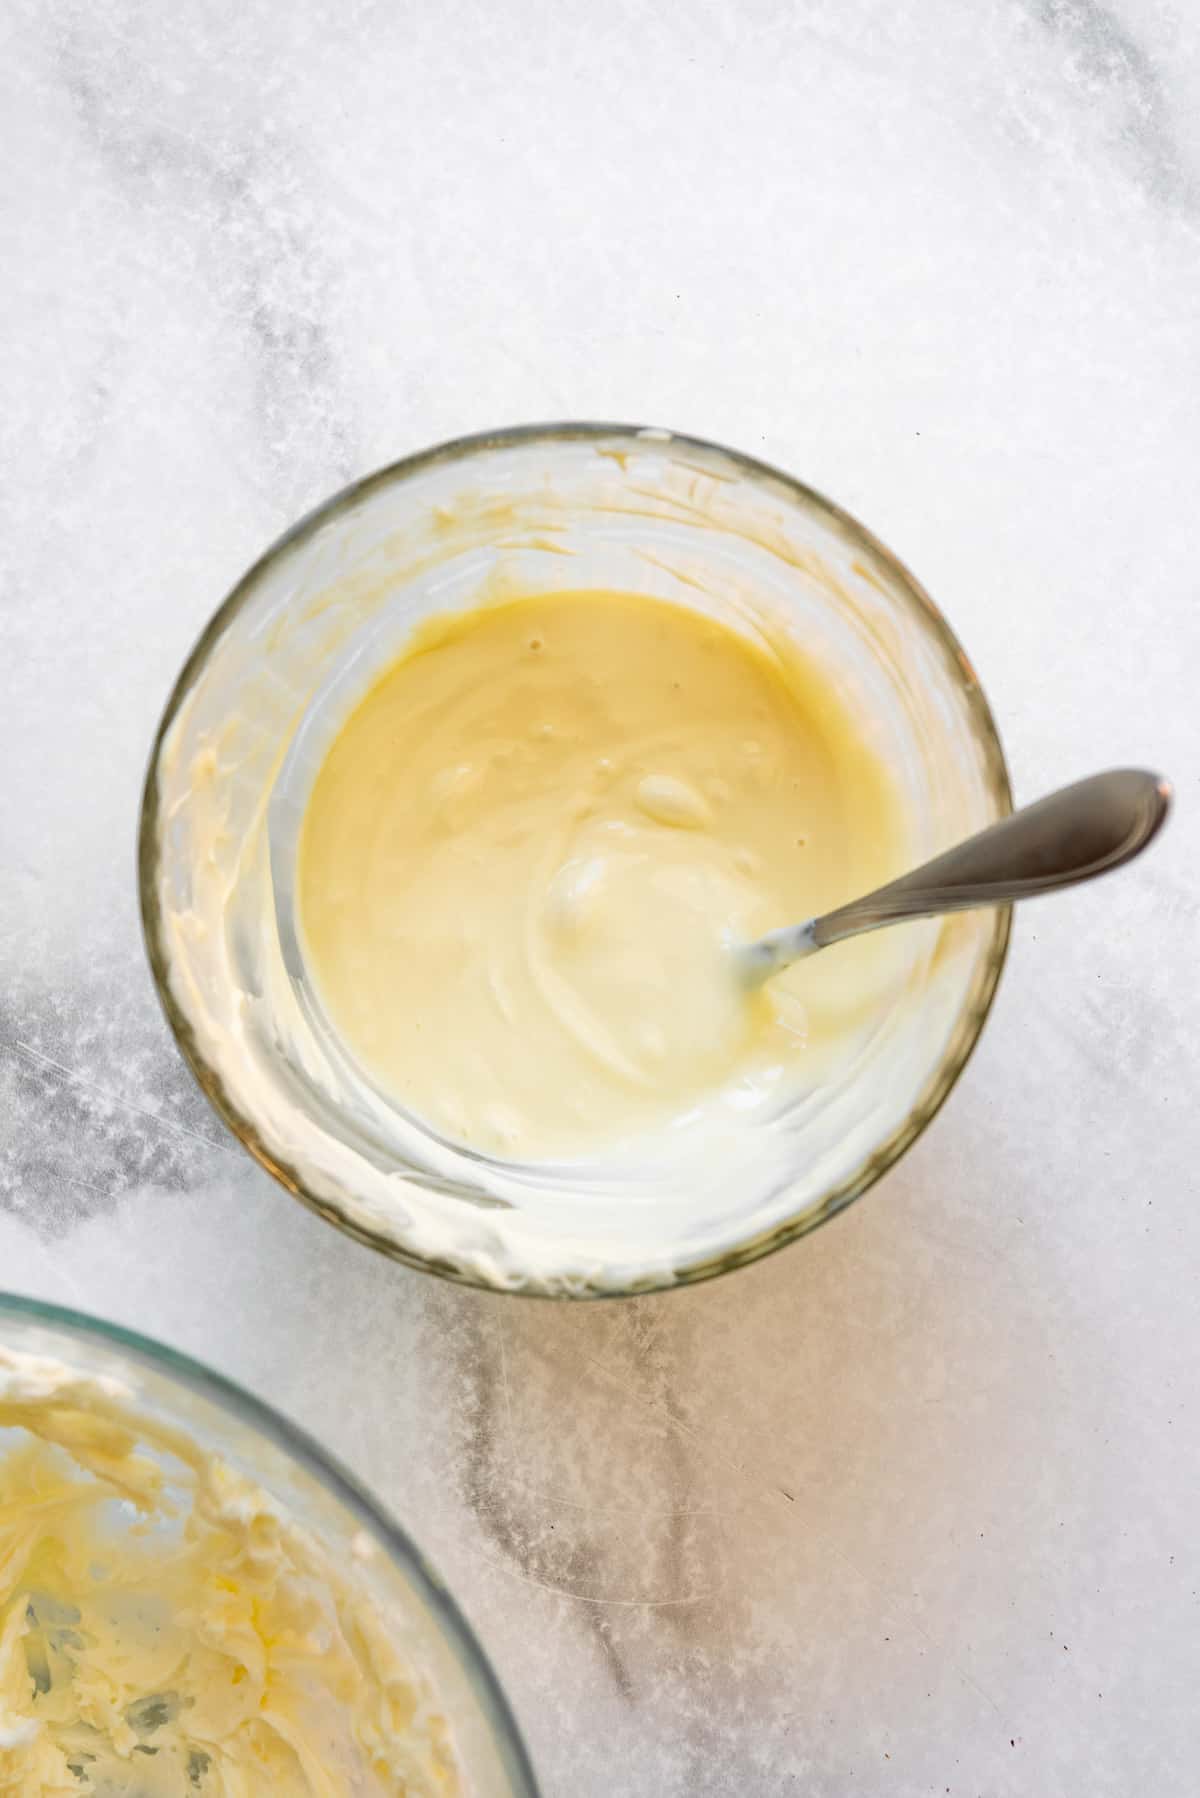
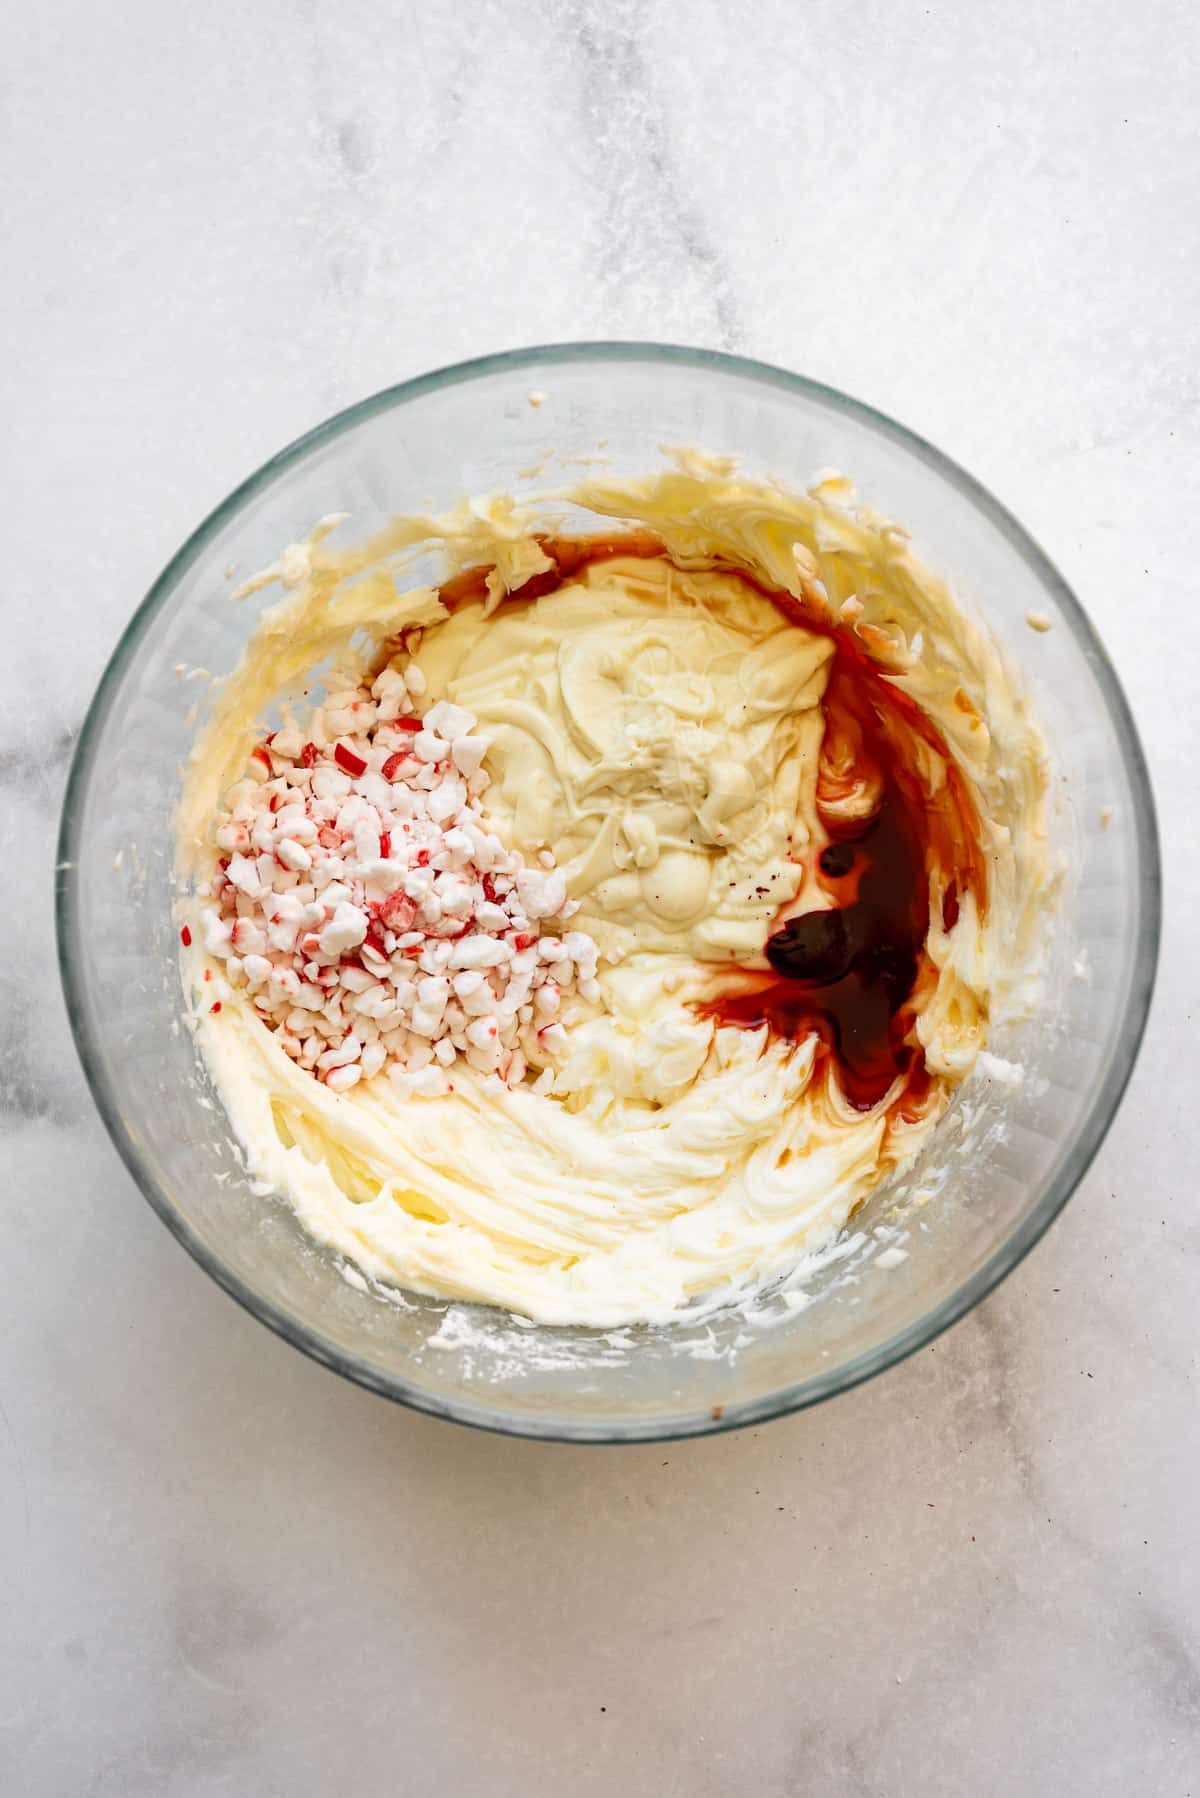
- Combine cream cheese and white chocolate: In a large bowl, beat the cream cheese and powdered sugar until smooth. It helps a lot to start with cream cheese that has been allowed to sit out on the counter for at least 30 minutes to soften slightly first. Add candy cane pieces, vanilla, and peppermint extract, and a drop or two of red food coloring (affiliate link) along with the melted white chocolate, then mix well.
- Add 2/3 of the whipped cream: I always just eyeball this part, but add about 2/3 of the whipped cream to the pie filling and fold it in with a rubber spatula until evenly combined. Reserve the remaining ⅓ of the whipped cream in the fridge for topping the peppermint pie once it’s set up.
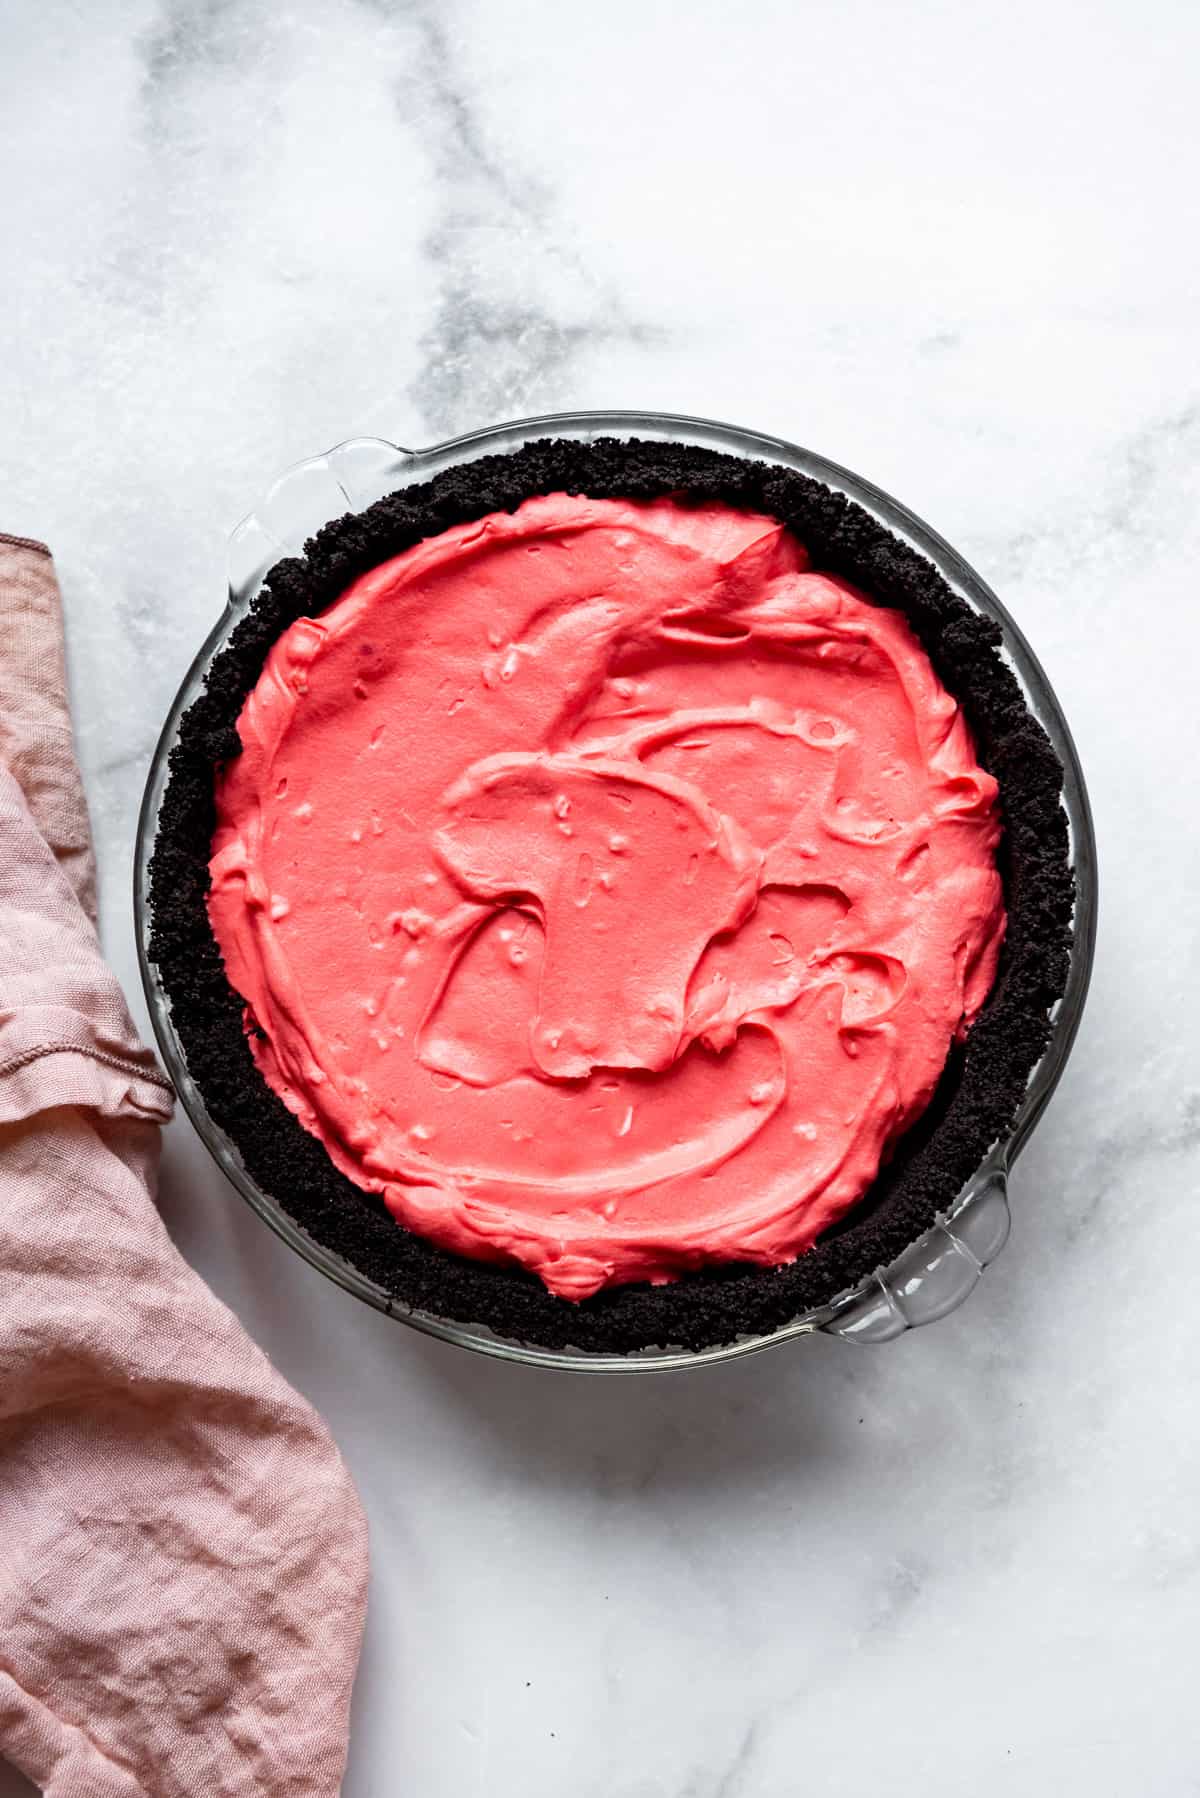
- Fill the pie crust and chill: Transfer the filling to the prepared Oreo crust and smooth it out on top. Transfer to the fridge and chill for at least 2 hours to set up so it is firm enough to slice.
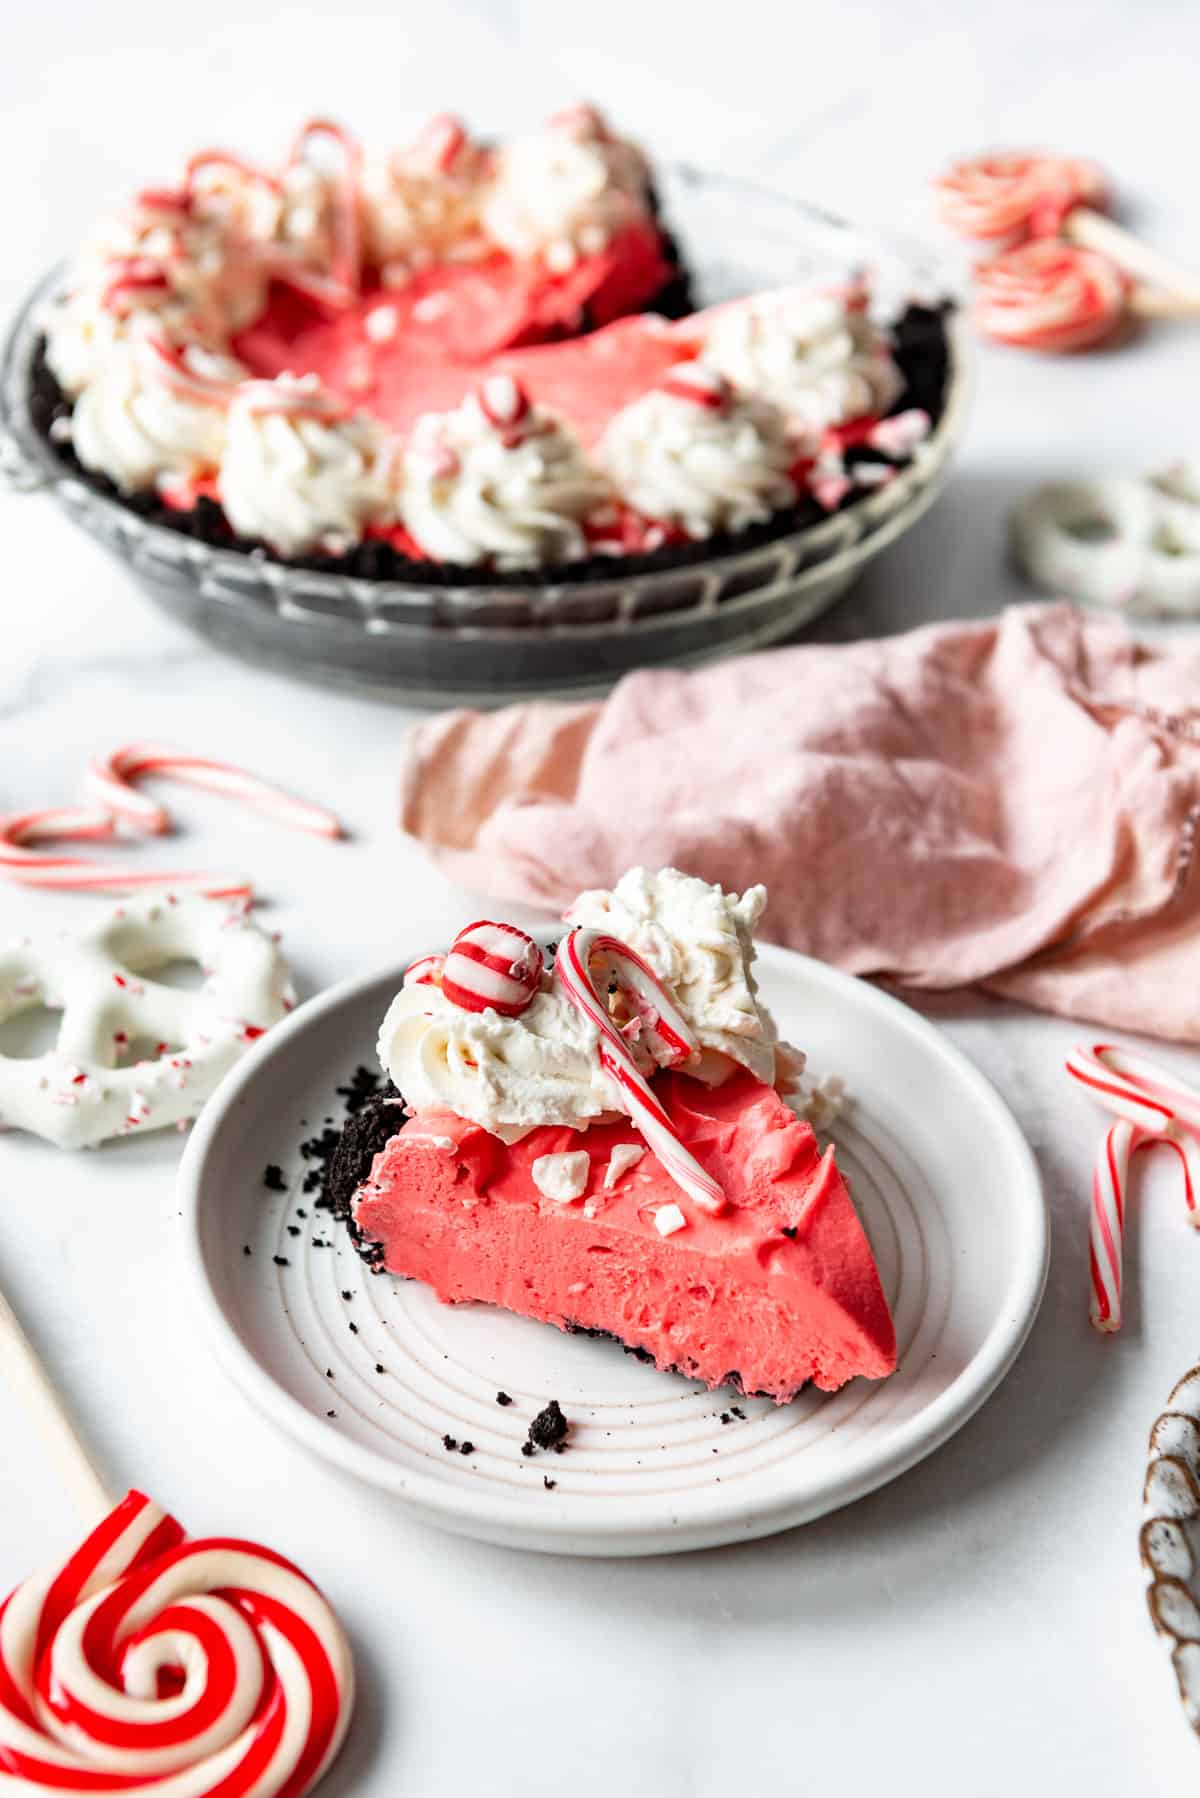
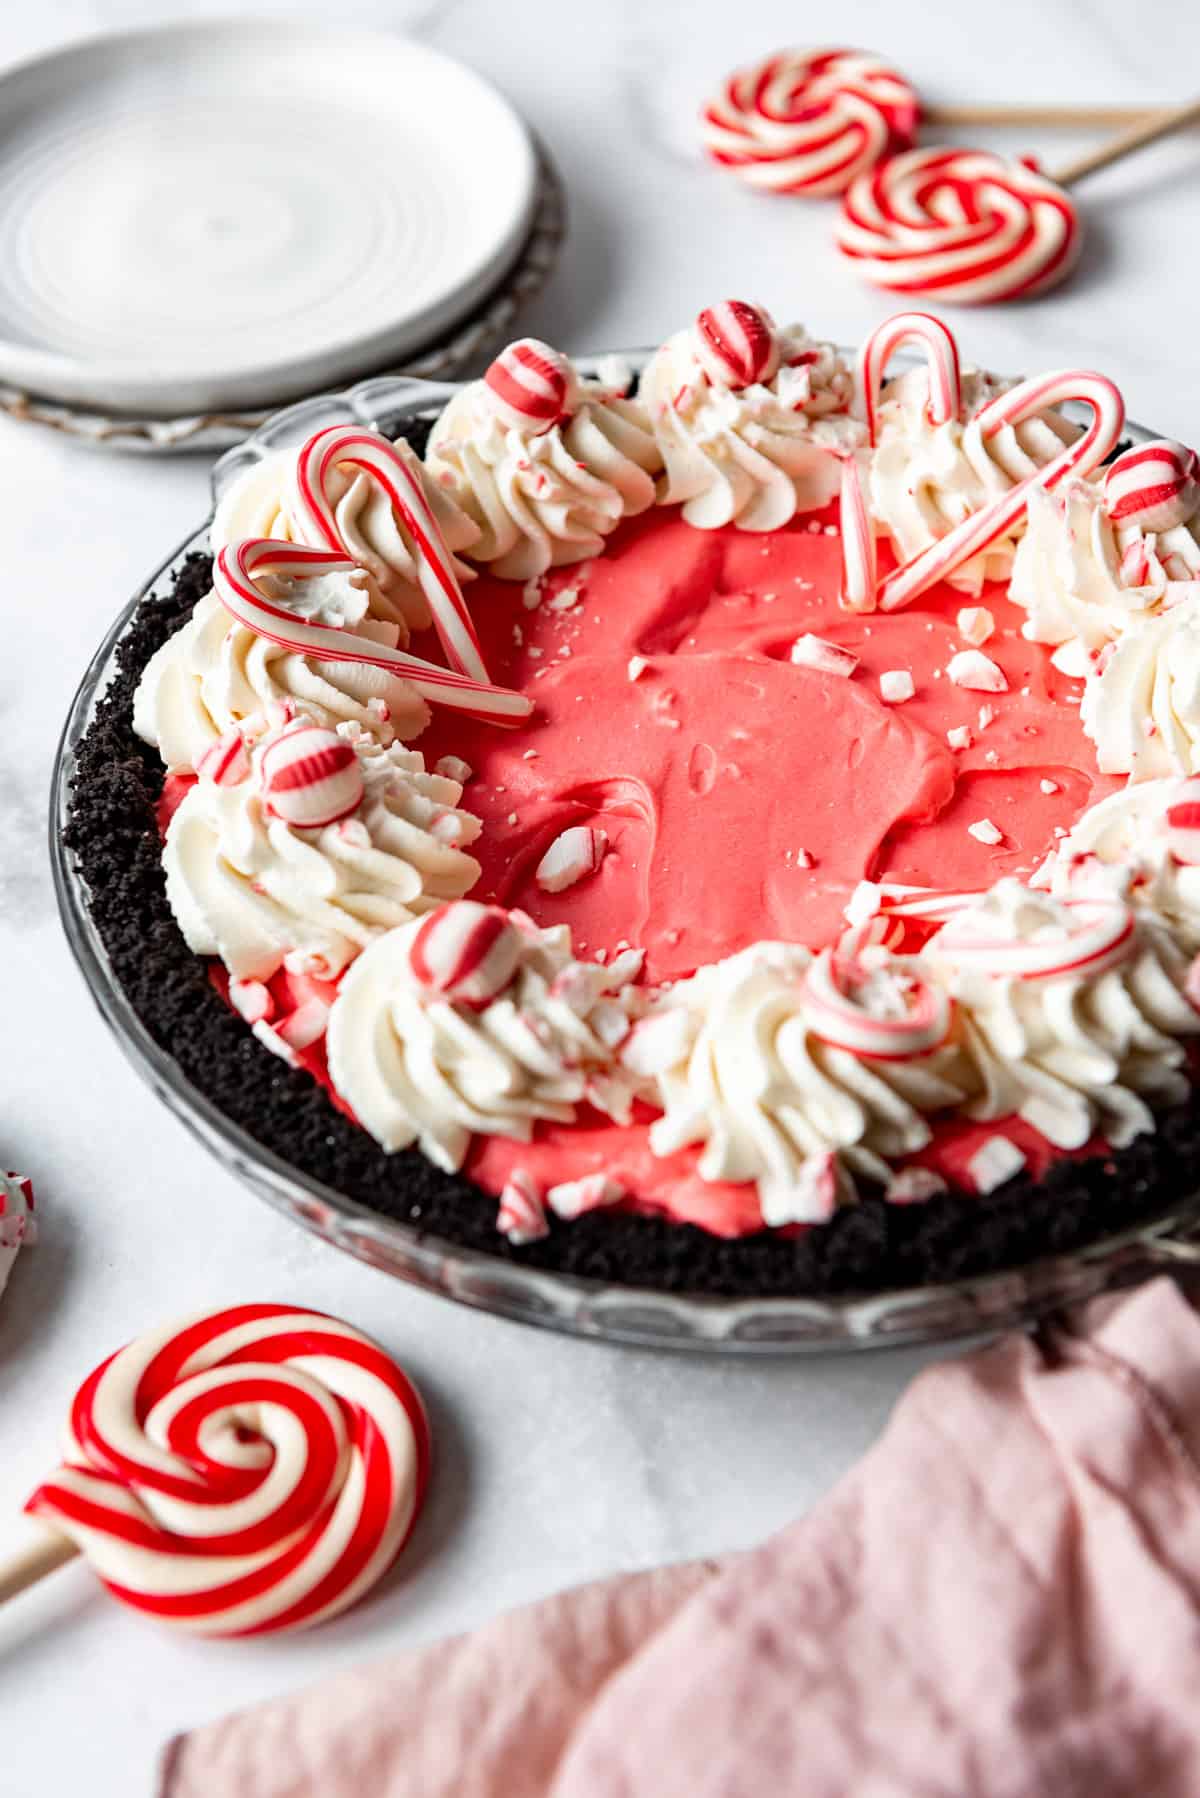
- Decorate: Once the pie is chilled, you can pipe swirls of the reserved whipped cream on top around the edges. Or just plop it all in the middle and spread it out in swirls like in my Chocolate Cream Pie. Sprinkle with some additional crushed candy cane pieces or decorate with mini candy canes and soft striped peppermint candies, then slice and serve!
Recipe FAQ’s
The pie is sturdy enough to sit out of the fridge for 1-2 hours, but otherwise it should be stored in the fridge because of the cream cheese and whipped cream. Keep in mind that if you try to shortcut things and use Reddi-Whip or Cool Whip instead of real whipped cream, it will melt much faster and your swirls decorating the top of your pie won’t hold up as well. No shade if that’s the route you take, but you might want to wait and top each slice of pie just before serving in that case.
Yes, you can freeze either the whole pie or individual slices. Just freeze for 2 hours to set the top of the pie, then cover it well with plastic wrap for longer term storage. Thaw overnight in the fridge or on the counter for a couple of hours before topping with whipped cream, then slicing and serving.
Peppermint pie will be good in the fridge for about 5 days. It’s great for making a day or two ahead.
Recipe Tips
- Red food coloring (affiliate link): You really don’t need much food coloring (affiliate link) to get a vivid color in this recipe. I recommend starting with a small amount – just a drop or two – and going from there.
- Peppermint candy garnish ideas: There are so many good choices this time of year like Hershey’s peppermint kisses, peppermint bark (either homemade or we like the Ghiradelli’s squares and the Williams Sonoma tins), soft striped peppermint sticks, or actual candy canes if you want more crunch.
- Variation: If you want to take things to the next level, consider adding some crushed Oreos or Trader Joe’s Peppermint Joe-Joe’s to the filling for an Oreo peppermint pie that is a hybrid of this recipe and my No-Bake Oreo Pie!
- Chocolate ganache: If you want an even more over-the-top approach, consider heating ½ cup of heavy cream in the microwave for 1 minute, then pouring it over 1 cup of semisweet chocolate chips in a bowl. Let it sit for 5 minutes, then stir until smooth and pour over the top of the pie for a decadent chocolate ganache.

More Peppermint Recipes
- Peppermint Bark Cheesecake
- Chocolate Peppermint Blossoms
- Peppermint Bark Caramel Corn
- Peppermint Macarons
Did you make this recipe?
Let me know what you thought with a comment and rating below. You can also take a picture and tag me on Instagram @houseofnasheats or share it on the Pinterest pin so I can see.

Candy Cane Peppermint Pie
Equipment
- Large Food Processor (an investment, but well worth it)
Ingredients
Oreo Crust
- 25 Oreos
- 6 Tablespoons salted butter melted
Filling
- 2 cups heavy cream
- 3/4 cup powdered sugar divided
- 8 ounces white chocolate chopped
- 8 ounces cream cheese softened
- 2 teaspoons pure vanilla extract
- 1 teaspoon peppermint extract
- Red food coloring (affiliate link)
- 1/2 cup crushed peppermint candy canes or starlight mints + extra for decorating
Instructions
Crust
- Preheat oven to 350°F.
- Pulse Oreos (including the filling) in a large food processor (affiliate link) until they are fine crumbs. Add the melted butter and pulse until evenly moistened. Press into a 9-inch pie plate (affiliate link) with the flat bottom of a glass or measuring cup. Bake for 8-10 minutes to set or freeze for 15 minutes before filling.25 Oreos, 6 Tablespoons salted butter
Filling
- In a large bowl, beat the heavy cream and ½ cup of the powdered sugar until stiff peaks form. Set aside in the fridge.2 cups heavy cream, ¾ cup powdered sugar
- In a separate bowl, melt the white chocolate in the microwave by heating in 20 second bursts of heat, stirring well between each burst. This should only take about 90 seconds. Set aside.8 ounces white chocolate
- In a large bowl, beat the cream cheese and remaining ¼ cup of powdered sugar until smooth. Add the melted white chocolate, vanilla extract, peppermint extract, food coloring (affiliate link), and crushed candy canes. Mix well until combined, scraping the bottom and sides of the bowl.8 ounces cream cheese, 2 teaspoons pure vanilla extract, 1 teaspoon peppermint extract, Red food coloring (affiliate link), ½ cup crushed peppermint candy canes
- Add 2/3 of the whipped cream to the filling. Use a rubber spatula to fold it in, then transfer the filling to the prepared Oreo pie crust.
- Transfer the pie to the fridge to chill for 2 hours before topping with the remaining whipped cream and decorating with additional crushed candy canes or peppermint bark.
Notes
- You can use a premade Oreo crust instead of making your own, if desired.
- Soft peppermint candies or even a bag of Hershey’s Candy Cane Kisses that have been unwrapped and chopped up can be used in place of candy canes for less crunch.
- White chocolate: I don’t recommend using white chocolate chips for this recipe as they don’t always melt very easily. Instead, I prefer to use Ghiradelli white chocolate baking bars.
- Storage: Keep in the fridge until ready to serve. Will keep well for up to 5 days in the fridge.
- Freezing: You can freeze the entire pie or individual slices for up to 2 months. Just wrap in plastic wrap and freeze. Thaw in the fridge overnight or on the counter for an hour or two before decorating with freshly whipped cream and serving.
- Variation: Try adding 12 crushed Oreos or Trader Joe’s Peppermint Joe-Joe’s to the filling for a peppermint Oreo pie.
- Chocolate ganache: If you want an even more over-the-top approach, consider heating ½ cup of heavy cream in the microwave for 1 minute, then pouring it over 1 cup of semisweet chocolate chips in a bowl. Let it sit for 5 minutes, then stir until smooth and pour over the top of the pie for a decadent chocolate ganache.


Amazing!