
This spooky chocolate Graveyard Dirt Cake is a classic Halloween dessert beloved by kids and adults alike! But instead of using a pudding mix and Cool Whip, this version is made completely from scratch!
I have always loved this no-bake dessert idea, whether it’s served family style in a 9×13-inch pan like I did here, or divided between individual cups (also fun, but definitely extra work!).
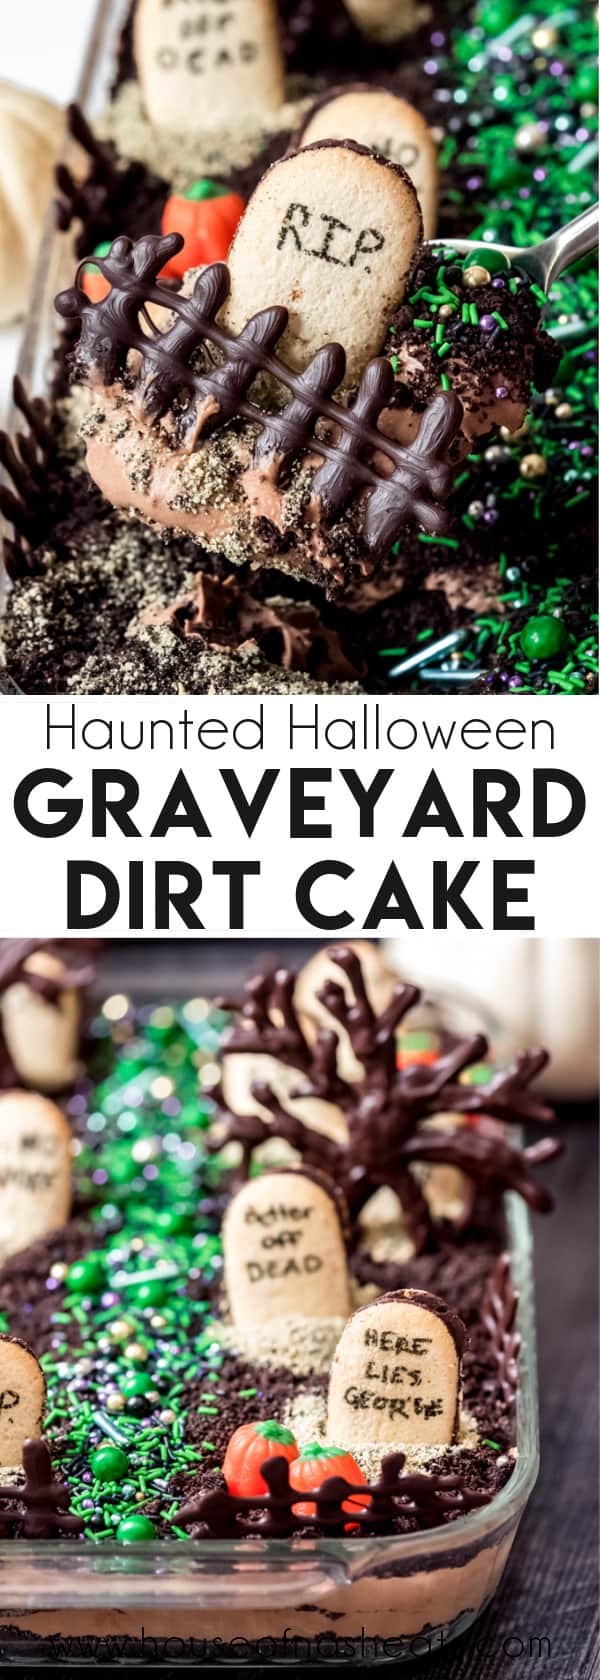
More pudding than actual cake, the easy, mousse-like chocolate filling is layered with Oreo crumbs to create the impression of dirt. It’s the decorating that really sells the idea and makes this a fun dessert for Halloween. Although really, this recipe is one that can be enjoyed all year long, especially in the summer when it’s hot and you don’t want to heat up the oven!
Love Halloween? Be sure to check out some of our other Halloween recipes like Poison Candied Apples, Halloween Chocolate Cherry Hand Pies, and Hocus Pocus Marshmallow Pops!
The classic approach to the chocolate filling is to just make a couple of packages of instant chocolate pudding and fold them together with a tub of thawed Cool Whip. But I wanted to make a homemade version using real ingredients.
If you haven’t made homemade chocolate pudding, you are in for a (literal) treat! It’s actually super easy, takes less than 10 minutes, and tastes 1,000X better than the box version.
Dirt Pudding Cake Ingredients
- Chocolate: Two types of chocolate – chopped dark chocolate and cocoa powder – go into this pudding for a really well-developed and intense chocolate flavor that isn’t as easily achieved with just one type of chocolate.
- Sugar: Granulated sugar sweetens the pudding so it isn’t bitter from the cocoa powder. The whipped cream also gets sweetened just a bit with a little powered sugar.
- Cornstarch: This is the thickening element that will make the pudding, well, pudding.
- Salt: A little salt brings out the flavors of the other ingredients.
- Whole milk: You could sub with a lower fat option, but the pudding won’t be quite as rich and delicious as it is when made with whole milk.
- Butter: Stirring in butter at the end results in a silky, rich pudding unlike anything else you have tried.
- Vanilla extract: This common baking ingredient balances out the other flavors.
- Heavy cream: Also called whipping cream, this will be beaten until soft peaks form, then folded in to the chocolate pudding to lighten it to the texture of a mousse.
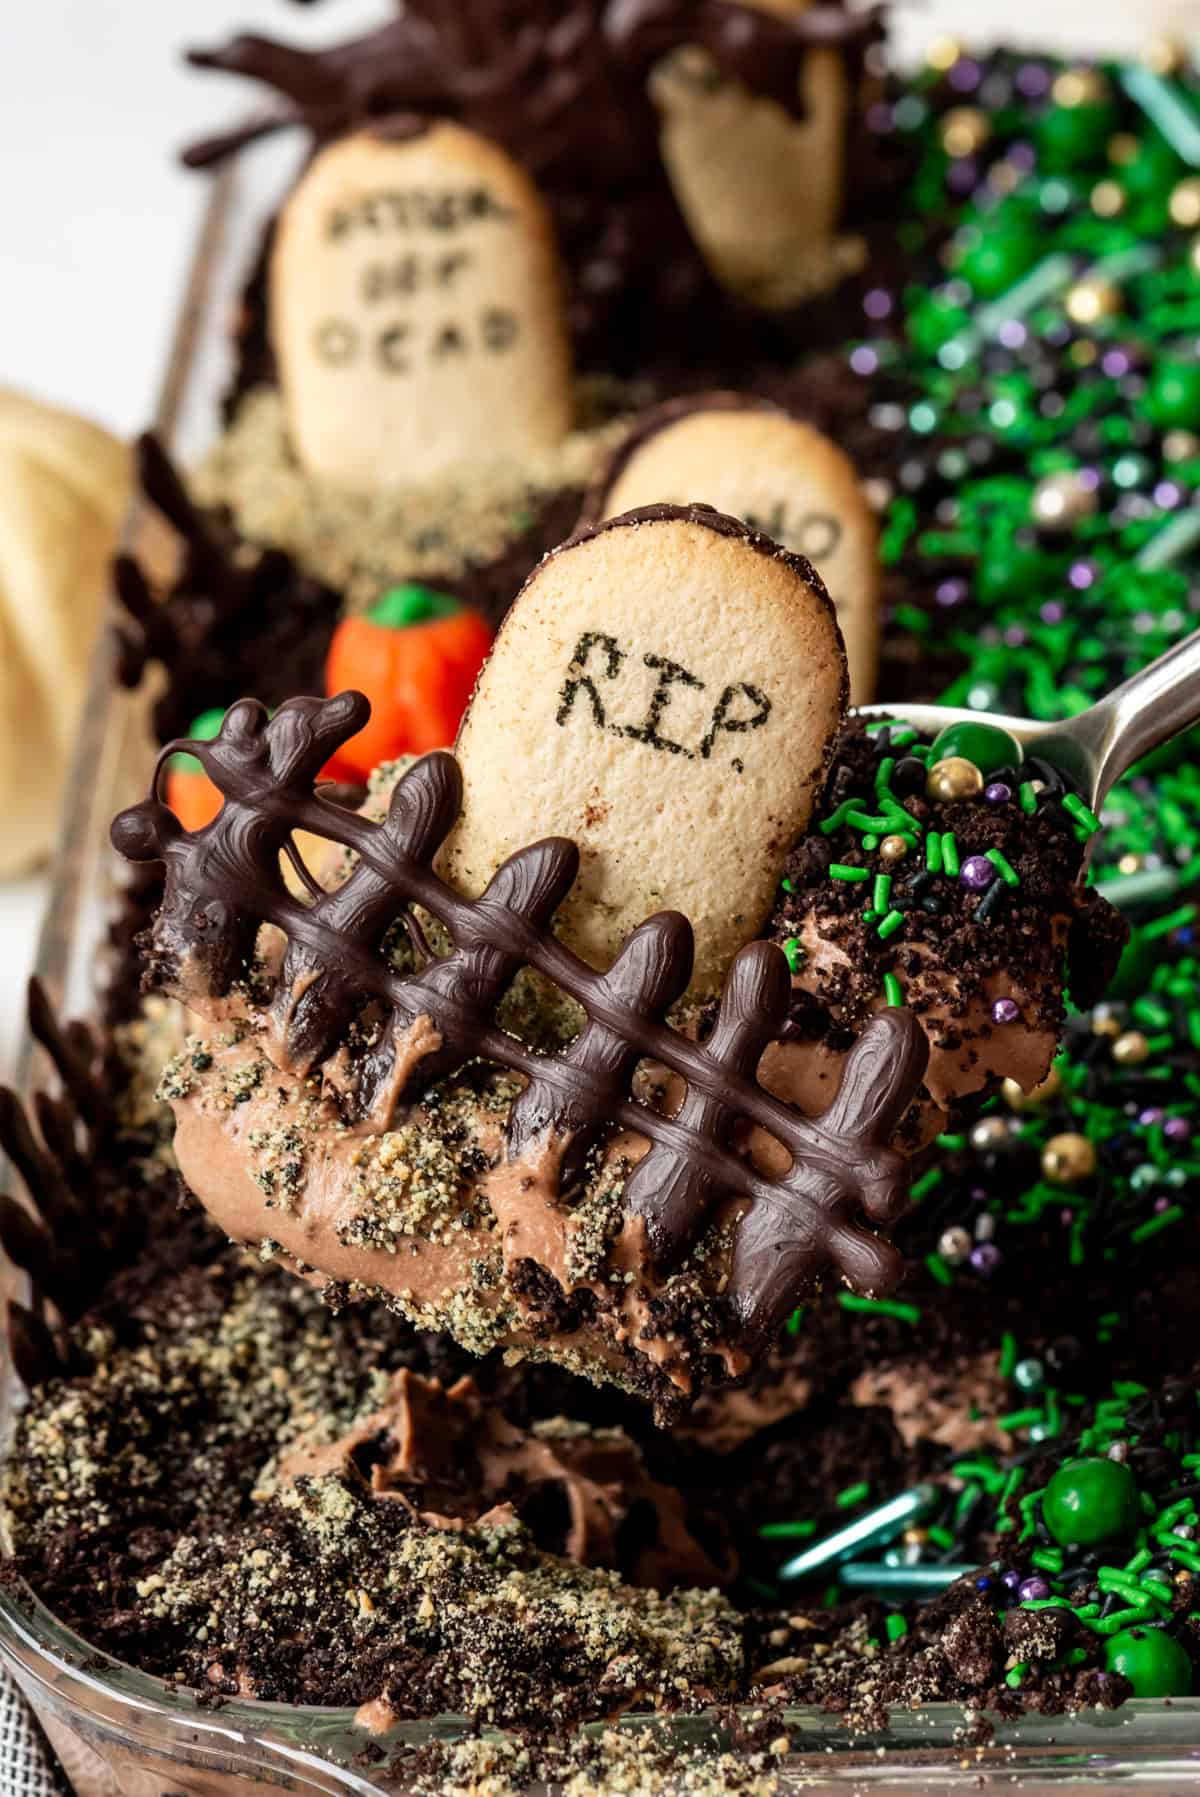
- Oreo cookies: Regular Oreos get crushed to fine crumbs to make up the “dirt” element of this kid-friendly dessert.
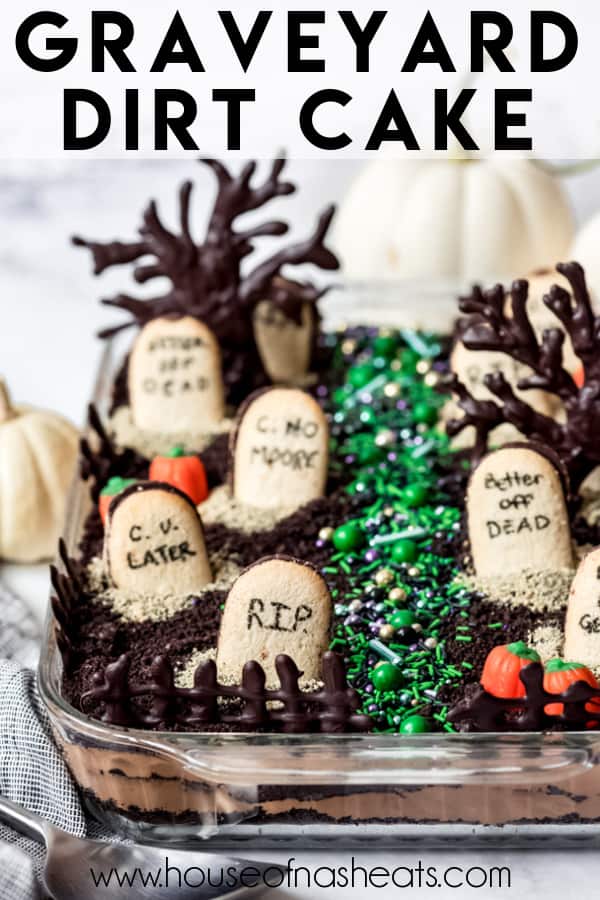
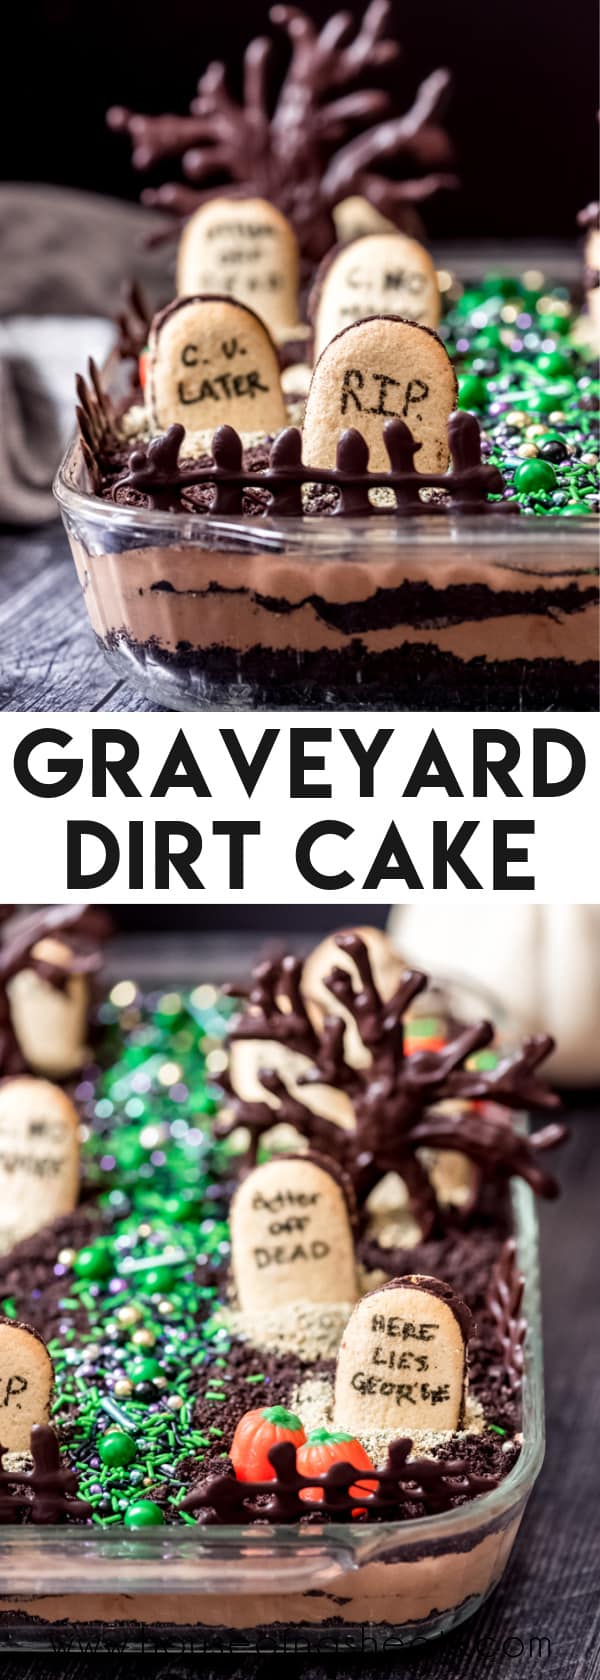
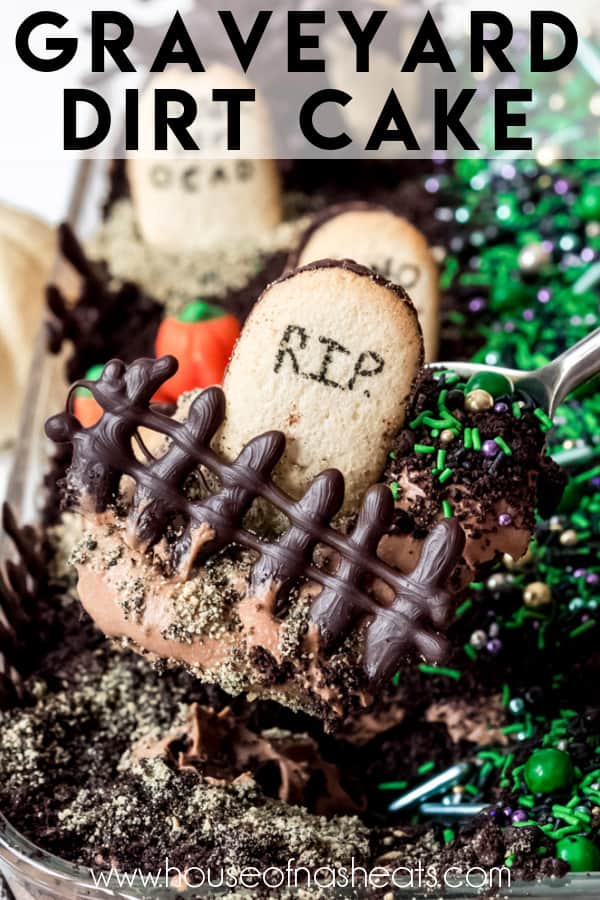
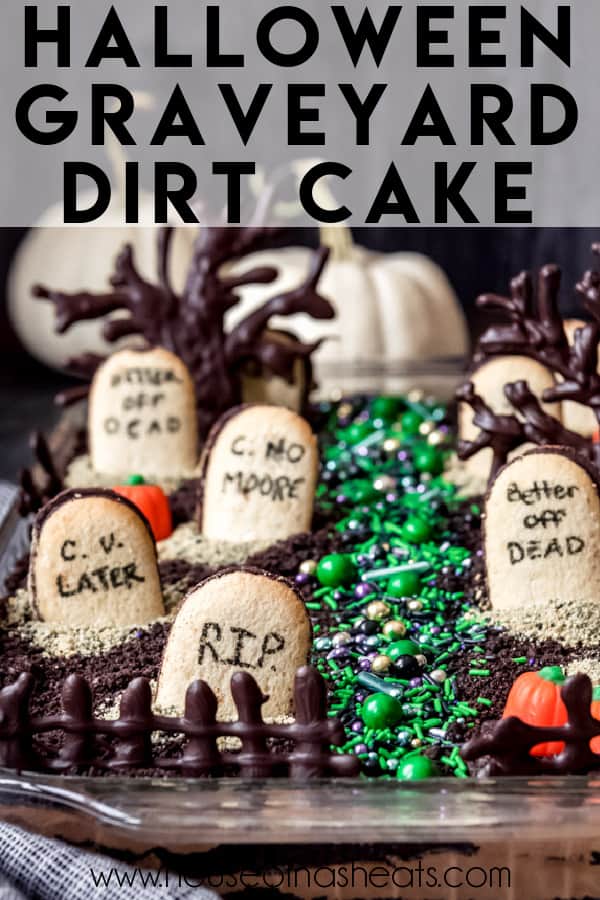
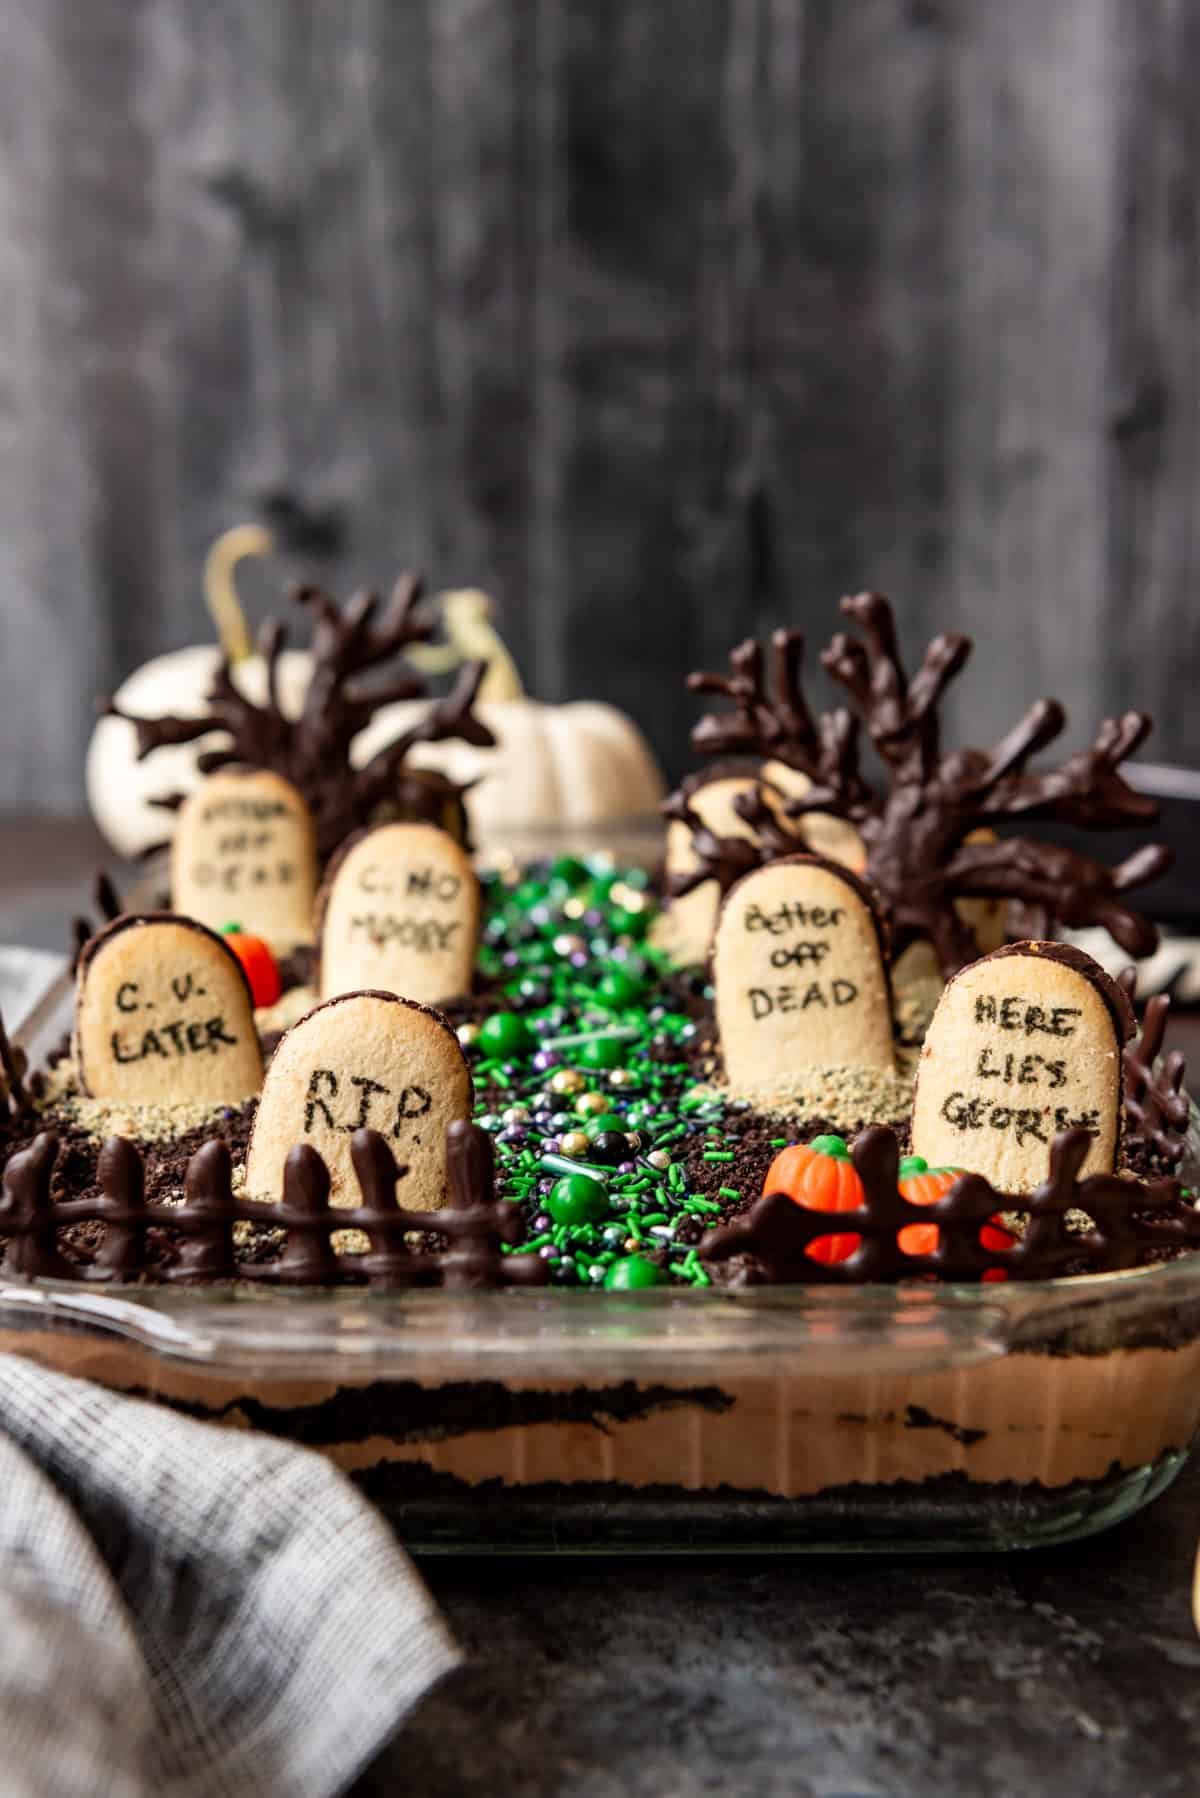
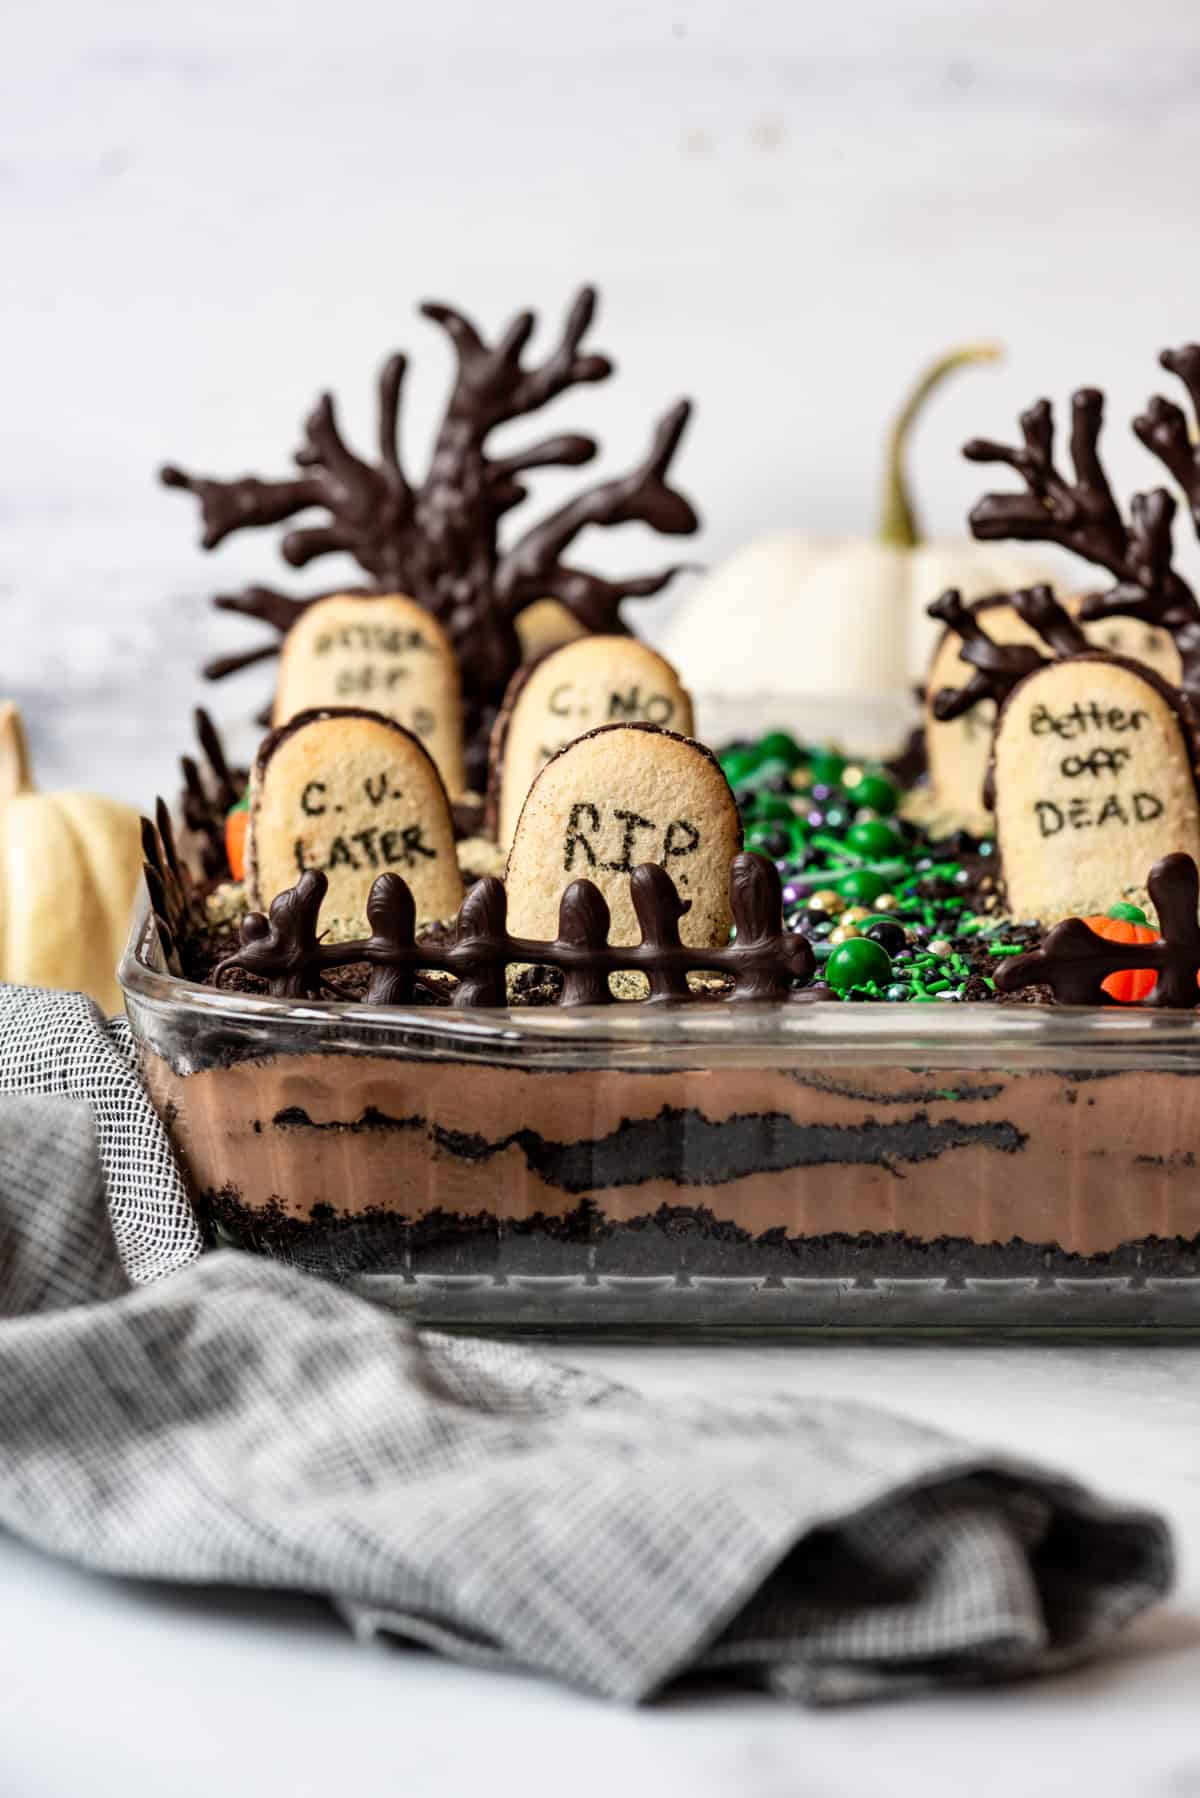
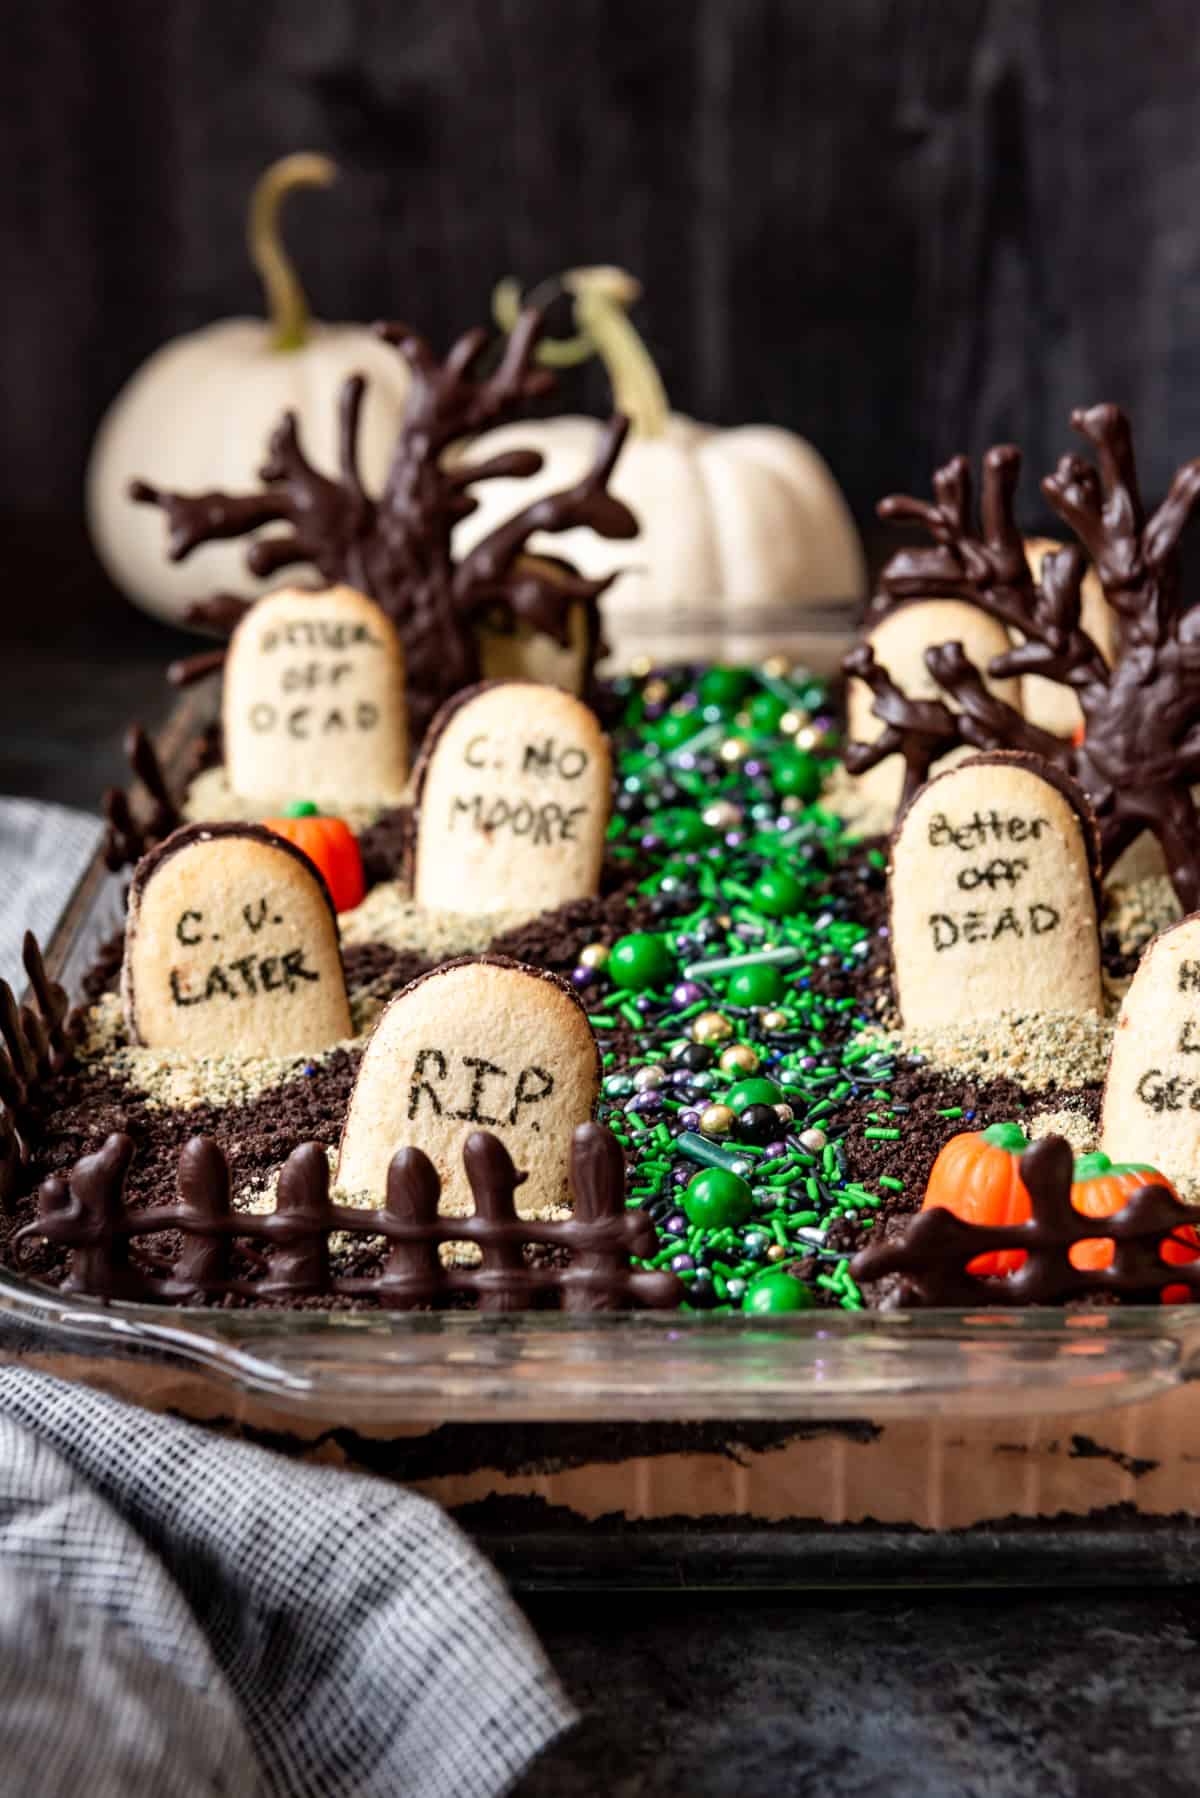
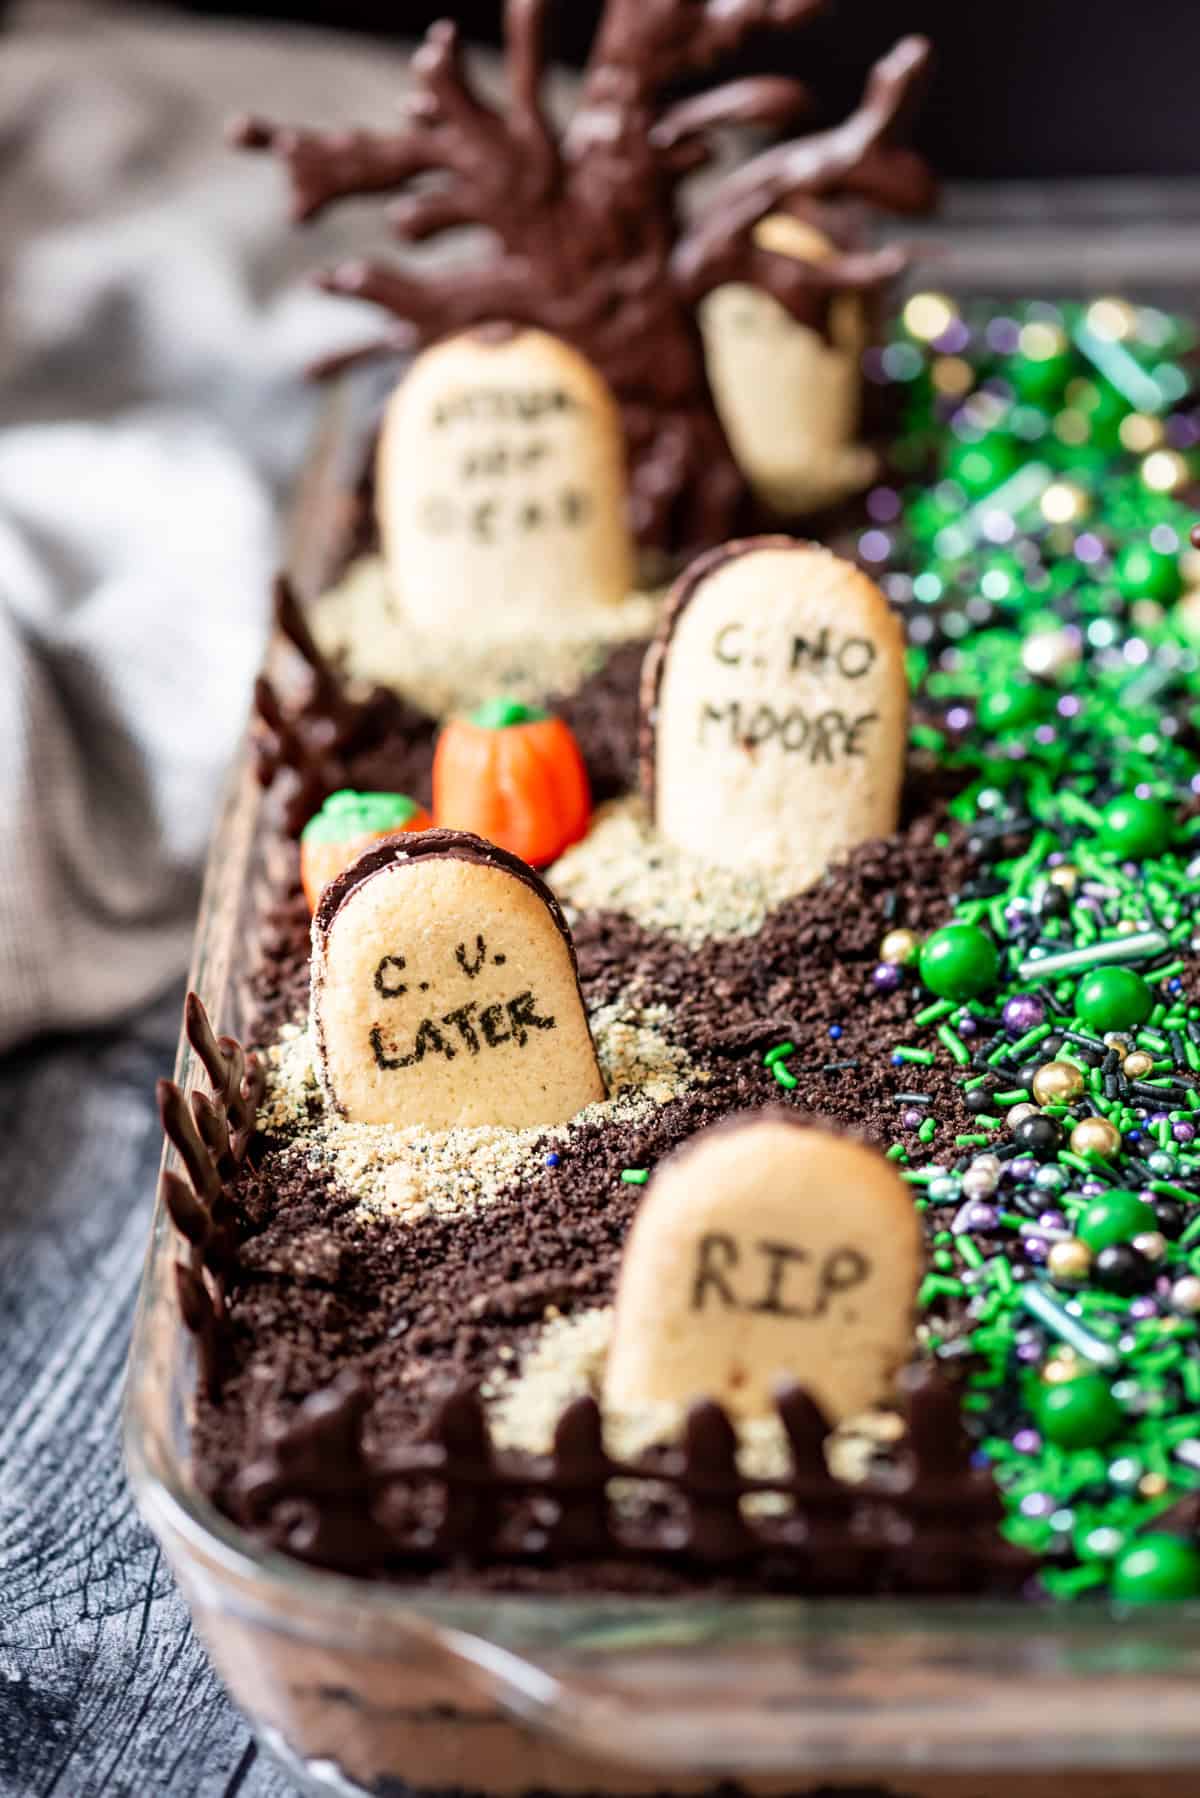
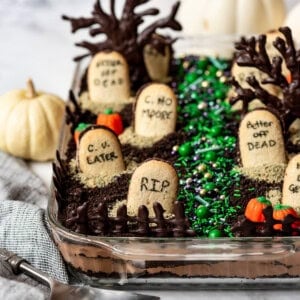
- Decorating elements: Milano cookies make excellent tombstones. I used a marker with edible ink that I picked up from a craft store to write the epitaphs on each tombstone. Some fun, festive sprinkles make a great “path” through the graveyard. And a few candy pumpkins add a pop of color and Halloween night vibe to the tableau.
How to make dirt cake
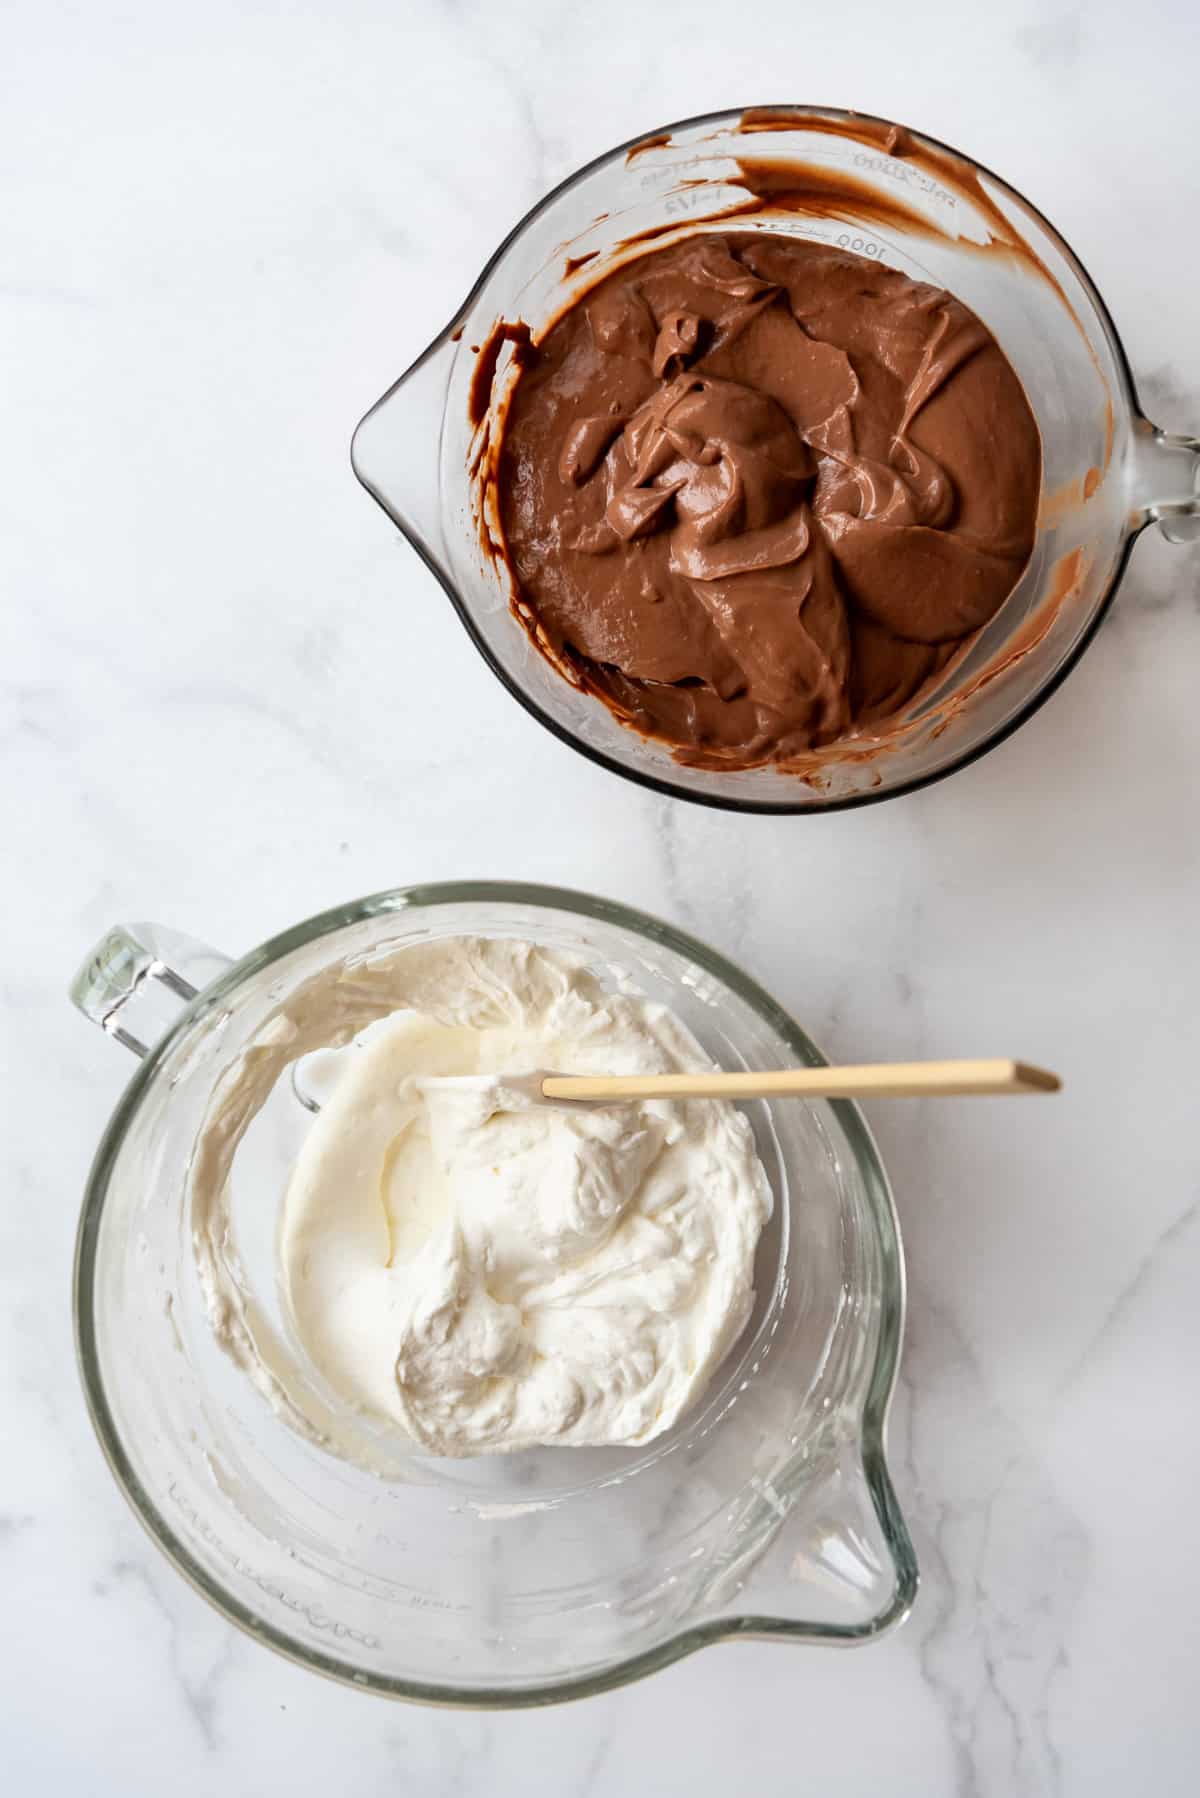
- Make the pudding filling: Whisk sugar, cocoa powder, cornstarch, and salt in a medium saucepan. Whisk in the milk, then bring this mixture to a boil and cook for 2 minutes, stirring constantly, until thickened. Remove from the heat and stir in chopped chocolate and butter until melted. Stir in vanilla extract, then cool completely in the fridge.
- Make the whipped cream: Beat heavy cream in a large mixing bowl until it starts to thicken. Add powdered sugar and vanilla extract, then finish beating until whipped to soft peaks.
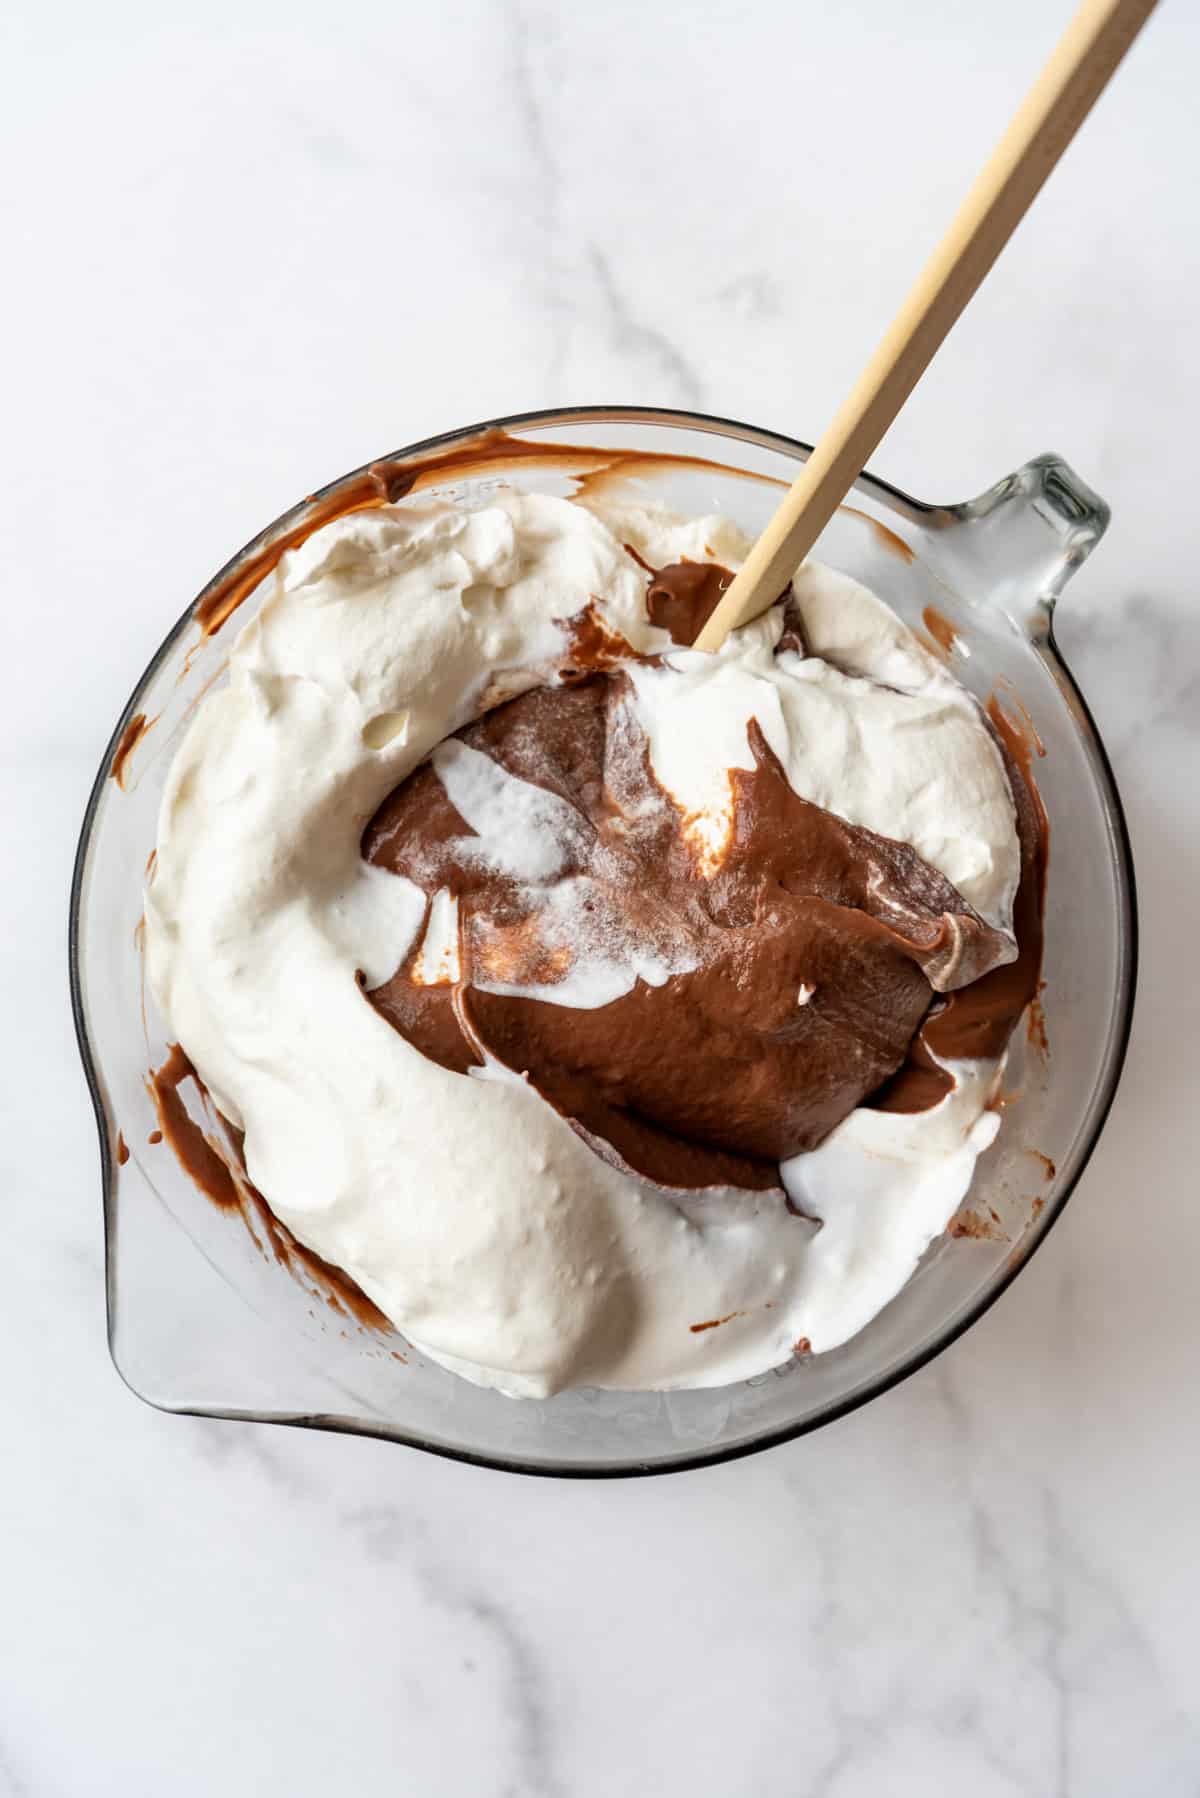
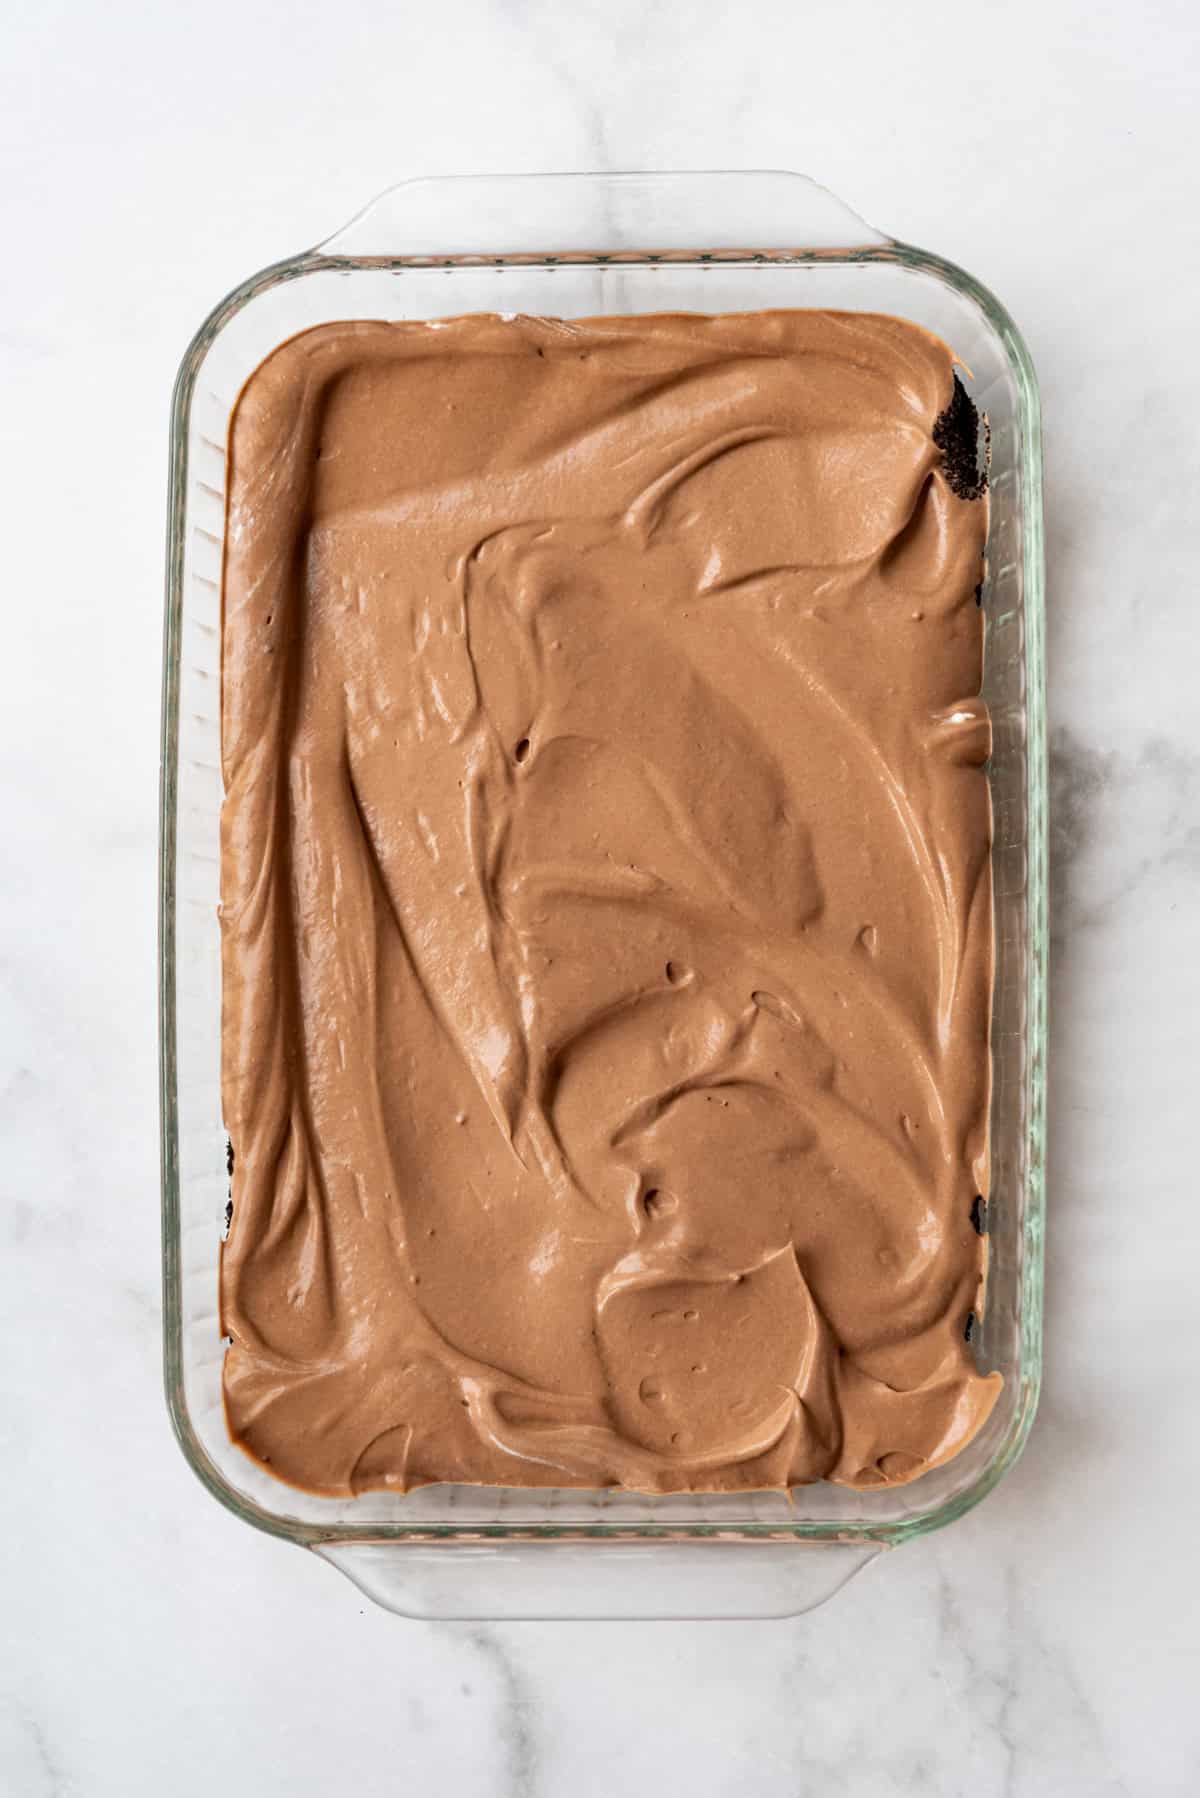
- Fold together: Use a rubber spatula to fold the whipped cream into the chocolate pudding until combined.
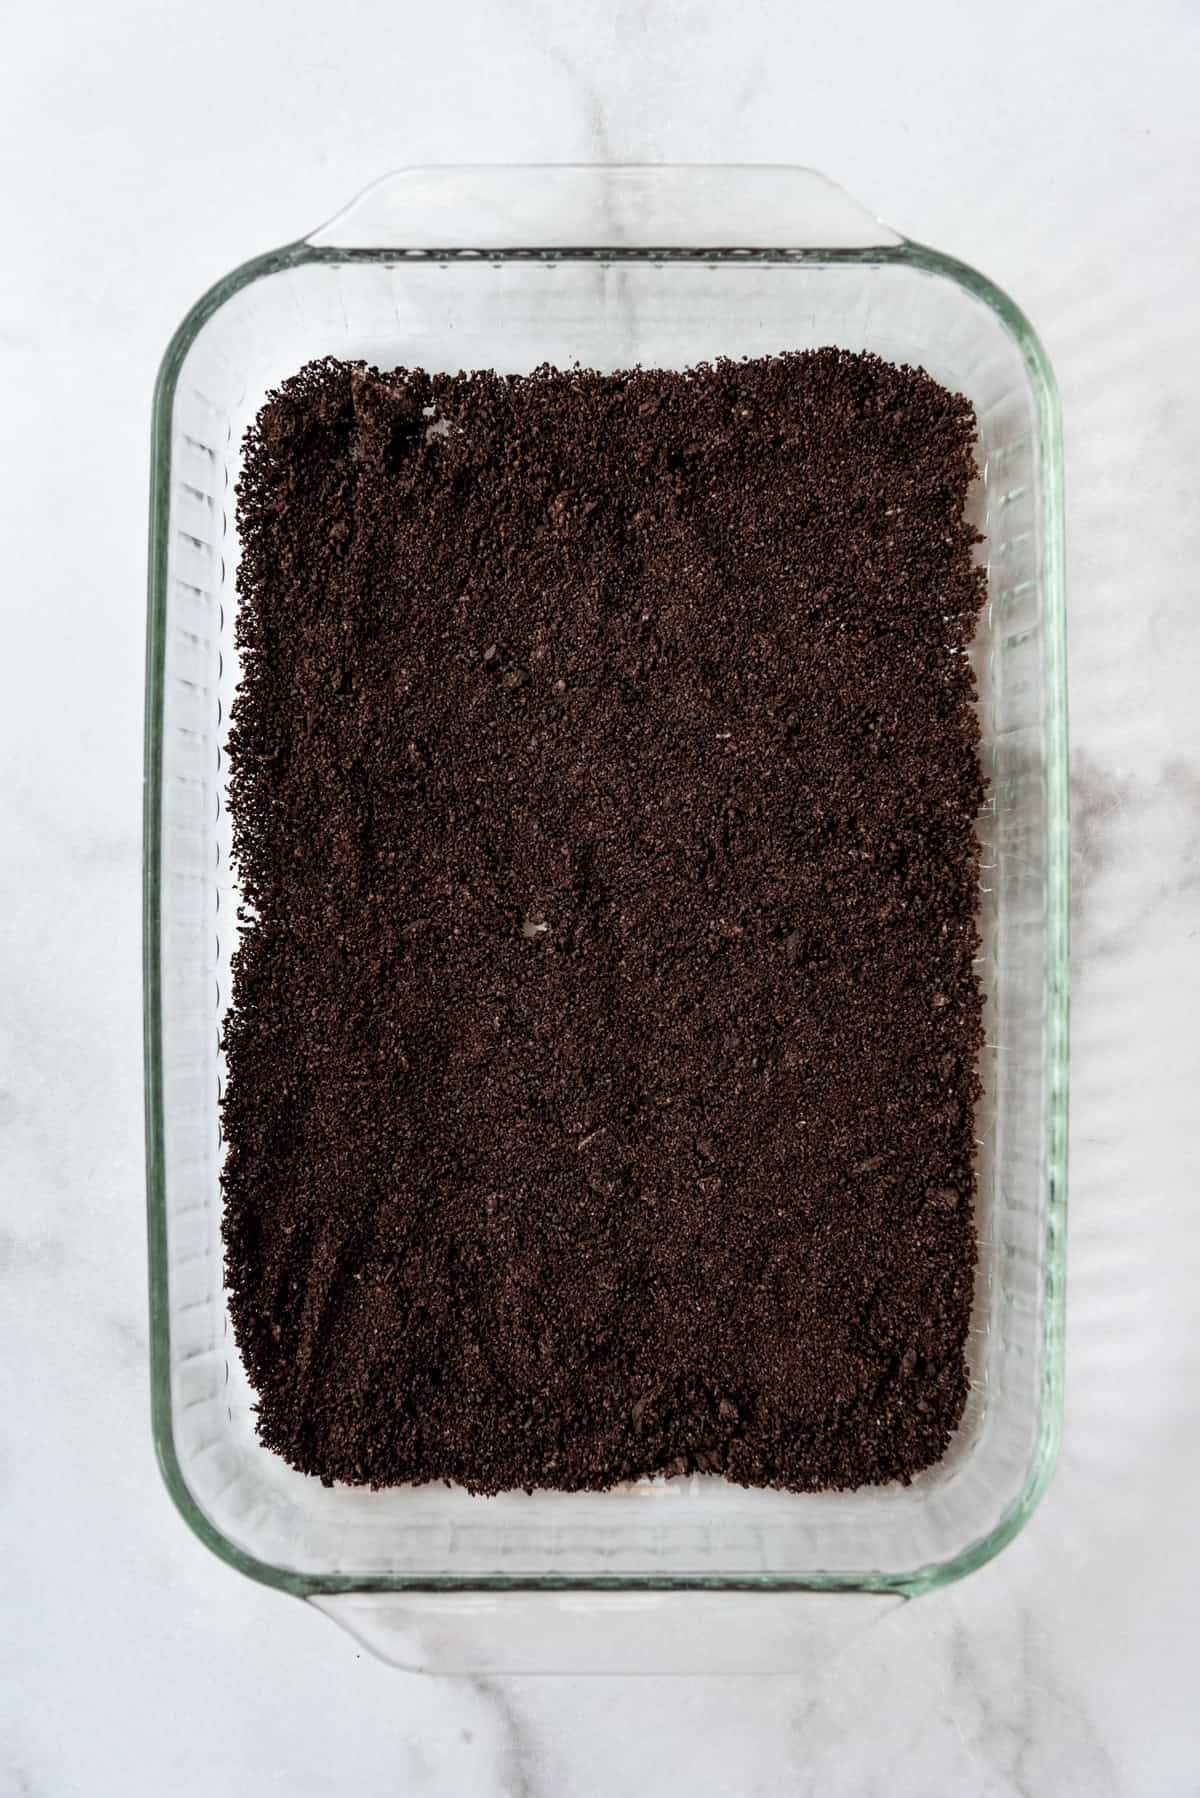
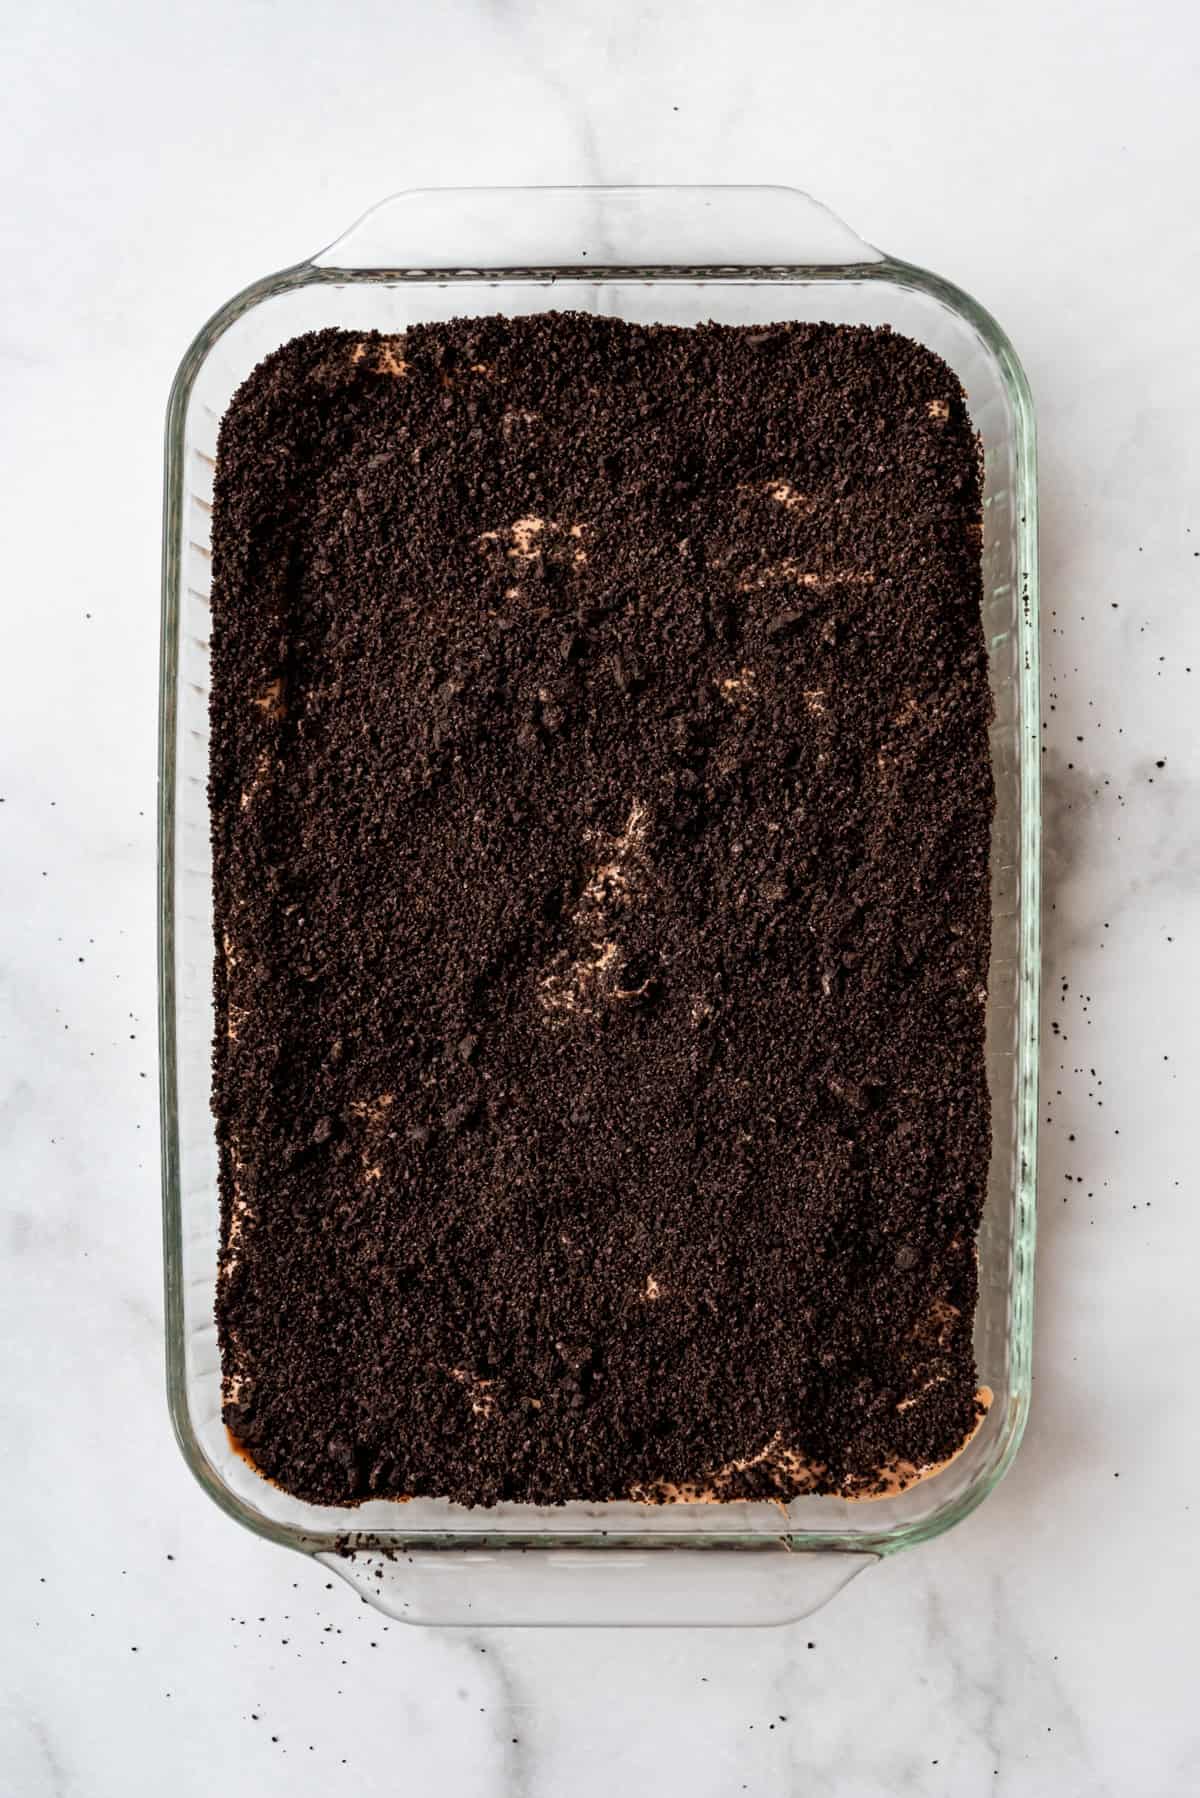
- Layer with crushed Oreo cookie crumbs: Press ⅓ of the crushed Oreos into an even layer on the bottom of a 9×13-inch pan. Gently spread ½ of the chocolate filling over the Oreo layer, then sprinkle with another ⅓ of the crushed cookies. Repeat with the remaining chocolate filling and crushed Oreos.
- Chill: Chilling helps stabilize the dessert just a bit and allows the Oreo crumbs to soften slightly so the whole thing kind of comes together.
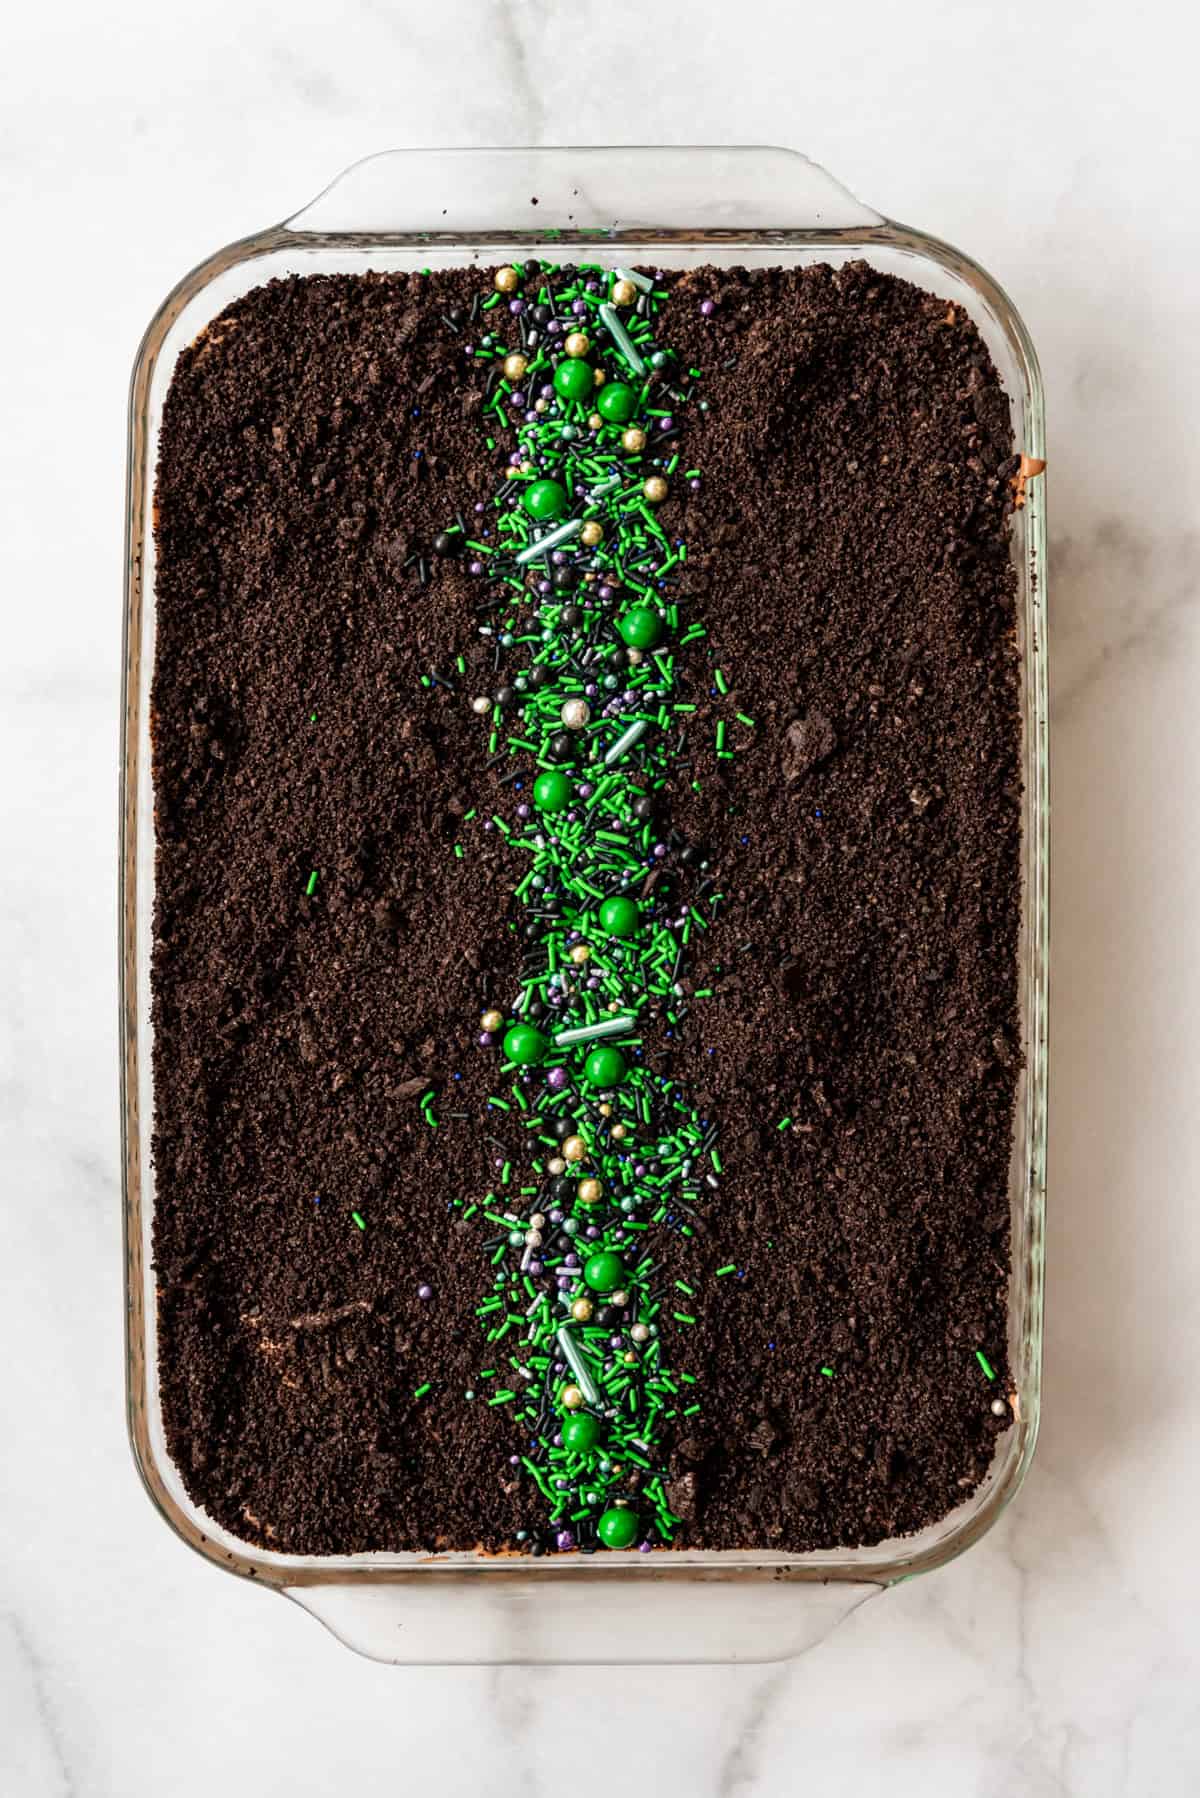
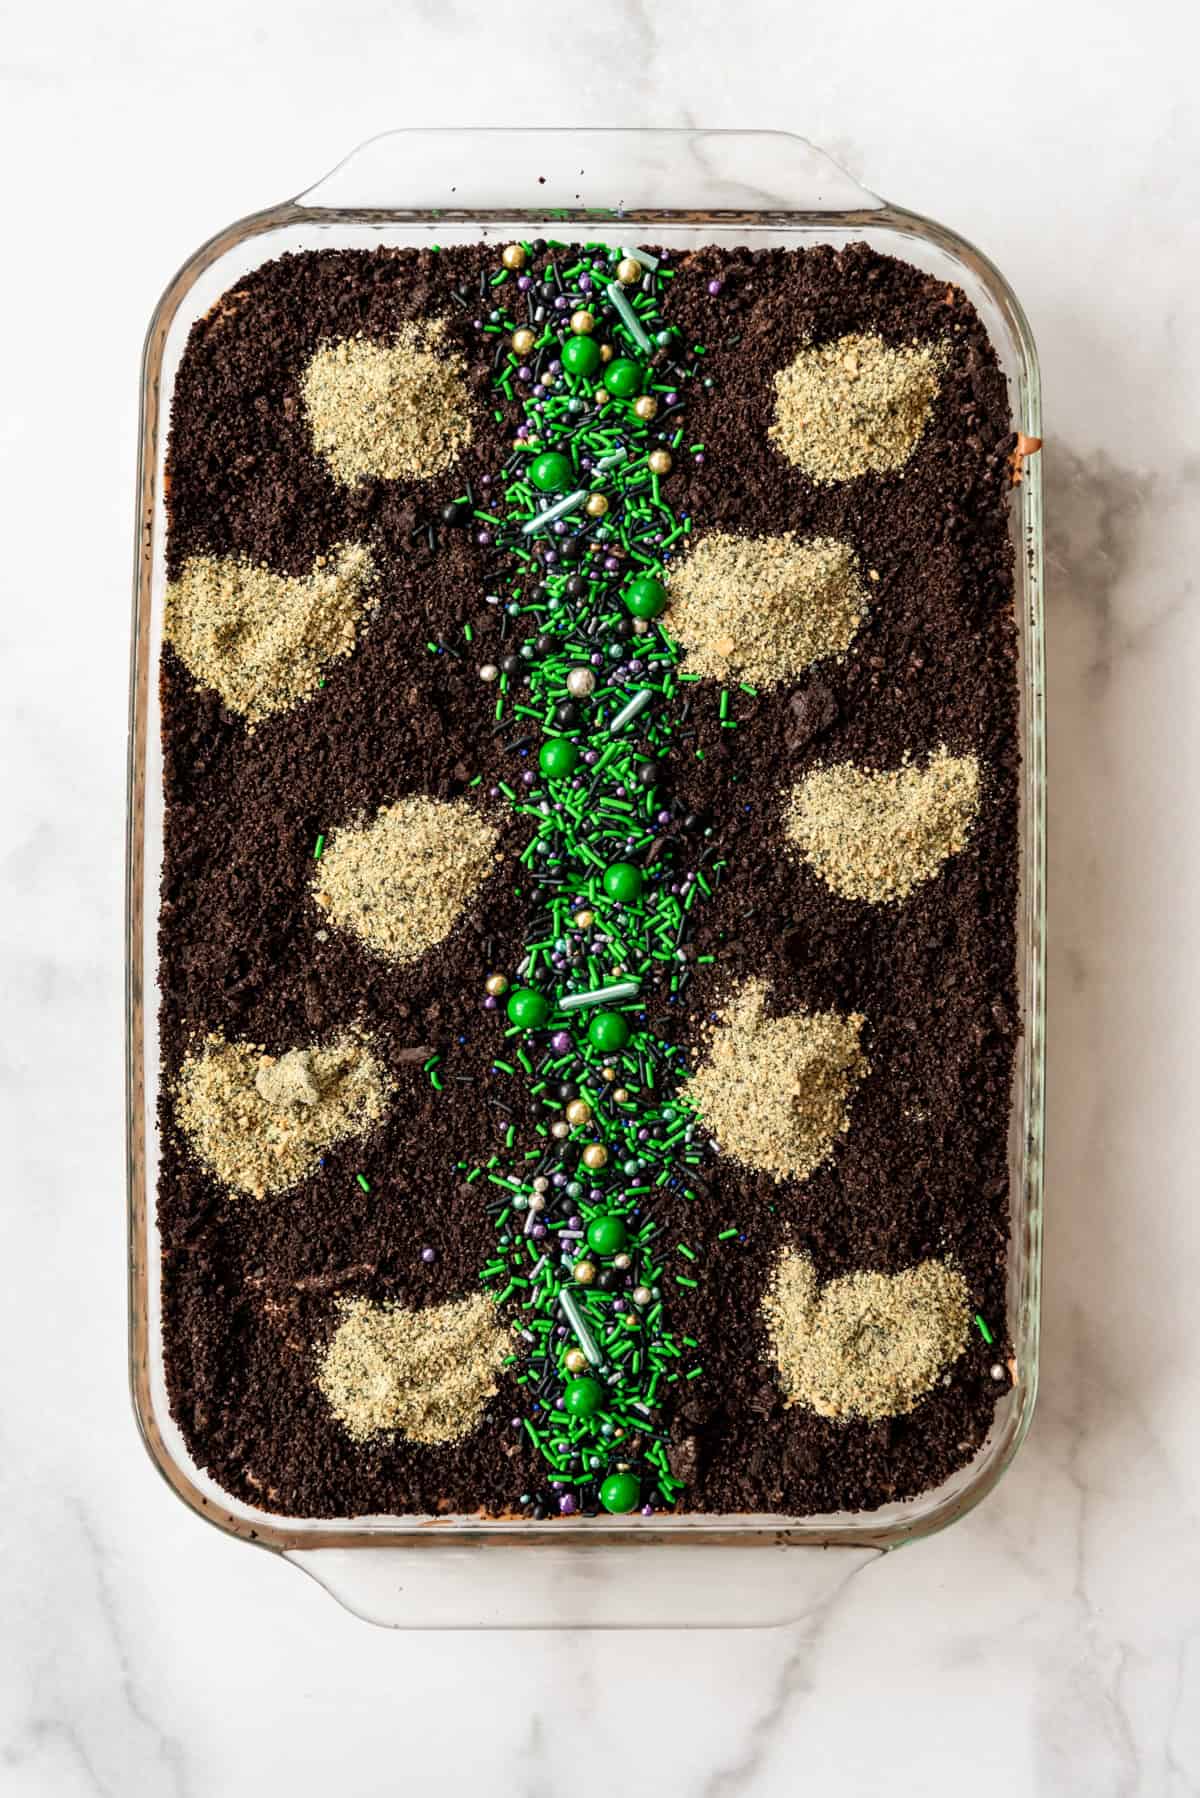
- Decorate: To decorate as a graveyard, start by making a sprinkle “path” down the center of the pan. Crush a few graham crackers with green food coloring (affiliate link) to make a mossy-looking “sand” and spoon small amounts around the top of the dish to create a base for the tombstones. Use an edible marker to write messages like R.I.P. on milano cookies, then stick them into the center of each graham cracker mound. It’s okay if they don’t stand straight! That just makes the graveyard look old and spookier! Finish off the look with a few pumpkin candies and chocolate trees, then serve.
Make trees and fence posts with melted chocolate
I really wanted my graveyard to have a haunted feel that the tombstones along weren’t giving, so I decided to create some spooky trees to add a height element to my dessert. These were so much easier to create than I thought they would be!
All you have to do is melted some dark or milk chocolate in the microwave using short 20 second bursts of heat and stirring between bursts until melted and smooth. Many microwaves even have a “melt” feature to help you with this.
Next, transfer the melted chocolate to a piping bag or ziploc bag and snip off the tip to create a small round hole for piping.
On a baking sheet lined with parchment paper, pipe the trunk of the tree first, making sure to include thinner, wiggly lines for “roots”. The roots won’t actually be seen once you stick the trees into your chocolate pudding dessert, but if you are going to lay these flat or use the trees for another purpose, the roots definitely add to the overall “tree” effect.
Pipe longer, thick “main branches” from the top of the trunk, then continue to build and add onto those main branches, piping smaller “twigs” that go off in different directions. Fill in gaps with more chocolate, then let the trees harden as the chocolate cools completely before peeling off the parchment paper and using in your dessert.
You can see from the trees below that my first attempt in the upper left-hand corner isn’t as convincing or clean-looking as my other attempts.

Fence posts can be made by piping short parallel lines in a row, then tying them together with a couple of perpendicular lines of chocolate piped right across the top. I recommend making shorter fence segments since longer ones tend to be less sturdy and break easily.
More decorating ideas
To really make this look festive and fun, you need to come up with a spooky design for decorating it. I chose to go with a haunted graveyard, complete with tombstones and ghostly trees, this time.

Candy corn, zombie hands, eyeballs, and other decorating elements are almost always available at craft stores and in seasonal aisles at grocery stores. Cake decorating brands always seem to have fun new things to use each year!
Here are some other ideas to get you started. You can use any combination of decorating elements to come up with your own ghastly treat. Let your imagination run wild and see what you can come up with!
- Haunted pumpkin patch: Use pumpkin mallow cremes and green frosting to pipe vines for a fun pumpkin patch. Make it haunted with the addition of ghost meringues or blobs of whipped cream with mini chocolate chips for eyes.
- Scattered bones: Pipe “bones” from white chocolate to make it look like a skeleton is being unearthed from the dirt.
- Worms, spiders & dirt: Use gummy worms and black spider rings to create a creepy-crawly effect. This one was always popular when I was a kid!
If it’s no longer Halloween and you want to make dirt cake, consider adding small toy trucks for a child’s birthday or using plastic shovels, chocolate seashells, and graham crackers in place of the Oreos to create a beachy “sand” effect instead.
More chocolate desserts you’ll love
- Chocolate Molten Lava Cakes
- Chewy Brownie Cookies
- Devil’s Food Chocolate Cake
- Chocolate Cream Pie
- The BEST Homemade Brownies
- Chocolate Covered Pretzel Rods
Did you make this recipe?
Let me know what you thought with a comment and rating below. You can also take a picture and tag me on Instagram @houseofnasheats or share it on the Pinterest pin so I can see.
Graveyard Dirt Cake
Ingredients
Chocolate Pudding Layer
- 1 1/2 cups granulated sugar
- 1/3 cup cocoa powder
- 1/3 cup cornstarch
- 1/2 teaspoon salt
- 5 cups whole milk
- 8 ounces dark chocolate finely chopped
- 4 Tablespoons salted butter
- 2 teaspoons vanilla extract
- 1 1/2 cups heavy cream
- 3 Tablespoons powdered sugar
Decorating
- 24 Oreos finely crushed
- graham crackers
- green food coloring (affiliate link)
- ghosts
- pumpkins
- Milano cookies for tombstones
- chocolate trees
- white chocolate bones
- sprinkles
- gummy worms
Instructions
- In a medium saucepan, whisk together the sugar, cocoa powder, cornstarch, and salt. Whisk in the milk, then heat over medium heat until it comes to a boil. Cook for 2 minutes, stirring constantly.1 ½ cups granulated sugar, ⅓ cup cocoa powder, ⅓ cup cornstarch, ½ teaspoon salt, 5 cups whole milk
- Remove from heat and stir in chopped chocolate and butter until melted. Stir in vanilla extract, then cool completely in the fridge, covered with plastic wrap placed directly on top of the pudding to prevent a skin from forming.8 ounces dark chocolate, 4 Tablespoons salted butter, 2 teaspoons vanilla extract
- When the pudding is completely chilled, beat the cream and powdered sugar using a whisk attachment until soft peaks form. Fold the whipped cream into the chocolate pudding, then set aside.1 ½ cups heavy cream, 3 Tablespoons powdered sugar
- In a large 9×13-inch baking dish, spread a layer of oreo crumbs. Top with the pudding mixture. Then more crumbs, then the other half of the pudding.24 Oreos
- Decorate the top with the remaining crumbs, and garnish with the tombstones, etc. Chill until ready to serve.graham crackers, green food coloring (affiliate link), ghosts, pumpkins, Milano cookies for tombstones, chocolate trees, white chocolate bones, sprinkles, gummy worms
Nutrition
More Halloween Recipes
Halloween Cookies & Bars
- Slice & Bake Pumpkin Cookies from The Flour Handprint
- Halloween Lollipop Cookies from Lemon Blossoms
Halloween Cakes & Cupcakes:
- Blood Splatter Cupcakes from Big Bear’s Wife
- Jack-o-lantern Cake Pops from Tastes of Homemade
- Graveyard Dirt Cake from House of Nash Eats
- Halloween Mummy Cake Pops from Karen’s Kitchen Stories
Halloween Pies & Tarts:
- Air Fryer Mummy Apple Mini Tarts from Fresh Coast Eats
Halloween Breakfast:
- Cinnamon Roll Intestines from Devour Dinner
Chilled Halloween Treats:
- Frankenberry Jell-O Shots from Sweet ReciPEAS
Halloween Snack Mix and Candy:
- Halloween Chex Mix from West Via Midwest
- Bloody Zombie Brains (Candied Walnuts) from The Spiffy Cookie
No Bake Halloween Desserts:
- White Chocolate Mummy Crispy Rice Treats from Savory Moments
- Halloween Spider Web Dip from I Am A Honeybee


We’ve made this for two Halloween’s in a row, and it’s always a hit! Who knew homemade pudding was so easy, and so much better than boxed? The creamy chocolate filling is divine, and I think it would be amazing in pie form too. My toddler and I had a lot of fun decorating it!
Exactly what I was looking for for a work potluck. I love that you have a scratch recipe for the pudding. Thanks again!
So glad you loved it!
Can I assemble the day before or will the cookie crumbs get soggy?
Hmm yes I think the cookie crumbs may start to get a little soggy, but not too bad. This might be a hard one to prep the day before. You can prep all the layers the day before and assemble day of.