

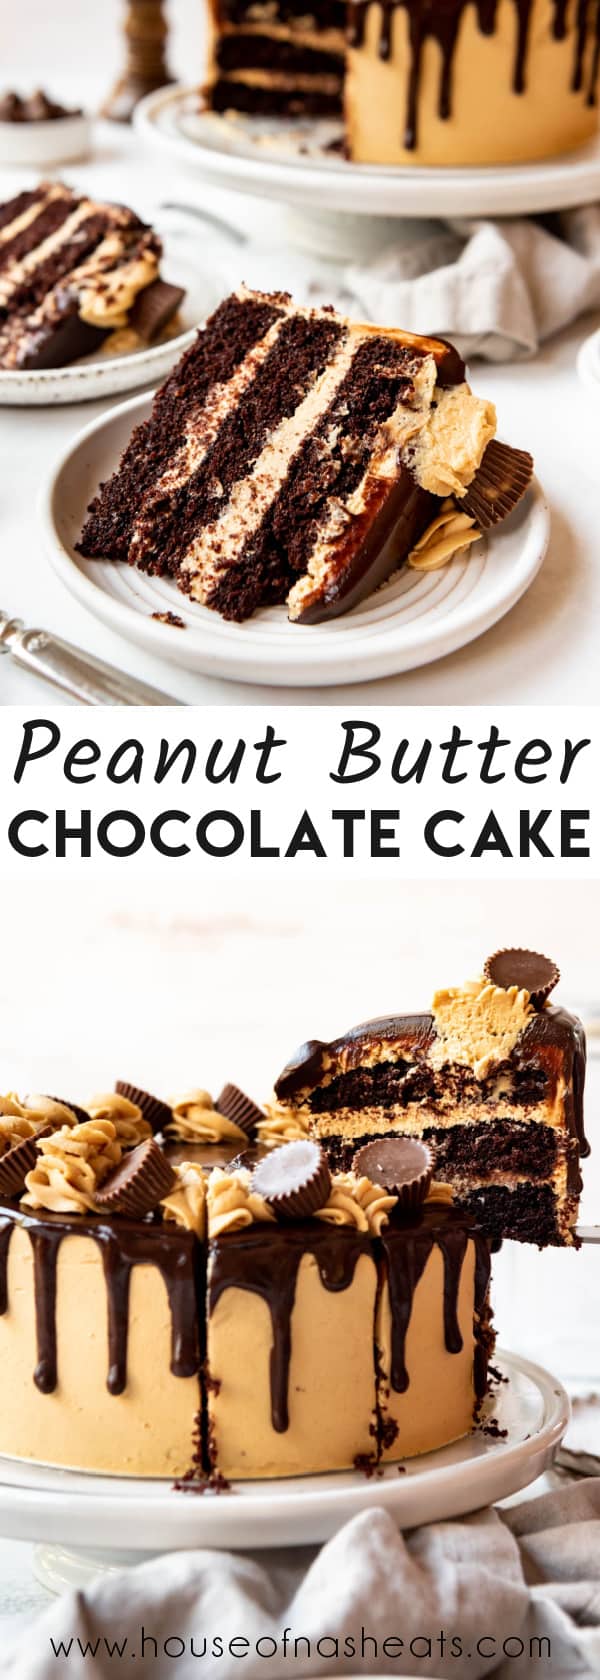
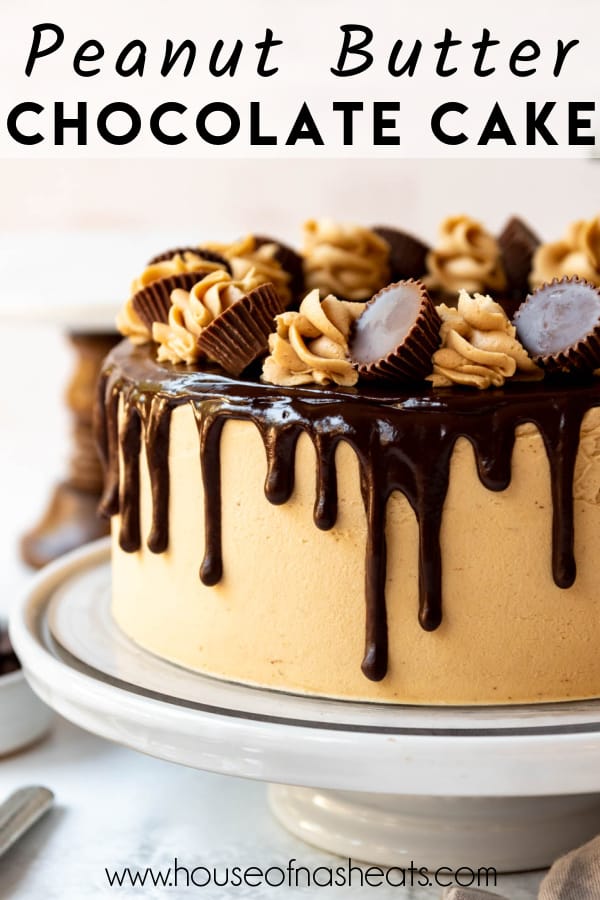
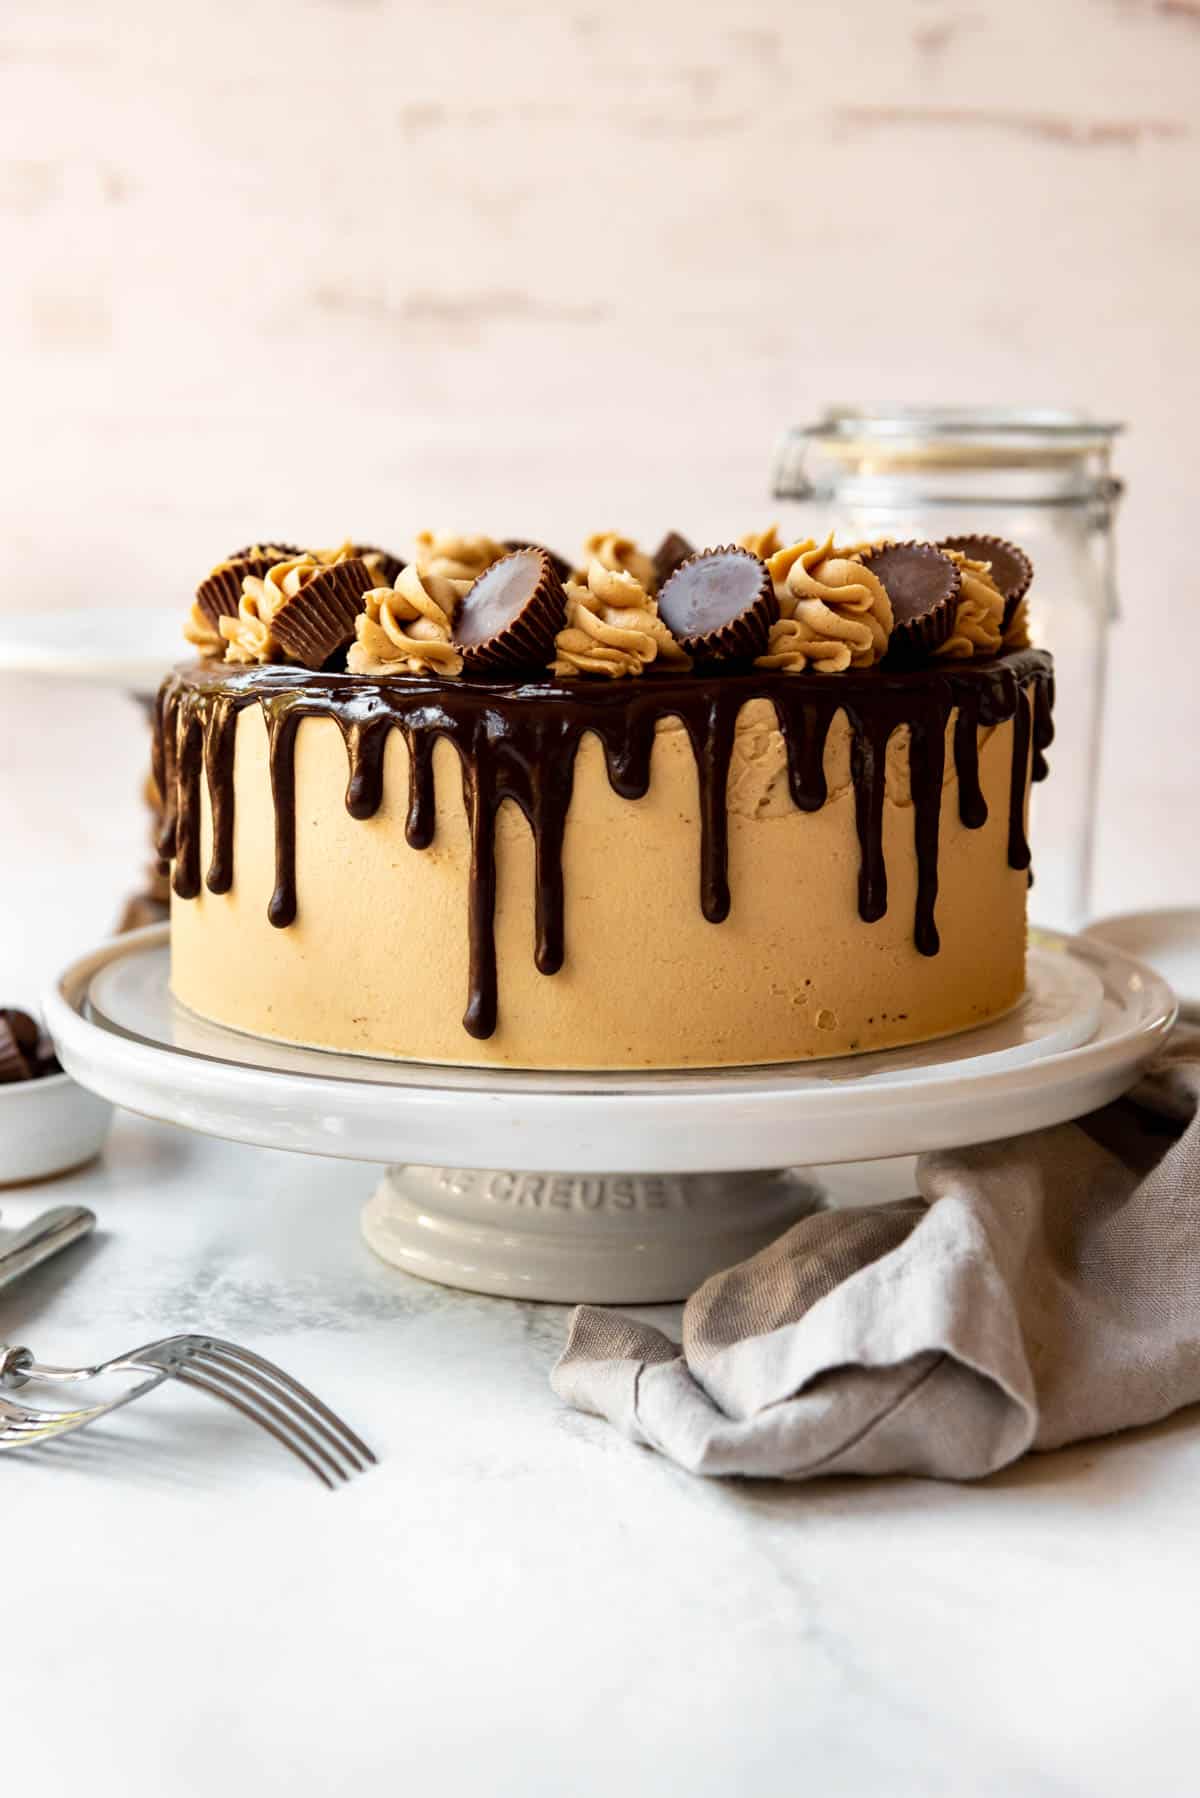
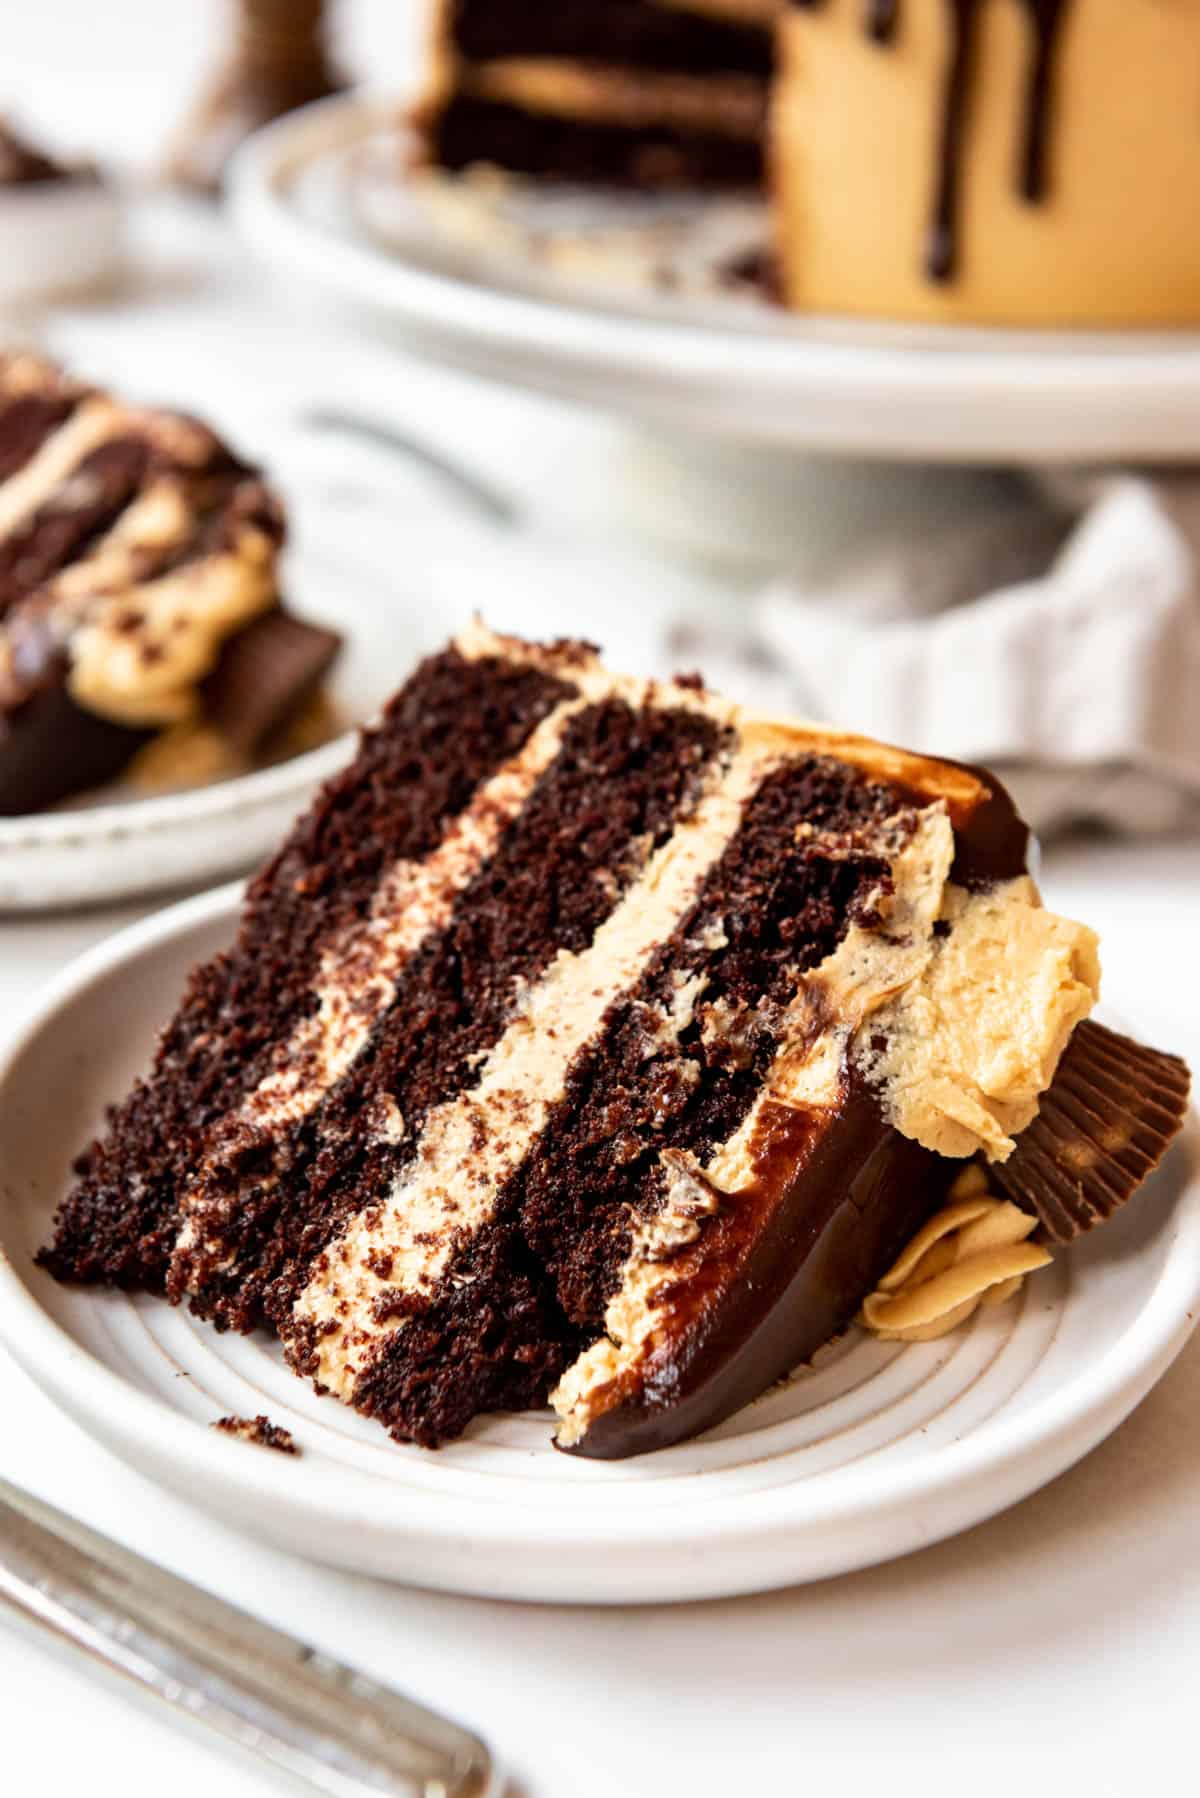
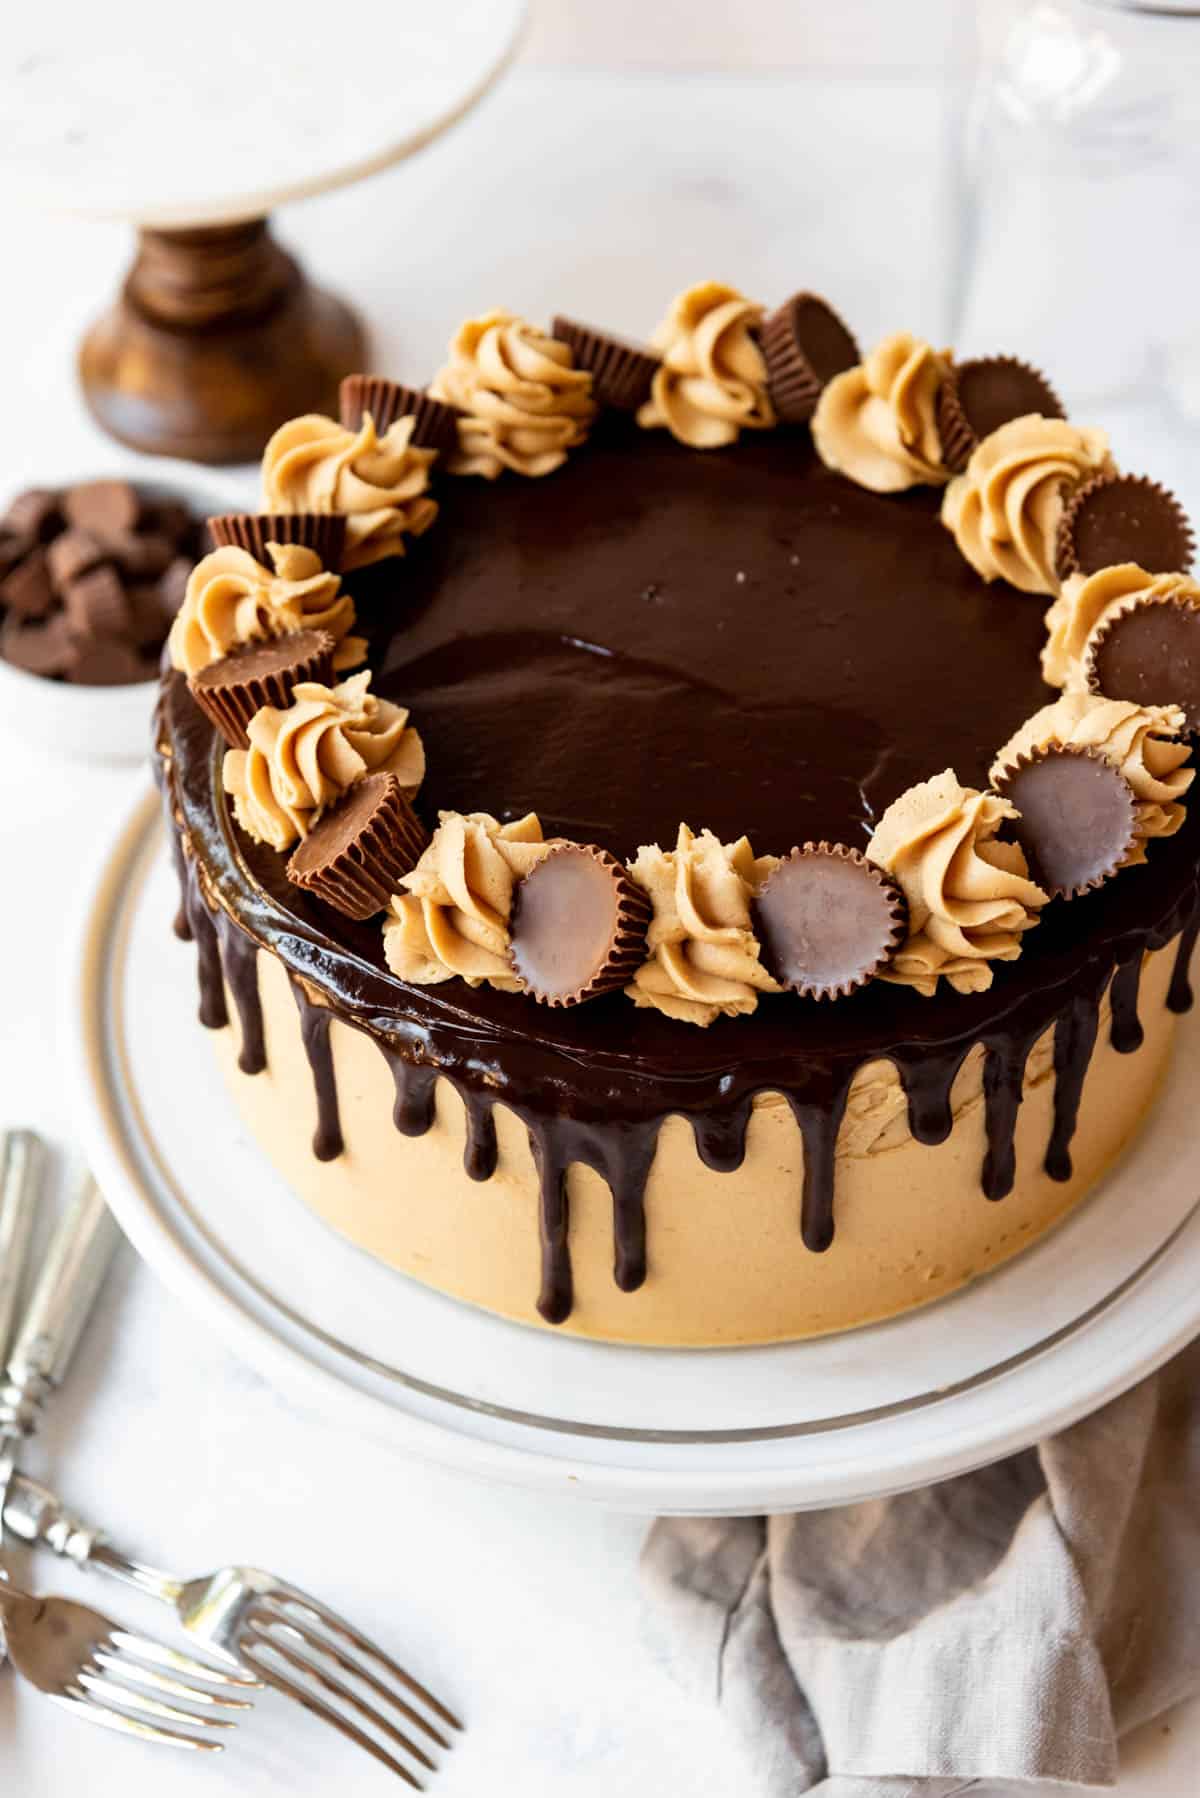
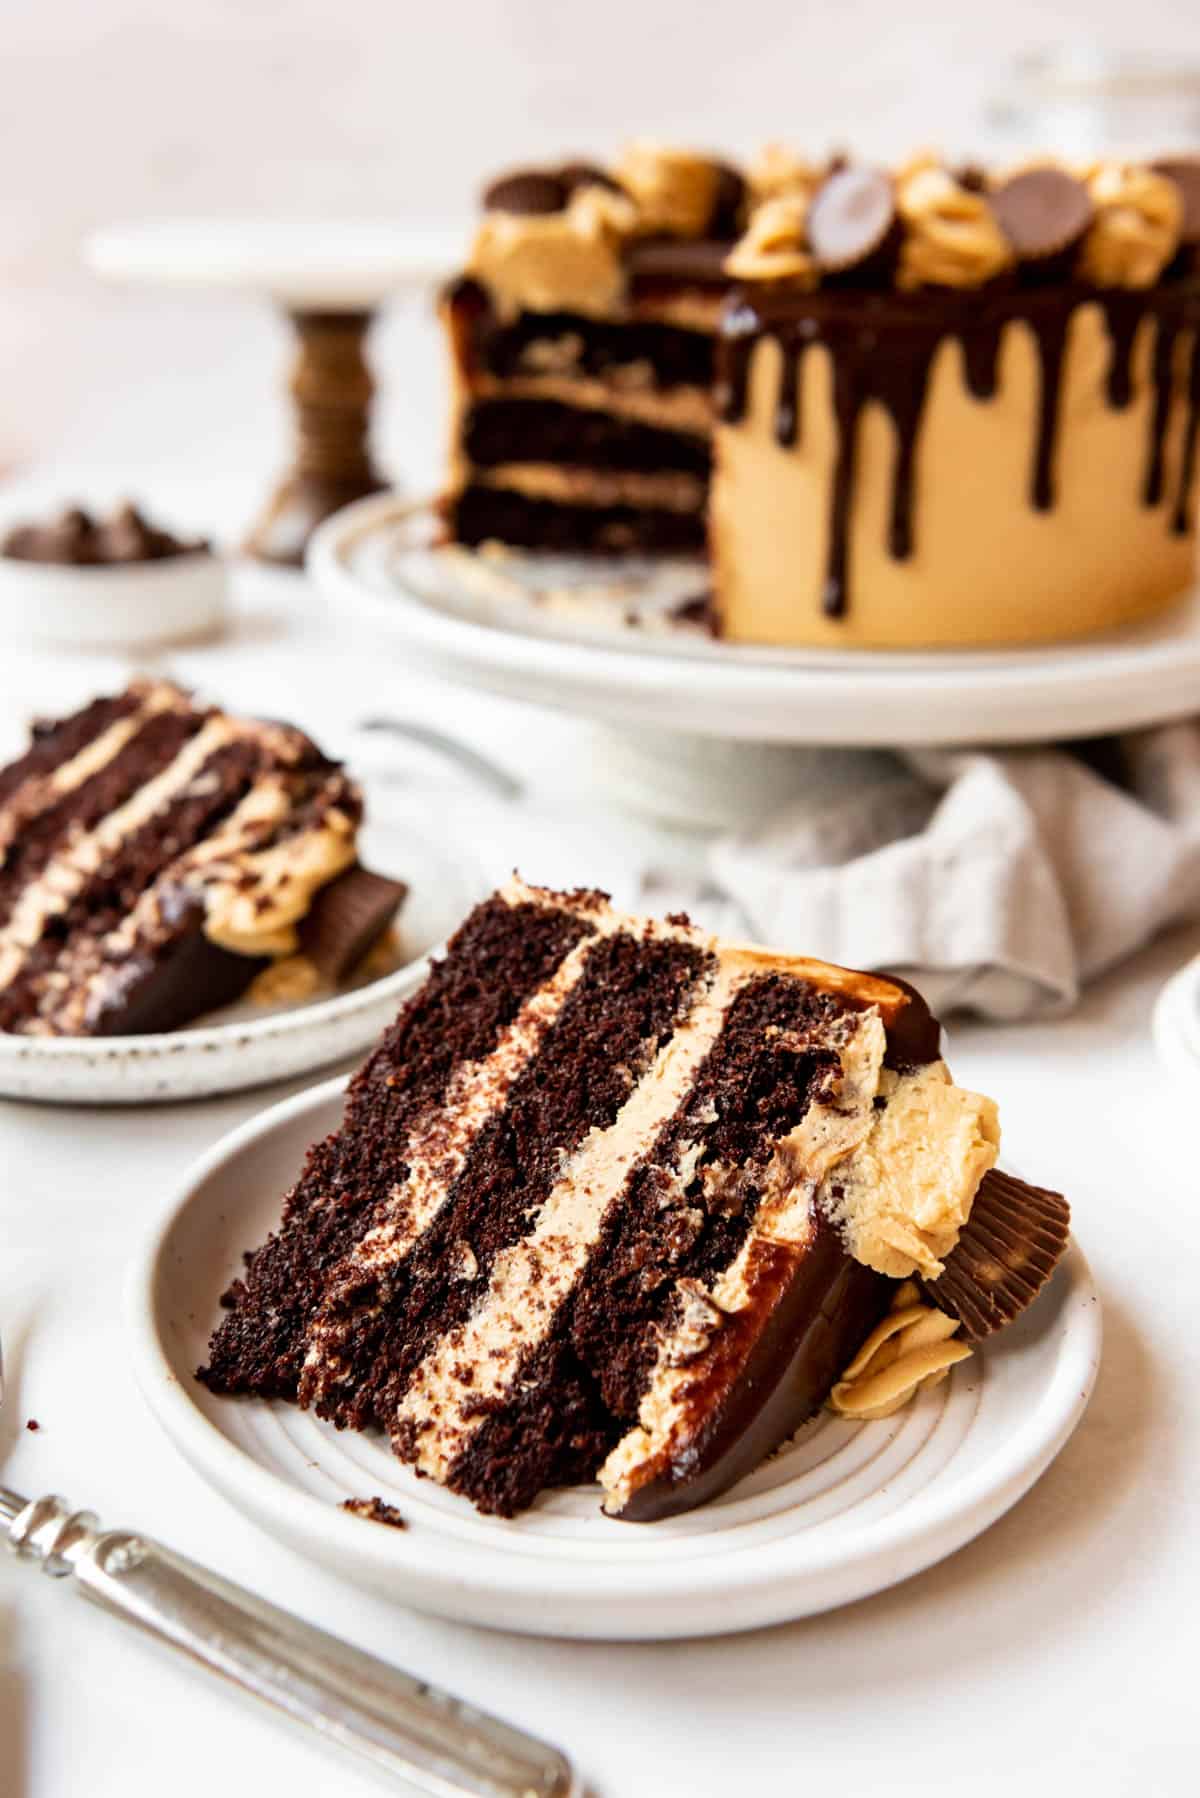
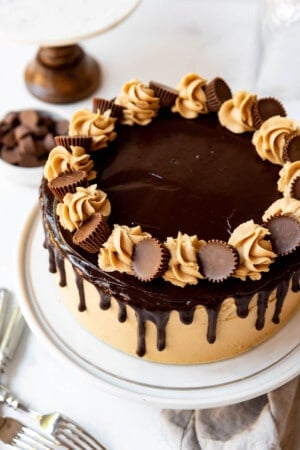
This triple-tiered Chocolate Peanut Butter Cake with chocolate ganache drip and homemade peanut butter frosting is a celebration cake to remember! Made with deliciously moist chocolate cake layers, it’s coated with my creamy peanut butter frosting, rich chocolate ganache, and topped with extra swirls of peanut butter frosting and mini Reese’s Peanut Butter Cups. It’s perfect for chocolate and peanut butter lovers everywhere!
For more amazing chocolate cake ideas, check out my German Chocolate Cake, Raspberry Chocolate Cake, Chocolate Chip Cookie Dough Cake, and my Devil’s Food Cake with Chocolate Frosting!
Table of Contents
Peanut butter and dark chocolate are two flavors that were just made for each other. I made this cake for Paul to take into the office one day for some birthday celebrations and he came home to report that multiple people said it was the best cake they have ever had.
This was actually my first attempt at a drip cake where you decorate the sides of the cake by letting ganache drip down for an intentionally messy effect. It’s a really fun technique and easier to do that you might think! Plus, it’s a crowd-pleaser that makes everyone think you are a professional baker.
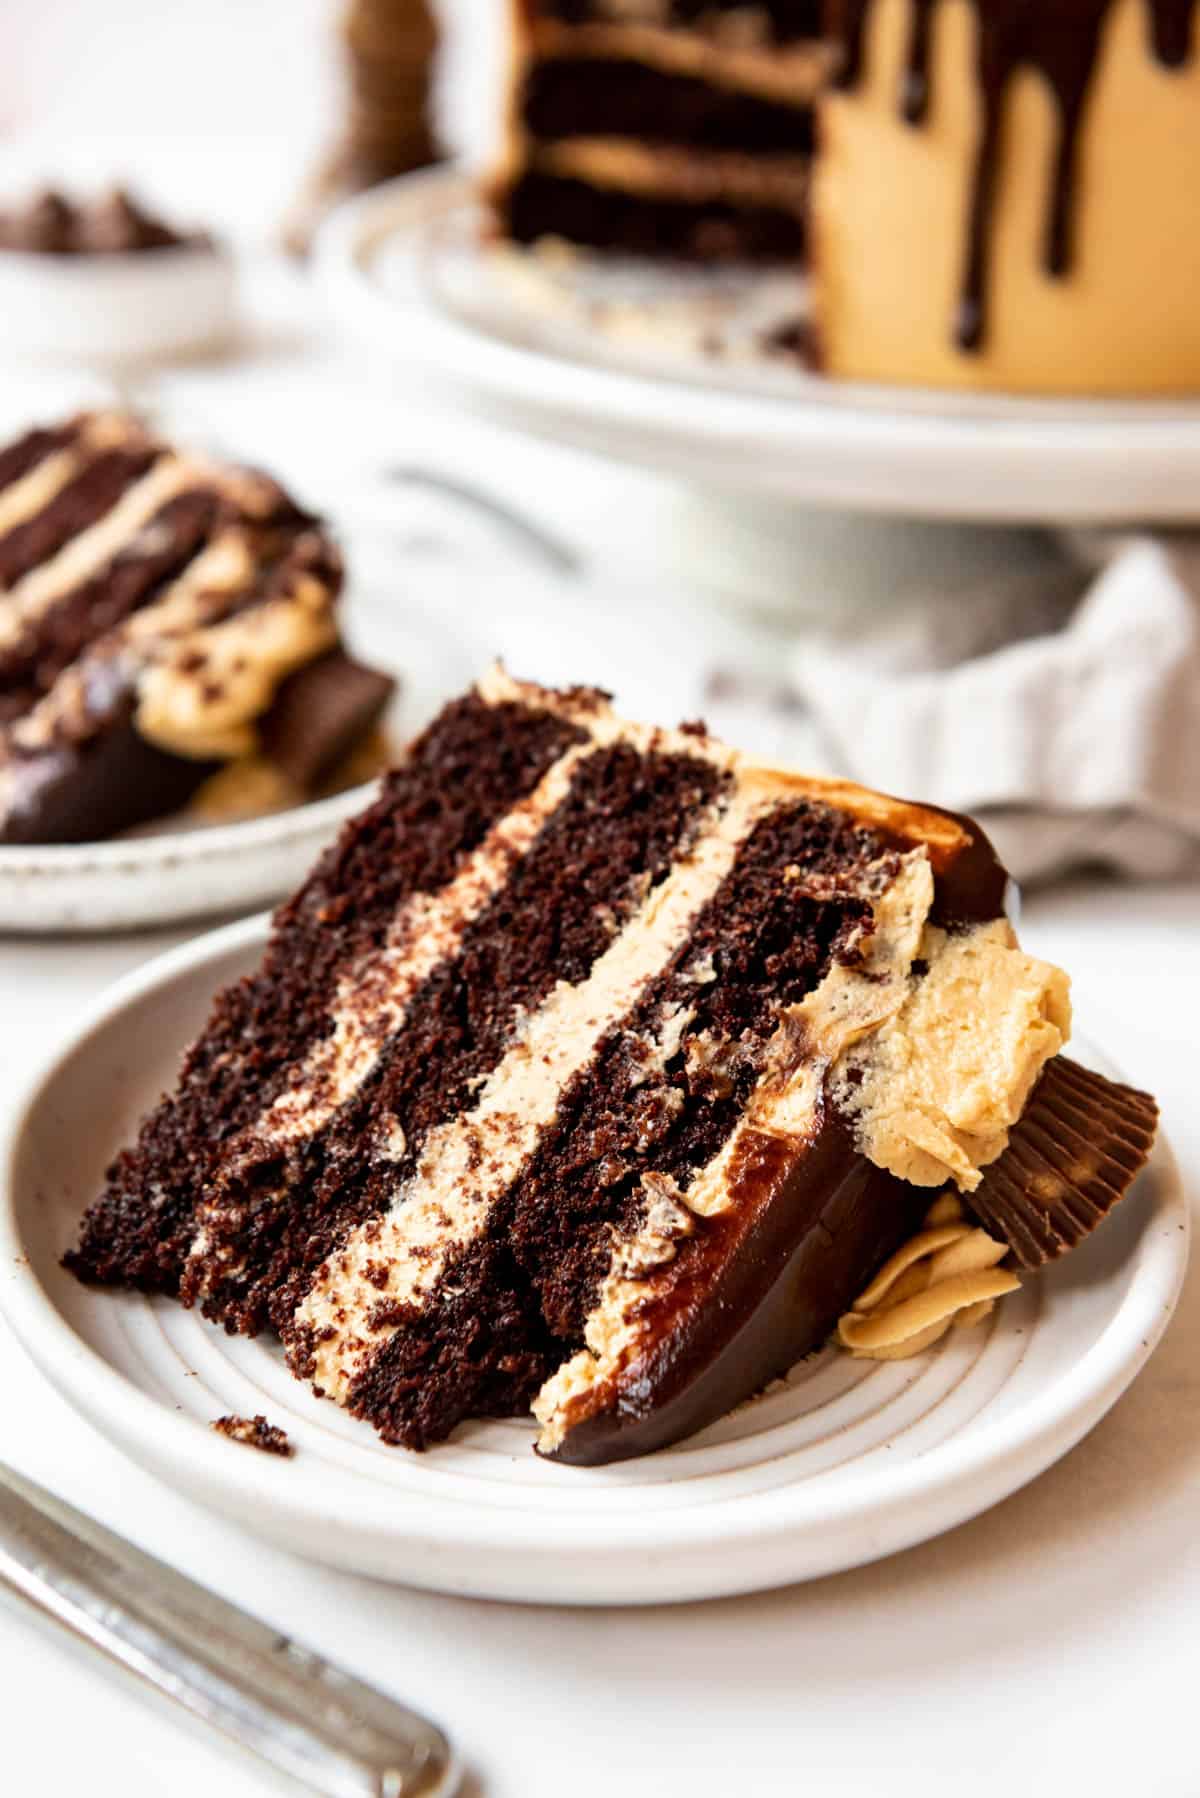
This special occasion cake is over-the-top rich with a rich homemade chocolate ganache and mini Reese’s peanut butter cups. Plus, this chocolate peanut butter cake recipe has the BEST layers of moist chocolate cake sandwiched together with the creamiest peanut butter frosting.
If you want more treats with that delicious peanut butter and chocolate flavor combination, try my Levain Copycat Chocolate Peanut Butter Chip Cookies, Lunch Lady Peanut Butter Bars, this No-Bake Peanut Butter Pie, Peanut Butter Swirl Brownies, or my Rocky Mountain Avalanche Bars!
Why We Love This Recipe
- You can decorate the cake any way you like to make it your own creation.
- It’s the ultimate of all peanut butter chocolate desserts, and it’s perfect for all your special occasions.
- It can be made ahead and keeps well in the fridge for a few days or can even be frozen whole and served later!
What You’ll Need
Scroll down to the recipe card below this post for ingredient quantities and full instructions.
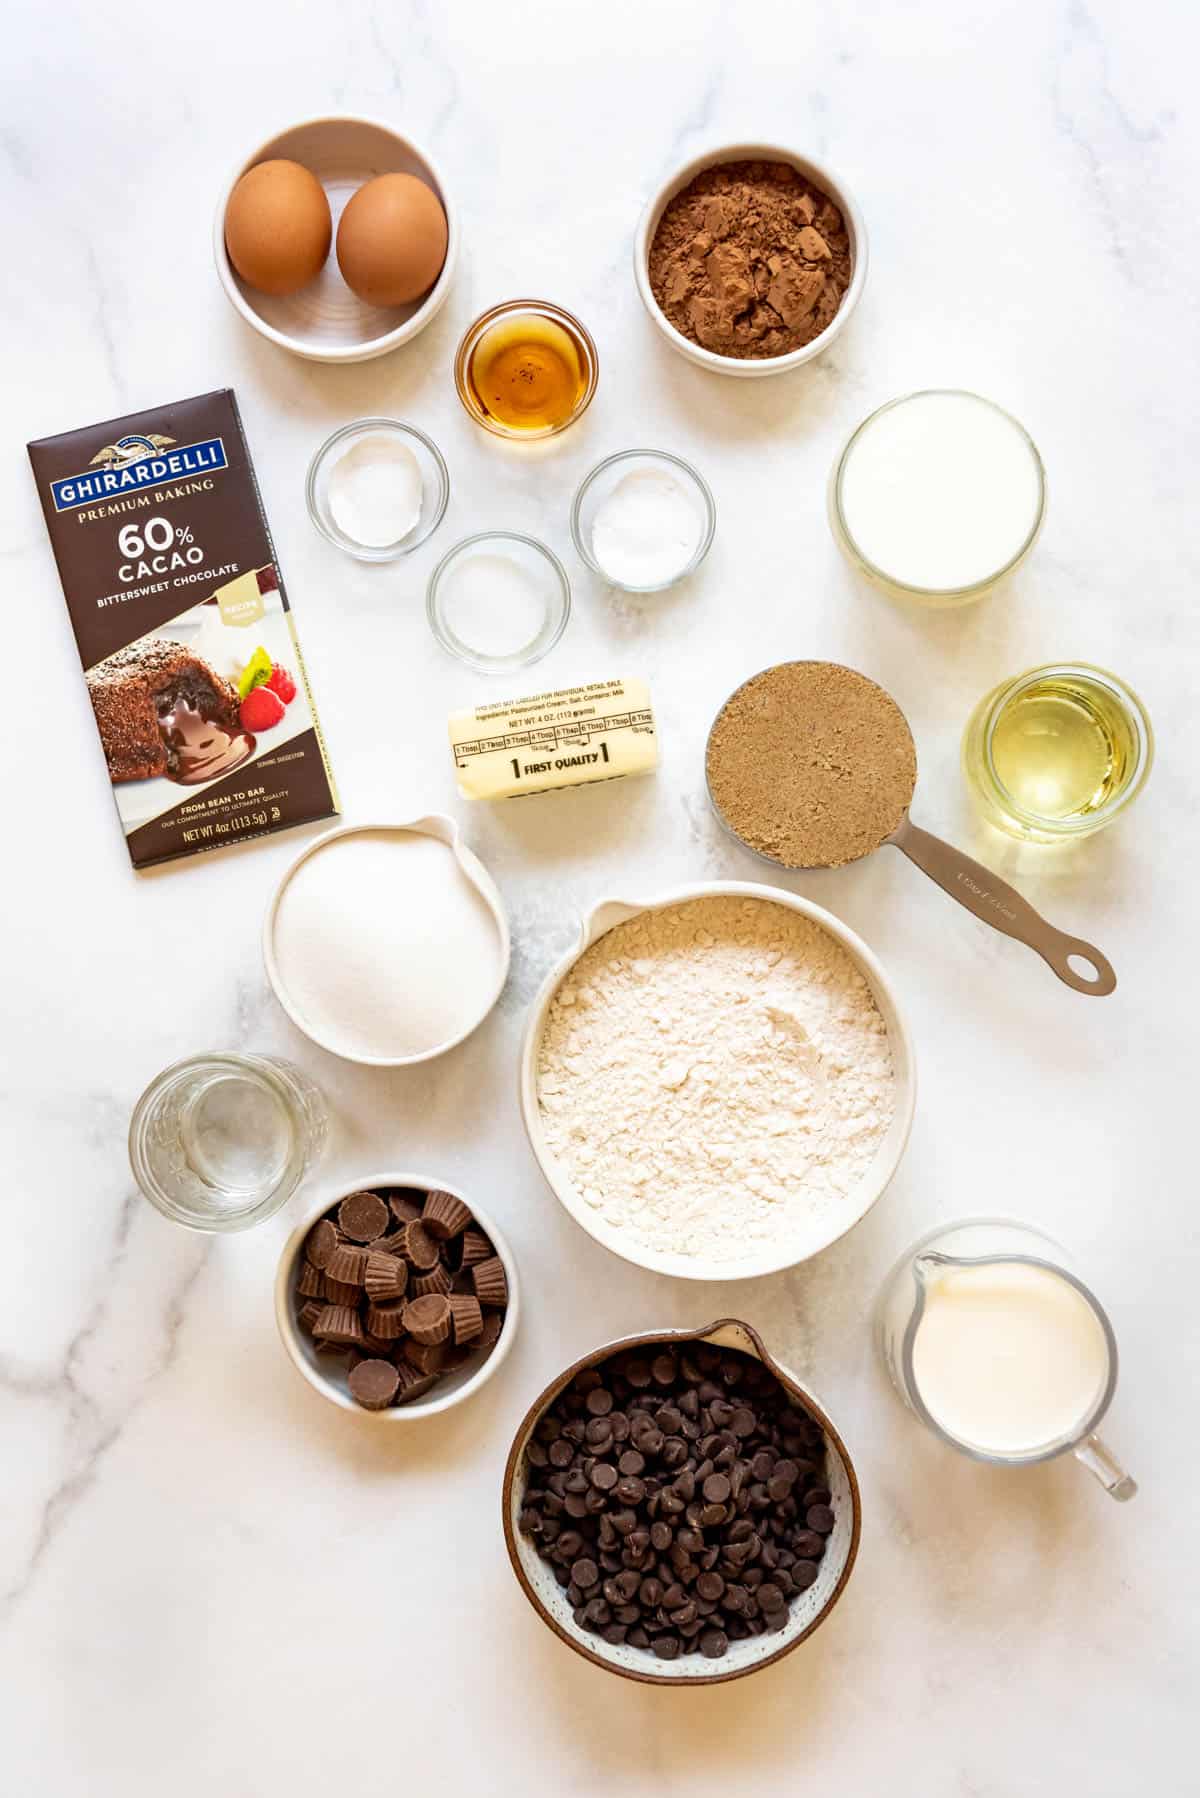
Chocolate Cake & Chocolate Ganache
- Cocoa Powder – Use natural, unsweetened cocoa powder for a milder chocolate flavor of the cake.
- Chocolate – Bittersweet or semisweet chocolate, to be mixed with cocoa powder and boiling water to make a chocolate paste for a rich chocolate-flavored cake!
- Buttermilk – Helps the cake to be fluffy and moist, but also adds depth and tang that balances the sweet flavors.
- Butter – Salted butter is best for this cake to enhance the flavors. If you only have unsalted butter, add a pinch of salt to the cake mix.
- Oil – I’ve used vegetable oil for the cake batter to help it be super moist, but canola oil or even olive oil will work.
- Brown Sugar – Firmly packed brown sugar adds complexity to the flavor of the cake.
- White Sugar – White granulated sugar sweetens the cake layers.
- Eggs – These are important to baking because they help keep the cake moist and contribute to the texture of the crumb.
- Vanilla Extract – I use vanilla in basically all my cakes to add that classic, subtle warm flavor.
- Flour – I’ve used all-purpose flour for this cake, but cake flour will also work.
- Rising Agents – Use both baking soda and baking powder to ensure the cake is fluffy!
- Salt – To enhance the flavors and balance the sweetness in this decadent cake.
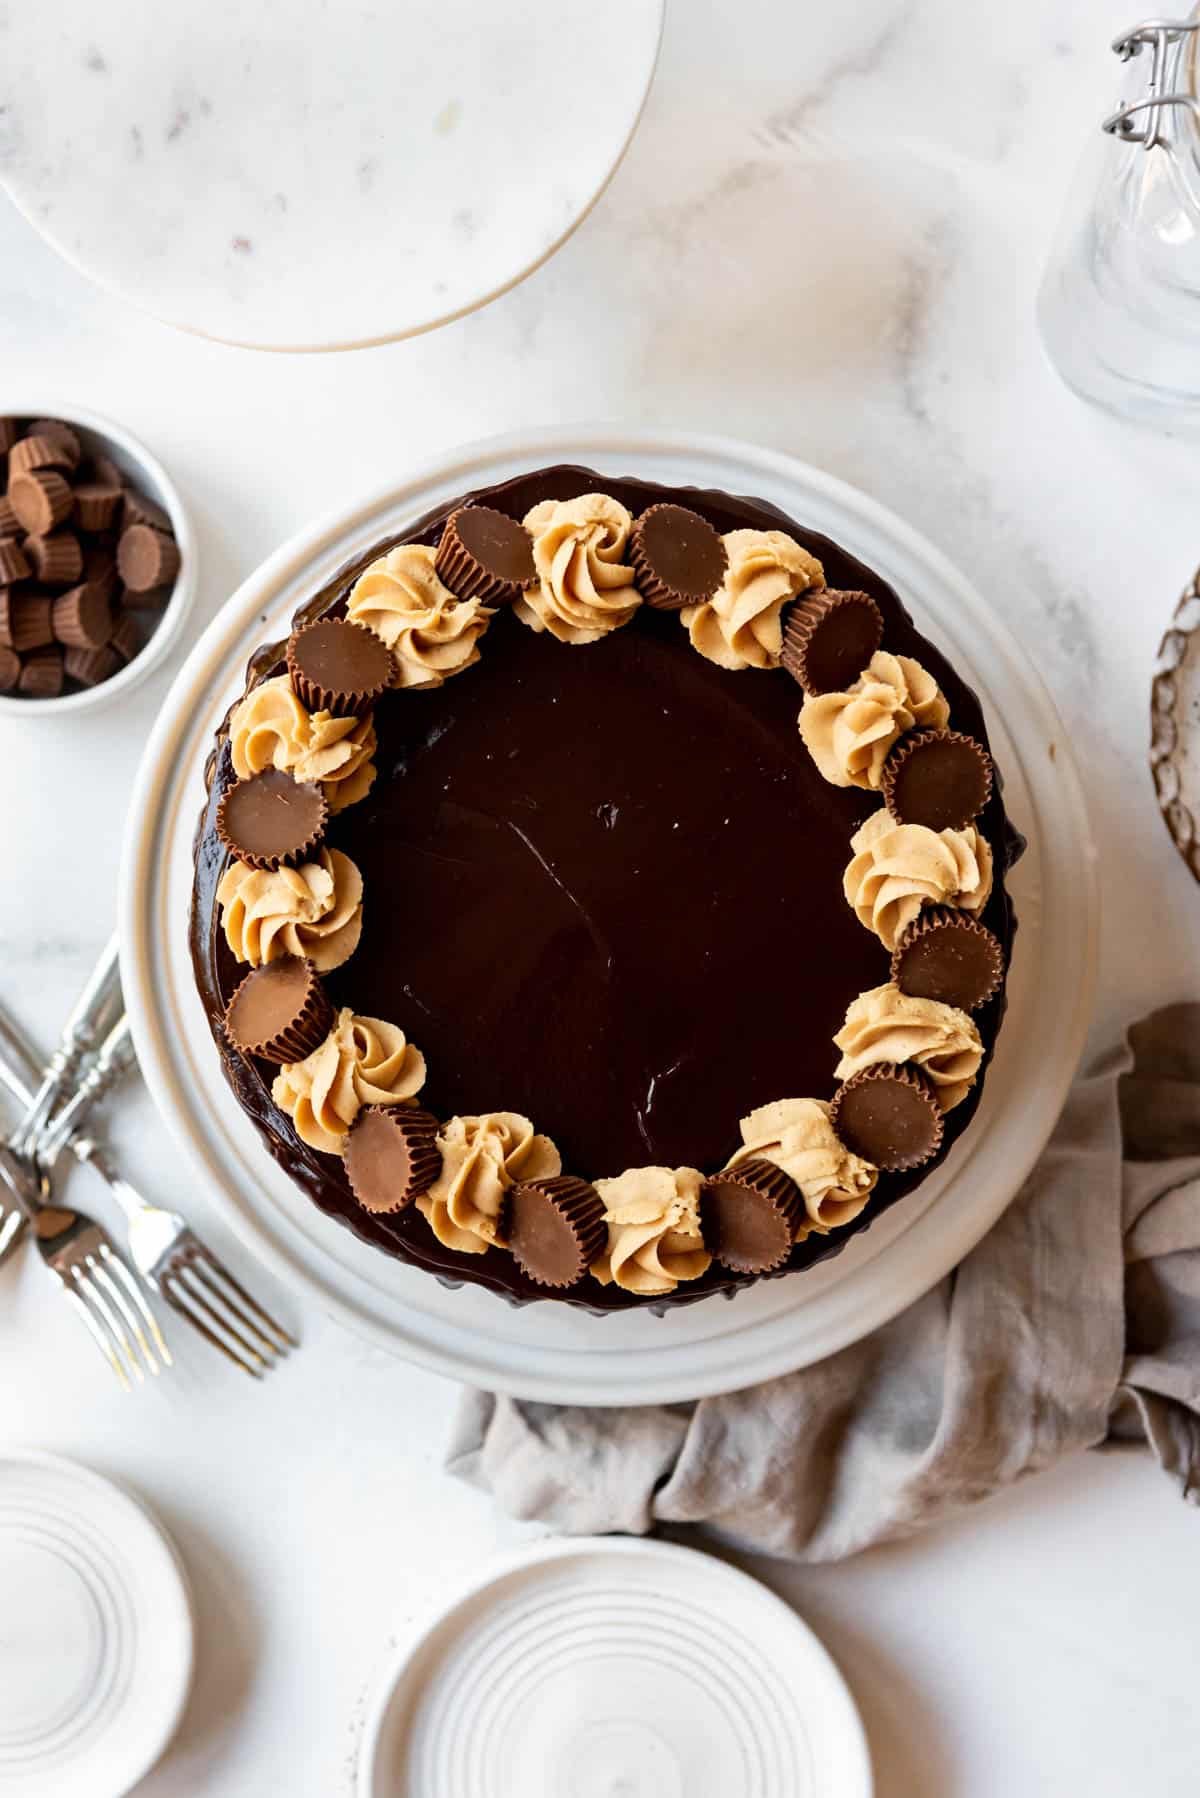
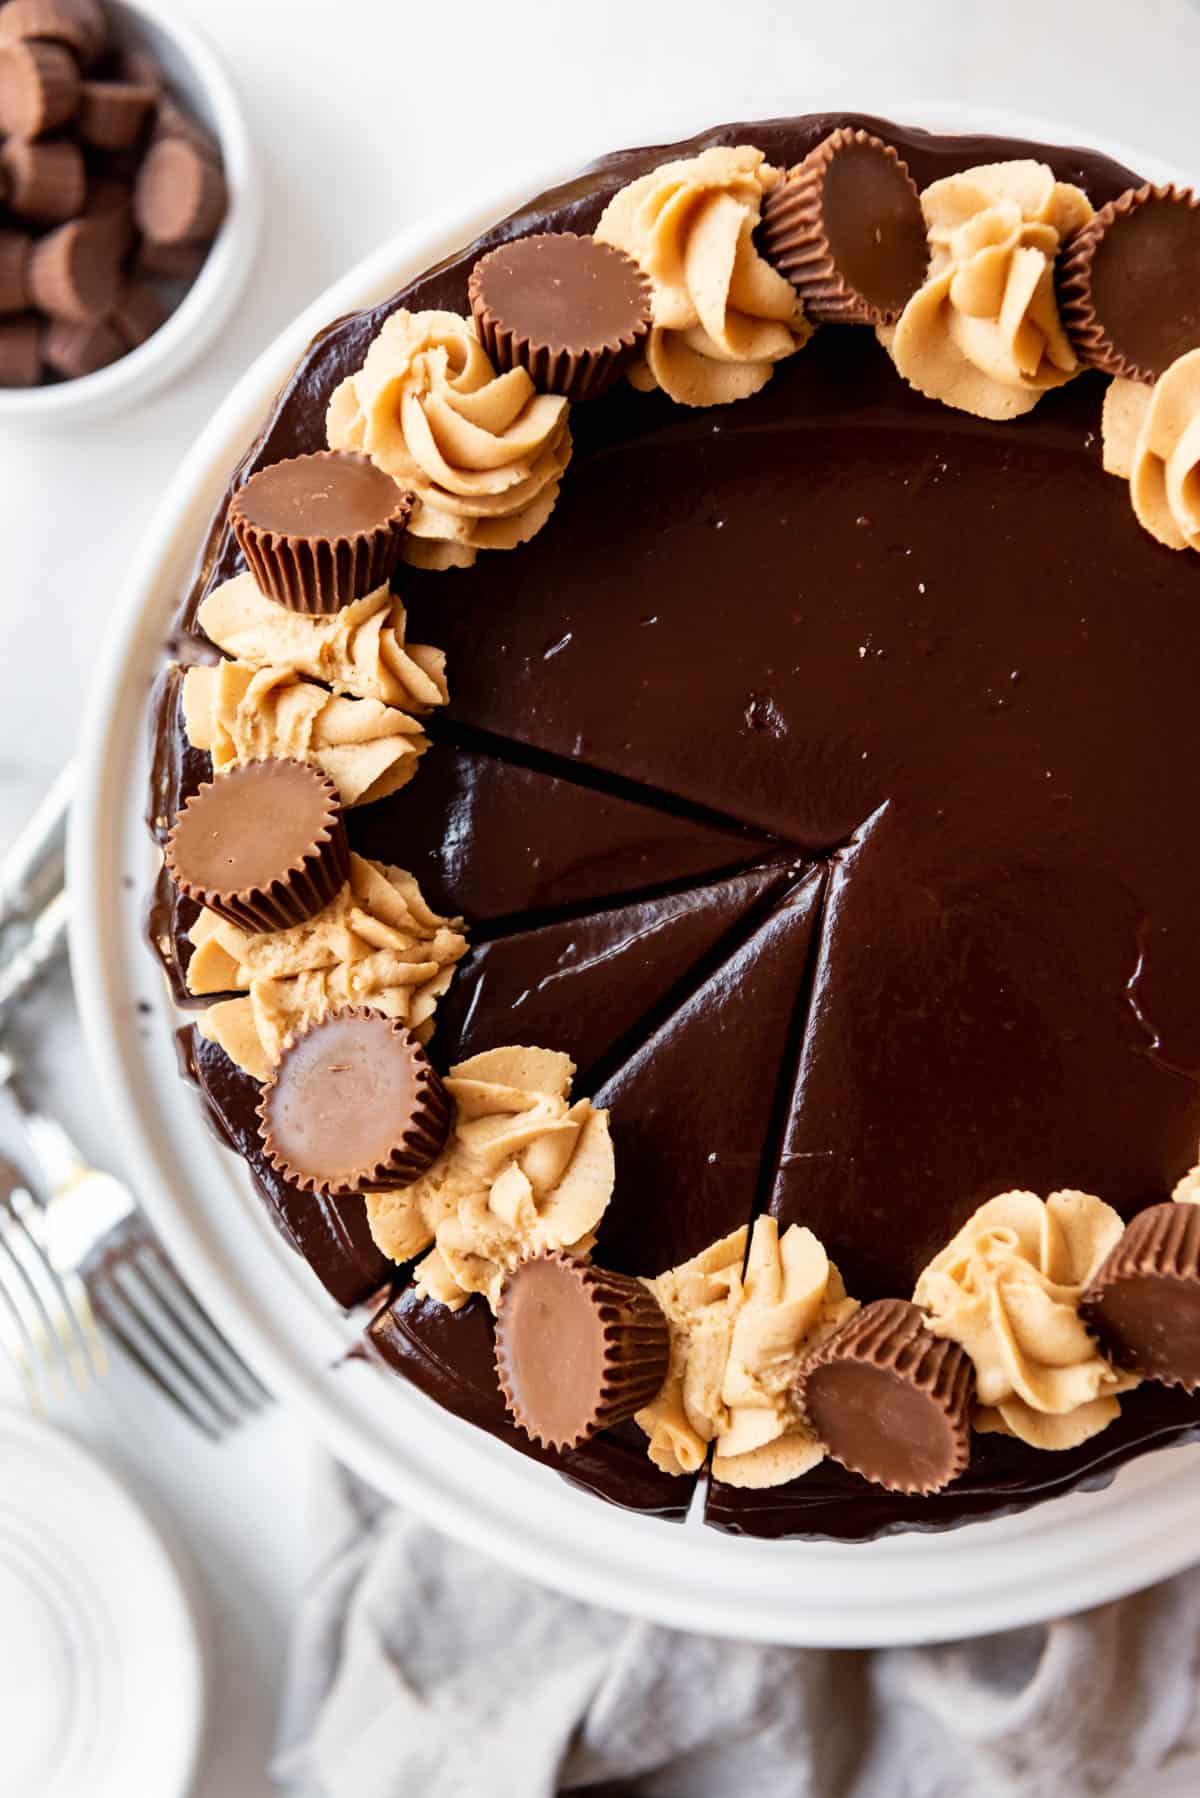
- Reese’s Peanut Butter Cups – Use as many or as few as you’d like to decorate the cake. I’ve used 12 for my design, but you could use less in a cluster in the middle or chop them up and sprinkle them on top if you prefer.
- Chocolate Chips – Use semisweet chocolate chips or chopped semisweet chocolate for the chocolate base for the ganache.
- Heavy Cream – Heavy whipping cream is best for giving chocolate ganache that creamy consistency.
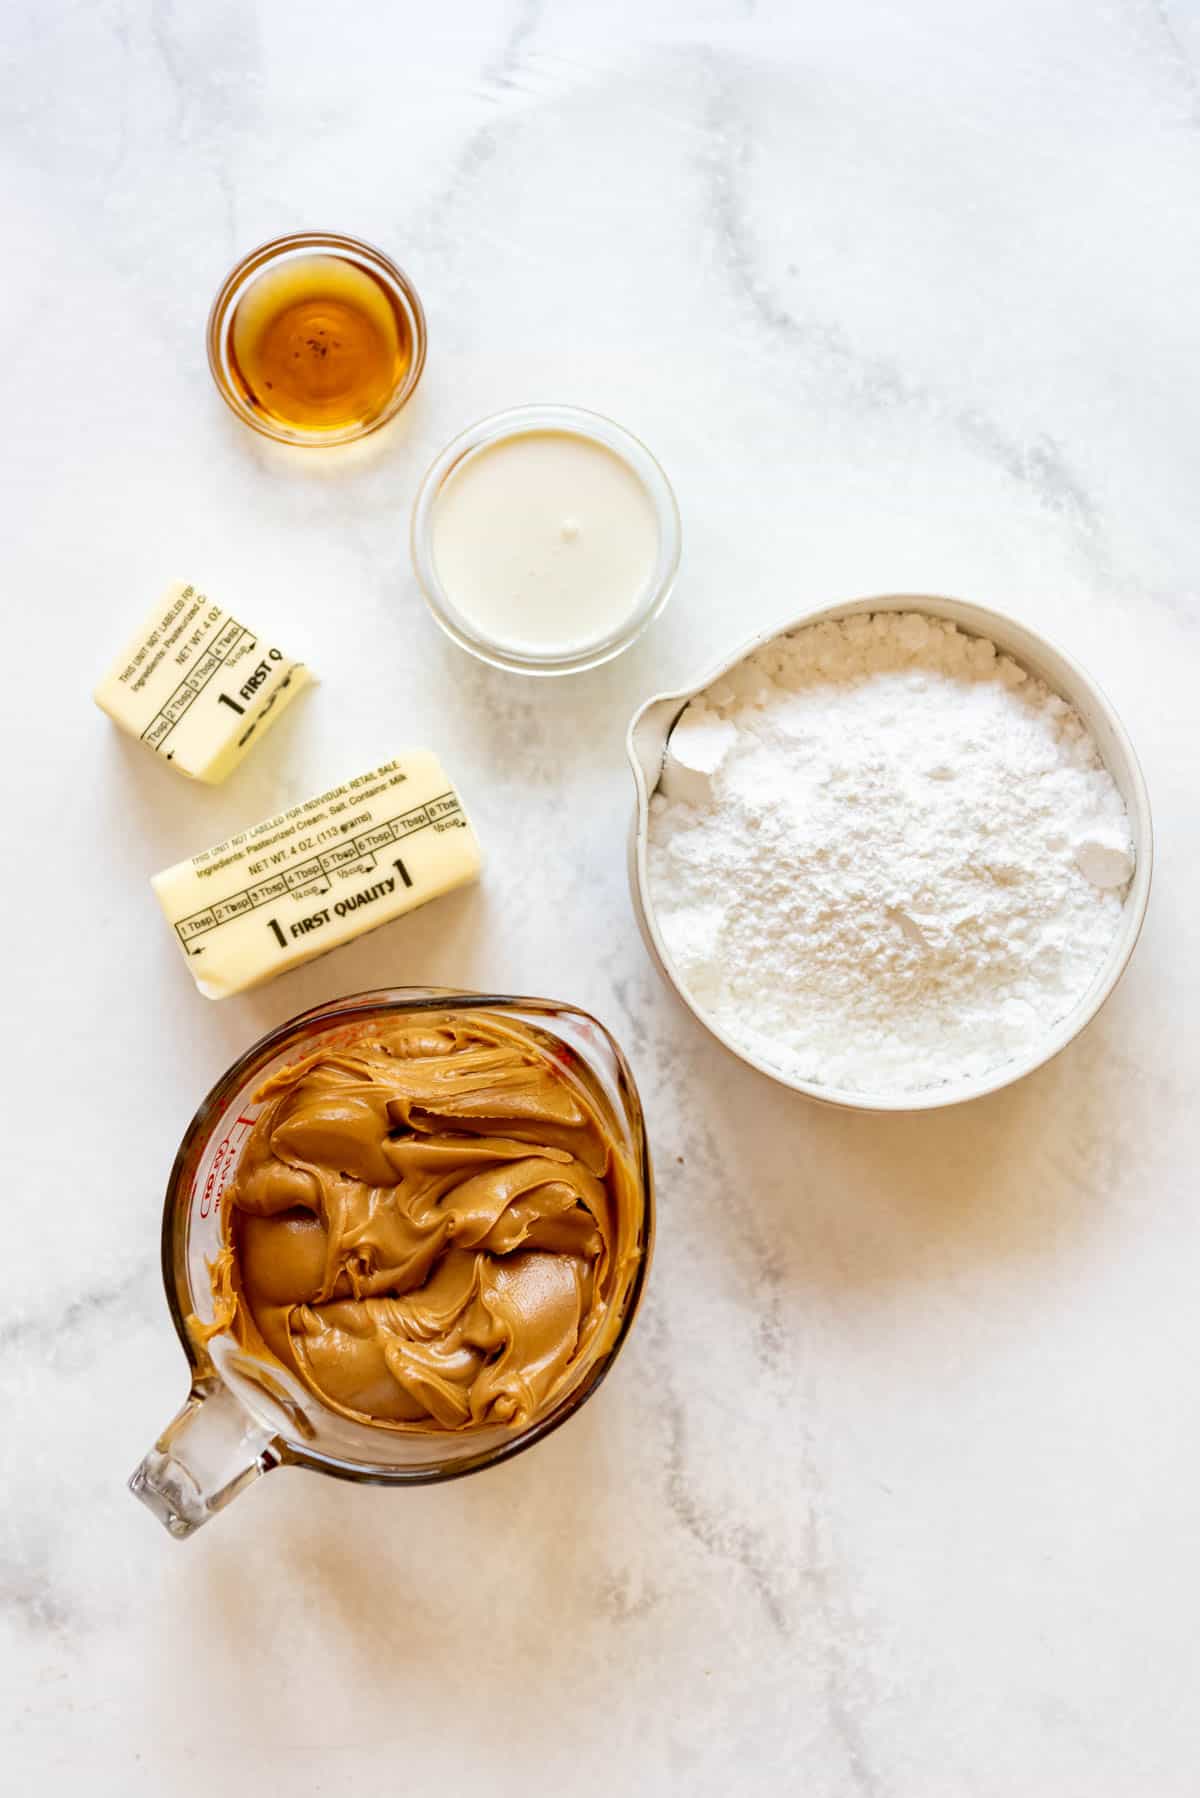
Peanut Butter Frosting
- Butter – Use salted butter to enhance the flavor of the frosting, or add ¼ teaspoon of salt if you’re using unsalted butter.
- Peanut Butter – Creamy peanut butter will work better than natural peanut butter where you have to stir to combine the ground peanuts and oil.
- Powdered Sugar – Makes the frosting sweet and gives it extra substance.
- Vanilla Extract – Adds a subtle sweet flavor that works well with the peanut butter flavor.
- Heavy Cream – You can use heavy whipping cream or even milk to get the frosting to the right consistency.
How to Make This Chocolate Peanut Butter Cake Recipe
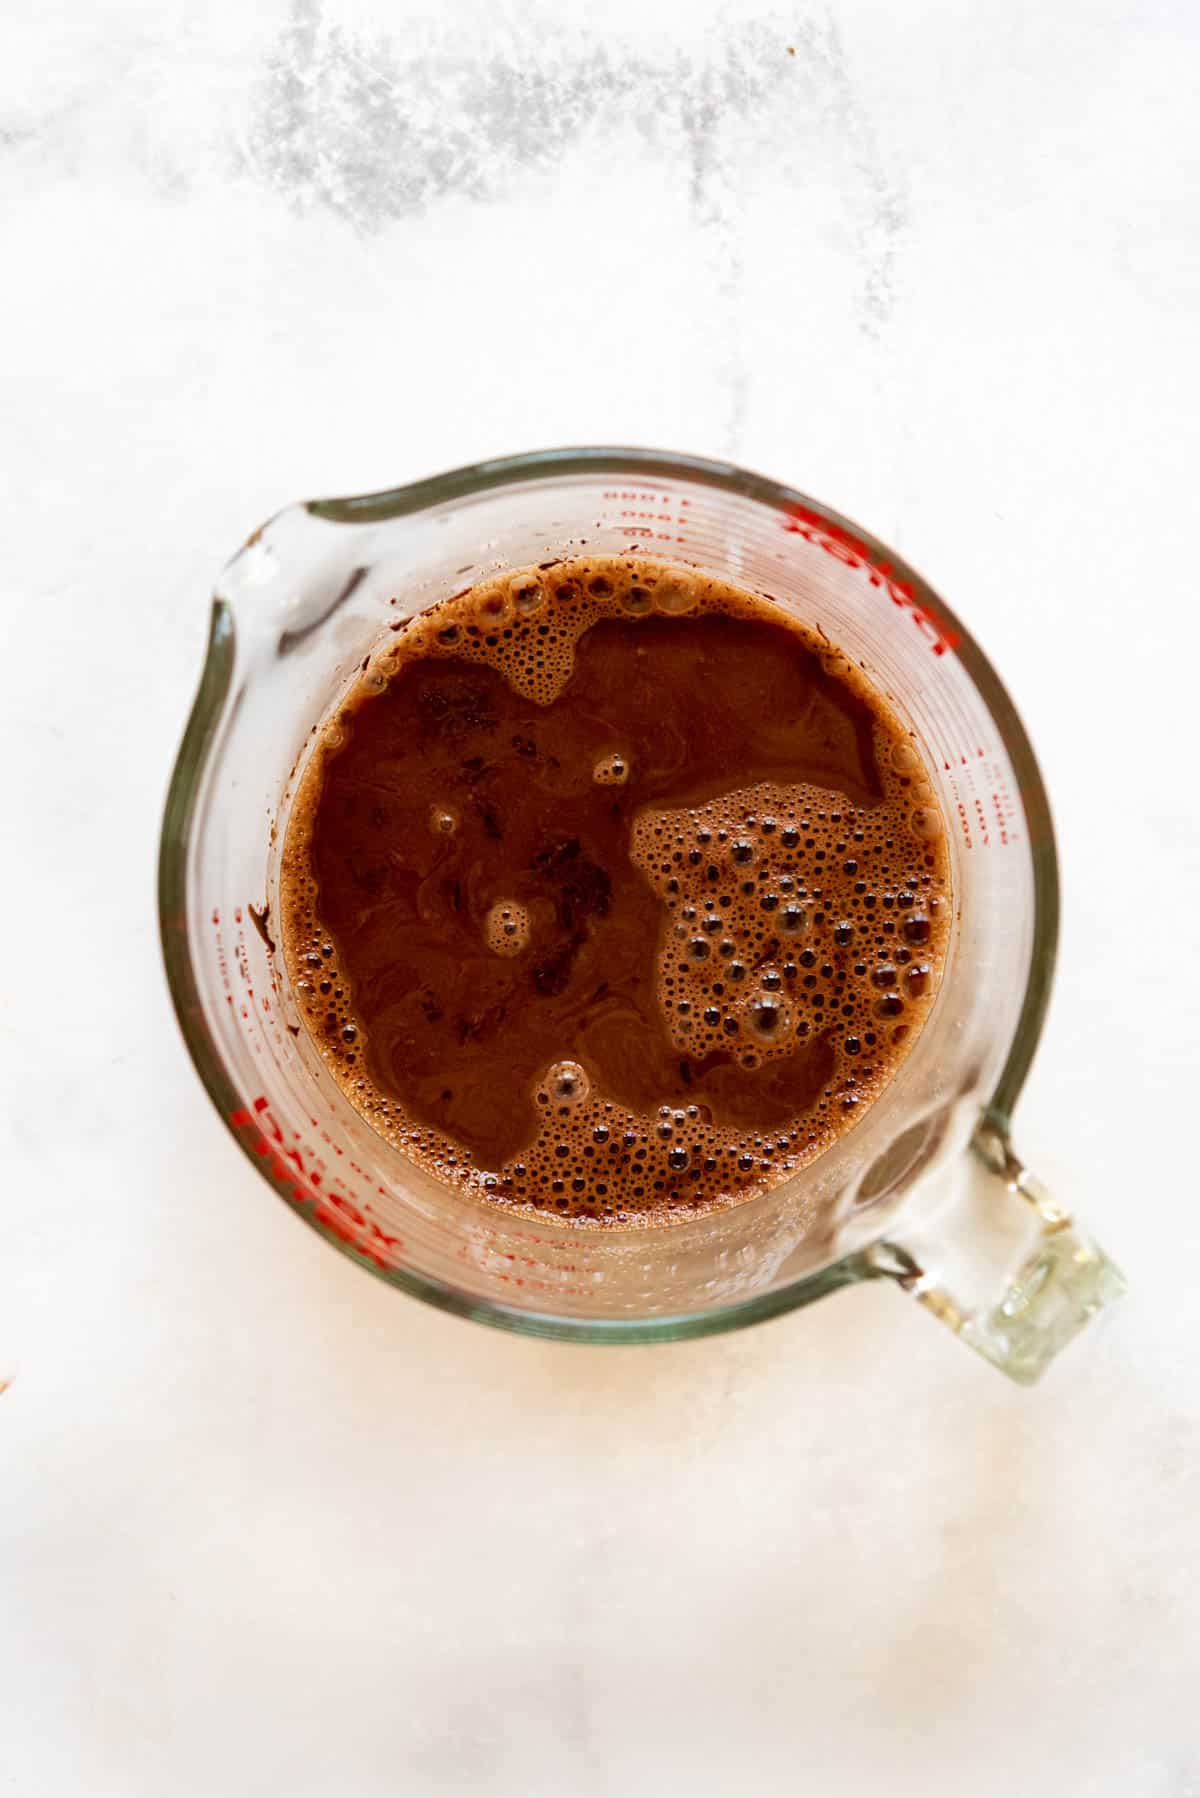
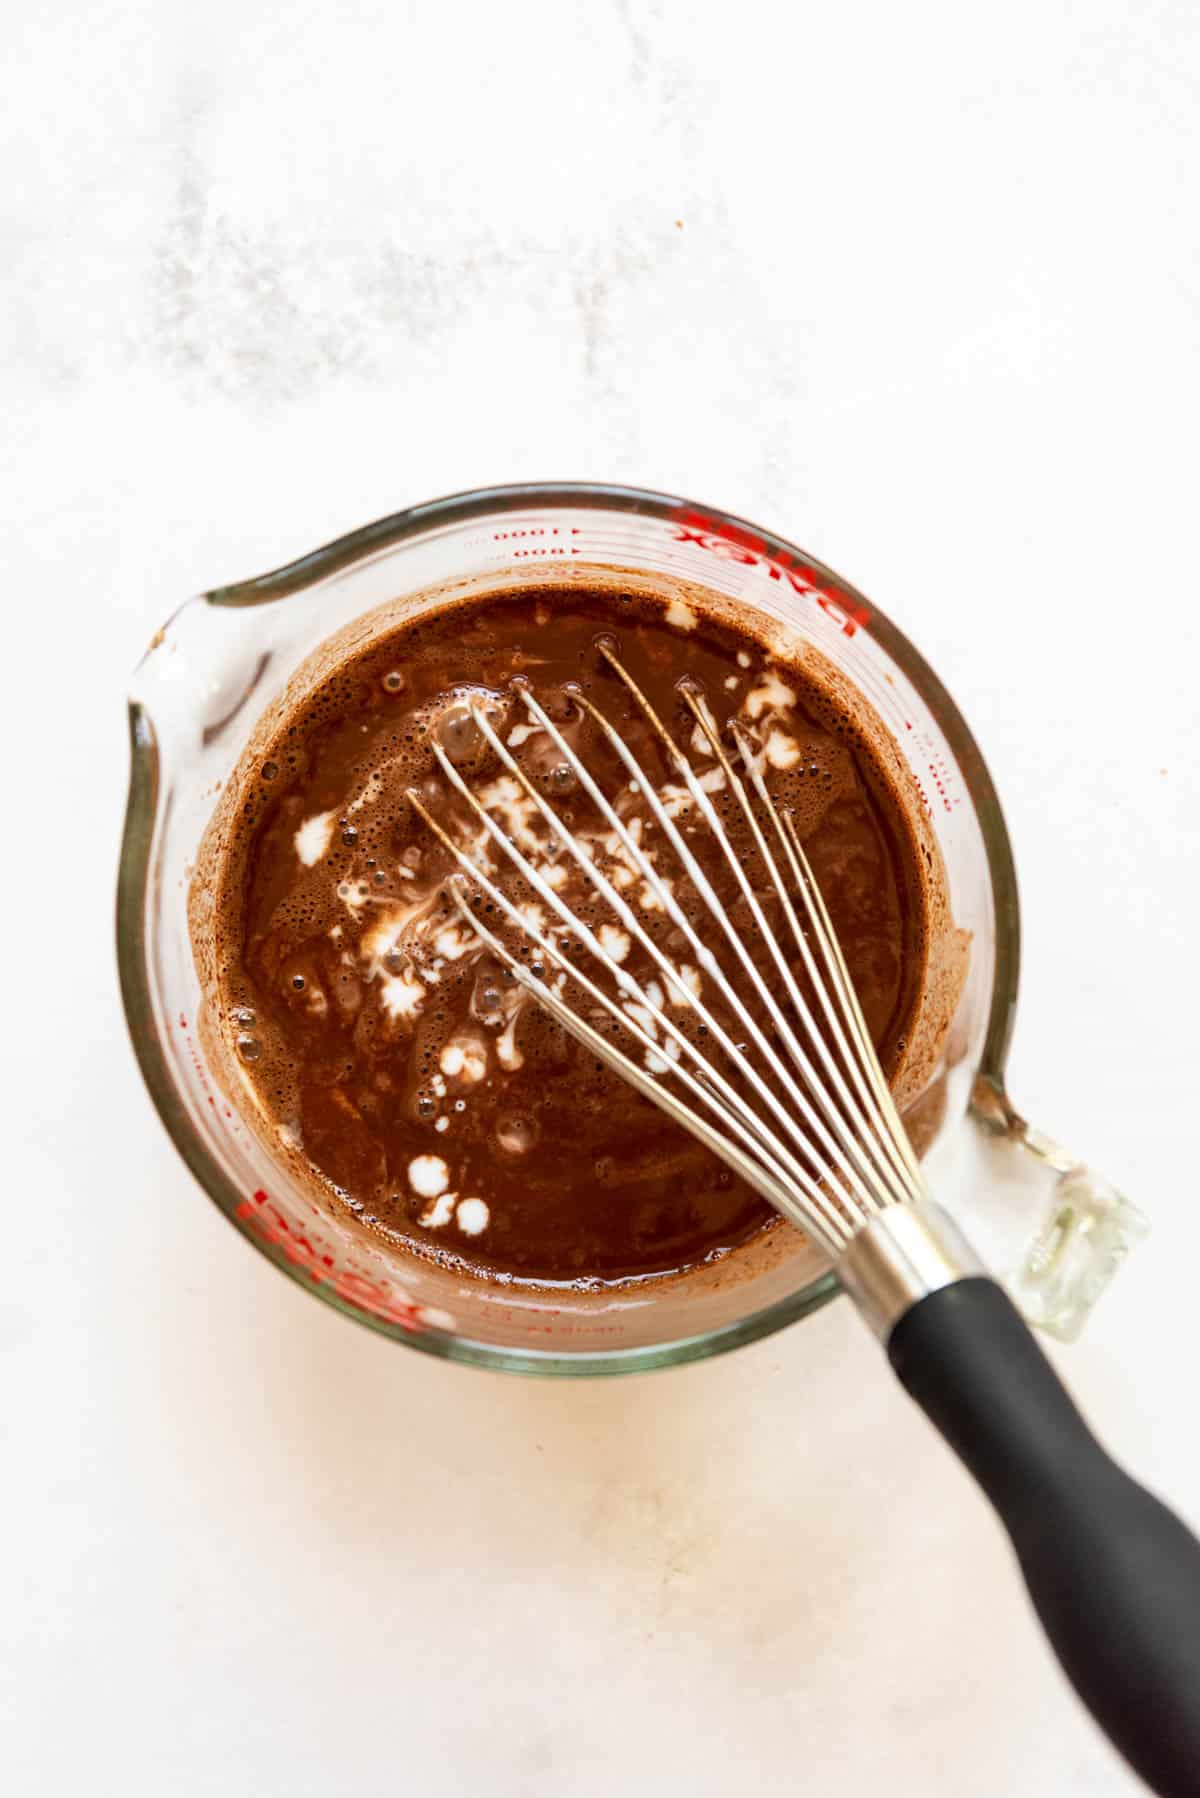
- Make the chocolate mixture. Combine the cocoa powder and finely chopped chocolate in a large bowl. Pour the boiling water over the chocolate and stir until the chocolate is completely melted. Let this cool for 5 minutes.
- Add buttermilk. Once slightly cooled, add the buttermilk to the chocolate mixture and whisk to combine.
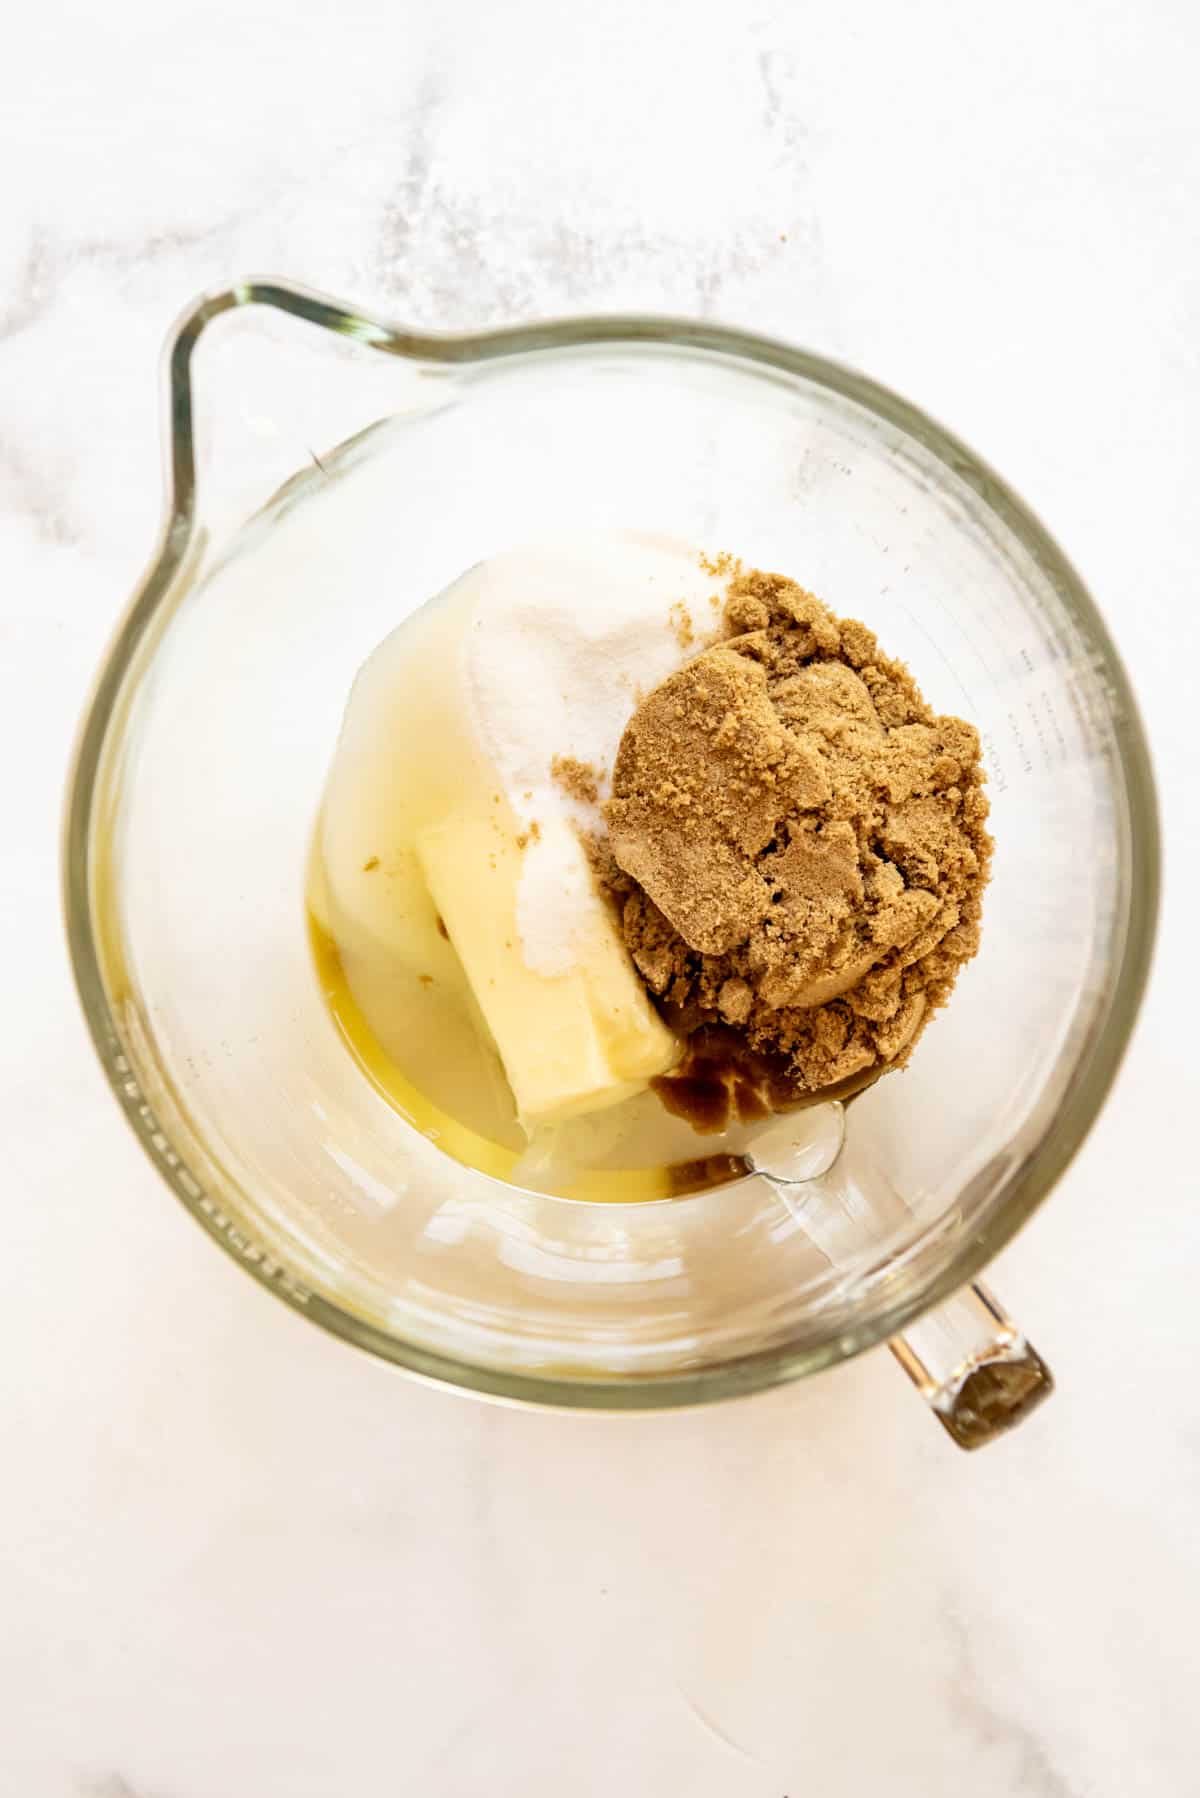
- Beat butter, oil, and sugars. In the large bowl of a stand mixer, beat the butter and oil together for 1 minute. Add the dark brown and granulated sugars and beat for another 2-3 minutes, until light and creamy.
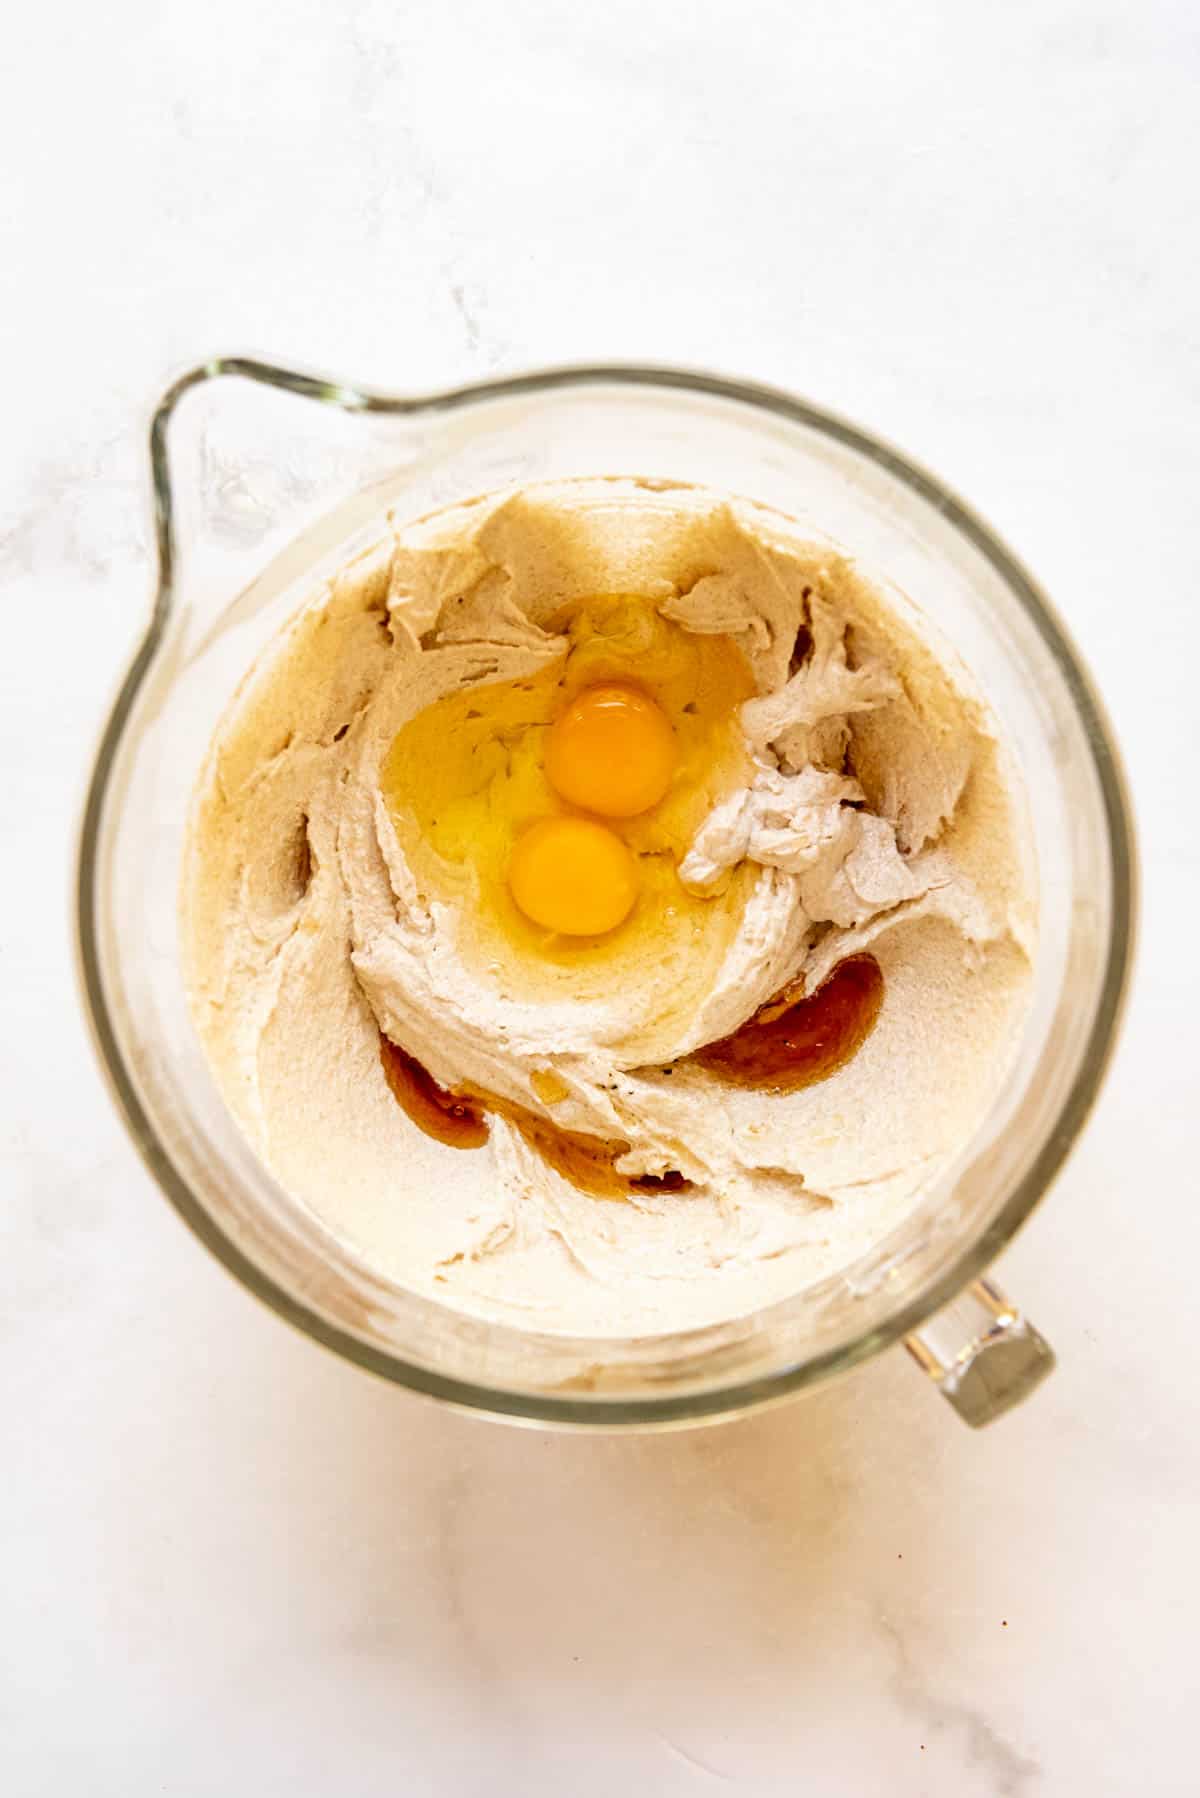
- Add eggs and vanilla. Scrape down the sides of the bowl and add in the eggs, one at a time, beating well after each addition and scraping down the sides of the bowl. Add the vanilla extract.
- Add some dry ingredients. In a separate bowl, sift together the flour, baking soda, and salt. Add half of this to the batter and mix on low speed just until combined.
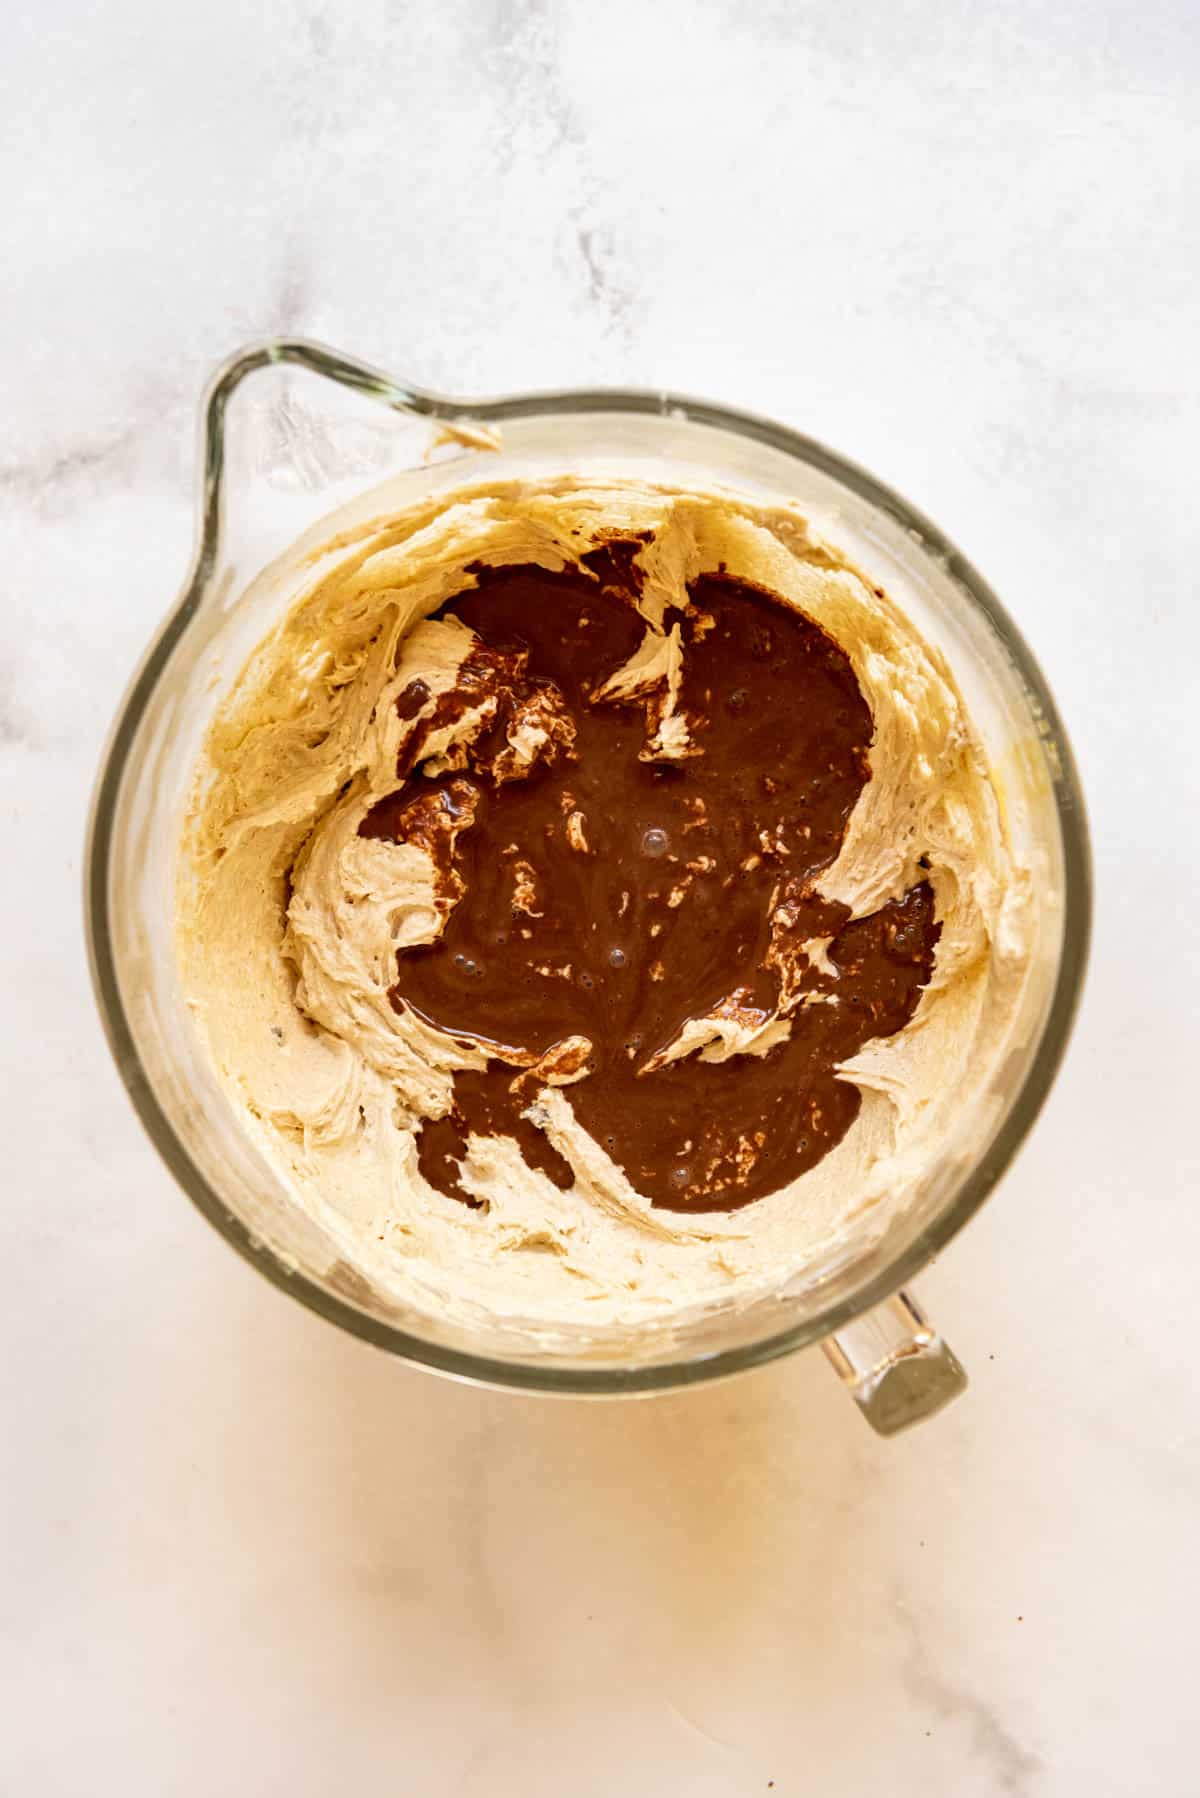
- Add half the chocolate mixture. Pour in half of the chocolate-buttermilk mixture and mix again, just until combined.

- Combine remaining mixtures. Repeat with the flour and the remaining chocolate-buttermilk mixture, scraping down the sides of the bowl between additions, until everything is incorporated.
- Bake. Divide the batter between the two prepared cake pans and bake for 20-24 minutes, or until a toothpick or cake tester comes out clean. Be sure not to overbake.
- Cool. Transfer the cakes to wire racks and allow them to cool completely before assembling the cake with frosting.
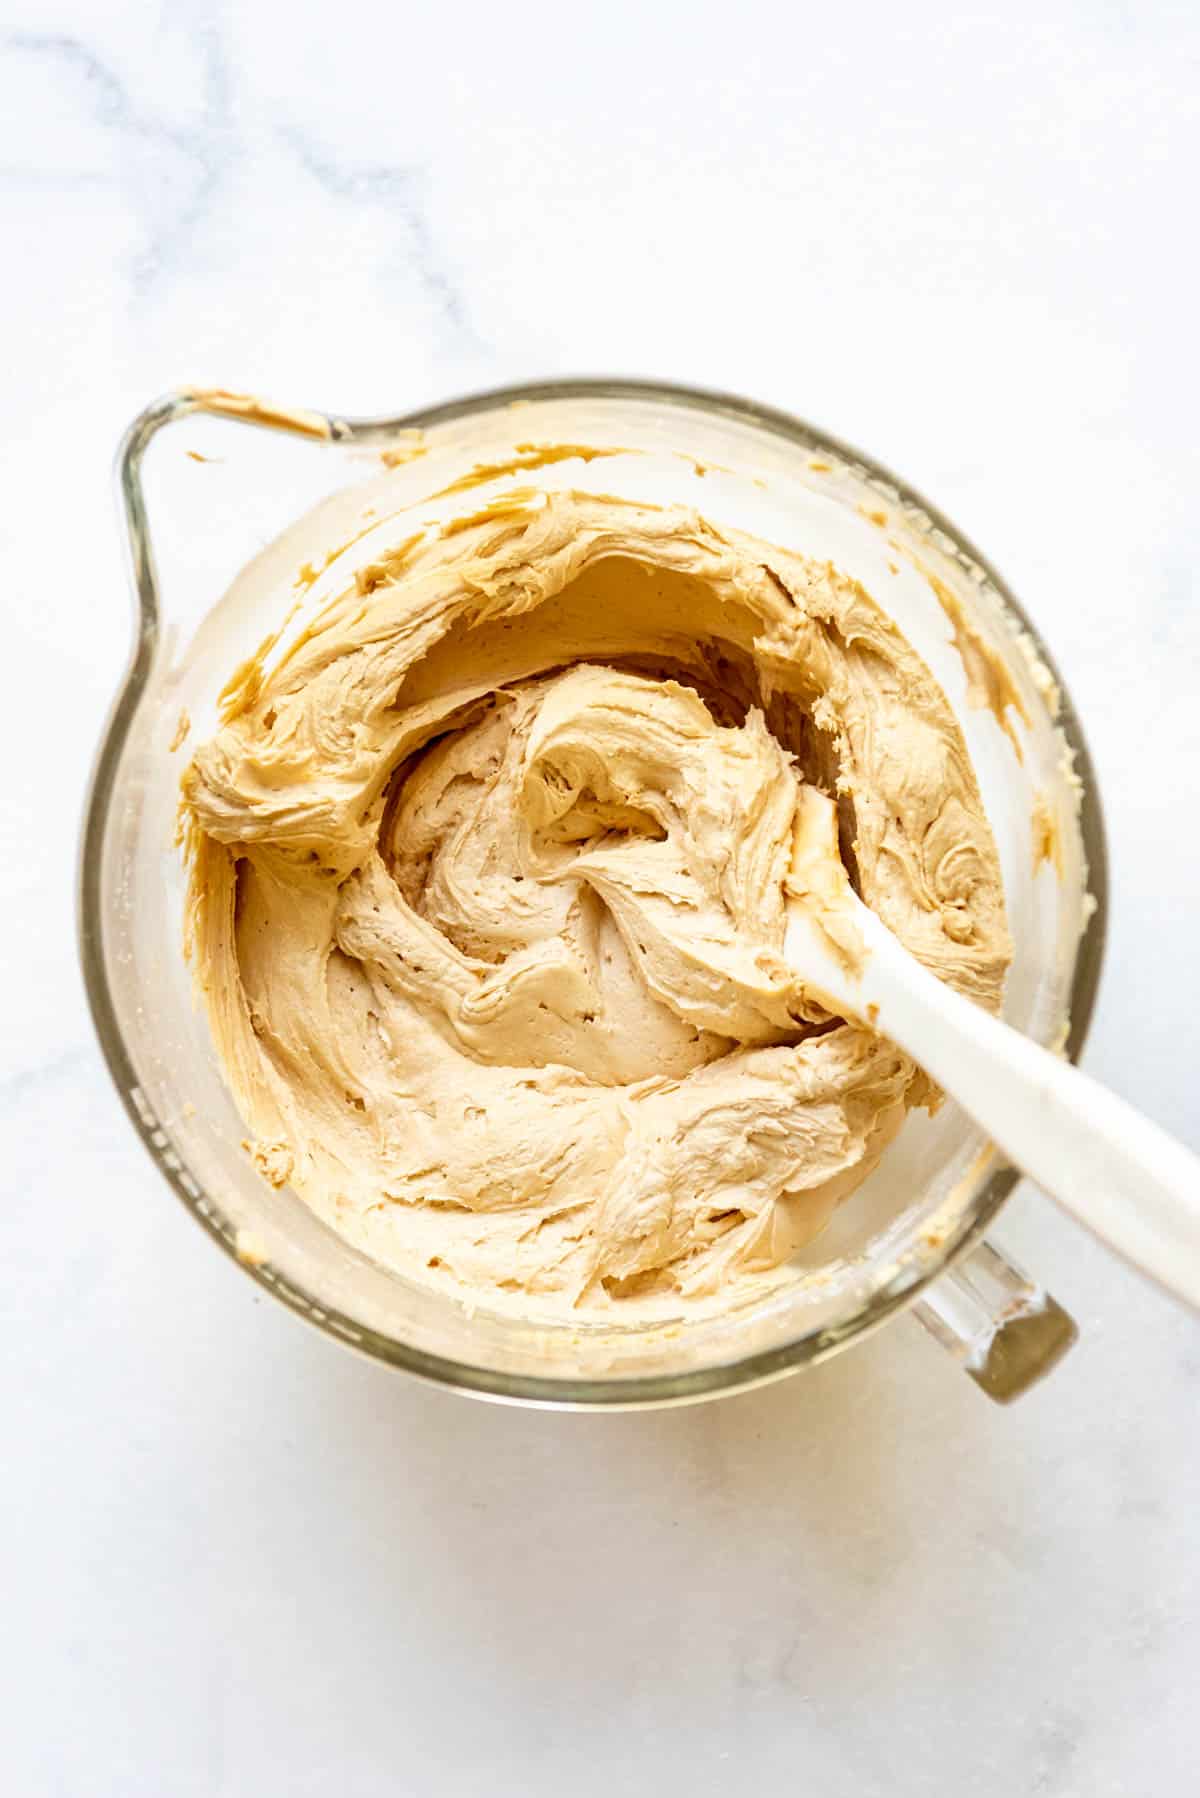
- Cream peanut butter. Beat the butter and peanut butter in a large bowl.
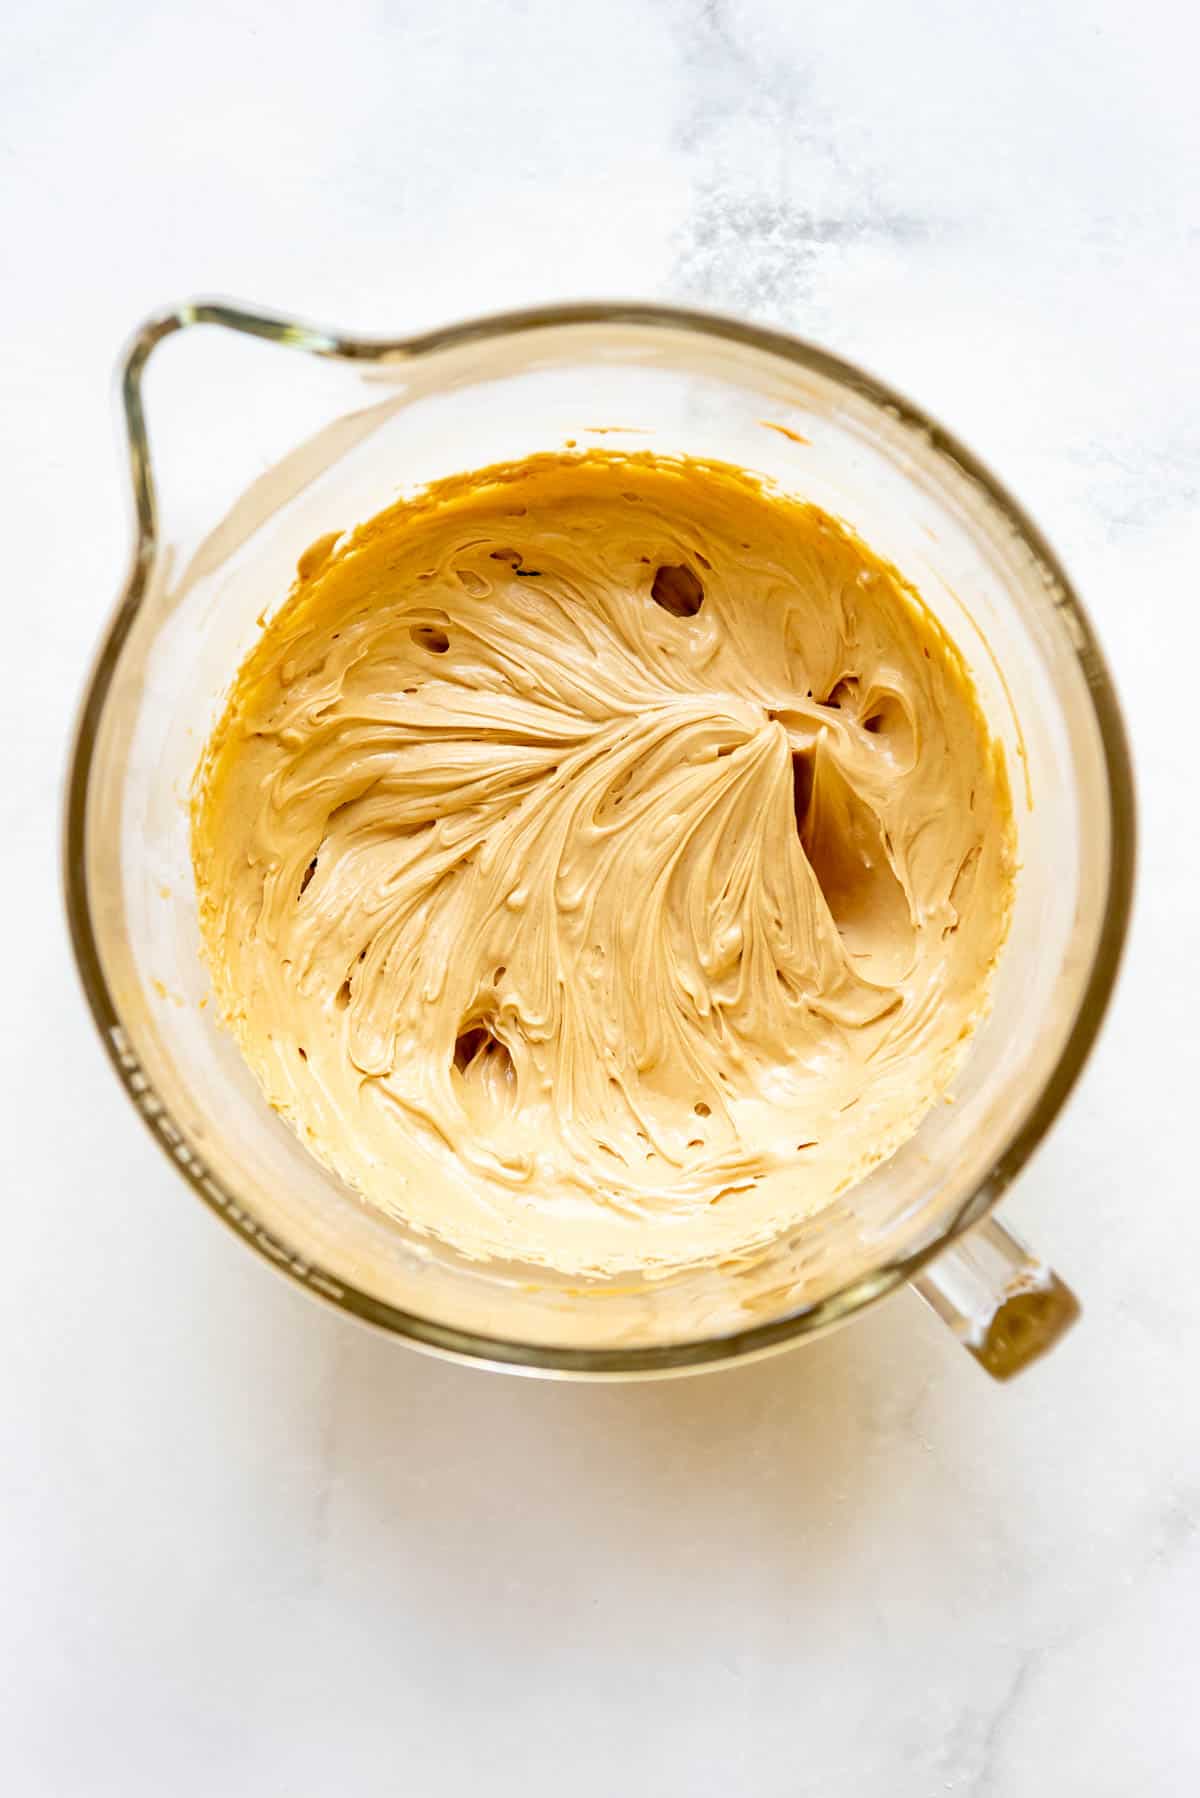
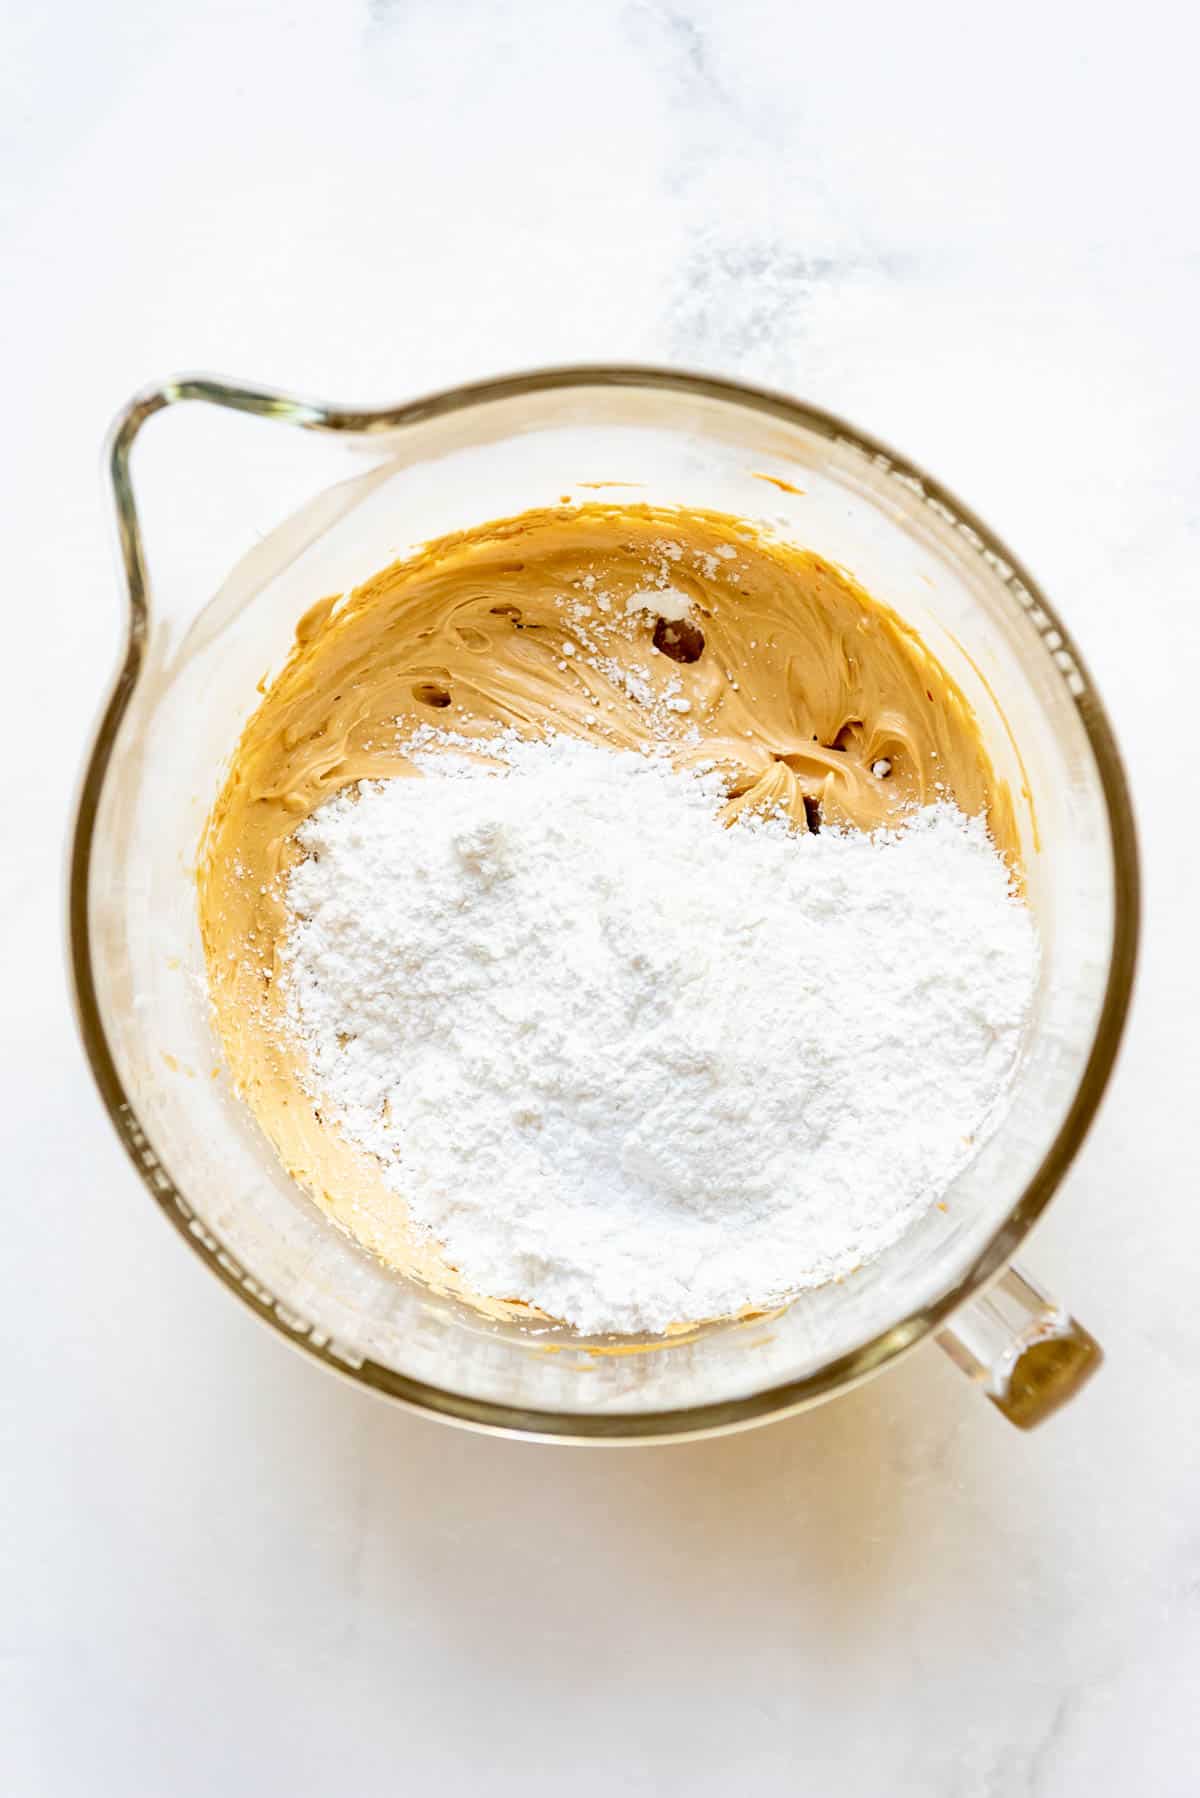
- Add remaining ingredients. Add powdered sugar, vanilla, and heavy cream.
- Cream until smooth. Cream all the ingredients until smooth. Add more cream or milk to reach the desired consistency.
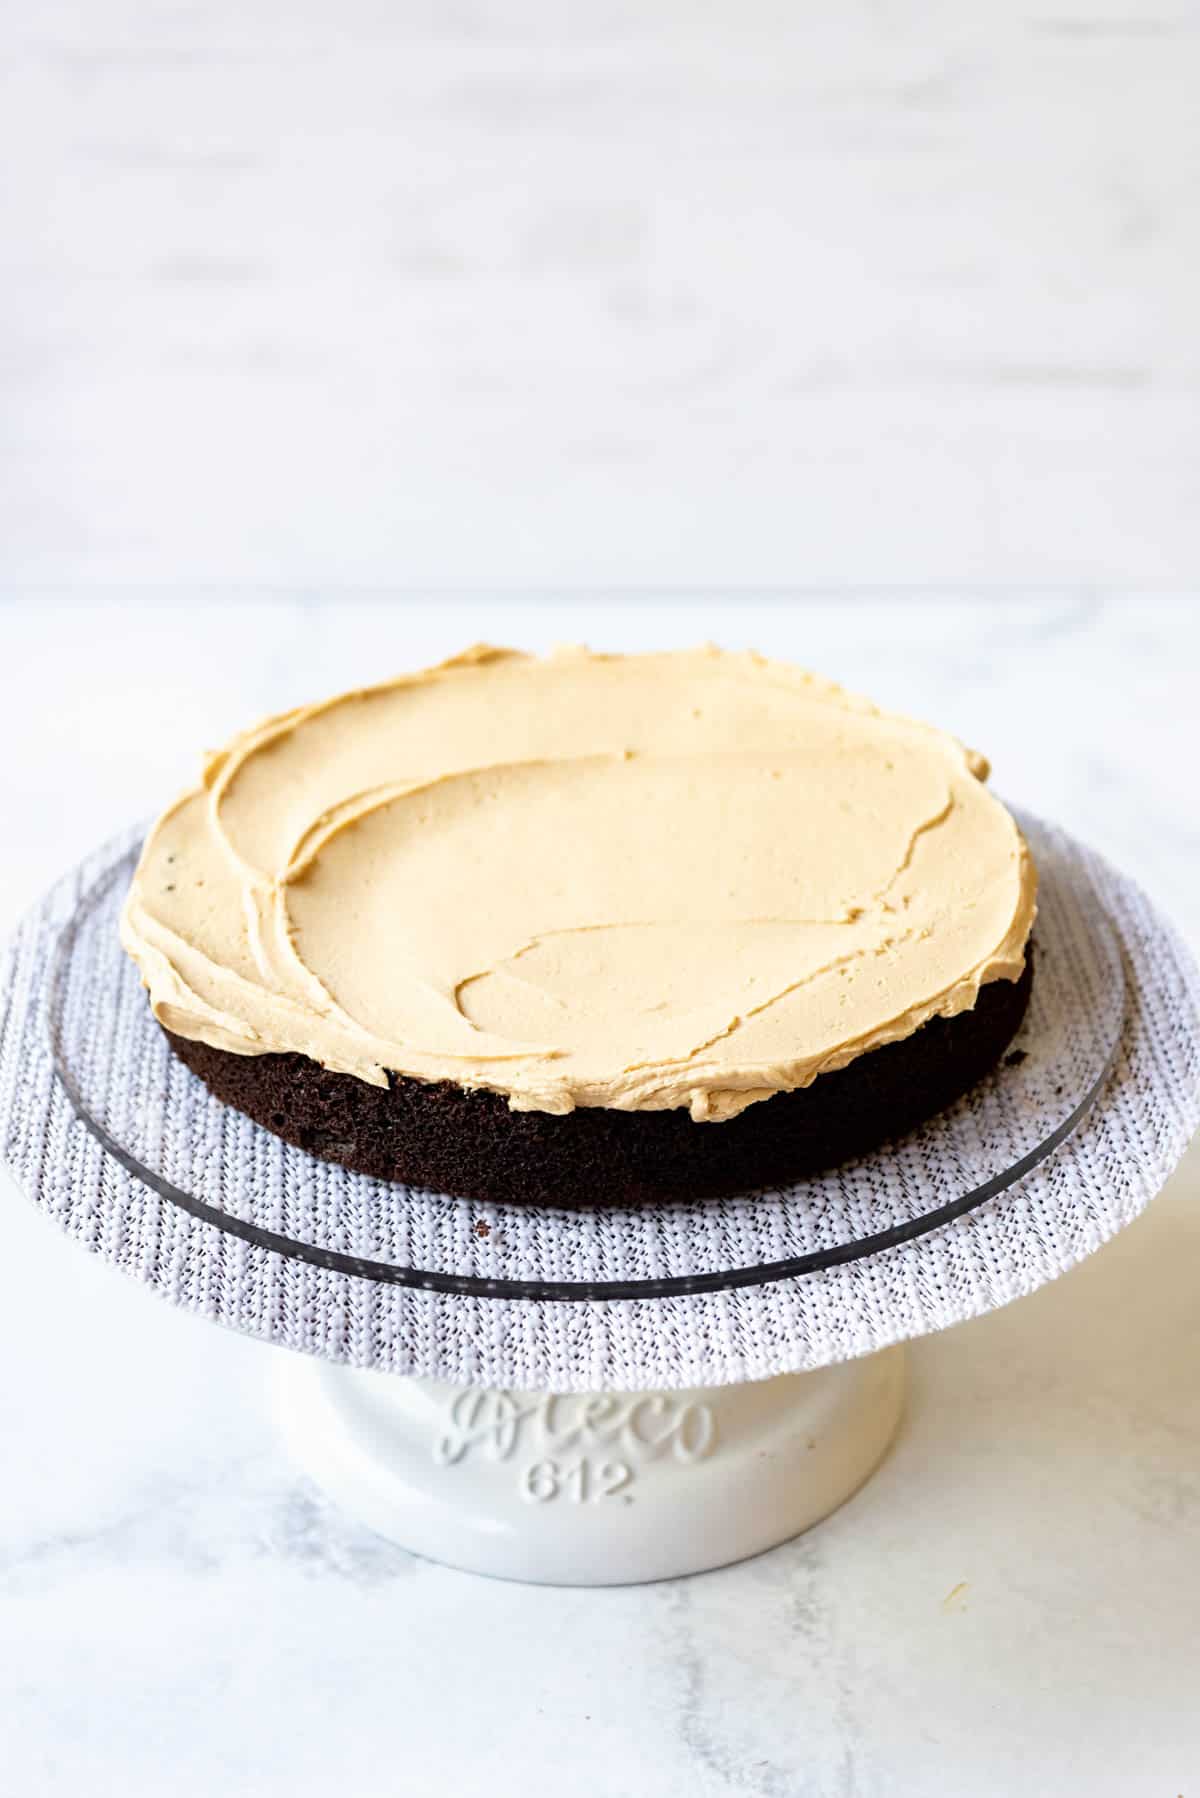
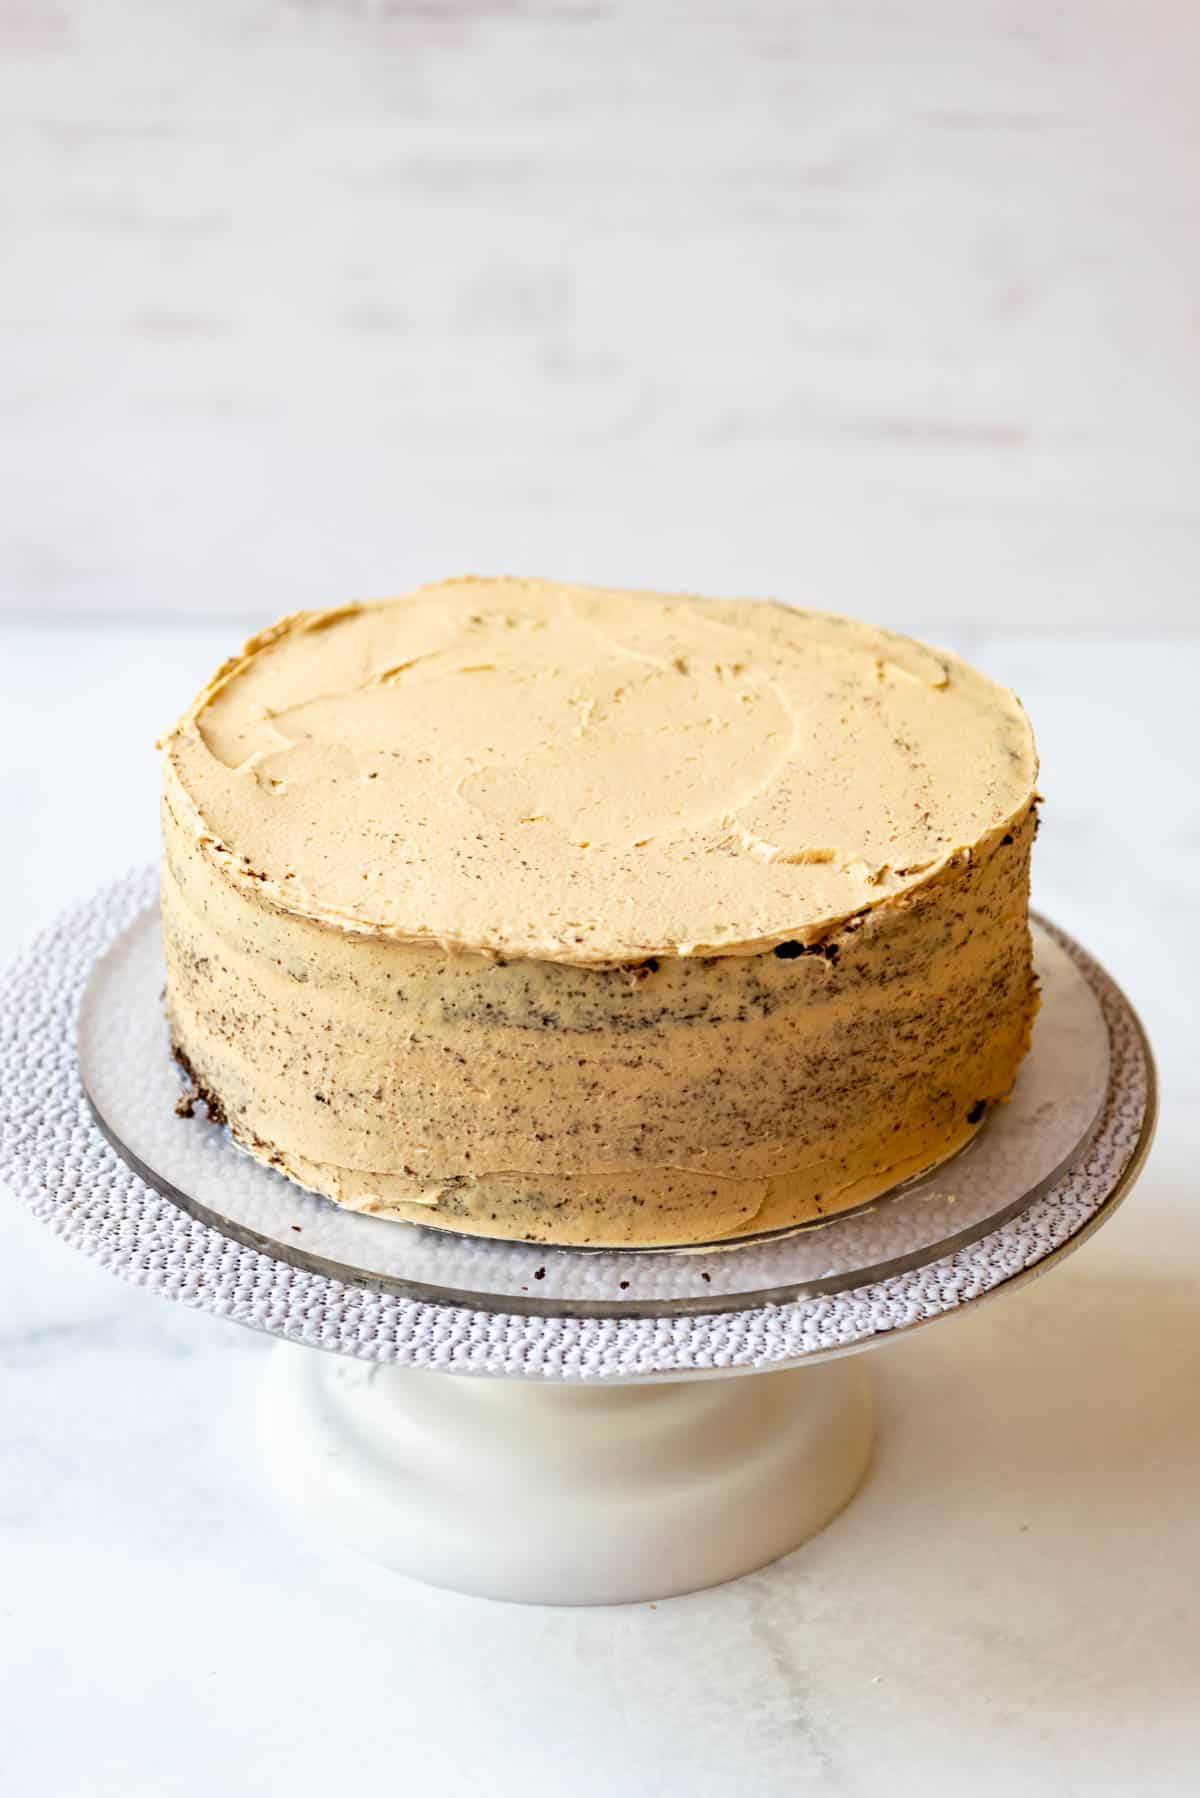
- Layer and frost. Once the cake has completely cooled, it can be assembled. Place one cake layer on a cake stand or serving plate, and cover it generously with an even layer of peanut butter frosting.
- Crumb coat. Repeat with the second and third layers, then finish by frosting around the sides of the cake with a thin layer of frosting for a crumb coat. This helps to seal in the crumbs for a nicer finish. Set the crumb coat by placing the cake in the freezer for 20 minutes.
- Finish frosting. Once the crumb coat is set to the touch, finish frosting the cake with a clean layer of frosting on the top and sides. Make sure to reserve some of the frosting to make decorative swirls on top if you want them.
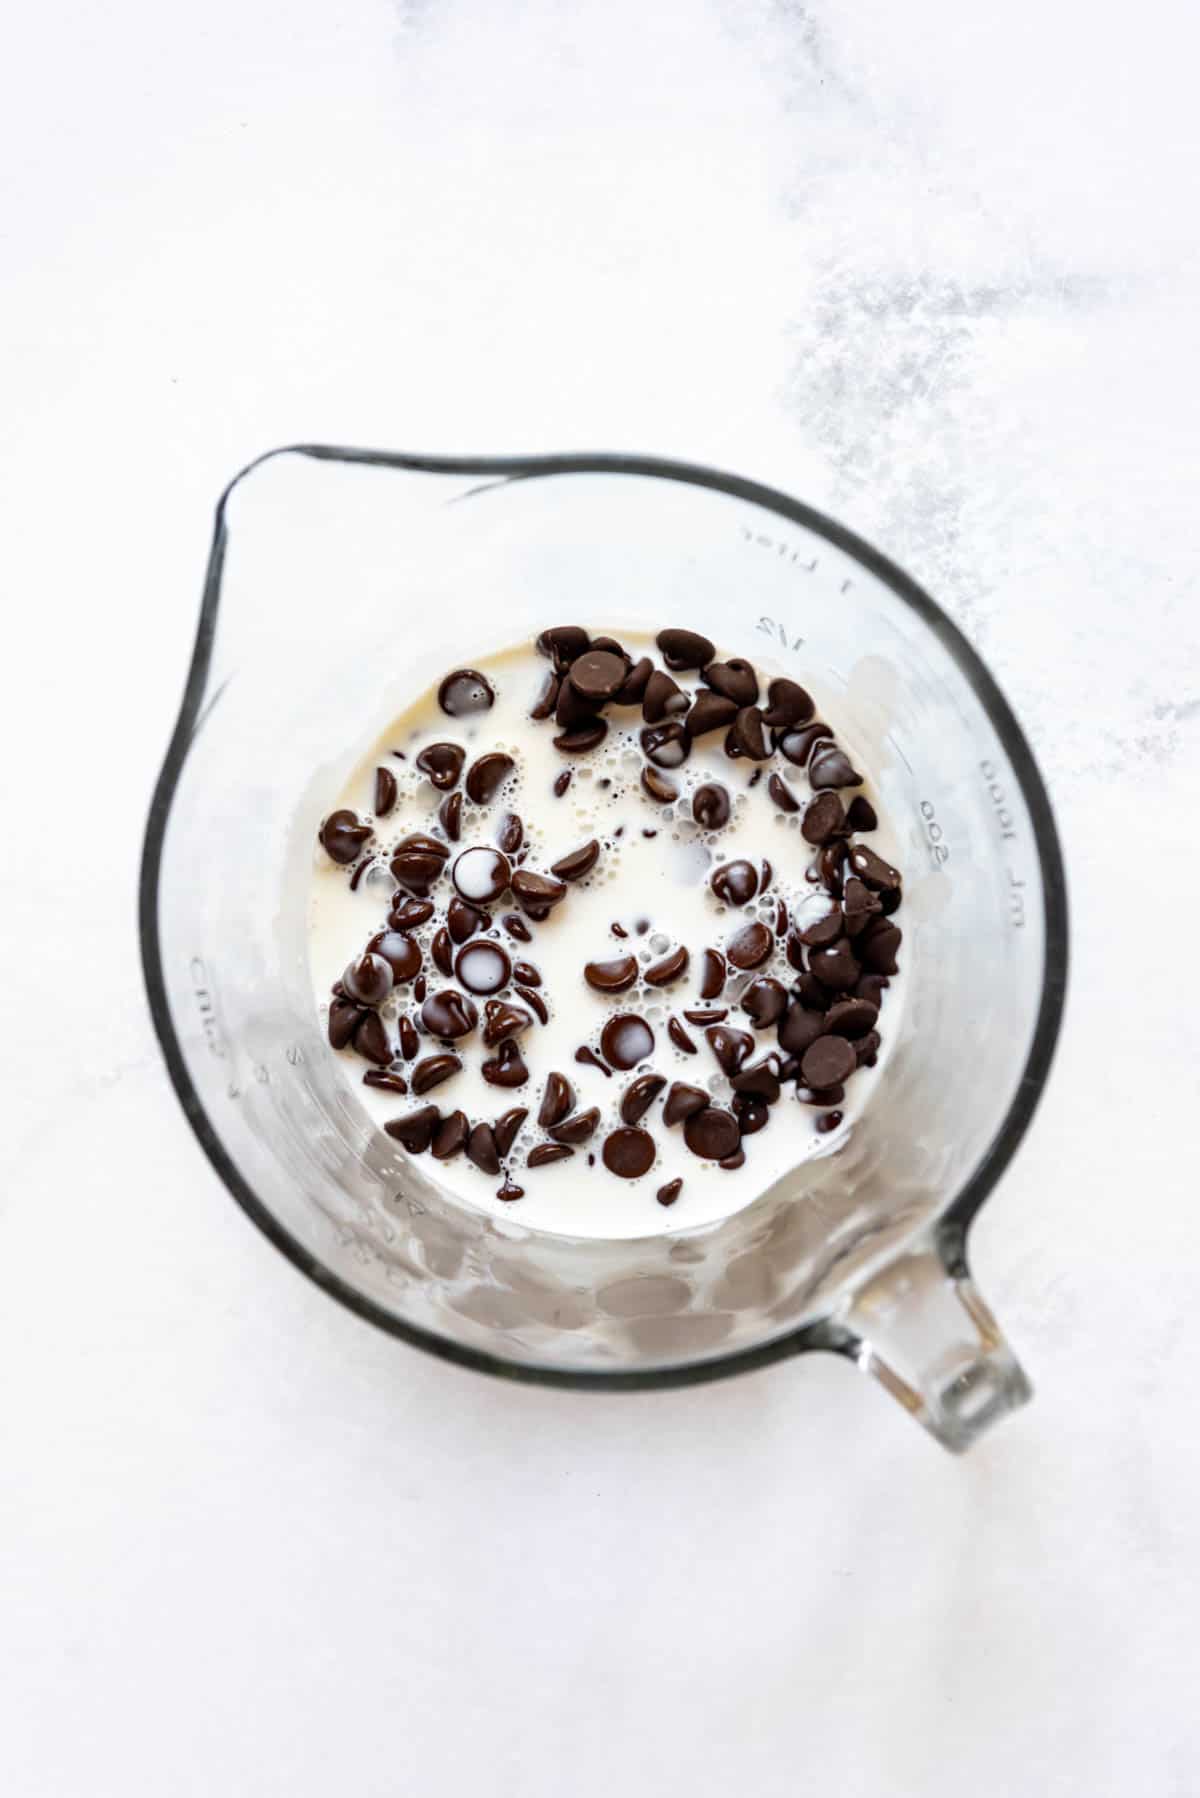
- Make ganache. Heat cream by microwaving it for 1 minute until very hot. Pour over the chocolate chips in a bowl, then let it sit without stirring! Wait 5 minutes, then stir until smooth and combined. Wait 15 minutes for the ganache to cool slightly so it isn’t as runny.
- Add ganache. Use a spoon to spill drips of ganache around the rim of the cake, letting it drip down the edges. You can also transfer the ganache to a squeeze bottle, if you have one. Once you have done drips around the edges of the cake, fill in the rest of the top with the remaining ganache. Let the ganache firm up for at least 10 minutes in the freezer before decorating with frosting swirls.
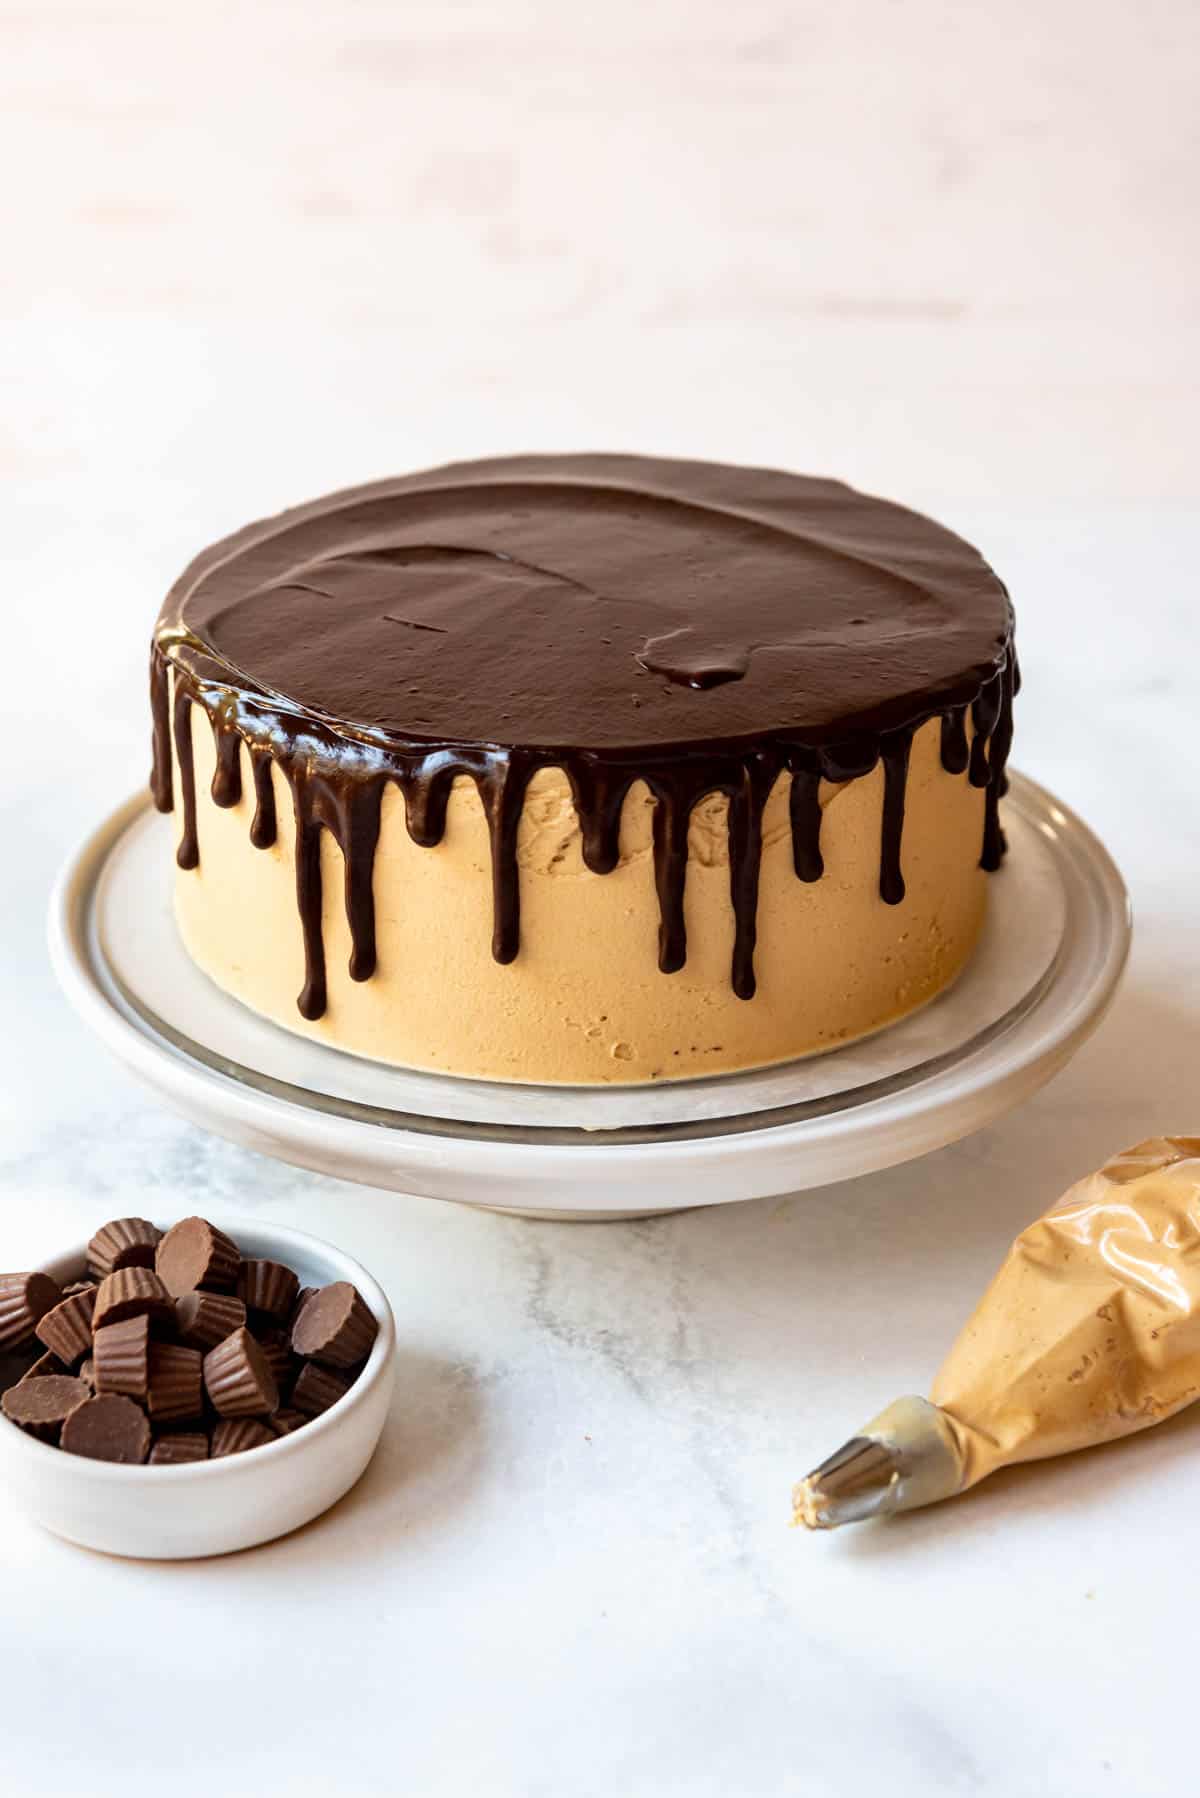
- Decorate. Use a decorative frosting tip (I used a Wilton 1M tip) to pipe swirls of the reserved peanut butter frosting around the edges of the cake, and place mini Reese’s Peanut Butter Cups between each swirl to finish.
Recipe FAQ’s
Natural cocoa tends to have a mild, light flavor that can also be known as “old-fashioned chocolate flavor.” Dutch-processed cocoa powder will give you a darker, more bittersweet flavor. Either will work with this cake recipe, but we prefer natural cocoa powder.
Yes! You can wrap the cake layers after they have been baked and cooled in plastic wrap and freeze them for up to 2 months! Just thaw and decorate to serve!
A frosted and decorated cake should be covered and kept at room temperature for up to 12 hours. Then, store your frosted cake in an airtight container in the fridge for up to 4 days. Let the cake come to room temperature for 30 minutes before serving it again.
You can keep an unfrosted cake in an airtight container at room temperature for up to 3 days, or in the fridge for up to 4 days. Or wrap the cake layers after they have been baked and cooled in plastic wrap and freeze them for up to 2 months! Just thaw and decorate to serve!
Yes, you can make and decorate the cake, then freeze it whole or freeze individual leftover slices.
To freeze it whole, freeze uncovered for about 1 hour to set the frosting, then wrap well with two layers of plastic wrap. Freeze for up to 1 month. Thaw in the fridge overnight, then let the cake sit out on the counter for 2 hours before serving.
If freezing individual slices, wrap them in plastic wrap and transfer to an airtight container. Thaw individual slices at room temperature for 1-2 hours before serving.
Tips for Success
- Use parchment paper. When baking any layer cake, I always line the bottom of each cake pan with a circle of parchment paper. It can be a little annoying to trace the pans and cut out the circles every time, but it’s totally worth it because your layers of chocolate cake will come out of the pans perfectly!
- Room temperature ingredients. Having your ingredients at room temperature before you start mixing will help your cake have the best texture, and it will also help it not fall in the middle. If you forget, you can cheat! Simply stick the eggs in a bowl of hot tap water for 5 minutes, microwave the butter for 10 seconds, and microwave the buttermilk for 30 seconds.
- Cupcakes. Easily use this recipe to make Chocolate Peanut Butter Cupcakes! Fill cupcake liners about ⅔ full and decrease the baking time to around 20-22 minutes at a lowered temperature of 325°F. This recipe will make around 36 cupcakes.
- Even layers. You can a kitchen scale to divide the batter between the three 9-inch cake pans (but I tend to just eyeball it because I don’t care enough about perfection).
How to Frost Your Cake Smoothly
If you usually have trouble with getting a crumb coating in your frosting, try spreading a thin layer of frosting around the entire cake, then sticking the whole thing in the freezer for 15 minutes. Then take it out and frost it with the rest of the frosting! This will help to “set” the crumbs so they don’t show up in the finished product. It’s a simple trick but can make all the difference!

Substitutions and Variations
- Flour. I’ve made this with both all-purpose and cake flour. I recommend all-purpose flour because I feel like the lighter cake flour doesn’t hold up quite as well to the heavier peanut butter frosting, but it’s great either way.
- Buttermilk. If you don’t have buttermilk, my favorite substitutes are: 1 cup of whole milk and ½ cup of sour cream in place of the buttermilk OR to add 1 tablespoon of lemon juice or white vinegar to 1 ½ cups of whole milk and let that sit for 5 minutes to curdle.
- Frosting. Instead of Peanut Butter Frosting, you can use Vanilla Buttercream Frosting, Chocolate Frosting, or Salted Caramel Frosting for a different flavor.
- Topping. Add some Reese’s Pieces, peanut butter M&Ms, chocolate chunks, or chocolate curls on top for extra sweetness.
More Amazing Celebration Cake Recipes
- Homemade Funfetti Cake
- Black Forest Chocolate Cake
- Fresh Strawberry Cake
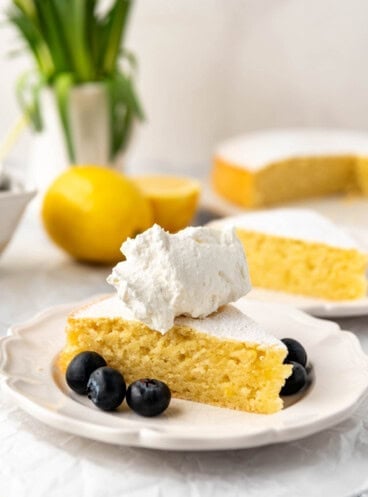
- Lucious Lemon Layer Cake
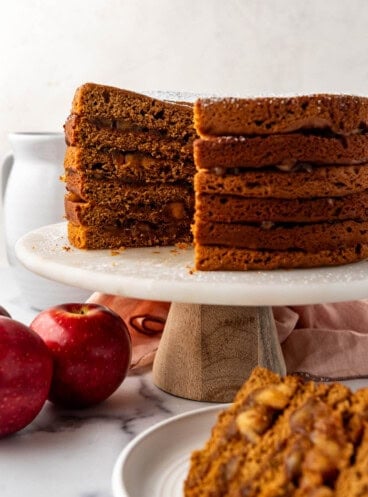
- Vintage Cherry Cake
- Amazing Carrot Cake
- 3-Layer S’mores Cake
Did you make this recipe?
Let me know what you thought with a comment and rating below. You can also take a picture and tag me on Instagram @houseofnasheats or share it on the Pinterest pin so I can see.
Chocolate Peanut Butter Cake Recipe
Ingredients
Cake
- ⅓ cup natural unsweetened cocoa powder
- 4 ounces bittersweet or semisweet chocolate chopped
- 1 cup boiling water
- 1 cup buttermilk
- ½ cup salted butter
- ½ cup vegetable oil
- 1 cup firmly packed brown sugar (200g)
- 1 cup granulated sugar (200g)
- 2 large eggs room temperature
- 2 teaspoon vanilla extract
- 2¼ cups all-purpose flour (281g)
- 2 teaspoons baking soda
- 1 teaspoon baking powder
- 1 teaspoon salt
- Reese's Peanut Butter Cups for decorating
Peanut Butter Frosting
- 1 cup salted butter
- 2 cups creamy peanut butter
- 4 cups powdered sugar
- 2 teaspoons vanilla extract
- 3 Tablespoons heavy cream or milk
Chocolate Ganache
- 6 ounces semisweet chocolate chopped (1 cup chocolate chips)
- ½ cup heavy cream
Instructions
Cake
- Preheat the oven to 350°F. Prepare three 9-inch round cake pans by cutting circles of parchment paper to line the bottoms, then lightly spray the insides of the pans with cooking spray.
- Combine the cocoa powder and finely chopped chocolate in a large bowl. Pour the boiling water over the chocolate and stir until the chocolate is completely melted.⅓ cup natural unsweetened cocoa powder, 4 ounces bittersweet or semisweet chocolate, 1 cup boiling water
- Once cooled, add the buttermilk to the chocolate mixture.1 cup buttermilk
- In the large bowl of a stand mixer, beat the butter and oil together for 1 minute. Add the dark brown and granulated sugars and beat for another 2-3 minutes, until light and creamy.½ cup salted butter, 1 cup firmly packed brown sugar, 1 cup granulated sugar, ½ cup vegetable oil
- Scrape down the sides of the bowl and add in the eggs, one at a time, beating well after each addition and scraping down the sides of the bowl. Add the vanilla extract.2 large eggs, 2 teaspoon vanilla extract
- In a separate bowl, sift together the flour, baking soda, baking powder and salt. Add half of this to the batter and mix on low speed just until combined.2¼ cups all-purpose flour, 2 teaspoons baking soda, 1 teaspoon salt, 1 teaspoon baking powder
- Pour in half of the chocolate-buttermilk mixture and mix again, just until combined.
- Repeat with the flour and the remaining chocolate-buttermilk mixture, scraping down the sides of the bowl between additions, until everything is incorporated.
- Divide the batter between the prepared cake pans and bake for 20-24 minutes, or until a toothpick or cake tester comes out clean. Be sure not to overbake.
- Transfer each of the cakes to a cooling rack and allow them to cool completely before assembling the cake with frosting.
Frosting
- Beat the butter and peanut butter in a large bowl.1 cup salted butter, 2 cups creamy peanut butter
- Add powdered sugar, vanilla, and cream.4 cups powdered sugar, 2 teaspoons vanilla extract, 3 Tablespoons heavy cream or milk
Ganache
- Heat cream. Pour over chocolate. Wait 5 minutes then stir until smooth. Wait 15 minutes for ganache to cool so it isn’t as runny. Decorate. Let ganache firm up for at least 10 minutes in freezer before decorating with frosting swirls.½ cup heavy cream, 6 ounces semisweet chocolate
Assemble the Cake
- Once the cake has completely cooled, it can be assembled. Place one cake layer on a cake stand or serving plate, and cover it generously with an even layer of peanut butter frosting.
- Repeat with the second and third layers, then finish by frosting the sides. Make sure to reserve some of the frosting to make decorative swirls on top.
- Once the cake is frosted and the ganache has cooled, pour it over the middle of the top of the cake, and around the edges, letting it make decorative drips down the sides of the cake. Chill the cake in the freezer for at least 10 minutes before adding the rest of the decorative frosting.
- Use a decorative frosting tip (I used a Wilton 1M tip) to pipe swirls around the edges of the cake, and place mini Reese’s Peanut Butter Cups between each swirl.Reese's Peanut Butter Cups
Notes
- Storage: A frosted and decorated cake should be covered and kept at room temperature for up to 12 hours. Then, store your frosted cake in an airtight container in the fridge for up to 4 days. Let the cake come to room temperature for 30 minutes before serving it again.
- Plain Cake: You can keep an unfrosted cake in an airtight container at room temperature for up to 3 days, or in the fridge for up to 4 days.
- Freezing Cake Layers: Wrap the cake layers after they have been baked and cooled in plastic wrap and freeze them for up to 2 months! Just thaw and decorate to serve!
- Freezing a whole cake: You can also make and decorate the cake, then freeze it whole or freeze individual leftover slices. To freeze it whole, freeze uncovered for about 1 hour to set the frosting, then wrap well with two layers of plastic wrap. Freeze for up to 1 month. Thaw in the fridge overnight, then let the cake sit out on the counter for 2 hours before serving. If freezing individual slices, wrap them in plastic wrap and transfer to an airtight container. Thaw individual slices at room temperature for 1-2 hours before serving.


This recipe looks delish! The recipe makes 2 layers but the photo shows 3. Should I make 1.5 recipe to make 3 layers?
Sorry! That was just a typo. In step 1 I mentioned three 9-inch pans but you caught my mistake in step 9 when I mentioned dividing the batter between two pans. It was just a slip! This recipe will make 3 layers, no problem.
I just wanna make sure I did the recipe correctly. It has baking soda and powder right. The directions on list soda. I tried to make these into cupcakes and it’s a hot mess lol taste is amazing but over flowed so much. lol
Oh no! Yes It uses 2 teaspoons of baking soda and 1 teaspoon of baking powder. The ingredients are listed on the recipe card at the end of the post. Maybe less batter in the cupcake tins? Let me know how it goes if you make it again!
Took a half hour just to scroll down to the actual recipe…
I have a very convenient button at the top of the page that says “jump to recipe” that will take you straight to the recipe with instructions, measurements, and ingredients. I like to have detailed instructions and pictures and some people find them very helpful. It is nice to have a visual of what the steps look like. But again, I made it easy to jump straight to the recipe.
Any adjustment for high altitude?
I bake at sea level so I don’t have a lot of specific tips for high altitude baking adjustments.
My son has requested this cake for his birthday for 4 years and counting. Guests love it equally as much!
I made this gluten free and it turned out great!
Great Darla! What type of flour did you use? It might help other readers so they can make it gluten free as well.
Is this a 2or 3 layer cake?
I make this into a 3 layer cake.
I made this and ate about half the cake myself…holy moly! Perfect combo and not too much either. I was worried it was going to be too much but it seriously was incredible!
Thanks Paige! I am glad you enjoyed it!
It was delicious but I thought the cake was a little crumbly when cut and the frosting was very stiff to decorate. Would add a little more heavy cream to make the decoration
this recipe is really wonderful, I’ve made it 3 times already.
But……I need to make the frosting the day before (TODAY) would I make it & chill until tomorrow? Let come to room temp & then frost??
Yep! That’s what I would do.